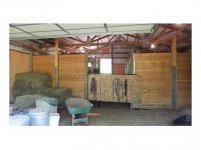
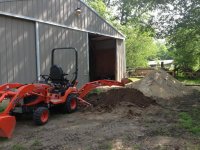
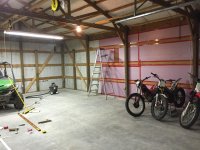
We bought this house about 2 1/2 yrs ago. After looking at a lot of places we decided on this one because of the lot primarily. However the outbuilding that was on the property was used for horses. So a lot of work went into just disassembling and removing the horse stalls. Here is the first shot of what the interior looked like when we bought the place.

You are using an out of date browser. It may not display this or other websites correctly.
You should upgrade or use an alternative browser.
You should upgrade or use an alternative browser.
Horse stalls conversion
- Thread starter kderacing
- Start date


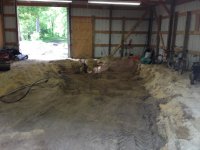


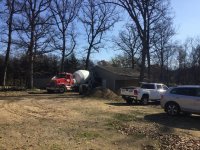
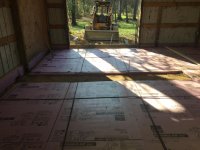
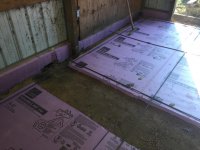
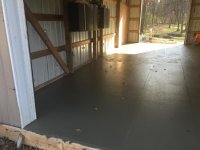
Once all of that was done we ran electrical outlets and filled the floor with gravel temporarily until the project was ready to resume. It sat like that for about another 1 1/2yrs while we sold the other house we had. That took much longer than we would've liked but it did finally sell and it was time to resume work on the shop. So I contacted my concrete contractor and we began the pouring. Now I didn't do radiant heat as much as I would've liked to but we did put insulation below the slab. I also had 7"s poured where the lift will eventually go just to ensure I don't have to worry about it. So onto the pour.
Attachments


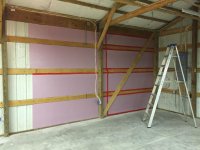
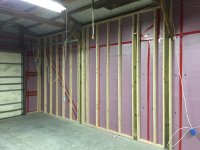
Now that the concrete was poured it was finally time to start on the interior. I started with 1 1/2" rigid foam between the horizontal supports of the building between the exterior and the posts. Then layered on top of that 2" rigid foam. Then framed walls with R15 batt insulation to ensure I leveraged the large wall cavity to it's fullest. Yes I could've done closed cell or other options but costs were a concern and this approach the labor was all me. With some help too but no paid labor. Anyway onto the insulation.
Attachments
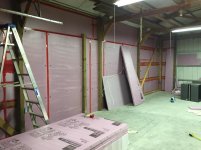

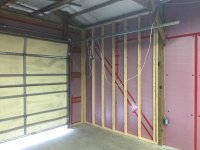
After both the rigid foam insulation layers are up then the interior walls were built and raised into place. The R15 batt insulation added, a vapor barrier and the final wall covering. I did not want to do drywall so I decided to go with Slatwall. I've ready pro's and con's for it on the forum here and decided to try it out. Starting out it was a little rough and it is heavy so it's difficult to work with. However with only 1 wall done so far I'm really pleased with the decision. I love the flexibility of having this stuff on the walls.
Attachments


Then for the Slatwall. I had to install it directly on top of the concrete because I was doing it myself, but I will go back and trim the bottom to allow for expansion then ultimately I will put in the industrial baseboards to cover the gap.
Attachments
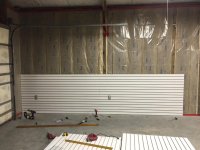

And here it is with 1 wall done. Now I have 3 more to do and the last one the front wall I'm going to use steel for that wall covering since it is where the walk in door and overhead door is. So still a lot left to do but it's starting to come together now. ")
Attachments

Sunbimmer
Well-known member
Wow, very nice job 
Kevkx125
Well-known member
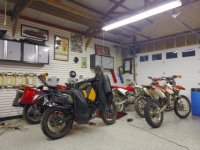
Cool trial's bike's and nice shop.
Bib Overalls
Well-known member
What is your plan for insulating the ceiling? I did much as you on the walls of my shop but I had my ceiling sprayed with closed cell foam.
Can you put your location in your profile? I'm thinking Yukon Territories or Tierra Del Fungo from the amount of insulation you are using.
You know of course, that when you or your executor sell the place a potential buyer will say "I wounder how much it would cost to tear out the concrete and put in horse stalls."
Thanks for the compliments. Kev funny that you noticed the trials bikes. I tried to leave the toys out of the pictures intentionally not to distract from the shop. Lol
Bib, I'm in Illinois but we're on propane so that's the reason for all the insulation. Well that and what else was I going to do with the 7" between the exterior and the posts.
As far as the ceiling goes I haven't decided yet. I'd really like it to stay open and if it does then I will do closed cell spray in. However I am thinking again because of the long term heating costs of propane, putting in a ceiling. If I do that it would be at 10' so then I wouldn't bother with spray in closed cell. I'd probably just do blow in insulation in the attic and maybe closed cell on the roof and high points. That is probably a year or so out. My goal right now is just to get all the walls done. That way I can move everything from the garage into here.
Currently the garage is overcrowded. Then parking vehicles can go back to the garage and this can truly just be a shop plus some toys. It's the right size for a shop but if I start storing things in there it will fill up quick.
nsula_country
Well-known member
I'm subscribed! You have done a lot of work to convert a horse barn into a shop. I'm curious to see how the slatwall turns out. I haven't decided on what I'm going to cover my walls with. Slatwall looks interesting. I'm googling it now. I was thinking either OSB or liner panels... Now a third option.
Build thread here http://www.garagejournal.com/forum/showthread.php?t=313043
CT
Build thread here http://www.garagejournal.com/forum/showthread.php?t=313043
CT
theoldwizard1
Well-known member
Then these were all of the post bases that were dug out 1 by 1 to remove them all.

I sure hope you did not have to dig/pull those by hand !
I helped my son remove over 20 posts from 2 small decks and a section of fence this past spring/summer. We worked out a system that we could use a truck to pull them up and out. Still a lot of work.
Last edited:
nwdustin
Well-known member
nice progress, can't wait to see how this turns out!
SweetD
Well-known member
That is a LOT of work! Nice job, and thanks for sharing your project with us...
Dave
Dave

Techie1961
Well-known member
That's going to be a great shop. Well insulated, big, bright, level floor. Nice job and trust me, I know it's a lot of hard work.

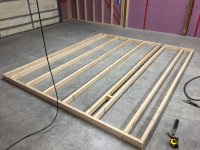
And yet some more progress. I'm starting to be able to visualize it now and I'm almost done with the batt insulation.
....
In my (years long
 ) design phase for my garage, I've concluded that when I insulate, I will do it with the rigid foam boards between the gurts as you have there. Very neat and tidy.
Adding a second layer and additional R15 batting should really keep your place toasty and quiet.
Do you have any plans for venting the structure? Not suggesting you need to or dont need to, I am just curious.
I have lots of plans most of them obviously just come down to time and money. I would like to be able to weld inside the building without opening doors. So ventilation is definitely on my radar. Just not far enough along yet to come up with an approach for it yet and make a decision. The part I do know is that it is one of the reasons I want to leave the rafters open. It would be much easier to install duct work for it without a ceiling. So I'll keep you posted as I get to that stage.
My current approach is obviously finishing the walls. Then getting a permanent heater. Right now I'm using a portable kerosene heater. Then epoxy coat the floor. After that's done then I'm going to trim the bottom 1/4" of the walls to allow for expansion. Then baseboards and interior items.
Wow having said all that the end doesn't seem that near. Lol
It would have been ideal to just shim the bottom Slatwall pieces which would have prevented the trimming post install. However because I'm installing it solo setting them directly on the ground was the only manageable way I could find to do it. Those panels are heavy. So it created more work but allowed me to do it without needing help.
Sent from my iPhone using Tapatalk
most of them obviously just come down to time and money. I would like to be able to weld inside the building without opening doors. So ventilation is definitely on my radar. Just not far enough along yet to come up with an approach for it yet and make a decision. The part I do know is that it is one of the reasons I want to leave the rafters open. It would be much easier to install duct work for it without a ceiling. So I'll keep you posted as I get to that stage.My current approach is obviously finishing the walls. Then getting a permanent heater. Right now I'm using a portable kerosene heater. Then epoxy coat the floor. After that's done then I'm going to trim the bottom 1/4" of the walls to allow for expansion. Then baseboards and interior items.
Wow having said all that the end doesn't seem that near. Lol
It would have been ideal to just shim the bottom Slatwall pieces which would have prevented the trimming post install. However because I'm installing it solo setting them directly on the ground was the only manageable way I could find to do it. Those panels are heavy. So it created more work but allowed me to do it without needing help.
Sent from my iPhone using Tapatalk
CodeRedZ
Well-known member
heck of a transformation. Some horse stall lover on here is probably crying now. lol

bww_mnm
Well-known member
You are going to have endless wall storage options w all that slat well ... im very jealous. How did that slate all compare to other options OSD, ?)
It's sad(?) to see all that work from the horse barn get tossed but I would have done the exact same thing. It was good to get an idea of the amount of work needed to convert as I've looks at a few houses w barns and have no desire to own a horse or anything other than a dog (and that includes my wife's cat )
It's sad(?) to see all that work from the horse barn get tossed but I would have done the exact same thing. It was good to get an idea of the amount of work needed to convert as I've looks at a few houses w barns and have no desire to own a horse or anything other than a dog (and that includes my wife's cat
)
Last edited:
theoldwizard1
Well-known member
Great job on the insulation and the slat wall will look great !
But, most people know that most of the heat lost from a building is through the ceiling/roof. What are your plans for that ?
But, most people know that most of the heat lost from a building is through the ceiling/roof. What are your plans for that ?
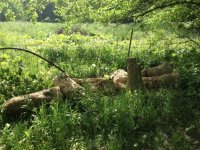
Yeah it has been a long road for sure. Converting one wouldn't have been my first choice. But the woods are impossible to create so I'll take this work.
As far as the ceiling goes I'm going to start with closed cell spray in up there. I want to keep it open for the height if I can without too much trouble.
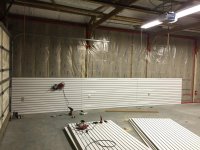
As far as the Slatwall. I'll say this it's much more expensive and hard to work with than drywall or other options. However if I were doing it over again I'd chose Slatwall again. Just because of the flexibility it offers. I have welding curtains that I can now hang anywhere to keep sparks contained. Installing cabinets is super easy. Moving them is easy so the benefits I think are worth it. Plus I'm fairly certain tha the cost of the materials but not paying for any labor probably is about the same as if I would've paid someone to do drywall for me. So it's sweat equity to me.
Ok now onto the latest pic.

Sent from my iPhone using Tapatalk
As far as the ceiling goes I'm going to start with closed cell spray in up there. I want to keep it open for the height if I can without too much trouble.
As far as the Slatwall. I'll say this it's much more expensive and hard to work with than drywall or other options. However if I were doing it over again I'd chose Slatwall again. Just because of the flexibility it offers. I have welding curtains that I can now hang anywhere to keep sparks contained. Installing cabinets is super easy. Moving them is easy so the benefits I think are worth it. Plus I'm fairly certain tha the cost of the materials but not paying for any labor probably is about the same as if I would've paid someone to do drywall for me. So it's sweat equity to me.
Ok now onto the latest pic.
Sent from my iPhone using Tapatalk


slamin81
Well-known member
come a long way, looks good

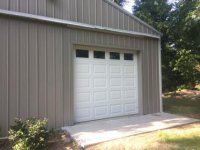
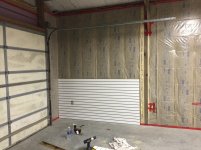
The rear door is now insulated and finished with wall covering. So now it's just down to the front wall which has the walk in door and 2 1/2 car garage door. For that I'm going to use steel to finish that wall. I also have a threshold on order to help seal up the back door at the bottom.
Keeping it at 50 degrees all the time then 60 when I'm out there working seems to be fairly cost effective as of now. So I'll probably just have closed cell sprayed into the top part of the end walls and leave the ceiling open. The roof is insulated so I think I'm going to be able to keep the rafters open.
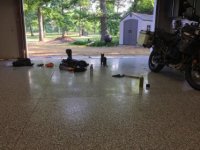
It's been a lot of work and I still have to wait for warmer weather to get the floor epoxy coated. It is getting there though.
Sent from my iPhone using Tapatalk
It has been a long time since I updated this thread. A lot has changed since my last update. The floor is all coated with epoxy coating. The rear door has been converted to an overhead door and all walls except the front wall have been finished.