To avoid these ads, REGISTER NOW!

How can I trace this

v1ru5879

Well-known member
Joined
Feb 19, 2018
Messages
369
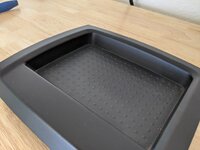
This is the dash tray of my truck. How would I scribe the inside of this so I can make a piece that will fit in there. Looking to get it as close as I can to exact measurements so I can design some mounts with my 3d printer for this.22d6b52e5d80618484b42aaa9db1010d.jpg64fbd59012f02e9c1fecab40d2303597.jpga305e62cbd0377bfc7323e45b822c463.jpga7350a7788c8361569ce6ec8888e0177.jpg

Sent from my Pixel 3a XL using Tapatalk
 

Attachments

  • 22d6b52e5d80618484b42aaa9db1010d.jpg
    22d6b52e5d80618484b42aaa9db1010d.jpg
    498.2 KB · Views: 0
  • 64fbd59012f02e9c1fecab40d2303597.jpg
    64fbd59012f02e9c1fecab40d2303597.jpg
    89.6 KB · Views: 0
  • a305e62cbd0377bfc7323e45b822c463.jpg
    a305e62cbd0377bfc7323e45b822c463.jpg
    440.7 KB · Views: 0
  • a7350a7788c8361569ce6ec8888e0177.jpg
    a7350a7788c8361569ce6ec8888e0177.jpg
    455.4 KB · Views: 1
To avoid these ads, REGISTER NOW!

4xdog

Well-known member
Joined
Aug 18, 2012
Messages
5,618
Location
Santa Fe, NM
I go olde school for that kind of stuff and trial-and-error trim a piece of paperboard.
 

Ray-CA

Well-known member
Joined
Jan 6, 2007
Messages
3,451
Location
San Diego CA
Flip it over, trace the outer edge. Measure the difference between that and the recessed area and scribe a new line. I'd transfer that to a scrap piece of 1/4 or 1/8 material and do a try fit.

Sent from my LM-X220PM using The Garage Journal mobile app
 

joe_padavano

Well-known member
Joined
Feb 26, 2011
Messages
1,788
Location
Northern VA
Typically you'd do it with four separate pieces, each smaller than the inside space. Put the first piece in one corner and use a pencil held hard against the side of the opening to mark that one corner. Repeat with the other three. Trim to the lines, put all four back in the opening, push out to the corners, and tape them together.
 

adrenalinejeeper

Well-known member
Joined
Jan 30, 2018
Messages
191
Location
Ventura County, CA
If you need it to be digital anyway, stick that with something for scale (2-3" of an old ruler?) in a flatbed scanner upside down. That will give you a digital image pretty close to flat that you can trace the shape from and use the scale to set the size.

Unless you are saying you want something with the same 3D contour, that would be more complicated. Start with the above then measure the angle of the walls and add that angle as you extrude the shape.
 

regguy1

Well-known member
Joined
Dec 15, 2009
Messages
4,055
Location
On Mount Olympus with Zeus
cut a piece of cardboard or stiff paper maybe an inch smaller than the opening, then put a straight edge down against the outer edge of the opening and trace a line on the cardboard on the inner edge of SE.. Then all you have to do is put the cardboard on the material you want to cut and place straight edge on the line and cut to size on outer edge
 

Kaizen

Well-known member
Joined
Jan 9, 2015
Messages
6,948
Location
New England
Plastic wrap then clay or anything that will hold shape when pulled out. Not sure if spray foam is crisp enough but worth a shot. Then you have the negative you can map in Cnc or hand measure.


Sent from my iPhone using Garage Journal
 

rlitman

Well-known member
Joined
Oct 18, 2010
Messages
24,618
Location
Long Island
Are those straight lines forming a rectangle with radiused corners?
Measure the interior dimensions and use radius gauges on the corners.
 

Dan in Pasadena

Well-known member
Joined
Feb 18, 2009
Messages
13,142
Location
Pasadena, CA
1. Masking tape pressed into the corners tightly inside.
2. CAREFULLY cut with an Exacto knife or single edge razor.
3. Remove and sprinkle talcum powder on the sticky side.

RESULT: You have an exact template of the interior.
 

mcj115

Well-known member
Joined
Dec 4, 2018
Messages
297
Location
Hershey PA
Fill it with water...place in freezer. Wait a few hours flip over? The possibilities are about endles
 

510ebl

Well-known member
Joined
Jan 20, 2015
Messages
518
Location
Southern New Jersey
1. Masking tape pressed into the corners tightly inside.
2. CAREFULLY cut with an Exacto knife or single edge razor.
3. Remove and sprinkle talcum powder on the sticky side.

RESULT: You have an exact template of the interior.

This, but use a pen to trace, remove, and cut along the line with scissors.
 

dwasifar

Well-known member
Joined
May 28, 2017
Messages
2,096
Pour in about 1/8" of Plasti-Dip and allow to set. Peel up the Plasti-Dip, being careful not to stretch it, and there's your template. Optionally you could tape around the inside edge before pouring, but probably not necessary.
 

Jinks

Well-known member
Joined
Aug 28, 2012
Messages
2,885
Location
Daytona Beach
Surprised no one has suggested a light coat of oil, pam, any release agent, & fill it with Flex Seal. Allow it to set, & pop the Flex Seal out..........:dunno:
 

niget2002

Well-known member
Joined
Oct 2, 2012
Messages
11,133
Location
Josephine, TX
Surprised no one has suggested a light coat of oil, pam, any release agent, & fill it with Flex Seal. Allow it to set, & pop the Flex Seal out..........:dunno:

I was going to say silicone, but I guess that's similar.

The other option that I've used a lot is the scanner idea if it will fit on the bed. If it won't fit on the bed, you can also use the camera on your phone. Lay a ruler inside it and take a picture. Import that into Fusion 360 and go from there.
 
To avoid these ads, REGISTER NOW!

PWC Repair

Well-known member
Joined
Dec 27, 2012
Messages
3,182
Location
Arkansas
LOL! You guys are killin' me here! All you need is an old school compass. cut a piece of paper smaller than the ID by an inch or so. Run the needle of the compass around the ID....the pencil will mark the paper. Lay that paper on a larger piece and follow your line with the needle this time, the pencil will mark out the exact pattern.
 

APEowner

Well-known member
Joined
Oct 2, 2009
Messages
4,164
Location
Sunny, New Mexico
LOL! You guys are killin' me here! All you need is an old school compass. cut a piece of paper smaller than the ID by an inch or so. Run the needle of the compass around the ID....the pencil will mark the paper. Lay that paper on a larger piece and follow your line with the needle this time, the pencil will mark out the exact pattern.

Old school but it's quick, easy and works.
 

zippyslug31

Well-known member
Joined
Jul 11, 2017
Messages
207
Location
Central Oregon
There's some pretty ingenious, if not overly complicated, solutions here... guess I'll toss mine in here too:
For the rough sidewall dimensions, I'd just lay in 4 sheets of paper that overlap. Move them each out in opposite directions until they are sitting flush with the inside walls, then tape them where they overlap. Do this in both X and Y directions and you have the overall form.
For the corners I guess you'd have to free-hand those... or we're back to using Jello in some weird way! ;)
 
OP
V

v1ru5879

Well-known member
Joined
Feb 19, 2018
Messages
369
What flavor Jello for the Nissan in question? Blue?

Sent from my Pixel 3a XL using Tapatalk
 
OP
V

v1ru5879

Well-known member
Joined
Feb 19, 2018
Messages
369
LOL! You guys are killin' me here! All you need is an old school compass. cut a piece of paper smaller than the ID by an inch or so. Run the needle of the compass around the ID....the pencil will mark the paper. Lay that paper on a larger piece and follow your line with the needle this time, the pencil will mark out the exact pattern.
I visioned something similar when asking this but thought that it being angled wouldn't give an accurate result. Gonna try this and the masking tape method a try. From there I can whip something up in tinkercad.

Sent from my Pixel 3a XL using Tapatalk
 
OP
V

v1ru5879

Well-known member
Joined
Feb 19, 2018
Messages
369
I used to make wood treasure boxes I sold with felt cut to fit the inside. I decided to add felt after the prototype was built.

I used the same method for making a pattern on vinyl sheet floor. cut 4 scraps, lay them in there around the perimeter, let them overlap, then tape them together.

easy peasy...
That was my first thought but with the rounded corners I figured I would need some radius gauges to get those accurate measurements for a 3d print

Sent from my Pixel 3a XL using Tapatalk
 
OP
V

v1ru5879

Well-known member
Joined
Feb 19, 2018
Messages
369
Thanks everyone for all the tricks you've shared. I love this forum for questions like this

Sent from my Pixel 3a XL using Tapatalk
 

CN Spots

Well-known member
Joined
Apr 21, 2016
Messages
3,073
Location
NW Mississippi
Spray a light coat of non-stick on it like Pam or something. fill it with plaster of Paris and let it harden. It won't melt or flex when you try to measure it.
 
OP
V

v1ru5879

Well-known member
Joined
Feb 19, 2018
Messages
369
Spend this months tool budget on a 3-D scanner.
I'm only trying to fit the inside to make mounts. Altho that would be a good tool investment, especially for visor clips and other plastic parts that tens to break

Sent from my Pixel 3a XL using Tapatalk
 
To avoid these ads, REGISTER NOW!
Top Bottom