To avoid these ads, REGISTER NOW!

How do I fix this vise ?

Jeanke

Well-known member
Joined
Aug 23, 2011
Messages
70
Hello all,

I don't post often (at all) but this forum is one heck of a source of inspiration!

After renovation of our house, finally I can do some simple odd jobs around the house prior to this summer when we'll dive back in the big works around the house.

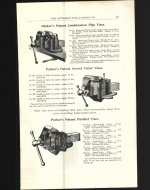
One of this, is to restore my grandfathers vise. This is a 'european' kind, I would imagine definitely not from China as it is so old. But, I can not find any branding on the vise. I will post pictures of it later, attached you have the one and only picture I have available at the moment (I took it to remember where stuff went before disassembly). It has suffered from decades of neglect to be honest, it is only now that I appreciate tools from the 'old world' with all this chinese stuff over here, that I decided to bring this one back to life (hopefully). It worked well, but is extremely rusty. In the picture attached I had wire wheeled it quite a bit already.

But my main question is, if anyone has suggestions how I can really 'secure' this vise as it has only one 'bolt' in the center of it to attach to the work surface.

illus-fig9.png

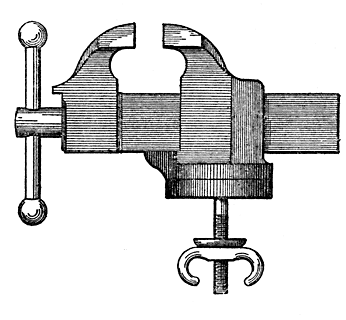
This is pretty acurate to represent that vise

I simply want to avoid that it will 'swivel' when I use it, as its main use will have to be to REALLY hold stuff fixed while I saw it or sand it (manually). Obviously I do not want to glue it as I will eventually change work tables etc... but it just seems that this one 'center bolt' design is not fabulous for fixing stuff in place.. Perhaps one of you has found an easy improvement on this. I can not weld, so please don't go that route for me :)

I promise to post more pics this evening, as I intend to restore it with a funky color later this week.

9r24g9.jpg
 
To avoid these ads, REGISTER NOW!

sk farmer

Well-known member
Joined
Mar 4, 2009
Messages
5,556
Location
nd
without seeing the actual vice it is hard to tell. maybe you could drill a small hole through the base, into the lower part of the rear jaw on each side and lock them together. maybe even using the same holes to bolt through the bench and make it more solid.
 

drivesitfar

Well-known member
Joined
Oct 23, 2013
Messages
36,007
Location
Pacific Northwest
don't drill any holes in your probably 100 year old vise. i'm sure others would be happy to trade you their restored old US made bench model for yours if your really don't like yours.

of course more pictures so we can see the hole vise and see if there is any damage to it that will effect its use would help a ton. I can tell you that you can drill a hole in your bench and put the bolt through and tighten it up so it doesn't swivel if that's what you really want to use it for. this is one of the first designs of a swivel base because you could loosen the vise, turn it and then tighten it again for a different position.

if you want to give us a clue to where you live there might be somebody close to help or trade you vises. I would if you lived close to me because I personally like 100 plus year old vises.

post as many pictures as you can from all sides and top and bottom and i'm sure you'll get some comments.
 

jjjrmx5

Well-known member
Joined
Dec 30, 2010
Messages
3,431
Location
Cincinnati, OH
don't drill any holes in your probably 100 year old vise. i'm sure others would be happy to trade you their restored old US made bench model for yours if your really don't like yours.

of course more pictures so we can see the hole vise and see if there is any damage to it that will effect its use would help a ton. I can tell you that you can drill a hole in your bench and put the bolt through and tighten it up so it doesn't swivel if that's what you really want to use it for. this is one of the first designs of a swivel base because you could loosen the vise, turn it and then tighten it again for a different position.

if you want to give us a clue to where you live there might be somebody close to help or trade you vises. I would if you lived close to me because I personally like 100 plus year old vises.

post as many pictures as you can from all sides and top and bottom and i'm sure you'll get some comments.

I agree with drivesitfar 100%

If the center stud is still useable, then just drill hole and thru bolt it to your work surface.

Flat washer, Lock washer, than locking or std nut should keep it in place.

As stated, the design allowed the vice to rotate but not have a true 2 piece swivel design. Way old skool but functional at that time.
 
OP
J

Jeanke

Well-known member
Joined
Aug 23, 2011
Messages
70
Thanks already for the excellent replies guys. Just to clarify, I do not want to trade this, as far as I can remember, this was on my grandpa's old workbench, it is priceless in this respect :) It is located in Belgium and has been so for at least 30 years that I can remember and more than likely much longer, but that's as much as I know...

I have attached some pictures to clarify and perhaps you can help me ID or put an age on this one? It has a bit of a 'bad' weld or at least what looks like it to me, as there are some air bubbles on the seems, I put picture below with comments.

Also when wire brushing (on drill), I can't seem to get to shiny iron, is this normal for such old piece? I just want it to be cleared enough to put a slight coating of paint on some parts of it (I won't put it everywhere no worries, sliding pieces etc... will be untouched).

The fixed piece, which you'd mount on the bench:
35i91nb.jpg


Back view of the above:
6dtxr5.jpg


Other angle:
2nu3gjq.jpg


On the back 'anvil' area, which I'm sure is NOT to be used as an anvil, it seems someone either tried to carve his initials or really abused this area:
bxybp.jpg


The sliding part:
29yle21.jpg

On the left side there are two holes, I'm guessing this is where the 'brand' tag used to be? Also on the right side, where the claw meets the bar, the 'weld' seems a bit unclean, some bubble-ish stuff going on there, though it seems sound other than that...

Close'up of that:
2nvfode.jpg


Same part but other side of the bar:
33p3s46.jpg


The actual claw (sorry I forget the terms in English), is solid fixed in there, it is not screwed in. It has two 'protecting' hooks of steel which they used to protect these claws. They are not in the picture, but basically just to 'hook' shaked parts of steel that were cut quite roughly to fit. Close up of the claw:
2lsi9ol.jpg


Here some pictures after wire wheeling, do you think this is sufficient, or should I keep going till it shines or something, in order to put a new coat of paint?
334njnt.jpg

Different flash:
2cgiivd.jpg


Overview from a bit further:
30k93wz.jpg


In conclusion, the thing still works fine, I just want to stop the rust from attacking it! A nice restore basically. The screw etc.... were still going strong, which is strange because it has been sitting in the worst condition (has even been flooded and never cleaned) in a shed in the back of a very humid area.
 
OP
J

Jeanke

Well-known member
Joined
Aug 23, 2011
Messages
70
View next to a 33cl beer bottle (no clue in US bottle sizes). It makes it look tiny, but it is a good 'hobby' vise and very sturdy, especially compared to what I can find in our stores.

2gsrbxu.jpg


One of those 'hook' claw things, to protect the actual claws. I'm not sure but it seems they MAY be some sort of copper-ish material, I'd have to clean them to see... Not sure at all, they may just be totally rusted to the bone... One is around one of the claw in the background, and the other one I'm holding in between my fingures:
243m8on.jpg


Again, view of the claws, but different lighting and without those protective hooks on them:
2yxqamc.jpg


Bottom view of 'swivel' base:
236zba.jpg
 
OP
J

Jeanke

Well-known member
Joined
Aug 23, 2011
Messages
70
Oh and the last one, here you can see the screw with which you'd fasten it to the table top, it is still in working condition amazingly... The bolt is not even rusted on it, I'm amazed..

9sf11w.jpg
 

rsanter

Well-known member
Joined
Dec 22, 2007
Messages
18,506
Location
visalia ca
To me it looks like you have a couple of options.

1 buy a piece of high durometer rubber. Perhaps 1/4" thick and have it between the base and the bench when you bolt it down. This will give some grip to the vise to avoid turning. You could also choose to glue the rubber to the vise as you can always remove it later with no damage. Glue it to the vise is what I would do.
Then on the bench side you could carve or cut some grooves that will act a little like teeth to help group the rubber.
Doing this means you will also be able to loosen the vise and swivel it.

2 so you do not change the look of the vise you could drill a couple of pin holes from the bottom but only about 2/3 the depth of the base. Install pins that will bite into the bench to prevent it from turning

Bob
 
OP
J

Jeanke

Well-known member
Joined
Aug 23, 2011
Messages
70
Wow I really like the rubber idea, simple and sounds effective! I won't glue it in first instance, but very nice idea!!

Also, please, if anyone has any idea on the age or type or brand (whatever info) on this vise, I so very much appreciate it.

But fix, I will definitely give the rubber a shot. Now only to find some rubber somewhere :)
 
OP
J

Jeanke

Well-known member
Joined
Aug 23, 2011
Messages
70
Did a bit more cleaning, but I think I need a better drill bit to clean this up somehow.

2ikqu6h.jpg


Should I perhaps use a flap wheel instead? What grit should I look into?
 
Last edited:

Outlawmws

Well-known member
Joined
Aug 9, 2011
Messages
39,189
Location
The Badlands
OK my turn.. :evil:

I think that may be a very early Parker, or Parker inspired vise. I think so because of the distinctive jaw interface, and the main screw retention. Possibly this was a company Parker bought to get into vise making? :dunno: No name in a case like this usually means it was made on contract for another company.

This style was the original "swivel" vise. there was often a hole in the static jaw base flange for pinning it with a bolt dropped into a hole for say, 30/45/60 deg angles.

These vises were normally on rough workbenches, and I'd bet a pine top, not a hardwood, so getting the thing to stay was not so difficult. On a modern work surface, more of a problem.
 

BFBOB

Well-known member
Joined
Sep 20, 2011
Messages
5,073
Your vise may be missing a part. I have two early center-bolt vises like yours, a Yost and an Oswego. Both have an iron disc that sits under the base of the vise and is fastened tp the work bench. One has tabs cast into it that bite into the workbench surface; the other has holes to screw it down. The vise then locks against this disc when the big wing nut is tightened. There are many variations of this scheme, some of which provide some kind of "teeth" on the bottom of the vise and the top of the disc to achieve a positive lock. Others just depend on friction. It sounds like someone else in Europe removed the vise for you? If so, ask them to check whether there's a big washer-like disc still sitting on the workbench where the vise used to be. You might get lucky!

And, yes, it looked like a Parker to me too, though I am less expert than most.
 

Outlawmws

Well-known member
Joined
Aug 9, 2011
Messages
39,189
Location
The Badlands
Bob, I have seen (and own) that type with the ring. They also make them without that ring. I doubt this one had it because I saw nothing on the bottom in the pics that would engage the ring you mention.
 
OP
J

Jeanke

Well-known member
Joined
Aug 23, 2011
Messages
70
Wow, so happy with all this information. I do also not think a part is missing, for the most part of its lifetime it was attached to the same table top (indeed very rough and very much used and abused), afterwards the thing was just unmounted and placed in the shed.

I will research this parker stuff :) Any clue anyone on the age range we're looking at here?
 

drivesitfar

Well-known member
Joined
Oct 23, 2013
Messages
36,007
Location
Pacific Northwest
Nice pictures and even better story. i'm glad Grand dad's old vise is going to find a home on your workbench. I have an old Prentiss that just has a bolt like that and I think it is about an 1880 era which might be close to yours.

not sure about the maker, but Parker seems to have the vote so far. since it came from Europe maybe a little more research on where Parker got it's design might find the European maker. or it could be one of the first Parkers that your gramps had shipped to Belgium.

I am a little concerned about the rough area you think might be welded. some of the older vises did have rough castings so can you look inside where the screw goes and either take a few more pictures or tell us that it is smooth inside or if you see a weld in there?

by the way the wire wheel is making it shine and if you don't want to paint it you can always wax the raw steel if you like that look best.
 

Mohawk Dave

Well-known member
Joined
Oct 7, 2012
Messages
5,068
Location
SoCal
Those definitely look like early Parker jaws...are they hot forged? They look like it. And the copper type vise jaws are just that. They are softer than the vise jaws in order to protect and not damage your workpiece. Clean those up and continue to use them OP.

That is a great vise. I like how the casting is rather rough and not so perfect. Definitely early. Super cool!
 
OP
J

Jeanke

Well-known member
Joined
Aug 23, 2011
Messages
70
did a bit of a search and indeed, it does look a lot like a parker (inspired) one, I found this one on youtube:

Here the fixed jaw seems to be made out of several pieces though, mine is just one big chunck of (cast?) iron. The moving jaw is almost identical in design, except that mind has that strange weld going on. Perhaps an old repair job? Jaws slide and align perfectly, so not too worried abou that. When I get home today I will try and clean up the inside a bit (very greasy inside) to take a picture for the experts here. I'm amazed at the knowledge on this board

The thing about cleaning this up for painting: Is there a rule as to how 'clean' you have to brush this prior to painting? I noticed on some restores here on the board that people really shine them up like new and then paint. Is there an added value here then just wire brushing to a certain extent where it seems like rust is removed and then just painting it?
 
Last edited:

gungatim

Well-known member
Joined
Jan 8, 2013
Messages
8,101
Location
west mich
Here is my idea without damaging the vice. I had a similar vice but not worth much that was missing the swivel base. As suggested above, drill a hole in your workbench to bolt to the center. On mine, I drilled an extra hole on the side opposite the hold-down and added bolts to keep it from swiveling. I would not do that to yours as it has some historical value. Instead, drill a hole and weld a nut on the underside of your workbench (not the vise) and use a bolt running underneath to clamp and keep it from turning (does that make sense?) basically like a hold down like most swivel vises have but the hold down is on the table not the vise itself (assuming of course you have access).

Just my 2 cents...
 
To avoid these ads, REGISTER NOW!

drivesitfar

Well-known member
Joined
Oct 23, 2013
Messages
36,007
Location
Pacific Northwest
did a bit of a search and indeed, it does look a lot like a parker (inspired) one, I found this one on youtube:

Here the fixed jaw seems to be made out of several pieces though, mine is just one big chunck of (cast?) iron. The moving jaw is almost identical in design, except that mind has that strange weld going on. Perhaps an old repair job? Jaws slide and align perfectly, so not too worried abou that. When I get home today I will try and clean up the inside a bit (very greasy inside) to take a picture for the experts here. I'm amazed at the knowledge on this board

The thing about cleaning this up for painting: Is there a rule as to how 'clean' you have to brush this prior to painting? I noticed on some restores here on the board that people really shine them up like new and then paint. Is there an added value here then just wire brushing to a certain extent where it seems like rust is removed and then just painting it?

you can take as much of the old paint off as you wish, but remember you are dealing with an antique and some of that old paint might be holding that old piece of art together. that said if you are going to paint it you don't have to take it all off if it is really on there and just need to make sure it has a little roughed up surface. if you are in a colder part of the country having the vise and paint over 50 degrees would be optimal for durability. some of the guys have an oven in their shops and some are lucky enough to be able to use the oven inside or just paint in a heated shop. if you are able to shine it as well as the vise in the picture I attached then by all means do as you wish. hopefully that is an old rough cast and not a weld on your Gramps vise and it will last another 100 years.

not sure
 

Attachments

  • SAM_1839_zpse22ed876.jpg
    SAM_1839_zpse22ed876.jpg
    30.6 KB · Views: 76
  • SAM_1836_zps0241febe.jpg
    SAM_1836_zps0241febe.jpg
    45.2 KB · Views: 78
OP
J

Jeanke

Well-known member
Joined
Aug 23, 2011
Messages
70
it is funny, my dad also got me that blue color to repaint the vise.. But I like how you simply waxed the moving jaw, you make me hesitate! :)
 

drivesitfar

Well-known member
Joined
Oct 23, 2013
Messages
36,007
Location
Pacific Northwest
I was just showing an example I had saved of one of our GJ members hard work to shine up his vise. i'm sorry I can't remember who it was at the moment, but I think he said he worked on it 2 full days to get that far. I was just giving you options with a good picture.

I think i'm going to do a couple vises I have in the natural steel if I can keep the rust at bay with either a wax or some other good treatment.

let us know when you get time to check below that casting or old weld and take a few pictures if you are not sure what you are seeing.

you are doing great by the way. Gramps would be proud.

and if you might want an idea for a stand instead of mounting it to a bench here is one of my favorites (I don't own this vise or stand yet).
 

Attachments

  • vice%20jesse%20james.jpg
    vice%20jesse%20james.jpg
    36.6 KB · Views: 43
  • vice%20bmw%20002.jpg
    vice%20bmw%20002.jpg
    128.9 KB · Views: 50

notlob

Well-known member
Joined
Aug 19, 2013
Messages
1,384
Location
norcal
did a bit of a search and indeed, it does look a lot like a parker (inspired) one, I found this one on youtube:

Here the fixed jaw seems to be made out of several pieces though, mine is just one big chunck of (cast?) iron. The moving jaw is almost identical in design, except that mind has that strange weld going on. Perhaps an old repair job?

The vise in your youtube link has a relatively rare swivel static jaw, while yours does not, and so it is made up of additional pieces.

I believe the welds on your dynamic jaw are evidence that it was broken and repaired.

You may be needlessly concerned about the vise rotating once mounted. Depending on the type of mounting surface, I believe that, absent large rotational torque, the vise will not readily swivel without loosening the bottom nut.

Your vise, and especially the jaw inserts (hot forged to the jaws?) look a lot like a Parker. See post 8 here:

http://www.garagejournal.com/forum/showthread.php?t=230268
 
Last edited:

drivesitfar

Well-known member
Joined
Oct 23, 2013
Messages
36,007
Location
Pacific Northwest
vise was OP's grand dad's located in Belgium so yes some but nothing confirmed in case you know. most are saying a Parker or a company that Parker bought out or bought their patent. or it might be that original company whoever that is.
 
OP
J

Jeanke

Well-known member
Joined
Aug 23, 2011
Messages
70
has anything been said about english treads or european manufacture?
Hey, must be my english, but I'm not sure what you're saying here. English treads?

I do think it is very possibly a European manufacture, English, German or even Belgian. Knowing about my family in those days, they would not have been able to afford shipping a vise over from the US :) Also UK, DE, BE had very good manufacturing going on, so there was as far as I can see, no real reason to ship something over from the States.

I will post pictures in about an hour or two of the inside 'weld'.
 
Last edited:

drivesitfar

Well-known member
Joined
Oct 23, 2013
Messages
36,007
Location
Pacific Northwest
also the other side of the dynamic jaw across from the rough cast or weld which I don't think you have shown us yet so we can tell if it might have been a complete break if you do find a weld or just a partial.

good luck
 
Last edited:
OP
J

Jeanke

Well-known member
Joined
Aug 23, 2011
Messages
70
Here we go, boy this is difficult to clean... Can anyone tell me how much cleaner I have to get the old green painted parts in order to be able to repaint that? The parts I want to 'shine' are the sliding parts and claws, which are pretty much as good as I want them to get...

Firstly, I checked out the always neglected copper protections, they are SO AWESOME haha. They don't show so well on the picture, but they look really fantastic, they seem to have suffered a lot over these past decades though lol I'm 100% sure these were a DIY job as they are absolutely not straight cut and one is different from the other, but I am not intending to replace these :)

73dws7.jpg


2n7fgol.jpg


vfgz6e.jpg


xejrrl.jpg


5l78ub.jpg


Now on to serious business... that weld. I have no clue what to say about it. It seems as though the 'cast' claw has a piece (but not like a repair piece, a real actual very clean cut piece) in between the claw and the sliding bar. It is over that piece that the big puddle of iron has been placed. Does that make sense? Like as if you would have three pieces, two big and in the center a small one, over the entire small middle and its seems, you would poor iron to make it all stick together.

Some pictures, but I wish you good luck trying to see something on them :D
28a2i6t.jpg


a3yr7q.jpg


2qc06r4.jpg


eitdv4.jpg


11brcie.jpg


50l9jr.jpg


aayozt.jpg
 
Last edited:
OP
J

Jeanke

Well-known member
Joined
Aug 23, 2011
Messages
70
Excuse me I was too fast, some additional pictures below where I had scrubbed a bit more

11176dk.jpg


2hebpsw.jpg


2nlakn4.jpg


1z3cs9z.jpg


o6n3av.jpg


swfl1j.jpg


33f6glv.jpg


124g0h2.jpg


Keep scrubbing or is the below good enough for spray painting (rustoleum high performance) ?

2uy0lzn.jpg
 

BFBOB

Well-known member
Joined
Sep 20, 2011
Messages
5,073
Incredible! The slide has been lengthened to allow the jaws to open wider!
(though I like the term 'claw' too!:thumbup:)
 
OP
J

Jeanke

Well-known member
Joined
Aug 23, 2011
Messages
70
:)

They did a fine job aligning the slide in that case, the claws match up perfectly.

Could anyone help me out here with the repainting, to what extent should I wire brush/sand the surface prior to painting with Rustoleum High Performance (Hard Hat) paint?
 
Last edited:

Mohawk Dave

Well-known member
Joined
Oct 7, 2012
Messages
5,068
Location
SoCal
:)

They did a find job aligning the slide in that case, the claws match up perfectly.

Could anyone help me out here with the repainting, to what extent should I wire brush/sand the surface prior to painting with Rustoleum High Performance (Hard Hat) paint?

I'd say you are fine where you are. I have painted many vises. If you continue to try to make it smoother, you will make some areas much smoother than others and it will look funny unless you smooth the whole damn thing. Right now, it will look uniform and keep the cast design that it does and should have. I think you have leveled the existing paint enough as well.

I have taken vises down to bare metal with a wire wheel, I've sand blasted them, and I've also ground until dead smooth. Now I get to the point you are at and paint them, and I think they look great.

If you do paint it now, and decide you don't like it, you can re-do it. But if you take metal off now, there is no going back. :beer:

EDIT: Btw, use a good heavy primer. It really helps.
 
OP
J

Jeanke

Well-known member
Joined
Aug 23, 2011
Messages
70
I'd say you are fine where you are. I have painted many vises. If you continue to try to make it smoother, you will make some areas much smoother than others and it will look funny unless you smooth the whole damn thing. Right now, it will look uniform and keep the cast design that it does and should have. I think you have leveled the existing paint enough as well.

I have taken vises down to bare metal with a wire wheel, I've sand blasted them, and I've also ground until dead smooth. Now I get to the point you are at and paint them, and I think they look great.

If you do paint it now, and decide you don't like it, you can re-do it. But if you take metal off now, there is no going back. :beer:

EDIT: Btw, use a good heavy primer. It really helps.

Thanks a lot for this info. I did not think of a primer! :dunno:
While I have the rustoleum high performance paint, that brand is difficult to get over here. I was thinking of using the Hammerite Primer (keeps away rust very very well in past experience), I guess that should work as good as any other rustoleum branded primer right?

You do indeed make a very very valid point on the surface changing by wire wheeling so much, in the end it looks like a machined item and not a cast item (if that makes sense). Also I will not polish the jaws to the extreme, so no need to go overboard I guess :)

The 'spinning bar' I was able to get in a nice smooth condition, except for the end 'caps' as the corner where the bar meets those spheres is difficult to clean. Will try a bit more on that.
 

drivesitfar

Well-known member
Joined
Oct 23, 2013
Messages
36,007
Location
Pacific Northwest
sounds like you are well on your way to having a well painted vise. you don't have to take off all the old paint as has been said and just make sure you have as much or all the dirt and grease off of it where the paint is going. rough up the surface a little on any areas that are tough to get the old paint off and you are ready for primer.

some of the better (more expensive) spray paints have sort of a primer in them so if you have plenty of paint to do a couple coats you can probably just use that. one important thing to think about is the vise and paint should be over 50 degrees and a little warmer is better. if you have a heated shop or can paint inside your house probably nothing to worry about, but some of us have freezing garages and snow and rain so not ideal for painting. warm and dry is best if possible. some guys put their vises in the oven to warm and dry any moisture off before blasting them with the paint.

not sure what to tell you about that weld because from all I know that would make the vise have issues if tightening down really tight or with larger items. since it is Gramps old vise just use it for light duty and you said it works ok so maybe it will last another 50 years. i'm hoping it will be fine. maybe get another old vise to put on the other end of your bench or on a stand if you need to do heavy duty items and you can have Gramps looking over your shop.

good luck
 
OP
J

Jeanke

Well-known member
Joined
Aug 23, 2011
Messages
70
Yes this is absolutely the plan, to add another clamp to the garage lol. I fact I really like the pricing on the Heuer vises, it is hard to believe I can get those for around 100 EUR. It seems so cheap.. but they are quality German made, and Germany is not far, so I guess it makes sense :) The weld I'm sure is fine really, I have seen the abuse this vise took when growing up, and the weld was definitely from before the time, because after I took of the first layer of rust, that's how that vise always looked for as long as I can remember. I'm really not worried about it.

I went and got the primer ready for tonight, put the screws and small bits in vinegar, hopefuly those clean up easily.

State that they in now, I'm still gonne do one pass with the flap wheel and then give it a rinse and dry thoroughly, and putting first coat of hammerite nr1 primer before going to sleep:

2q0ulqa.jpg


Edit: You know what tool would be REALLY handy when cleaning/scrubbing this thing? A VISE! Man I really could use one to hold those pieces up..
 

drivesitfar

Well-known member
Joined
Oct 23, 2013
Messages
36,007
Location
Pacific Northwest
Right on. by the way some paint and some don't paint the piece the handle is in and usually just shine up the handle some and your choice will be the best one.

good luck and ready for more Vise **** when you are done
 
OP
J

Jeanke

Well-known member
Joined
Aug 23, 2011
Messages
70
that piece in which the handle is in, I would prefer to shine it up, but with the limited tools available to get that shining, it is not really feasible doing that this time around. Maybe next time when it asks for a new coat of paint :)

I scrubbed a lot more in fact today, and put the smaller pieces in vinegar for some hours. Man it works a miracle! The big bolt is really in fantastic shape, whereas I originally was going to replace it with a new one...

I have put one layer of hammerite no 1 primer. I'm very happy with the results it had on our fences everywhere. But at the moment that color is really horrible looking, it is so 'fleshy' :-O

2d9nzw4.jpg


s2ayqr.jpg


24wh7w0.jpg


Now on the 'tin' of hammerite it says to apply two coats of primer. This makes sense to me on a fence outside, but I'm wondering if that would not just be too much on a vise? Is there any downside? I am in any case only putting the final color this weekend so it is not a time issue, I just want to avoid that there is 'too much' primer on so that it would easily chip of or something. It is brushed on, so it is easily on too thick imho.

Also, looking at the color I bought, I kinda wish I had gone for a hammered look. But then I see pics on here that don't have hammered effect, and they look awesome too.. so not sure lol. The thing is I dished out quite a bit to get the Rustoleum in the first place (quite rare in my area, so was special order....)
 

drivesitfar

Well-known member
Joined
Oct 23, 2013
Messages
36,007
Location
Pacific Northwest
i'd follow the directions and use the two coats of primer because your brush strokes have probably missed a few spots and the new brush strokes will leave a rough enough surface for new paint. IMHO

never seen yellow masking tape over here in US. by the way is the pizza good in your town?
 

EOC_Jason

Well-known member
Joined
Jun 25, 2012
Messages
11,388
Location
Bentonville, AR
Yes, that is an early Parker, you can tell by the style and the jaws. Most vises with the center post like that are pre-1900... Newer vises they switched to multiple holes in the base for mounting, and eventually swivel bases and such.

Looks like the slide broke and it was repaired a long time ago. I'm sure it will continue to work just fine for a long long time.

The only ad I have showing an old parker with the one center post is from 1901 and it's a different model. I don't really get into those models so I don't keep any info I come across, though you can probably find some scanned catalog images on eBay if you search for "Parker Vise".
 

Attachments

  • Parker Parallel 1901.jpg
    Parker Parallel 1901.jpg
    136.2 KB · Views: 26
To avoid these ads, REGISTER NOW!
Top Bottom