To avoid these ads, REGISTER NOW!

How do I setup a trolly for a hoist?

OP
S

Spta97

Well-known member
Joined
Apr 18, 2016
Messages
183
The unistrut will be fine with an unsupported end. BUT when the trolley is under it, all the load will be pulling on the last hanger, instead of being distributed among at least two rafters. I'd suggest toe nailing a 2x4 between the last two rafters and supporting the track at the end if you want to use it to the end.

Good idea. I'll do that.
 
To avoid these ads, REGISTER NOW!
OP
S

Spta97

Well-known member
Joined
Apr 18, 2016
Messages
183
Ugh - more issues!

I got all the hardware and was measuring for the cross braces tonight. Because the rack is mounted up high the 17" of height will not bring the tires up high enough.

Even when I changed the plan to use the hub to run the tow strap instead of through the rims it is still too low off the ceiling to make it up to the rack.

Problem is I can't put the rack any lower due to the cross braces in the garage.

My only other idea is to make a platform and hoist the tires up laying flat. Or scrap the entire idea.

Any thoughts before I hang myself with the hoist?

Edit - can I use a pulley mounted higher?
 
Last edited:
OP
S

Spta97

Well-known member
Joined
Apr 18, 2016
Messages
183
I thought more about my setup and how I could overcome the problem. The best idea I could think of is to mount the hoist vertically on the wall and have a pulley on the track. Then, have a trolley next to it and switch the load to that.

I would then move the trolley with tire to the position but not exactly sure how to lower it.

I've gotta be missing something obvious.
 

BD1

Well-known member
Joined
Mar 18, 2007
Messages
4,602
Location
north side
Would it be possible to set up the hoist to lift the rack with tries in it ?? Not sure what ceiling joist construction is or if you could raise between joist and make a quarter turn with rack to set on joist .
 
OP
S

Spta97

Well-known member
Joined
Apr 18, 2016
Messages
183
Unfortunately no. The rack is bolted to the wall and the joists are 2x6 so I don't think they could handle the weight anyway (400 lbs fully loaded).

I looked for other places to move the rack but There is no other place it will fit (and allow me to still park my car).

What do you think of the pulley idea? I was toying around about having a pulley on a trolley so I can lift the tire, move, the. Lower into place.
 

BD1

Well-known member
Joined
Mar 18, 2007
Messages
4,602
Location
north side
I think the pulley on a trolley will work , The hoist can be mounted almost anywhere but I think you'll need like 10 feet of straight cable to allow for drifting the pulley. Depending on what type of pulley you have , you may need a shackle on the trolley and then the pulley on the shackle to get enough movement. Might be a trial and error thing.
 
OP
S

Spta97

Well-known member
Joined
Apr 18, 2016
Messages
183
BD1 - do you mean something like this?

pul121-500.gif


If I were to mount this to a trolley I could use the hoist mounted on the wall to raise the tire high enough. Then, I would have to release the line as I pushed to trolley with the tire over so it has enough slack to move.

Once in the final location I would lower the last foot or so on to the rack.

This is far from ideal.

I'm not sure how I would stop the trolley from moving back towards the trolley though I guess I could just have that be the end of the track.

I'm not sure I'm following what you were saying about needing an extra 10 feet?

The other thought was to put the pulley right above the rack and guide the tire past it as I lift. Would that be an issue? The tire would keep the line from the pulley at a 45 degree angle as it slid past the lower rod on the rack. This way would be easier but not sure if it is possible.
 

rlitman

Well-known member
Joined
Oct 18, 2010
Messages
24,596
Location
Long Island
Id rethink how everything goes together to recover the vertical space. Like can you mount the track higher?
 
OP
S

Spta97

Well-known member
Joined
Apr 18, 2016
Messages
183
Id rethink how everything goes together to recover the vertical space. Like can you mount the track higher?

These ideas I'm posting are with the track at the peak of the roof. I'll have to deal with the lower support in the way.

I have to check out mounting it between the joists (the hoist) to see if that will help.
 

Charlie51

Well-known member
Joined
Nov 1, 2015
Messages
224
Location
Bolingbrook, Illinois, USA and Michigan's Upper Pe
Why don't you just mount the channel to the rafters parallel with and a couple of inches in front of the rack? You can move the trolley in position, hoist the tire up almost to it and above the rack, turn the tire 90 degrees, and shove it in the rack. How hard does it have to be?
 

Charlie51

Well-known member
Joined
Nov 1, 2015
Messages
224
Location
Bolingbrook, Illinois, USA and Michigan's Upper Pe
I just put in a trolley to hoist some engines to the upstairs of a recently acquired garage. The garage originally had a flat roof, but trusses were added later, so the "floor" of the attic is pretty substantial. My access was a folding stairway. I used a barn door channel and trolley from Tractor Supply, and bought a forged eye in the trolley to hang the block and tackle from. (I staked the threaded end of the eye through the nut so it won't unscrew)

The channel is about 30 inches long. I fold the lower part of the stairs out of the way as much as possible and lift the engine close to the opening, then tie it off. Then unfold the stairs, and get upstairs to continue the lift, moving the trolley to near the center of the opening so it clears. When I get it high enough, I shove a piece of 3/4 inch plywood under it, and lower it down. Then, I'm (almost) home free.
 

Attachments

  • engineup.jpg
    engineup.jpg
    121.2 KB · Views: 175
  • trolleyhoist.jpg
    trolleyhoist.jpg
    134.8 KB · Views: 158
  • engineup2.jpg
    engineup2.jpg
    125.5 KB · Views: 157
OP
S

Spta97

Well-known member
Joined
Apr 18, 2016
Messages
183
Why don't you just mount the channel to the rafters parallel with and a couple of inches in front of the rack? You can move the trolley in position, hoist the tire up almost to it and above the rack, turn the tire 90 degrees, and shove it in the rack. How hard does it have to be?

The issue with my setup is there are cross supports blocking the tire from raising which is why I went with the trolley in the first place.

The second problem is the rack is too high no matter where I mount the track because from trolley to hook it measures about 18" and the tires measure 33".

If I had the room to mount the rack lower I would just lift them up. On a ladder it is significantly more difficult to maintain balance while lifting an ackwardly sized tire (and not damaging / scratching the rim).

What I've decided is to mount the track as high as I can and lift the tire the remaining 2'. Since it will be on the trolley I can push and lift at the same time and get it up there. That's the hope anyway - I plan to install tomorrow.
 

Charlie51

Well-known member
Joined
Nov 1, 2015
Messages
224
Location
Bolingbrook, Illinois, USA and Michigan's Upper Pe
The reason I went with a block and tackle is because it was more compact when fully up than either a chain fall or a come-along. So it seems your challenge is to come up with something that would hold the wheel's center and counterbalance it so it stays vertical as you lift it. Then if you lift it to that 18 inch limit you would still have the tire 2 inches above the rack. Pictures would help.
 
OP
S

Spta97

Well-known member
Joined
Apr 18, 2016
Messages
183
The reason I went with a block and tackle is because it was more compact when fully up than either a chain fall or a come-along. So it seems your challenge is to come up with something that would hold the wheel's center and counterbalance it so it stays vertical as you lift it. Then if you lift it to that 18 inch limit you would still have the tire 2 inches above the rack. Pictures would help.

It would be great to get the highest point of the lift higher but I'm not sure how to accomplish that.

Here's some pics from today. I made it as far as installing the cross supports as moving the ladder 100 times cut into the day.

Notice how the cross braces are in the way of everything (slowing things down considerably as I had to snake around them while working).

Next step is to mount the track and hangers to the left of the center brace off the joist cross members I installed today (you can see it in the first pic).

I'm open to ideas if you have them


Charlie51

Well-known member
Joined
Nov 1, 2015
Messages
224
Location
Bolingbrook, Illinois, USA and Michigan's Upper Pe
I think I would remove the second collar tie from the wall and bridge the channel on top of the first and third ones (securely fastened and level), offset from the lower wooden stringer so I could lift the tire vertically above the rack. Then trolley the tire over the rack and lower it. Then you'll have to shove the tire left or right to make room for the next one.
 
OP
S

Spta97

Well-known member
Joined
Apr 18, 2016
Messages
183
I'm sorry I'm not following what you are describing. The first and second joist cross supports I installed today are both above the rack.
 
OP
S

Spta97

Well-known member
Joined
Apr 18, 2016
Messages
183
I did some more tinkering and had a question.

I've got the track up with two of the 6 supports connected. It supported my ~200 lbs at the end of the line so I think it will be ok with the hoist and tire (pretty dumb of me as I was on the top of an 8' ladder ;) ).


Here's how I have the hangers connected. I'm debating on putting another nut and washer under the bracket but doing so would make it inflexible


The way it is now there is some nice side to side give that will help me with off center loads:


I think this is a good thing from what I have read here. However, with only one nut on the top of the bracket there is nothing to stop it from threading up (other than weight and the threaded rod is locked into the hanger).

Ideally I would put a second nut on top to lock it in, but using the first hole in the bracket the head of the bolt that holds it into the wood is in the way.

So my question, should I leave it as is so the track can move freely from side to side or should I install another nut under the bracket to lock it in?
 

lakeroadster

Well-known member
Joined
Jan 19, 2015
Messages
5,166
Location
Central Colorado
.... Here's how I have the hangers connected. I'm debating on putting another nut and washer under the bracket but doing so would make it inflexible....


...... with only one nut on the top of the bracket there is nothing to stop it from threading up (other than weight and the threaded rod is locked into the hanger).

Ideally I would put a second nut on top to lock it in, but using the first hole in the bracket the head of the bolt that holds it into the wood is in the way. I'd also suggest the use of lock washers.

As you eluded to, put the double nut (locknut) under the bracket.. instead of on top. Then there won't be an interference with the L-bracket to truss fastener. I'd suggest the use of lock washers also.

You want the rail fixed solid. If the nut in question loosens that bracket sub-***'y. is no longer carrying the load, its load will then be distributed to the other trusses. If this happens in numerous locations you end up loading just a few trusses.

The flexibility you desire will be provided by the cable of the hoist, correct?
 
Last edited:

Rockcam

Well-known member
Joined
Jan 16, 2010
Messages
256
Location
Grand Rapids
While I would respectfully disagree with John if you were planning on heavy loads, having a rigid track may be fine for the 40-100 pound loads you're lifting, even if they are off center.

Still, I am not sure what the downside is of adding a second nut above the bracket to prevent the first one from backing off, and allowing some swivel.

Unistrut is pretty specific about the need for a way for the track to swivel slightly from side to side. If the track is held rigid, and you lift an off center load, you could bend the green brackets. Giving some swivel room would eliminate this.
 
OP
S

Spta97

Well-known member
Joined
Apr 18, 2016
Messages
183
As you eluded to, put the double nut (locknut) under the bracket.. instead of on top. Then there won't be an interference with the L-bracket to truss fastener. I'd suggest the use of lock washers also.

You want the rail fixed solid. If the nut in question loosens that bracket sub-***'y. is no longer carrying the load, its load will then be distributed to the other trusses. If this happens in numerous locations you end up loading just a few trusses.

The flexibility you desire will be provided by the cable of the hoist, correct?

I will be using a double line life so I suppose that will have enough flex?
 
To avoid these ads, REGISTER NOW!
OP
S

Spta97

Well-known member
Joined
Apr 18, 2016
Messages
183
While I would respectfully disagree with John if you were planning on heavy loads, having a rigid track may be fine for the 40-100 pound loads you're lifting, even if they are off center.

Still, I am not sure what the downside is of adding a second nut above the bracket to prevent the first one from backing off, and allowing some swivel.

Unistrut is pretty specific about the need for a way for the track to swivel slightly from side to side. If the track is held rigid, and you lift an off center load, you could bend the green brackets. Giving some swivel room would eliminate this.

The problem with a second nut on the top is I can't fit it. If you look at the pic with the green L bracket, you see it is bolted to the joist cross brace with two bolts. The head of the lower bolt is preventing me from fitting a second nut.

I had to remove the washer due to the lack of room.

I suppose I could use a lock nut on top (which would be a total pita as I would need to wrench it down above my head 18' in the air).
 
Last edited:
OP
S

Spta97

Well-known member
Joined
Apr 18, 2016
Messages
183
My other option is to use the second mount hole on the green L bracket. This would leave plenty of room for the second nut on top.

The down side is leverage would be working against the bracket and they could potentially bend.
 

ItsNemo

Well-known member
Joined
Mar 5, 2016
Messages
4,805
Location
Canada
My other option is to use the second mount hole on the green L bracket. This would leave plenty of room for the second nut on top.

The down side is leverage would be working against the bracket and they could potentially bend.
Can you weld? Make a couple gussets for the corner of the bracket so you can use the further out hole.
 

Rockcam

Well-known member
Joined
Jan 16, 2010
Messages
256
Location
Grand Rapids
ok, then what about using Loctite blue? It should keep it from spinning (actually may not spin at all given the amount of use this thing will get).

And it's a lot faster than taking up welding ;-)
 
OP
S

Spta97

Well-known member
Joined
Apr 18, 2016
Messages
183
ok, then what about using Loctite blue? It should keep it from spinning (actually may not spin at all given the amount of use this thing will get).

And it's a lot faster than taking up welding ;-)

That's a great idea! I don't know why I keep forgetting about this stuff unless I'm working on my cars :)

So you think the left / right flexibility is a desirable attribute?

The locknut is also an option so I'll have to test how much of a pain that is.

I'm sure I am over engineering this for my needs but the track, hangers, and hoist are probably close to 50 lbs alone. Also, I would like to reuse these parts one day if I move and have a real garage with a loft (akin to yours).
 

lakeroadster

Well-known member
Joined
Jan 19, 2015
Messages
5,166
Location
Central Colorado
While I would respectfully disagree with John if you were planning on heavy loads, having a rigid track may be fine for the 40-100 pound loads you're lifting, even if they are off center.

Still, I am not sure what the downside is of adding a second nut above the bracket to prevent the first one from backing off, and allowing some swivel.

Unistrut is pretty specific about the need for a way for the track to swivel slightly from side to side. If the track is held rigid, and you lift an off center load, you could bend the green brackets. Giving some swivel room would eliminate this.

Well... rocking back and forth on a nut likely isn't what uni-strut had in mind :) Which leads me to feel compelled to state the following:

[#] Have a Professional Engineer (PE) review your end use design and the implementation thereof. If you use a hoist that is overcapacity, use improperly sized components, or install the items incorrectly you will harm person and property. Additionally, your local jurisdiction likely requires the PE review, and likely a permit.

I spent some time this morning thinking about how the OP could mount the track within the design constraints of his application, yet still allow for some track movement.

The design below eliminates loading of the non-gussetted l-bracket arm, allows for some track lateral movement and still provide the required height adjustment.

The sketch isn't accurate from a scale perspective, but it gets the point across.

  • Flip the L-bracket over and use it to simply spread the bracket / rafter bolt loading and to allow the top bolt to assist the load on the lower bolt from trying to tear the lower bolt from the rafter [#]
  • Use a longer lower bolt [#]
  • Use an eyebolt or a rod end.... a lifting style eyebolt or rod end [#]
  • And use a nylon style lock nut to retain the eye bolt... yet allow it freedom to rotate.[#]

 
Last edited:
OP
S

Spta97

Well-known member
Joined
Apr 18, 2016
Messages
183
Well... rocking back and forth on a nut likely isn't what uni-strut had in mind :) Which leads me to feel compelled to state the following:

[#] Have a Professional Engineer (PE) review your end use design and the implementation thereof. If you use a hoist that is overcapacity, use improperly sized components, or install the items incorrectly you will harm person and property. Additionally, your local jurisdiction likely requires the PE review, and likely a permit.

I spent some time this morning thinking about how the OP could mount the track within the design constraints of his application, yet still allow for some track movement.

The design below eliminates loading of the non-gussetted l-bracket arm, allows for some track lateral movement and still provide the required height adjustment.

The sketch isn't accurate from a scale perspective, but it gets the point across.

  • Flip the L-bracket over and use it to simply spread the bracket / rafter bolt loading and to allow the top bolt to assist the load on the lower bolt from trying to tear the lower bolt from the rafter [#]
  • Use a longer lower bolt [#]
  • Use an eyebolt or a rod end.... a lifting style eyebolt or rod end [#]
  • And use a nylon style lock nut to retain the eye bolt... yet allow it freedom to rotate.[#]


John - the I you for taking the time to put this together!

A couple questions:
- would it make sense to put another washer between the eye bolt and nylon lock nut so the moving eye bolt is not rubbing on the locknut?
- is the eye bolt something I can get locally at a box store?


Edit: my only concern is finding a lifting eye bolt of the right length - with the threaded rod I can go as high as possible. Not the case with an eye bolt.
 
Last edited:

lakeroadster

Well-known member
Joined
Jan 19, 2015
Messages
5,166
Location
Central Colorado
Extra washer.. sure. The lock nut won't be tight against the eyebolt / rod end, it would be tightened up for a slip fit, so the washer(s) are snug but can still be spun by hand.

Rod Ends, McMaster Carr: http://www.mcmaster.com/#rod-ends/=12gdjfm Look at the "Fully Threaded Solid Rod Ends"
I think you will find the steel rod ends will work better in your application. They make ball joint rod ends, but not with the long shank you are after... at least not off the shelf.
 
Last edited:
OP
S

Spta97

Well-known member
Joined
Apr 18, 2016
Messages
183
Extra washer.. sure. The lock nut won't be tight against the eyebolt / rod end, it would be tightened up for a slip fit, so the washer(s) are snug but can still be spun by hand.

Rod Ends, McMaster Carr: http://www.mcmaster.com/#rod-ends/=12gdjfm Look at the "Fully Threaded Solid Rod Ends"
I think you will find the steel rod ends will work better in your application. They make ball joint rod ends, but not with the long shank you are after... at least not off the shelf.

Thanks for the link. I think I found what I need but I'll need to measure up in the garage before ordering as the unistrut bracket has a bolt going through it so I have limited space in the bracket for the thread.

This approach looks like it will work out great but unfortunately after all this the tire still won't be as high as the rack. I'm hoping that lifting it up a foot onto the rack while on the ladder won't be too bad.
 

lakeroadster

Well-known member
Joined
Jan 19, 2015
Messages
5,166
Location
Central Colorado
Why not make a hinged flip down ramp that is like a shoe. You hoist the tire up and sit it in the shoe, then hinge the shoe up that rolls the tire into the tire craddle. Think that would work?
 
OP
S

Spta97

Well-known member
Joined
Apr 18, 2016
Messages
183
It might. I'm limited to wood and the connection point would be on a chrome bar of the rack.

I'll see how this works out and consider that for phase 2 if getting the tire in on a ladder proves too much.

Tomorrow I'll get the ladder out, measure and order the hardware (Master McCarr is one day shipping to me).

Thanks again for putting in the effort on the design!
 

D45

Well-known member
Joined
Mar 21, 2014
Messages
4,834
Location
NW INDIANA
I have 2x6s for ceiling joists

I have been told that one 2x6 can safely hold and support 200 pounds, max

My joists are 48" OC

I would love to figure out a way to hang and use this, without a steel beam

Bought a cool hoist on CL for $60

1/3 HP and 1,200 capacity

Even came with the owners manual from 1974

Sealed, Oil bath lubricated motor with actual bearings

The 1/4" cable has seen better days, but that's a simple and easy fix

Total weight is only 40 pounds

Lifts 1,200 on a single line

Gear reduction is 533:1

IMG_20140725_203619_394_zpsg7kldk0a.jpg


IMG_20140725_203721_951_zpsnzgx3guq.jpg


00P0P_ljyQaLztGww_600x450_zpsd0679e16.jpg


00d0d_3bbDkYsnc8z_600x450_zpsea99a19d.jpg


00B0B_isUAXtC9QCn_600x450_zps4e67fa58.jpg


01414_kiTfls62tMC_50x50c_zps620445bd.jpg


00202_kFzkAaotS3B_600x450_zpsd777b1f8.jpg
 
Last edited:

matt_i

Well-known member
Joined
Mar 14, 2008
Messages
10,725
Location
SE Michigan
The problem I have with a winch is that it doesn't typically have an independent brake. Typically it relies on the worm gear being of a large ratio that's too hard to back-drive. But it doesn't account for any backup for the failure of the gearset under static or dynamic load....which would cause the thing to freewheel via gravity.

In general if there's a brake, there's a mechanical override/release lever.

Also, a 2x6 can hold thousands of pounds, if its end-grain in short compression. Easily 2000 lbs under 250psi equally distributed. However, if its on a 18 foot span, unbraced in the center, the 200# proposed would be too much. Its better to do some simple static analysis on what's happening or simply build it "way overkill" compared to standard framing rather than just quote a number.
 
Last edited:

D45

Well-known member
Joined
Mar 21, 2014
Messages
4,834
Location
NW INDIANA
My 2x6 ceiling joists are spanned over a 16' distance, but are braced and supported/connected to the rafters for the roof, with 1/2" plywood squares (using 5 screws)

The hoist I have, has a integrated electric brake
 
OP
S

Spta97

Well-known member
Joined
Apr 18, 2016
Messages
183
More drama with this never ending project!

I took John's advice and used the rod ends in the setup:


That worked out pretty well (thanks!) and now the track is secured, no chance of bending the angle bracket and can pivot so no track spreading. Good.

That took a while but I finished today. To be sure I got the track level and didn't tighten the brackets too much I put the trolley in (not connected to the hoist) and everything was smooth.

I then bolted the trolley to the hoist and got it up the ladder and put it in (not fun on the top of my a-frame). Here's where the trouble starts. I got the first trolley in the track and got stuck on the track bracket where the hoist bracket is. It didn't occur to me to try the trolley with the hoist attached. Grrr.


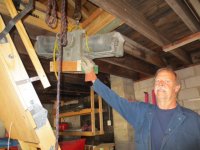
I wasn't sure where I went wrong until I checked Rockcam's setup:


It turns out the extra height of the narrow unistrut I used for the trolley-hoist mount is too tall and makes the hoist bracket too high (which I think is part of the issue). More important, the bolts are in the middle rather than towards the top. Rockcam's setup does not take up the entire space under the hoist brackets and the bolts are towards the top end so the hoist brackets will sit lower in comparison and clear the track brackets.

So now I have to find another method of attaching the trolleys to the hoist. I would have gone with Rockcam's method (iron rectangles) but I was unable to find them locally. All the box stores had was angle iron which would not work.

Can anyone tell me where I might be able to find the rectangle iron? Or any other ideas?

I could grind the unistrut slots so the bolts can sit higher but I fear that will weaken it.

Thanks!
 

Rockcam

Well-known member
Joined
Jan 16, 2010
Messages
256
Location
Grand Rapids
Spta: it's just rectangular steel tubing. I'm at the airport, so can't measure.

You can likely buy from a local steel supplier. Mine came from my model shop at work.
 

BD1

Well-known member
Joined
Mar 18, 2007
Messages
4,602
Location
north side
Since the top of the hoist brackets collide with the track supports, I would drill through the uprights on the hoist brackets and thru bolt. After drilling remove hoist brackets and cut off the top . You'll now have four angle clips with holes to reattach to hoist without the top hitting.
 
To avoid these ads, REGISTER NOW!
Top Bottom