To avoid these ads, REGISTER NOW!

How to paint two tone garage scheme?

Dr_Pippin

Well-known member
Joined
Feb 23, 2023
Messages
101
I feel silly asking how to paint something, yet here I am. I'm nearing the end of a ~2,000 square foot garage build (expansion of existing attached), and am ready for paint. I primed the ceiling two days ago and the walls yesterday, spraying using a Graco x7 with Kilz PVA primer. My plan was to paint the lower 5' of my walls "shadow mountain" (color I painted the beam and support) and then the upper 7' of walls and ceiling white. I would really like to continue to use the sprayer for as much as possible, because of how much faster it has gone than rolling - and a 12' ceiling sounds miserable to roll.

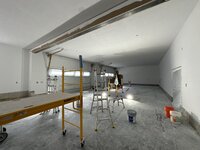
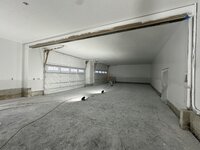
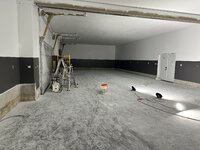
What paint should I be using and what order of application should I follow? Ceiling has knockdown texture and walls are smooth drywall. I've heard flat paint for ceiling, does that hold true in the garage? And how do I do the walls - paint white first, apply frog tape, then roll the bottom section with the dark paint? What sheen for walls? If I cut in along the top of the walls with a brush, can I then spray white on the walls in a different sheen to the ceiling without worrying about a little spatter? Sorry for the list of presumably simple questions, I just have no experience on projects this big (something I've said on literally every step of this project the past 4 months). Here's the space before I primed:

IMG_6464.jpg
 
Last edited:
To avoid these ads, REGISTER NOW!

GrayFlattop

Well-known member
Joined
Jan 18, 2018
Messages
1,053
Location
Chicago
Yes - top-down.

I would paint everything white first using the sprayer, then after the paint is dry mask it off at the 5' height that you mentioned and paint the lower portion last. It's a choice to spray or use a roller on the bottom 5' - more masking is required if spraying, but the time spent masking will be made up in application time.

Sheen? Personally, I'd go with an eggshell finish for everything, but that's just me. Flat hides defects in the taping / finishin better, but clean-up is not as easy as it would be with eggshell.
 

vwpieces

Well-known member
Joined
Apr 28, 2020
Messages
5,925
Location
Hills, PA
I asked a similar question on my Dining room that has a Lot of Trim.
Consensus was Ceiling first, Trim and walls. That was my initial thought too and was confirmed by some Pro painters. @demarpaint
It is much easier to cut walls into trim than cutting trim into wall by hand.
If you are actually going to spray the trim and windows... I dunno.

It's a Garage and Semi will clean up better/easier if a good quality paint is used. Cheep Wally world paint will literally wash off.
 

Leaflessshadetree

Well-known member
Joined
Aug 1, 2013
Messages
7,202
Location
Don't ask.
Paint the ceiling, then the top of the walls go lower than your bottom color will start. Then apply the tape and paint the lower edge of the tape with the top color. Then paint the bottom color. So top to bottom and lighter color before dark.
Honestly I'd choose a brush and roller over a sprayer. I don't have a lot of experience with a sprayer but when I did the prep and clean up was more work than it saved.
 
OP
D

Dr_Pippin

Well-known member
Joined
Feb 23, 2023
Messages
101
Yes - top-down.

I would paint everything white first using the sprayer, then after the paint is dry mask it off at the 5' height that you mentioned and paint the lower portion last. It's a choice to spray or use a roller on the bottom 5' - more masking is required if spraying, but the time spent masking will be made up in application time.

Sheen? Personally, I'd go with an eggshell finish for everything, but that's just me. Flat hides defects in the taping / finishin better, but clean-up is not as easy as it would be with eggshell.
Thanks, this is what I was imaging as easiest for me. Spray the ceiling and top of the walls, then roll the bottom portion (which is actually only 3' or 4' of drywall due to 1' and 2' stem walls). I can manage to roll that much.

I asked a similar question on my Dining room that has a Lot of Trim.
Consensus was Ceiling first, Trim and walls. That was my initial thought too and was confirmed by some Pro painters. @demarpaint
It is much easier to cut walls into trim than cutting trim into wall by hand.
If you are actually going to spray the trim and windows... I dunno.

It's a Garage and Semi will clean up better/easier if a good quality paint is used. Cheep Wally world paint will literally wash off.
Thanks for the link. I haven't installed any trim yet, so that makes it easy - ceiling then walls!

Paint the ceiling, then the top of the walls go lower than your bottom color will start. Then apply the tape and paint the lower edge of the tape with the top color. Then paint the bottom color. So top to bottom and lighter color before dark.
Honestly I'd choose a brush and roller over a sprayer. I don't have a lot of experience with a sprayer but when I did the prep and clean up was more work than it saved.
That is a fantastic tip to seal the tape. I assume after you've taped and painted the lower edge of the tape with the top color, you let the paint dry, then paint the bottom color, then remove the tape while the bottom color is still wet?

I've already taped off everything (yes, it took quite a bit of time), so at this point spraying more doesn't take any more prep time.
 

vwpieces

Well-known member
Joined
Apr 28, 2020
Messages
5,925
Location
Hills, PA
LOL, 5Gal of GOOD paint is going to be next shocker. Sherwin Williams runs occasional great deals and I was able to get some at 45% off. Sign up for offers. Spraying will use it up fast. I sprayed a couple doors and was amazed how fast it goes away.
 
OP
D

Dr_Pippin

Well-known member
Joined
Feb 23, 2023
Messages
101
LOL, 5Gal of GOOD paint is going to be next shocker. Sherwin Williams runs occasional great deals and I was able to get some at 45% off. Sign up for offers. Spraying will use it up fast. I sprayed a couple doors and was amazed how fast it goes away.
I used 19.5 gallons of primer.... I'm not excited for my paint bill.
 

vwpieces

Well-known member
Joined
Apr 28, 2020
Messages
5,925
Location
Hills, PA
I used 19.5 gallons of primer.... I'm not excited for my paint bill.
If that was all the walls and ceiling I am impressed. I would guess 30+ Gal.
My DR was down to bare plaster on ceiling and walls. Plaster, not sheetrock... And I went through almost 5 gal of Primer. It just sucked it up. I did 2 coats of primer because after 1st coat dried it was thin, Used Kils#2? I think... Paint was almost a gallon on ceiling and under 2 gallons on walls. DR also has 3 doorways (one open large to LR, 2 man size doors) (2) 6ft windows and a built-in china cabinet. still almost 2 gal of paint on walls for 2 coats rolled by hand. 10ft walls, Old late 1800's house.
 

no704

Well-known member
Joined
Apr 27, 2016
Messages
5,262
Not going to get you a color u want. But my local hazmat recycling place (Tempe Az) has free paint in 2 colors. Have done the exterior of my home twice. Think I got 20gal last time. Must be a resident. Not sure how common this is. Imagine you could tint it to a darker color?
 

demarpaint

Well-known member
Joined
Sep 17, 2010
Messages
1,237
Location
Long Island
Some good advice here, so I'll try to keep it short and not repeat anything. We did some spraying, not much. We did a lot of high end residential work where spraying would not be practical.

I would cut in all the returns on the window and door frames, and then mask it off. Window frames and door jams I would paint with a brush, doors could be removed and sprayed in a masked off area, or elsewhere if you choose. I would spray the ceiling, then the walls if it's the same color, if not I would spray the ceiling then cut in and brush roll the walls. Two toned walls were already mentioned so no point in repeating it.

Keep one thing in mind when spraying drywall. It is always best to back roll the primer and paint. Contrary to belief the mechanical action of rolling gives better adhesion, even to drywall. Make sure the walls are free of drywall dust, especially when spraying.
 

MileHighRover

Well-known member
Joined
Mar 13, 2018
Messages
1,181
I was going to say to make sure you back roll, but demarpaint beat me to it.

For a garage where lighting is everything, I'd recommend semigloss finish. It will reflect more light.
 

CraigStu

Well-known member
Joined
May 22, 2014
Messages
4,080
Location
Blacksburg, Va
I would spray the ceiling, then the walls if it's the same color, if not I would spray the ceiling then cut in and brush roll the walls.
This is such a time saver. Not cutting in at a wall to ceiling line 12ft up makes things so much easier. My last garage I chose a super light grey so I sprayed everything all the same color. I'd use the masking roll that has about 12" wide paper w/ tape pre applied at the edge so I could mask the top of the wall and the floor and spray that bottom color. You could also use strips cut from a standard clear plastic drop cloth for the masking which might be less expensive.
 

duneslider

Well-known member
Joined
Jan 20, 2013
Messages
2,297
Location
Riverton, Utah
All high quality paint will clean just fine. Back in the day the recommendation was for semi-gloss but now days egg shell will clean up just fine without rubbing off if you are using good paint. If you buy the cheap stuff who knows what results you will get...

I would eggshell everything unless you want a different sheen on the accent band along the bottom. You could do matte for the white and eggshell for the band and that would probably look good and give a little sheen difference.

You will use more paint spraying than rolling but you may get done faster, at least with the initial white base coat. If you have lower trim that will be dark like the wall then you don't have that much masking to do before spraying the dark, I would probably spray the dark too.
 

duneslider

Well-known member
Joined
Jan 20, 2013
Messages
2,297
Location
Riverton, Utah
Some good advice here, so I'll try to keep it short and not repeat anything. We did some spraying, not much. We did a lot of high end residential work where spraying would not be practical.

I would cut in all the returns on the window and door frames, and then mask it off. Window frames and door jams I would paint with a brush, doors could be removed and sprayed in a masked off area, or elsewhere if you choose. I would spray the ceiling, then the walls if it's the same color, if not I would spray the ceiling then cut in and brush roll the walls. Two toned walls were already mentioned so no point in repeating it.

Keep one thing in mind when spraying drywall. It is always best to back roll the primer and paint. Contrary to belief the mechanical action of rolling gives better adhesion, even to drywall. Make sure the walls are free of drywall dust, especially when spraying.
I am not a pro-painter (actually I hate painting) but I have found a light sand after the first primer coat helps a lot. All the drywall fuzz and missed dust comes right off with a light sand and gives a nice finish. I think a drywall guy gave me the tip. He said they would drop by a house right after the painter finished the primer and hit the walls with a light sand and check for any imperfections they needed to touch up. Then the painter would come back and prime again, or lay paint.
 
OP
D

Dr_Pippin

Well-known member
Joined
Feb 23, 2023
Messages
101
If that was all the walls and ceiling I am impressed. I would guess 30+ Gal.
My DR was down to bare plaster on ceiling and walls. Plaster, not sheetrock... And I went through almost 5 gal of Primer. It just sucked it up. I did 2 coats of primer because after 1st coat dried it was thin, Used Kils#2? I think... Paint was almost a gallon on ceiling and under 2 gallons on walls. DR also has 3 doorways (one open large to LR, 2 man size doors) (2) 6ft windows and a built-in china cabinet. still almost 2 gal of paint on walls for 2 coats rolled by hand. 10ft walls, Old late 1800's house.

Good to know my usage wasn't crazy. I initially bought 15 gallons of primer, but after using 9.5 on the ceiling I went and bought another 5 before starting the walls.

Not going to get you a color u want. But my local hazmat recycling place (Tempe Az) has free paint in 2 colors. Have done the exterior of my home twice. Think I got 20gal last time. Must be a resident. Not sure how common this is. Imagine you could tint it to a darker color?
Interesting, never heard of that before. I picked up 20 gallons of Sherwin Williams super paint this morning, so I'm set for at least my first coat inside. I'll keep that in mind for exterior painting where I'm going to need a lot more than 20 gallons!

Some good advice here, so I'll try to keep it short and not repeat anything. We did some spraying, not much. We did a lot of high end residential work where spraying would not be practical.

I would cut in all the returns on the window and door frames, and then mask it off. Window frames and door jams I would paint with a brush, doors could be removed and sprayed in a masked off area, or elsewhere if you choose. I would spray the ceiling, then the walls if it's the same color, if not I would spray the ceiling then cut in and brush roll the walls. Two toned walls were already mentioned so no point in repeating it.

Keep one thing in mind when spraying drywall. It is always best to back roll the primer and paint. Contrary to belief the mechanical action of rolling gives better adhesion, even to drywall. Make sure the walls are free of drywall dust, especially when spraying.
Thanks for the tips. I didn't backroll the primer, hope that's not going to bite me later. I'll be spraying the ceiling and the upper 7' of walls today, hopefully 15 gallons covers it all. Do I need to expect to have to do a second coat? I'm using Sherwin Williams super paint and used Killz PVA primer.
I was going to say to make sure you back roll, but demarpaint beat me to it.

For a garage where lighting is everything, I'd recommend semigloss finish. It will reflect more light.
Thanks. I went with satin, figure I'll take the benefit of light reflection and just pay the price of it highlighting my mistakes.
This is such a time saver. Not cutting in at a wall to ceiling line 12ft up makes things so much easier. My last garage I chose a super light grey so I sprayed everything all the same color. I'd use the masking roll that has about 12" wide paper w/ tape pre applied at the edge so I could mask the top of the wall and the floor and spray that bottom color. You could also use strips cut from a standard clear plastic drop cloth for the masking which might be less expensive.
I'm very much an amateur, so I do everything slower than most everyone else. So saving time not cutting in at the top of the walls seemed like a real plus!
All high quality paint will clean just fine. Back in the day the recommendation was for semi-gloss but now days egg shell will clean up just fine without rubbing off if you are using good paint. If you buy the cheap stuff who knows what results you will get...

I would eggshell everything unless you want a different sheen on the accent band along the bottom. You could do matte for the white and eggshell for the band and that would probably look good and give a little sheen difference.

You will use more paint spraying than rolling but you may get done faster, at least with the initial white base coat. If you have lower trim that will be dark like the wall then you don't have that much masking to do before spraying the dark, I would probably spray the dark too.
I've got Sherwin Williams super paint, so hopefully no issues with it rubbing off!
I am not a pro-painter (actually I hate painting) but I have found a light sand after the first primer coat helps a lot. All the drywall fuzz and missed dust comes right off with a light sand and gives a nice finish. I think a drywall guy gave me the tip. He said they would drop by a house right after the painter finished the primer and hit the walls with a light sand and check for any imperfections they needed to touch up. Then the painter would come back and prime again, or lay paint.
That's a good tip, but I think I'm just going to go with what I've got now. My arm hurts just thinking about that much sanding. I used a powerful leaf blower to blast the dust from the walls before priming (got a ton off), and did it multiple times over a few days so anything that settled back onto the walls was blown away.
 
To avoid these ads, REGISTER NOW!
OP
D

Dr_Pippin

Well-known member
Joined
Feb 23, 2023
Messages
101
7 gallons used. I’ve already sent my wife to pick up another 5 gallons of white. Apparently I’m applying a little thicker than I did with primer?
 

Attachments

  • image.jpg
    image.jpg
    634.3 KB · Views: 94
OP
D

Dr_Pippin

Well-known member
Joined
Feb 23, 2023
Messages
101
18 gallons of white have been applied. I’ll give it a few days to dry before taping off and rolling the bottom portion. Thanks everyone for tips and suggestions!
 

Attachments

  • IMG_6557.jpeg
    IMG_6557.jpeg
    792.1 KB · Views: 85

rayra

Well-known member
Joined
Dec 1, 2014
Messages
4,724
Location
Escaped from Los Angeles
I used 19.5 gallons of primer.... I'm not excited for my paint bill.
Seems excessive. That's only about 200sq'/gal. you ought to be getting 50% more coverage or even greater with primer, unless you are covering some heinous color or graffiti. You are either laying it on really thick or doing it twice?

Paint from high to low, and light colors first.
 
OP
D

Dr_Pippin

Well-known member
Joined
Feb 23, 2023
Messages
101
Seems excessive. That's only about 200sq'/gal. you ought to be getting 50% more coverage or even greater with primer, unless you are covering some heinous color or graffiti. You are either laying it on really thick or doing it twice?

Paint from high to low, and light colors first.

As with everything on this project, I have no idea what I'm doing and learning as I go. This is my first time using a sprayer, so I'm sure I was applying it too thick.
 

ludakris04

Well-known member
Joined
May 16, 2011
Messages
3,793
Location
Maryland
As with everything on this project, I have no idea what I'm doing and learning as I go. This is my first time using a sprayer, so I'm sure I was applying it too thick.
I have seen a few people (armatures) on youtube use paint sprayers. They all seem to report using much more paint, but in a shorter time.

I have sprayer... Its soo much harder than it looks. I ended up wearing more paint then the wall did.
 

dcg9381

Well-known member
Joined
Jun 20, 2018
Messages
11,989
Location
Austin, TX
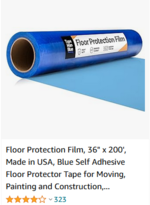
What are your plans for that floor? When I do these jobs, I start by finishing the floor, as it's inevitable that paint and other **** is going to get on the floor, which is possible to clean, but can be a pain in the ***.

I cover the finished floor with a product like this:
1709222607825.png
 
OP
D

Dr_Pippin

Well-known member
Joined
Feb 23, 2023
Messages
101
I have seen a few people (armatures) on youtube use paint sprayers. They all seem to report using much more paint, but in a shorter time.

I have sprayer... Its soo much harder than it looks. I ended up wearing more paint then the wall did.
Definitely used a lot of paint! I just cannot imagine rolling the ceiling. My shoulder would have given out halfway through. I'm already really sore from building the dang thing!

What are your plans for that floor? When I do these jobs, I start by finishing the floor, as it's inevitable that paint and other **** is going to get on the floor, which is possible to clean, but can be a pain in the ***.

I cover the finished floor with a product like this:
1709222607825.png
I'm leaving the floor bare concrete. I'll toss down a tarp before rolling on the bottom, but for spraying I just let the aerosolized paint go where it wanted. It's amazing, I have what just appears to be a fine dust (like after drywall sanding) covering the floor. I'll leaf blow it out, then pressure washer it. Any drips I'll just pick at, but I've hardly seen any. I think I got off easy!
 

rayra

Well-known member
Joined
Dec 1, 2014
Messages
4,724
Location
Escaped from Los Angeles
If your shoulders get worn out rolling a ceiling you are doing it wrong. Get a longer pole so you don't have to raise your hands above your shoulders. And only try to roll a 4'-6' swath at a time. Work across the narrower dimension of the ceiling.

Your spraying white on white is probably contributing to your overconsumption of paint. You cant gauge the coverage. One trick to overcome that is positioning a light downrange so you can see the reflection on the wet surface and you can tell when you have decent coverage.

Another important technique for any spray painting is working from wet to dry. Your overspray should be blowing across the area you are about to paint, and not back over the area you have just painted. That way the overspray does some good by landing where it is needed and not in making your prior application fuzzy.

And with any large area painting, you need to 'keep a wet edge'. Working across the area from one side to the other, partially overlapping with each pass (1/2 to 1/3 overlap). This way you don't have to fully saturate an area before moving on AND you also cover the same point on the surface multiple times. This lets you use lighter spray coverage and still ultimately get full coverage.

The angle you hit the surface also matters, especially when spraying. As well as your fluid and air flow settings (if you aren't using an airless sprayer). You want to hit at about 30-45deg to the face. Most folks try to hit it square to the face of the surface* and and that too uses a lot more paint than necessary AND can result in some terrible banding / striping in the final finish, depending on the surface being covered and the material being applied. Using that overlap technique helps even things out better. And doing it consistently allows better more even coverage with less paint.


* there are times when you WANT to be mostly square, spraying things like window or door mullions or trims or getting up under a shiplap siding while trying to cover the entire board in one pass. All depends where you are trying to get the paint and what kind of coverage you are getting.
 

Lumpy102

Well-known member
Joined
Aug 26, 2012
Messages
207
Location
Ontario Canada
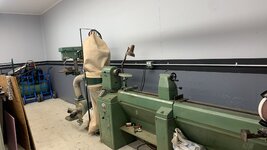
I'm gonna jump in here as I've just finished painting my shop. The masking idea above works very well, mask, brush paint the top colour over the edge of the tape where you're changing colour, make sure you don't paint too wide so you can see the edge of the tape. I only waited 15-20 minutes before I started painting the dark colour and pulled the tape within a few minutes of when I was done painting. I used something in the range of eggshell, it wasn't called that though.IMG_5353.jpegIMG_5364.jpeg
 

Johnny Generic

Well-known member
Joined
Nov 24, 2015
Messages
602
Location
35 miles NE of Pittsburgh, Pa.
I'm gonna jump in here as I've just finished painting my shop. The masking idea above works very well, mask, brush paint the top colour over the edge of the tape where you're changing colour, make sure you don't paint too wide so you can see the edge of the tape. I only waited 15-20 minutes before I started painting the dark colour and pulled the tape within a few minutes of when I was done painting. I used something in the range of eggshell, it wasn't called that though.IMG_5353.jpegIMG_5364.jpeg
how the heck did you paint behind the conduit.
 
OP
D

Dr_Pippin

Well-known member
Joined
Feb 23, 2023
Messages
101
If your shoulders get worn out rolling a ceiling you are doing it wrong. Get a longer pole so you don't have to raise your hands above your shoulders. And only try to roll a 4'-6' swath at a time. Work across the narrower dimension of the ceiling.

Your spraying white on white is probably contributing to your overconsumption of paint. You cant gauge the coverage. One trick to overcome that is positioning a light downrange so you can see the reflection on the wet surface and you can tell when you have decent coverage.

Another important technique for any spray painting is working from wet to dry. Your overspray should be blowing across the area you are about to paint, and not back over the area you have just painted. That way the overspray does some good by landing where it is needed and not in making your prior application fuzzy.

And with any large area painting, you need to 'keep a wet edge'. Working across the area from one side to the other, partially overlapping with each pass (1/2 to 1/3 overlap). This way you don't have to fully saturate an area before moving on AND you also cover the same point on the surface multiple times. This lets you use lighter spray coverage and still ultimately get full coverage.

The angle you hit the surface also matters, especially when spraying. As well as your fluid and air flow settings (if you aren't using an airless sprayer). You want to hit at about 30-45deg to the face. Most folks try to hit it square to the face of the surface* and and that too uses a lot more paint than necessary AND can result in some terrible banding / striping in the final finish, depending on the surface being covered and the material being applied. Using that overlap technique helps even things out better. And doing it consistently allows better more even coverage with less paint.


* there are times when you WANT to be mostly square, spraying things like window or door mullions or trims or getting up under a shiplap siding while trying to cover the entire board in one pass. All depends where you are trying to get the paint and what kind of coverage you are getting.
After having sprayed now, I can see how your suggestions would really have helped. I was spraying straight on, not at an angle, as the Graco video I watched to learn how to use the sprayer said to spray straight on. I've got the banding you mentioned would happen with how I sprayed. I wonder why Graco recommeneded spraying straight on? Oh well, live and learn.

What's wrong with you? You know this is GJ, right?

:)

Clean up is definitely easier if you do it as you go. And yes, if you're spraying that spray gets everywhere... Great garage, great project!
Hahaha. I thought about a nifty floor coating, then I checked price per square foot, did a little mental math for my 2,000 square feet, and decided nope!
I'm gonna jump in here as I've just finished painting my shop. The masking idea above works very well, mask, brush paint the top colour over the edge of the tape where you're changing colour, make sure you don't paint too wide so you can see the edge of the tape. I only waited 15-20 minutes before I started painting the dark colour and pulled the tape within a few minutes of when I was done painting. I used something in the range of eggshell, it wasn't called that though.
Worked great for me, too. Really impressed how crisp my edge turned out:
IMG_6592.jpg
 
OP
D

Dr_Pippin

Well-known member
Joined
Feb 23, 2023
Messages
101
Two tone paint complete! Still need trim around the pedestrian door and along the bottom edge of the drywall, but that can wait as I have more exciting things to do - like install my lifts! Thanks everyone for the help!

IMG_6593.jpg
 

rayra

Well-known member
Joined
Dec 1, 2014
Messages
4,724
Location
Escaped from Los Angeles
straight-on gives some even coverage from the 'fan' of the spray head. It takes a little practice to get the overlapping spray going, get it going at a optimum angle, get even coverage, not get the nozzle too close so paint won't pile up, and six other things you have to all do simultaneously. Just takes practice.
The same overlapping technique and trying to distribute paint evenly is at play using a roller or brush, too. Not too much paint in any one swath or area. Lot of times with rollers or brushes I'll make a preliminary pass to spread the bulk of the pain off the device, then go back to the wet edge and start trying to apply things evenly, picking up some 'extra' paint from the prelim pass as I ago. Instead of starting with a sopping brush and laying on too thick at the start and running out on the brush before refilling, or dipping too often and putting on way too much paint.
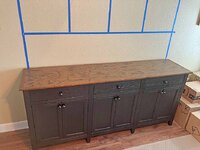
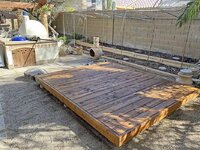
Was just using a similar technique earlier this week when poly-coating an 81"x19" counter top on a dining hutch, trying to apply as even a coating as possible. And again today when re-oiling a small deck. Used a garden sprayer as an applicator and dragged it with a towel, on that, took ~20mins.

It's all similar techniques using different applicators, different materials, different surfaces. Trying to get even coverage that looks good.
 

Attachments

  • dining hutch 124 poly countertop wet.jpg
    dining hutch 124 poly countertop wet.jpg
    132.1 KB · Views: 19
  • dining hutch 133 in place.jpg
    dining hutch 133 in place.jpg
    101.5 KB · Views: 16
  • sparta deck oiling 2 230304.jpg
    sparta deck oiling 2 230304.jpg
    193.2 KB · Views: 32
OP
D

Dr_Pippin

Well-known member
Joined
Feb 23, 2023
Messages
101
What you gonna do for the Stem wall?
Haven’t decided for sure yet. Was thinking I’d see about painting it the same charcoal gray color as the lower wall to blend them together - I assume painting concrete is feasible? I spent my day setting up my new 2 post and 4 post lifts (still plenty to do on them, but the heavy lifting parts are finished), so haven’t put any effort into researching concrete painting.

straight-on gives some even coverage from the 'fan' of the spray head. It takes a little practice to get the overlapping spray going, get it going at a optimum angle, get even coverage, not get the nozzle too close so paint won't pile up, and six other things you have to all do simultaneously. Just takes practice.
The same overlapping technique and trying to distribute paint evenly is at play using a roller or brush, too. Not too much paint in any one swath or area. Lot of times with rollers or brushes I'll make a preliminary pass to spread the bulk of the pain off the device, then go back to the wet edge and start trying to apply things evenly, picking up some 'extra' paint from the prelim pass as I ago. Instead of starting with a sopping brush and laying on too thick at the start and running out on the brush before refilling, or dipping too often and putting on way too much paint.
Was just using a similar technique earlier this week when poly-coating an 81"x19" counter top on a dining hutch, trying to apply as even a coating as possible. And again today when re-oiling a small deck. Used a garden sprayer as an applicator and dragged it with a towel, on that, took ~20mins.

It's all similar techniques using different applicators, different materials, different surfaces. Trying to get even coverage that looks good.
I’ll get plenty more practice when I paint the exterior of my house in a couple months! Thanks for the pointers.
 
To avoid these ads, REGISTER NOW!
Top Bottom