To avoid these ads, REGISTER NOW!

I Finally Have My Garage!!

boiler7904

Well-known member
Joined
Apr 4, 2006
Messages
3,414
Location
NW IN
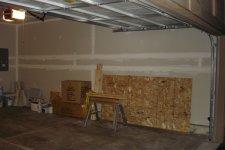
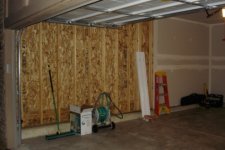
The months of waiting are over. As of last Monday, my fiancé and I own our first garage (and house)! There are pics attached below. Here are some quick answers to questions that always come up:

Size is 19’-8” wide x 22’-6” deep (nowhere near big enough but it’s the biggest my builder offered in our subdivision) No chance of adding on since I’m in half of a duplex.

Ceiling height is 9’-6” which is fine since I don’t need a lift.

Floor is sealed concrete – got to get that **** stripped off so that I can apply Rust Oleum Professional Epoxy coating in a couple of weeks.

Overhead door is 16’ x 7’ un-insulated steel.

Lighting is handled by one (and only one) 60 watt bulb and the two bulbs in the door operator (can’t see the bare bulb in the photo because of the operator in the way)

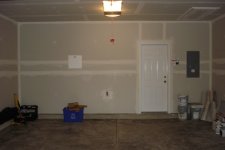
I have two 15 amp GFCI receptacles – one on the north wall and one on the east wall. Good news is that the power panel is in the garage and there is room to add a few more circuits.

There is a hose spigot in the garage (east wall).

The white panel to the middle left of the east wall photo is a panel for telephone and tv cables to be home run to. It also serves as a great way to break up what would have been an otherwise useful wall for cabinets.

Future plans in no particular order after the floor and workbench.

1. Rust Oleum Professional Epoxy Shield Floor Coating in Tile Red (tan and black flecks) with clear coat – want to mix non-skid additive into base coat so they are not as prominent and make clean up easier. Scheduled to do prep work last weekend of this month and apply coating over labor day weekend.
2. Homebuilt workbench – size and location to be determined. Most likely to be 6’ to 8’ long at the north end of the east wall.
3. Mix of cabinets and open shelves, basically storage for all kinds of stuff – hand and power tools, ladder, shop vac, sawhorses, a few yard tools, 2 mountain bikes, trash cans, and all of the other stuff that finds it’s way into the garage. My fiancé has already offered to let me keep car cleaning supplies in the laundry room (through the door on the east wall) so that they don’t freeze in the [unheated] garage. Storage will be a work in progress.
4. Additional electric receptacles - count and location to be determined. Until I figure out what I want, I can reach anypoint in the garage from either existing location with a 25’ cord or any point on the driveway with about 75’ of cord.
5. New lighting – either track or fluorescent because what I’ve got just isn’t going to cut it. May try to work a ceiling fan into this somehow.
6. Insulate and drywall the remaining half of the north wall and the west wall (around the overhead door). As a part of this, all existing drywall will be sanded (from fire taping) and finish taped prior to priming and painting.
7. Add decoration like signs or posters.

This is all going to be done as time and my budget permit. I’ll be sure to keep updated pics coming along as I start making improvements.
 

Attachments

  • East Wall.JPG
    East Wall.JPG
    65.1 KB · Views: 347
  • North Wall.JPG
    North Wall.JPG
    72.7 KB · Views: 258
  • South Wall.JPG
    South Wall.JPG
    75.7 KB · Views: 230
To avoid these ads, REGISTER NOW!

bje31

Well-known member
Joined
Mar 21, 2005
Messages
202
Location
Western PA
boiler7904 said:
The months of waiting are over. As of last Monday, my fiancé and I own our first garage (and house)! There are pics attached below. Here are some quick answers to questions that always come up:

Size is 19’-8” wide x 22’-6” deep (nowhere near big enough but it’s the biggest my builder offered in our subdivision) No chance of adding on since I’m in half of a duplex.

Ceiling height is 9’-6” which is fine since I don’t need a lift.

Floor is sealed concrete – got to get that **** stripped off so that I can apply Rust Oleum Professional Epoxy coating in a couple of weeks.

Overhead door is 16’ x 7’ un-insulated steel.

Lighting is handled by one (and only one) 60 watt bulb and the two bulbs in the door operator (can’t see the bare bulb in the photo because of the operator in the way)

I have two 15 amp GFCI receptacles – one on the north wall and one on the east wall. Good news is that the power panel is in the garage and there is room to add a few more circuits.

There is a hose spigot in the garage (east wall).

The white panel to the middle left of the east wall photo is a panel for telephone and tv cables to be home run to. It also serves as a great way to break up what would have been an otherwise useful wall for cabinets.

Future plans in no particular order after the floor and workbench.

1. Rust Oleum Professional Epoxy Shield Floor Coating in Tile Red (tan and black flecks) with clear coat – want to mix non-skid additive into base coat so they are not as prominent and make clean up easier. Scheduled to do prep work last weekend of this month and apply coating over labor day weekend.
2. Homebuilt workbench – size and location to be determined. Most likely to be 6’ to 8’ long at the north end of the east wall.
3. Mix of cabinets and open shelves, basically storage for all kinds of stuff – hand and power tools, ladder, shop vac, sawhorses, a few yard tools, 2 mountain bikes, trash cans, and all of the other stuff that finds it’s way into the garage. My fiancé has already offered to let me keep car cleaning supplies in the laundry room (through the door on the east wall) so that they don’t freeze in the [unheated] garage. Storage will be a work in progress.
4. Additional electric receptacles - count and location to be determined. Until I figure out what I want, I can reach anypoint in the garage from either existing location with a 25’ cord or any point on the driveway with about 75’ of cord.
5. New lighting – either track or fluorescent because what I’ve got just isn’t going to cut it. May try to work a ceiling fan into this somehow.
6. Insulate and drywall the remaining half of the north wall and the west wall (around the overhead door). As a part of this, all existing drywall will be sanded (from fire taping) and finish taped prior to priming and painting.
7. Add decoration like signs or posters.

This is all going to be done as time and my budget permit. I’ll be sure to keep updated pics coming along as I start making improvements.

Looks like a great place to start a great garage!!!!...Good Luck.
 

bmwpower

Super Moderator
Staff member
Joined
Apr 24, 2005
Messages
12,578
Location
NJ
Looking good....lots of possibilities.

Is it me or did the builder SKIMP on drywall screws?? You're going to want to put more screws in those sheets for sure before painting.
 

Der Bugmeister

Well-known member
Joined
Dec 29, 2005
Messages
445
bmwpower said:
Looking good....lots of possibilities.

Is it me or did the builder SKIMP on drywall screws?? You're going to want to put more screws in those sheets for sure before painting.

:+1:

Especially on the ceiling boards...
 
OP
B

boiler7904

Well-known member
Joined
Apr 4, 2006
Messages
3,414
Location
NW IN
Der Bugmeister said:
:+1:

Especially on the ceiling boards...

You're both right. I'm missing a lot of screws. The builder's only saving grace is that they glued all of the board to the studs. I'll be driving extra screws before i hang anything on the walls. Hmmm. That means a new drywall screwgun. I love it when I come up with an excuse, I mean reason, to but new tools.

During framing (three months ago), I took the time to measure the location of every stud in the garage, laundry room, and closets for any wall that had the possibility of having new shelves or cabinets installed to make the job easier in the future. Now I just need to find those sheets of paper.
 

oldgoat

Well-known member
Joined
Feb 7, 2006
Messages
4,529
Location
Wichita Kansas
When they glue they don't have to use near as many screws so it probably isn't needed to add more. If I did I would add more just on the ceiling. On my garage I took digital pictures of everything before I put the insulation and drywall up so that I can see where the studs and electrical lines run. Looks like a pretty nice garage and should give you plenty of reasons to expand your tool selection and storage. How much space will you have to surrender to the fiancee though?
 

snorvet

Well-known member
Joined
Oct 29, 2005
Messages
777
Location
Northern Illinois
good luck with the new place! You may not need a lot of new receptacles if you get the electrical cord on a reel to hang from your ceiling.
 

Wardrum

Well-known member
Joined
Jan 31, 2006
Messages
243
Location
Wisconsin
The white panel to the middle left of the east wall photo is a panel for telephone and tv cables to be home run to. It also serves as a great way to break up what would have been an otherwise useful wall for cabinets.
You should still be able to mount wall cabinets if one of them has an opening in back for access to the panel.

Good looking start to a nice garage. :thumbup:
 

logical

Well-known member
Joined
Aug 31, 2005
Messages
2,468
Location
Northern fringe of the Motor City Suburbs
As long as they glued, you have all the screws you need. I see plenty out in the field of the ceiling sheets and using none in the field of the vertical sheets is pretty standard for garages. They put plenty along the edges I suspect. All of this assumes it is glued, which I think you said it was. I'd get after the walls and floor before anything else...well run any wires first of course. Once you start hanging shelves and cabinets and lights and reels and fans and heaters and rakes and shovels.......painting gets a whole lot more complicated.
 
OP
B

boiler7904

Well-known member
Joined
Apr 4, 2006
Messages
3,414
Location
NW IN
oldgoat said:
How much space will you have to surrender to the fiancee though?

Only enough for her to park her Ford Escape on the right side.

She actually wants me to store things that go bad when stored in unheated spaces (like car cleaning supplies, paints, etc.) on shelves in the laundry room so that I don't have to continually replace stuff each spring.

Her attitude on the garage is that it is my room to do whatever I want with as long as improvements in the house are made on a regular basis. For instance, I paint the bedroom, closet, and two bathrooms for her and get to apply epoxy to garage floor - equal trade except that I'll be doing all of the work. I guess I should get used to that.
 
OP
B

boiler7904

Well-known member
Joined
Apr 4, 2006
Messages
3,414
Location
NW IN
snorvet said:
good luck with the new place! You may not need a lot of new receptacles if you get the electrical cord on a reel to hang from your ceiling.

I'll have to look into to one of those. I do have an extra plug in the receptacle for the door operator. I still want to add a couple of outlets while I have open walls though and probably a couple to the left of the door to the house.

I bought a Plugmold Tough power strip a couple of weeks ago when it was on sale to mount to the workbench so I'll need a place to plug it in.
 
To avoid these ads, REGISTER NOW!
OP
B

boiler7904

Well-known member
Joined
Apr 4, 2006
Messages
3,414
Location
NW IN
Wardrum said:
You should still be able to mount wall cabinets if one of them has an opening in back for access to the panel.

Good looking start to a nice garage. :thumbup:

I'm planning on using a french cleat system for all wall mounted items based on a design I saw in Family Handyman magazine a year or two ago. If everything works as planned, the entire cabinet would just lift off of the wall if I ever needed into the panel again.
 
OP
B

boiler7904

Well-known member
Joined
Apr 4, 2006
Messages
3,414
Location
NW IN
Thanks to everyone for your congratulations. This site has been a great source of info and ideas since I found it a couple of months ago. I'm sure I'll be here a lot more in the future asking questions every step of the way.
 

Charles (in GA)

Well-known member
Joined
Jan 11, 2006
Messages
12,489
Location
50 mi south of Atlanta
boiler7904 said:
I have two 15 amp GFCI receptacles – one on the north wall and one on the east wall. Good news is that the power panel is in the garage and there is room to add a few more circuits.

Stop and carefully cut the sheetrock on either side of the elect panel, from floor to ceiling, centered on the studs. Cut some fiberboard the same thickness as the sheetrock and attach it with screws above and below the panel. Later, any time you need access to the panel to run more wires, all you have to do is remove screws and the fiberboard and everything is exposed top and bottom of the panel.

Charles
 
OP
B

boiler7904

Well-known member
Joined
Apr 4, 2006
Messages
3,414
Location
NW IN
Yesterday was the day to clean out the garage and get ready for epoxy next weekend.

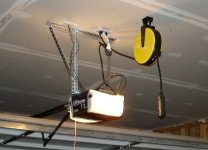
I also hung a cord reel from the ceiling (Snorvet's suggestion) using the extra outlet at the garage door opener for power. It is a Bayco unit with a 30' cord and tri-tap at the end. It's only rated for 10 amps but the price was right at $30 (minus 10% coupon) at Lowes. I'll just use extension cords and plug the stuff with bigger draws into the wall outlets. Photo is attached.

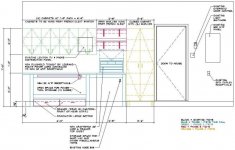
This weekend was also the time to draw what I think I want for a workbench and storage on the east wall. Due to budget constraints and my impending wedding, it will have to be done in phases as time and money permit.

Phase 1: 6'-8" x 24" deep work bench with storage shelf below and 2'-8" x 18" deep extension for tool chest to sit on with shop vac storage below. Also have to build a large storage shelf on another wall not shown in the pictures.
Phase 2: Four (4) 1'-8" wide x 2'-4" tall x 12" deep wall cabinets with adjustable shelves in each.
Phase 3: Two (2) shelves over the tool chest, a six outlet plugstrip on the front apron of the workbench, a new outlet in the wall to plug the plugstrip into, and drawers below the workbench shelf.
Phase 4: 2'-6" wide x 7'-0" tall x 24" deep cabinet with adjustable shelves.

Phases 2 and 3 will probably get combined and done early next spring. The drawing is attached as a jpeg image.

Comments and suggestions on the design are welcome and appreciated.
 

Attachments

  • Cord Reel.JPG
    Cord Reel.JPG
    72.7 KB · Views: 52
  • garage elevation.jpg
    garage elevation.jpg
    68.4 KB · Views: 91

wrigh003

Well-known member
Joined
Mar 27, 2006
Messages
783
Location
Birmingham, AL
boiler7904 said:
Her attitude on the garage is that it is my room to do whatever I want with as long as improvements in the house are made on a regular basis. For instance, I paint the bedroom, closet, and two bathrooms for her and get to apply epoxy to garage floor - equal trade except that I'll be doing all of the work. I guess I should get used to that.

Haha- yeah that's pretty much how it goes. :bounce:

Looks good on your plan, too. If that's accurate and to scale, I think I might consider reworking the cabinet placement to leave access to that panel, if you think it's somthing you might need. Of course, you could always just move it down a foot or so, or if it's something you don't feel like you'll need to get into except on very infrequent occasions, your french cleat idea is very very good.

Post pictures as you go along!
 
OP
B

boiler7904

Well-known member
Joined
Apr 4, 2006
Messages
3,414
Location
NW IN
wrigh003 said:
Looks good on your plan, too. If that's accurate and to scale, I think I might consider reworking the cabinet placement to leave access to that panel, if you think it's somthing you might need. Of course, you could always just move it down a foot or so, or if it's something you don't feel like you'll need to get into except on very infrequent occasions, your french cleat idea is very very good.

Post pictures as you go along!

I measured everything this weekend and then drew it to scale in AutoCAD.

As far as I know, I'm only going to need access to the TV panel in a couple of weeks when I add another TV jack for the family room (current one is on the wrong wall). My thought is that if I use a strong enough cleat, I can let gravity hold the cabinet to the wall. The cabinet would then just lift off if I did need access. I'll have to add a standoff at the bottom of the cabinets as the panel cover sticks out about 1/4" from the wall surface.

More pictures are coming after next weekend when the floor goes down.
 

wrigh003

Well-known member
Joined
Mar 27, 2006
Messages
783
Location
Birmingham, AL
boiler7904 said:
I measured everything this weekend and then drew it to scale in AutoCAD.

As far as I know, I'm only going to need access to the TV panel in a couple of weeks when I add another TV jack for the family room (current one is on the wrong wall). My thought is that if I use a strong enough cleat, I can let gravity hold the cabinet to the wall. The cabinet would then just lift off if I did need access. I'll have to add a standoff at the bottom of the cabinets as the panel cover sticks out about 1/4" from the wall surface.

More pictures are coming after next weekend when the floor goes down.

Instead of a standoff at the bottom, you could make a cutout in the back of the cabinet to match the panel with the cable and phone lines in there- that way instead of giving yourself a hernia lifting a cabinet at an odd angle over a workbench, you can just open a door and move some cleaning supplies/oil/etc out of the way. That would keep the cabinet from hanging out away from the wall, and then if you felt like it you could go all belt and suspenders mode and screw the back of the cabinet into the studs in addition to your french cleat idea.

That autocad sketch is pretty cool!
 

XR7G428

Well-known member
Joined
Jul 11, 2005
Messages
102
Location
Fountain Hills, Arizona
If you use Garage Storage Cabinets (GSC Brand), the cabinets do not have a back for this very reason. Put your stuff into one of those clear storage boxes, and put the box on the shelf. If you need to access the panel you just pull out the box and you are there. I have actually used these in about half of my cabinets just becasue it is easier to pull the box out, and put it on the bench to find what I need.

wrigh003 said:
Instead of a standoff at the bottom, you could make a cutout in the back of the cabinet to match the panel with the cable and phone lines in there- that way instead of giving yourself a hernia lifting a cabinet at an odd angle over a workbench, you can just open a door and move some cleaning supplies/oil/etc out of the way. That would keep the cabinet from hanging out away from the wall, and then if you felt like it you could go all belt and suspenders mode and screw the back of the cabinet into the studs in addition to your french cleat idea.

That autocad sketch is pretty cool!
 
To avoid these ads, REGISTER NOW!
Top Bottom