To avoid these ads, REGISTER NOW!

I need a wood working mentor.

Zeke

Well-known member
Joined
Aug 13, 2009
Messages
17,176
Location
Long Beach CA, the sewer by the sea.
I have a great metalworking mentor I met here and we've become email buddies. He does a fair share of woodworking as he built his house and did an all wood interior. From the pics it looks fabulous.

But I need someone who is a shop woodworker to ask a few things of now and then. I'm a carpenter by trade but that doesn't mean I'm a woodsmith.

I just bought a wood lathe for a project and that's done. Now doing some veneer repairs and might need a bit of help. Shoot me a PM if you want to be involved as a 'pen pal.'

Thanks.
 
To avoid these ads, REGISTER NOW!

Beachside Hank

Well-known member
Joined
Jul 9, 2013
Messages
116
Location
PALM BAY FL
You may call me "master", I will call you "grasshopper", when you can ****** the dowel pin from my hand, you will be ready.

Seriously, would like to help, p.m. on the way.
 
OP
Z

Zeke

Well-known member
Joined
Aug 13, 2009
Messages
17,176
Location
Long Beach CA, the sewer by the sea.
Hank and other, thanks for the PM's. I replied.

Here's where I stand on the veneer: I want to do what is apparently not possible with common shop tools and techniques. That is unless I build a pantograph. Let me explain. I would like to repair damaged veneer at the base of a square wood column. I don't want to disturb any of the existing veneer or finish because the object is a quite valuable antique. Yet, it has severe damage that warrants repair, at least according to the owner, an antiques dealer who knows his stuff.

But the pantograph won't work because the the work is not bench mounted but rather in situ on the furniture itself. There are 2 approaches that I know, cut a piece that will cover the repair and trace it out on the column and cut away. Or, cut away the damage and match a piece to the cut. Both tedious and the depths sometimes don't jive.

Enter the router and the bow tie method. Fine except a bow tie is not acceptable in this repair. It's on the corner and a random pattern with some grain match up would be the hot ticket. Short of having a CNC router and being able to scan the repair, my preferred method would be to free hand cut along the damage into good wood and then transfer the pattern of the female cut to a veneer blank and make the male insert.

I've just about exhausted any method I can find from Saran Wrap, carbon paper, clay, you name it. As I said, if I had a pantograph I could trace the inside of the cut and produce the male patch piece but I'd have to mount that whole apparatus on the piece of furniture and that won't work here.

What other tracing or molding methods are possible? Links to pics and vids would be most helpful, but if you can do this and write about it, come on down!
 
OP
Z

Zeke

Well-known member
Joined
Aug 13, 2009
Messages
17,176
Location
Long Beach CA, the sewer by the sea.
The damage is 1" x 3. I could take a picture, outline, putty, outline or guess at it and carve one that fits. It's all the same, using an Exacto knife with all the inherint flaws. Maybe I should have made the words router and trace bold with an underline.

It sure would be great if I could pour veneer but last I knew, wood still grew in the ground.
 

machine_punk

Well-known member
Joined
May 14, 2011
Messages
2,540
Location
Napa Valley, California
I am having a hard time figuring out exactly what you want to do, but I think this will work for you...

cut a piece of new veneer a little larger than the area you want to replace. tape the new veneer directly over the damaged section of old veneer (just use some painter's tape, all the way around the edge of the piece). Use a super-sharp knife (Exacto knife with a #11 blade) and cut through both the new piece of veneer and the old piece of veneer. Chisel or scrape the old veneer away, being very careful near the border you just cut. The new piece of veneer should now fit the patch perfectly.

I think that will work, for what I understand to be your problem.

Kev
 

aggierailroad

Well-known member
Joined
Jan 8, 2012
Messages
581
Location
Houston, TX
A pic would help a lot. Sounds like the veneer got damaged and maybe the substrate?

I don't want to propose anything without clearly understanding the problem. Let us know!
 
OP
Z

Zeke

Well-known member
Joined
Aug 13, 2009
Messages
17,176
Location
Long Beach CA, the sewer by the sea.
@machine_punk, that would work but I'd like to be able to remove the damaged area first. Aggie, you're correct. I'm approaching this very unconventionally and I may have to give up the thought. Pics coming. But to stir your imagination, think of a repair in a burl where I follow the burl grain to hide the dutchman.

And since the material is very tough (rosewood and the like) the Exacto method is very tedious. Trying to find a way to use the router.
 

MoonRise

Well-known member
Joined
Nov 5, 2010
Messages
4,045
Location
NJ
1" x 3" damaged veneer section, on the 'base' of some furniture piece by a square column on the furniture?

By the 'edge' of the base, so that you are doing an outside edge?

I'd probably say use a veneer saw and make the cut on the damaged section of the veneer on the base and run that along the grain line from opposite corner to opposite corner (assumption that you have the wood grain running 'along' the closest edge, so that you can make the long cut parallel to the grain and the 'end grain' will be at the opposite corners).

|==========|
|==========|

With some careful grain matching (size and 'shape' or pattern, generally 'color' can be taken care of with staining), a patch along the grain lines can be pretty unobtrusive. At the 'end' grain, the patch is often more noticable, hence my suggestion to run the patch from 'edge' to 'edge' of the square base.

Got some pictures of the workpiece so we can see a bit better what you are dealing with?

Do you have working room in-situ to do a 'bow-tie' type repair, but make the pattern 'master' yourself and in the size and shape you desire? If you don't have room in-situ for a router, is there room for a trim router? If not enough room for a trim router, do you have room to use a Dremel size/type tool with the router base attachment? If not room for that, is there room to mount the pattern 'master' and then use a flex-shaft and a shop-made collar to support/guide the flex-shaft head and the mini router cutter on the pattern 'master'?

Take the pattern 'master' and route out the damaged section on the workpiece. Take pattern 'master' and route out an identical recess in a work block. Fit veneer patch to work block recess (which should be identical to the routed section on the workpiece), final test fit into actual workpiece, install.

For the possibility of varying veneer depths, just make sure the replacement veneer is thicker than the original and thicker than the depth of the 'recess'. Install, let dry, then sand/scrape (cabinet scraper, not paint scraper :D ) to match.
 
OP
Z

Zeke

Well-known member
Joined
Aug 13, 2009
Messages
17,176
Location
Long Beach CA, the sewer by the sea.
MoonRise, pics coming in a bit. The object according to the dealer that commissioned me to do this is to make a repair that makes the piece more valuable but not noticeable and certainly not aggressive enough to remove any existing finish where it's good. I may have to push those boundaries. I could reface the whole piece which looks about as you descibe but he doesn't want anything that isn't damaged removed.

Think of the gilded picture frame in the link in post #4. The areas missing were duplicated but not at the expense of any of the existing. So, instead of sawing off the rim of the frame and wrapping it with a new piece of embossed molding, the repairs are held to the absolute minimum.

At least that's the way I understand it. Now let me got get those pics.
 
OP
Z

Zeke

Well-known member
Joined
Aug 13, 2009
Messages
17,176
Location
Long Beach CA, the sewer by the sea.
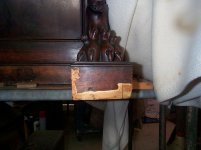
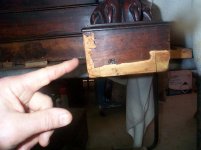
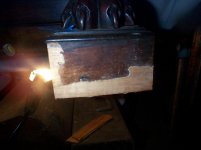
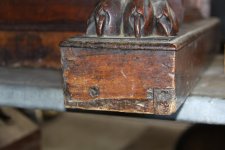
The first pic shows some veneer removed. The lower section was done with a template and the collars on the trim router. And in the 2nd pic you can see the piece made to fit. The 3rd is the piece I'd like to transfer the pattern of the removed material and make the dutchman to fit. I know, that's a long shot. I can always straighten out the lines and keep it simple. But for now....
 

Attachments

  • DCP01905.jpg
    DCP01905.jpg
    86.7 KB · Views: 88
  • DCP01906.jpg
    DCP01906.jpg
    85.6 KB · Views: 75
  • DCP01907.jpg
    DCP01907.jpg
    90.1 KB · Views: 85

aggierailroad

Well-known member
Joined
Jan 8, 2012
Messages
581
Location
Houston, TX
My Opinion, for what it's worth, is to knock the whole face of that off (start with a chisel and use a rebate and block plane if you have them to finish it), don't try to patch it. Your repair lines will be hidden at the top and sides where you miter the veneer to the corners.

Use a veneer hammer and painters tape - good to go.
 
OP
Z

Zeke

Well-known member
Joined
Aug 13, 2009
Messages
17,176
Location
Long Beach CA, the sewer by the sea.
Hah! I found just what I needed. It's called a Silver Bullet cutter which is really a plotter. All I need to execute perfect patches is a thousand dollars in equipment. I guess if I was going to do a whole lot of this I could get one plus a scanner to upload my patterns. Anything is possible in the digital world.

I wonder how my dealer buddy would feel about digital repairs on early 19th Century furniture. ;) ?
 
To avoid these ads, REGISTER NOW!

Beachside Hank

Well-known member
Joined
Jul 9, 2013
Messages
116
Location
PALM BAY FL
My Opinion, for what it's worth, is to knock the whole face of that off (start with a chisel and use a rebate and block plane if you have them to finish it), don't try to patch it. Your repair lines will be hidden at the top and sides where you miter the veneer to the corners.

Use a veneer hammer and painters tape - good to go.

I endorse this approach, this finish can be blended quite easily to the existing by using spray toner, a lacquer in an aerosol can that comes in 3 basic shades: light, medium, dark, and clear and semi gloss top coat; use of any or all will get the desired results. With that and shellac sticks, I was in the furniture touch- up biz long before the franchise goons ruined it for everybody with their crayons and paint.
 

Kevin54

MEMBER EMERITUS
Joined
Jan 12, 2005
Messages
29,341
Location
Urbana, Ohio
Ditto on the re[placement of the complete face. I've made a few repairs on furniture, but with that, I think I would just re-veneer the complete face and call it a day. If it was a very intricate piece with inlays, then I can see trying to replicate the design, but for the bottom of the newel post, if the complete face is replaced, no one will ever notice. The hardest part of the whole project will be matching the varnish.
 
OP
Z

Zeke

Well-known member
Joined
Aug 13, 2009
Messages
17,176
Location
Long Beach CA, the sewer by the sea.
Nah, matching the varnish is a POC. I blend satin and semi until I get the right gloss.

No matter how you do it a straight line will show. A wiggly line won't pick up the light. Grain is only part of the repair process. The end result needs to not look new, undented and straight. It has to be distressed to match the overall character of the piece. IOW, the repair can't be obvious to anyone but an expert.

Now, I'm not that good to be sure. This is a new adventure for me. I am definitely experimenting. I have so much time in this piece you wouldn't believe it. It's all gone pretty well and I'm down to the bottom. I want to finis out with as good of results as I have achieved on other places on this piece.

All the other patches got rubbed down and rounded with polished steel bars and metal finishing dollies. I'm a little short of taking a chain and beating on the thing :) but I do have to produce some artificial wear on anything new or it just looks new. One thing the dealer and I discussed was that corners were to not look new, rebuilt or straight.

This is faking for sure, but it has to be done just like a fake painting has to look old. Add that dimension in when you are thinking about how you would go at this.
 

MoonRise

Well-known member
Joined
Nov 5, 2010
Messages
4,045
Location
NJ
Remove old veneer from that entire face, install new veneer, finish to match and be done.

Small area and trying to fit in the Dutchman is going to take more time and effort IMHO than just removing the old damaged veneer and replacing with new undamaged veneer and then distressing the new veneer to look old and dented but not missing a chunk.

Finish to match includes all the 'artistic' distressing to add the desired amount of wear, dents, scratches, and so forth. A bag or sack of various rocks or nuts/bolts or whatever (or a sack of nickles :D ) can come in handy. :D
 

MoonRise

Well-known member
Joined
Nov 5, 2010
Messages
4,045
Location
NJ
Oh, and if the piece is 'early 19th century', then the adhesive used for the veneer should have been old-school (at the time, pretty much the 'only' school) hide glue.

Just in case you didn't realize it.

Good news, hide glue is 'reversible'. A little heat and moisture and the glue should release the veneer.

If you are really-really set on making a patch and not just replacing the veneer on that one face, gently remove the damaged veneer from the workpiece and then work on it on a temp work block on the bench (using the aformentioned removable and reversible hide glue). Cut-fit-splice-whatever. Remove (remember the hide glue) from the temp block and install onto the actual workpiece.
 

Kevin54

MEMBER EMERITUS
Joined
Jan 12, 2005
Messages
29,341
Location
Urbana, Ohio


Zeke....I never heard of doing that. What does it do? Does it burnish the pieces of material to help blend together?

Any chance of seeing some pics of doing that?
 
OP
Z

Zeke

Well-known member
Joined
Aug 13, 2009
Messages
17,176
Location
Long Beach CA, the sewer by the sea.
Kevin, one of the things a carpenter will do with stain grade moldings on outside corners is to soften the edge of the joint. And the easiest way to do that is with gentle taps using a finish hammer. It closes the joint to an almost imperceptible line particularly pre stained molding. Most other straight edges will be broken with sandpaper or a pass with a plane set shallow so as to not tear. All I was doing was "beating up" the new wood a bit so it no longer looked like new wood.

You see, coloring is only part of the game. Texture is another part and some things have to be patinated. In fact, that word was used on "Antiques Road Show" last night.
 
OP
Z

Zeke

Well-known member
Joined
Aug 13, 2009
Messages
17,176
Location
Long Beach CA, the sewer by the sea.
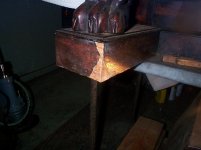
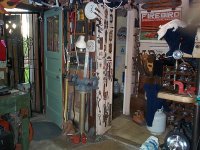
Update: Here's where I'm at presently. I got the wiggly dutchemen glued in on the face and the other corner. The 'other corner' looks pretty good so those of you that said keep it simple were spot on. I'm going to throw in a sneak preview of my garage/shop as I intend to start a thread soon called "The Eclectic Garage." Bear in mind that TEG was in extreme disarray at photo time and that is what has prompted me to think about a thread that will push me into making some improvements without losing any of the character of a 1930's garage. Same as Jack Olsen's but it won't go in that direction I can assure you. That's no reflection on how I feel about Jack's garage or any other for that matter. I just need a bunch of organized clutter and old collectible and interesting things about. If you look closely below the Firebird Raceway poster partially blocked by the CM 150 drill press you will notice many old saws and couple of braces with bit extensions sticking out of an old nail keg. The keg below has never been opened and contains 100 lb. of finish nails. The date on the tag is before WWII.

The thread on TEG in due time.
 

Attachments

  • DCP01911.jpg
    DCP01911.jpg
    69.4 KB · Views: 39
  • DCP01910.jpg
    DCP01910.jpg
    85.7 KB · Views: 38
  • DCP01901.jpg
    DCP01901.jpg
    148.3 KB · Views: 40
OP
Z

Zeke

Well-known member
Joined
Aug 13, 2009
Messages
17,176
Location
Long Beach CA, the sewer by the sea.
Funny, I see more of the old grain in the pics than I do working on the piece. I will draw the continuation of the grain into the new part as I begin the toning and finishing. I still have some wood blending to do.

At the end some small amount of colored putty will save me along with a coat of varnish. The rest of the thing (all of the upper parts I cleaned and patched) look great. I'm just stressing here at the very bottom knowing that sometime in the future the bottom will be the top.
 

MoonRise

Well-known member
Joined
Nov 5, 2010
Messages
4,045
Location
NJ
:beer:

A little toning and shading and distressing (maybe a few small/medium scratches and gouges to go along with the 'dents' you applied) and I think you are there with the repair. (the rhyme was unintentional, but now that I typed/said it I kind of like it. :D )
 
To avoid these ads, REGISTER NOW!
Top Bottom