To avoid these ads, REGISTER NOW!

Insulated Window Header Construction??

NWOhioChevyGuy

Well-known member
Joined
Feb 20, 2007
Messages
1,967
Location
Buckeye Hill (Morenci, MI)
So I'm getting everything lined up for a total gut and remodel of our kitchen.
Exterior Wall Construction will be 2x6 with flash & batt, Flash = 2" of froth pack spray, 3.5" Batt = Rockwool
Zip type exterior sheeting, with cement lap siding, Nickle gap for interior finish

This wall will have 5 casement windows installed as shown in the mock up.
1715878053009.png

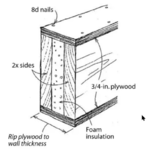
Current plan is to construct insulated headers like this.
2x10 + 1.5" foam + 1" foam + 2x10 as the "sandwich"
1715878250107.png

Any other suggested construction?
Criticisms?
 
To avoid these ads, REGISTER NOW!

dcg9381

Well-known member
Joined
Jun 20, 2018
Messages
11,989
Location
Austin, TX
Can you use zip-R, or does that create issues with the existing exterior as it'd likely create more offset?
 
OP
N

NWOhioChevyGuy

Well-known member
Joined
Feb 20, 2007
Messages
1,967
Location
Buckeye Hill (Morenci, MI)

duneslider

Well-known member
Joined
Jan 20, 2013
Messages
2,297
Location
Riverton, Utah
This. And no plywood caps needed
Agreed, not sure what the plywood caps are doing. I also usually don't see the sandwich done. Usually the two wood towards the outside and the foam inside (probably due to ease of construction since framers usually don't do insulation.

The sandwich gives you good nailing on both sides.

Why flash and batt? I think dense pack would be my choice.
 
OP
N

NWOhioChevyGuy

Well-known member
Joined
Feb 20, 2007
Messages
1,967
Location
Buckeye Hill (Morenci, MI)
Can you use zip-R, or does that create issues with the existing exterior as it'd likely create more offset?
This would move the framing in the thickness of the insulation, while a great idea, the floor plan will not allow for giving up any further floor space.
This wall exterior will be flush with existing brick wall it marries to.
 
OP
N

NWOhioChevyGuy

Well-known member
Joined
Feb 20, 2007
Messages
1,967
Location
Buckeye Hill (Morenci, MI)
Agreed, not sure what the plywood caps are doing. I also usually don't see the sandwich done. Usually the two wood towards the outside and the foam inside (probably due to ease of construction since framers usually don't do insulation.

The sandwich gives you good nailing on both sides.

Why flash and batt? I think dense pack would be my choice.
Flash & Batt as it is what I have settled on.... No other reason.

With the small size of the project I will be insulating myself and not bring in a contractor.
 
OP
N

NWOhioChevyGuy

Well-known member
Joined
Feb 20, 2007
Messages
1,967
Location
Buckeye Hill (Morenci, MI)
This. And no plywood caps needed
I was not necessarily planning on the plywood "caps" but the cross section with a 2x10 on exterior and interior will allow for trim and finishes to be installed easier.

The caps maybe just to hold it together for installation? as long enough screws would cost far more than the scrap plywood.
 

duneslider

Well-known member
Joined
Jan 20, 2013
Messages
2,297
Location
Riverton, Utah
Flash & Batt as it is what I have settled on.... No other reason.

With the small size of the project I will be insulating myself and not bring in a contractor.
I just don't think you are gaining much with the spray foam. Usually people do the sprayfoam to help with air sealing because they can't handle the air sealing on the exterior.

I am starting to hear more and more talk that spray foam is the asbestos of the 21st century.
 
OP
N

NWOhioChevyGuy

Well-known member
Joined
Feb 20, 2007
Messages
1,967
Location
Buckeye Hill (Morenci, MI)
Using an LVL for the header you may "get away" with a single (1 3/4") ply leaving room for more foam.
I will look into an LVL.

I was planning on small individual headers over each window.
With spacing to have a single gang box between each above the counter in the window trim.
There will be three sconce lights above the windows, so doing the small headers leaves that small stud bay open for electrical.

And also my vent from the sink drain.
 

billconner

Well-known member
Joined
Jul 20, 2021
Messages
6,996
Location
Thousand Islands NYS
A continuous single header - like a 2x10 (need more details to size) is perfectly fine by code and would allow electrical and plumbing.


1715899558806.png

Or box - just 1/2" ply both sides 2x5s top and bottom - also easy for electrical and plumbing to pass through. Both allow more insulation.
 
OP
N

NWOhioChevyGuy

Well-known member
Joined
Feb 20, 2007
Messages
1,967
Location
Buckeye Hill (Morenci, MI)
This wall will have an existing second floor sitting on it. Floor joist terminate on top of this wall, I will have a double top plate to accommodate this.

If a 2x12 is required, that’s easy enough to accommodate. Or I can do a single LVL for the header.

There would be a jack stud next to each window with the continuous header. Widest opening is 36” (center window) the other 4 will be 30”.
 

PCustoms

Well-known member
Joined
Jul 23, 2011
Messages
23,684
Location
VT
2nd on the LVL, do that whole wall in 1 ****.

There's also something off in your rendering, I think it's the left side. Can you add another cabinet to balance it out?
 
OP
N

NWOhioChevyGuy

Well-known member
Joined
Feb 20, 2007
Messages
1,967
Location
Buckeye Hill (Morenci, MI)
2nd on the LVL, do that whole wall in 1 ****.

There's also something off in your rendering, I think it's the left side. Can you add another cabinet to balance it out?
There is an island table not shown, as the rendering was done by the cabinet company. Normal times the island will be in the center of the kitchen, when we have gatherings it will be parked there like a peninsula.
 

pcmeiners

Well-known member
Joined
Aug 13, 2009
Messages
8,061
Location
In the only town in Pennsylvania, Bloomsburg.
"And no plywood caps needed" :thumbup:

Window setup looks a bit odd.... personally I would enlarge the cabinets ( custom) and counter top to the left of the sink so furthest left window lines up with cabinet/top ends.

Perhaps windows could be raised a few inches, 2 or 3", will also keep less water splash from sink onto windows, with present height off sink, it will be an issue

Consider applying floor covering, ceramic, tile, plank etc before installing cabinets, allows for future renovation with out issues if cabinets are modified.

As to your concerns for insulation, the glass is your major heat loss, so get the best glass type you can afford.

.
 
Last edited:

jar944

Well-known member
Joined
Jul 26, 2010
Messages
6,020
Location
Northern VA
Perhaps windows could be raised a few inches, 2 or 3", will also keep less water splash from sink onto windows, with present height off sink, it will be an issue

It will be fine at that height. I prefer them flush to the counter myself for the aesthetic.
 

mike93lx

ALLIANCE MEMBER
Joined
Dec 9, 2013
Messages
38,398
Location
Richmond, VA
It will be fine at that height. I prefer them flush to the counter myself for the aesthetic.
Working on a reno at my folks now and I tried for lowering the window based on suggestions here, but I couldn't convince them. I liked the pics that were shared having it slightly raised to control water
 
To avoid these ads, REGISTER NOW!

jar944

Well-known member
Joined
Jul 26, 2010
Messages
6,020
Location
Northern VA
Working on a reno at my folks now and I tried for lowering the window based on suggestions here, but I couldn't convince them. I liked the pics that were shared having it slightly raised to control water

Ah, thats too bad. What was the main concern?

With a stone stool, you get 99% of the flush look and don't have to work about water running behind the cabinet or Into the window like a true flush setup.
 

mike93lx

ALLIANCE MEMBER
Joined
Dec 9, 2013
Messages
38,398
Location
Richmond, VA
Ah, thats too bad. What was the main concern?

With a stone stool, you get 99% of the flush look and don't have to work about water running behind the cabinet or Into the window like a true flush setup.
Frankly, just that it's different. It was just a change that my mother couldn't really picture liking.

Its OK. We are replacing a smallish replacement double hung with a big fixed picture window. They'll get tons of light and a big view of the backyard
 
OP
N

NWOhioChevyGuy

Well-known member
Joined
Feb 20, 2007
Messages
1,967
Location
Buckeye Hill (Morenci, MI)
The rendering is not 100% accurate as the windows were copy & pasted into the picture done by the cabinet company. Spacing will be slightly different both in width & height.

The windows will be centered on the sink, which is almost centered on the wall. It is a HUGE upgrade from the 1914 layout we currently have!

Cabinets are already sitting in my garage so no changes there and windows are due in next week.

Everything is here except the framing lumber, so not redesigning the space any.
 

mike93lx

ALLIANCE MEMBER
Joined
Dec 9, 2013
Messages
38,398
Location
Richmond, VA
The rendering is not 100% accurate as the windows were copy & pasted into the picture done by the cabinet company. Spacing will be slightly different both in width & height.

The windows will be centered on the sink, which is almost centered on the wall. It is a HUGE upgrade from the 1914 layout we currently have!

Cabinets are already sitting in my garage so no changes there and windows are due in next week.

Everything is here except the framing lumber, so not redesigning the space any.
Its going to look great. That's a lot of window

I would also try to run a continuous header. I think the install will be easier and you'll be more likely to end up with a nice flat surface.
 

loganb

ALLIANCE MEMBER
Joined
Dec 29, 2011
Messages
5,705
Location
Omaha, NE
Ditch the plywood cap, at least on the bottom as assuming you're using a nailing fin install, it's bringing the fasteners closer to the edge of the 2x. The risk of fastener pullout issues with it being closer to the edge is greater than the minor strength that may be gained from the plywood

If there are jackstuds at each window, the doubled up 2x10 is likely overkill as the effective span isn't that much. But I agree that the single header will likely help deliver a flatter end result. Make sure there are cripples above header to the double top plate.

If using Zip or similar, ensure you read and understand the seam sealing instructions for the sheathing.... That tape must be rolled out!
 
OP
N

NWOhioChevyGuy

Well-known member
Joined
Feb 20, 2007
Messages
1,967
Location
Buckeye Hill (Morenci, MI)
Ditch the plywood cap, at least on the bottom as assuming you're using a nailing fin install, it's bringing the fasteners closer to the edge of the 2x. The risk of fastener pullout issues with it being closer to the edge is greater than the minor strength that may be gained from the plywood

If there are jackstuds at each window, the doubled up 2x10 is likely overkill as the effective span isn't that much. But I agree that the single header will likely help deliver a flatter end result. Make sure there are cripples above header to the double top plate.

If using Zip or similar, ensure you read and understand the seam sealing instructions for the sheathing.... That tape must be rolled out!
Exactly why I posted the question.

I will be moving forward with the single LVL across all windows. For both reasons mentioned, more insulation & flatter / true wall.

Yes there will be cripples installed.

I have not done the Zip style sheeting before, but have educated myself on the install. 👍🏻

This wall is the only framed wall in our brick house, and the existing wall is DRAFTY! The new wall will NOT be!
 

billconner

Well-known member
Joined
Jul 20, 2021
Messages
6,996
Location
Thousand Islands NYS
With a single header - 2by or lvl - I would think you would need a 2x6 plate across tops of windows to attach drywall or other interior sheathing and casing as well as atop the header, like figure from IRC I posted.

I think a continuous header will help a lot, but just trying to picture the rest of it.
 
OP
N

NWOhioChevyGuy

Well-known member
Joined
Feb 20, 2007
Messages
1,967
Location
Buckeye Hill (Morenci, MI)
With a single header - 2by or lvl - I would think you would need a 2x6 plate across tops of windows to attach drywall or other interior sheathing and casing as well as atop the header, like figure from IRC I posted.

I think a continuous header will help a lot, but just trying to picture the rest of it.
There will be Nickel Gap lap siding as the interior finish on the wall. Trim around windows will be "flush" with NG. (as it is 3/4")
So thinking out the framing for those terminations are still in the works.

I may need to add an extra nailing flange/stud on the interior (around windows) for the ends of the NG siding to nail to.
Trim will be simple dimensional painted poplar.
 

jkeyser14

Well-known member
Joined
Dec 19, 2008
Messages
1,823
Location
(rural) Maryland
I just don't think you are gaining much with the spray foam. Usually people do the sprayfoam to help with air sealing because they can't handle the air sealing on the exterior.

I am starting to hear more and more talk that spray foam is the asbestos of the 21st century.
Polyurethane (the material used in spray foam) is used in everything these days. If there is any "asbestos" like concerns it is with the foaming solvents that evaporate out when the foam is applied. There are no similarities to asbestos which causes a inhalation risk for thousands of years.
 

jar944

Well-known member
Joined
Jul 26, 2010
Messages
6,020
Location
Northern VA
Trim around windows will be "flush" with NG. (as it is 3/4")

Are you sure you want to try that? I forsee lots of dicking around to get that to come out flush and looking clean.

I'd at a minimum pack out the trim 1/4" and cut a 1/2" rabbit so it lips over the NG.

Personally I'd set the trim on top of the NG and just use wider extension jambs.
 
OP
N

NWOhioChevyGuy

Well-known member
Joined
Feb 20, 2007
Messages
1,967
Location
Buckeye Hill (Morenci, MI)
Are you sure you want to try that? I forsee lots of dicking around to get that to come out flush and looking clean.

I'd at a minimum pack out the trim 1/4" and cut a 1/2" rabbit so it lips over the NG.

Personally I'd set the trim on top of the NG and just use wider extension jambs.
That's a great idea, the extension jams coming with the windows are for 1/2" drywall finish. So if I took a 1/4" rabbit off the edge of my trim it would cover the ends of the NG.
 

Hank11

Well-known member
Joined
Aug 19, 2019
Messages
1,168
Location
Tennessee
That article has almost exactly what I plan as one of the builds.
1715891566385.png
This design gives you something to attach your interior finish. Plenty of room for any kind of window or door casing. Plenty of room to fasten drywall. Plenty of structure to make a rigid wall section. The plates let you adjust the wall for flatness.
 
OP
N

NWOhioChevyGuy

Well-known member
Joined
Feb 20, 2007
Messages
1,967
Location
Buckeye Hill (Morenci, MI)
This design gives you something to attach your interior finish. Plenty of room for any kind of window or door casing. Plenty of room to fasten drywall. Plenty of structure to make a rigid wall section. The plates let you adjust the wall for flatness.
I'm leaning towards this design again, which will be much more cost effective and likely efficient enough on the insulation side of things. It will provide me with more structure to nail finishes to as well.

Coming back full circle to where I started.
 
OP
N

NWOhioChevyGuy

Well-known member
Joined
Feb 20, 2007
Messages
1,967
Location
Buckeye Hill (Morenci, MI)
Its going to look great. That's a lot of window

I would also try to run a continuous header. I think the install will be easier and you'll be more likely to end up with a nice flat surface.
The wall of windows will turn our dark kitchen into a very open feel.
This wall faces north and currently has only one small none operational window, making for a hot room when the wife is canning in late summer. She is VERY much looking forward to this project being completed.
 

Hank11

Well-known member
Joined
Aug 19, 2019
Messages
1,168
Location
Tennessee
I'm leaning towards this design again, which will be much more cost effective and likely efficient enough on the insulation side of things. It will provide me with more structure to nail finishes to as well.

Coming back full circle to where I started.
Plates from 2X6 and pick good straight ones.
Pull it straight to a line and then nail it up.
 

C-S-H

Well-known member
Joined
Jan 18, 2024
Messages
148
I will be moving forward with the single LVL across all windows.
No don't. The wall is heavily loaded. It is highly doubtful that it would pass a stability design check.
I'm leaning towards this design again
Phew!
Coming back full circle to where I started.
Calculate some loads from the roof down with due regard for window locations in the second floor wall. Since there is so much sheathing depth above the windows, the sheathing panel above each window is much stiffer than the header and will try to take all the load. So nail the sheathing accordingly, and don't skimp on the depth of the headers. You may need to stabilize the compression edge of the headers with a flange as in the picture above, or move the headers up under the top plate. I even specify a glued header assembly when really starved for header stiffness, including gluing it to the lower top plate.
 

PCustoms

Well-known member
Joined
Jul 23, 2011
Messages
23,684
Location
VT
No don't. The wall is heavily loaded. It is highly doubtful that it would pass a stability design check.

How is a supported lvl spanning the window bays worse then a disjointed slab made up of multiple headers?
 

C-S-H

Well-known member
Joined
Jan 18, 2024
Messages
148
How is a supported lvl spanning the window bays worse then a disjointed slab made up of multiple headers?
It is a heavily loaded wall. The long LVL would act like a hinge in the wall studs (primary vertical load carrying members).
 

billconner

Well-known member
Joined
Jul 20, 2021
Messages
6,996
Location
Thousand Islands NYS
So your suggesting king studs from bottom plate to top plate? Valid concern, but wish I knew more about all the loads.

Makes me think continuous 2x4 studs to top plate and then a single header but that kind of fussy detail often reveals other kinks.

One of the reasons I liked the box beam because it's stiff in both axes.
 
To avoid these ads, REGISTER NOW!
Top Bottom