To avoid these ads, REGISTER NOW!

Insulation - please comment

JTB

Active member
Joined
Dec 23, 2007
Messages
38
Location
Traverse City MI
Insulation - please comment - increased my budget!!

OK, taking on board all the advice below I need to break open another piggy bank!! How about the following -

- fill in the gaps at the base of the siding with fillers or expanding foam.
- forget the foam insulation against the siding.
- Install 2*4 studs on 2' centers
- install 5.5" or 6.5" thick R19 fiberglass with Kraft facing
- then cover with 7/16" OSB.

Will this be a better option than the foam panels and 3.5" thick R11?

This is walls only, yet to decide on the ceiling.

Cheers, John


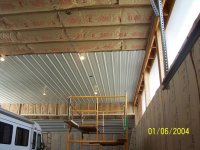
My first winter in MI (having moved from Houston) I realize an insulated barn is now necessary otherwise I waste 4 months of the year!!
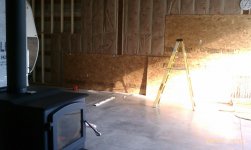
So my 30'*40' barn looks like this at the moment -


As always, budget comes into the equation. My most affordable option seems to be to fill in between all the spars (sorry I'm not a joiner/carpenter) with foam insulation boards, 1 1/2" thick R7.5 and cover with OSB. The roof will get closed in (4'*8' boards to be decided?) and filled with insulation. Paint the whole thing white for reflection and install double 8' florescent lights.
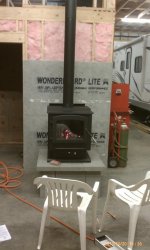
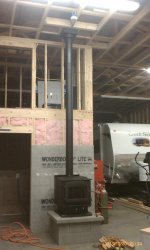
Then source/install a wood burning heater.
Is this approach likely to be able to produce a work area I can heat sufficiently to work in?
Comments and ideas please but I don't have bottomless budget.

Cheers, John
 
Last edited:
To avoid these ads, REGISTER NOW!

ThomasT

Well-known member
Joined
Dec 1, 2013
Messages
58
Location
Etoile, Texas
I did a shop up in north Texas with the “Blown in Styrene” insulation that worked really good, but it was a bit expensive. On your big overhead door, make a plastic tarp roll up to cover the entire door. The trap would be like a Chinese bamboo shade that is rolled up by two ropes on either end and simply put several small weights on the bottom to hold it in place, this will keep a lot of cold air out.
 

samert111

Well-known member
Joined
Feb 28, 2010
Messages
182
Location
Rockford, Mi
John,
The method you described will work fine, especially if you have an unlimited supply of free or cheap wood. There are some simple things you may want to do first to reduce/eliminate the air leaks in your building.

I'm in Western Michigan (GR Area) and before I did any insulating I purchased the foam filler strips that match the shape of the metal siding and slid them at the bottom between the siding and the skirt boards and also up top at the truss headers. Others have used the expanding foam in a can, it's cheaper but kinda messy. This will block off all the ribs in the siding and also help keep the bugs out. I also removed the exterior corner trim pcs and used some metal flashing tape to cover the gap where the siding comes together on the corners. Then put in your foam between the horizontal purlins. Later if you wanted to add more insulation you could always frame in-between the posts and put in some R-19 fiberglass batts.

I can't tell from the photos if you have a metal roof or OSB decking and shingles. If shingles and you have vented soffits you will want to install baffles in the rafter bays between each truss so when you insulate the ceiling you do not close off the openings out into the eaves. The baffles leave a 1" air flow gap on the underside of the roof decking because in Michigan you need to let the attic area breath in the winter and keep it cold up there. Otherwise the heat that does get thru the ceiling insulation will get captured and melt snow off the roof and then re-freeze out over the eaves and cause ice damming which will damage your shingles and create hazardous icicles. If you do not have vented soffits then you either need to put some in or gable vents on the end walls. I'm betting you have vented soffits already though. You should also have a ridge vent or pot vents up in the peak for air flow.

If you have a metal roof I'm not real sure what the best method is for venting because then you have to be concerned with condensation dripping off from the inside of the metal roofing. Though I think the builders typically put a bubble insulation on the underside of the metal roofing to capture any condensation and let it drain out to the roofs edge. I'm sure others will chime in on what to do if a metal roof.

PS, why in the world did you move from Houston to Michigan? I thought I was the only crazy transplant (moved from Tucson in 1975) from the South.

Good luck with your project.

Steve
 
OP
J

JTB

Active member
Joined
Dec 23, 2007
Messages
38
Location
Traverse City MI
Hi Steve, thanks for the detailed reply, lots to think about and some ideas I never would have considered. Give me and engine, paint and electrics and I'm good, this building stuff is going to take some research!!
I will check out the roof when I get back in town (off to Houston for some sun for a few days!!).
I was in Houston for 10 years in the Oil and Gas business now living in Traverse City. I'm originally from England so getting back to having 4 seasons is neat but it does hamper project work over the winter, hence the need for heat.
Where can I get those foam strips to match the siding you mentioned?
Cheers, John
 

jvitez

Well-known member
Joined
Nov 30, 2009
Messages
2,429
Location
Big Sky Country, Canada
I doubt R7.5 would be enough in a Michigan winter. You're in climate zone 6 so you need a vapour barrier anyway. I would use the foam as you mentioned but use EPS not XPS as you don't want it function as a vapour barrier. Install horizontal framing members between the posts 23" apart, and install 23" wide fibreglass or better yet mineral wool batt insulation over the foam board, vapour barrier over the batts, and drywall/OSB/plywood as you wish.

Most important though is ceiling insulation, as hot air rises.
 

iowafarmkid

Member
Joined
Nov 29, 2013
Messages
6
Iowa Foam
Main Office: 515-382-FOAM
Fax: 515-382-3640
Joe: (Owner) 515-231-0345
Tony (Sales): 712-830-8021
Des Moines (Sales): 515-783-7208 Home
Company
Products
Benefits
Videos
Photos
REVIEWS
BLOG
QUOTE
Contact
.


COMPANY

Iowa Foam Insulators LLC is a family owned and operated company started by Joseph Steffes. Joseph went to Iowa State University and graduated with a degree in Agricultural Business with a minor in Agronomy and an emphasis in sales. After graduating Joseph worked for Van Wall until he decided to open his own insulation company. Iowa Foam Insulators LLC has been in business in Central Iowa since 2006.

We offer 3 ways to fulfill your insulation needs with Spray Foam, Injection Foam and Blown In Insulation. We also offer Thermal Imaging which gives us the ability to see things that our eyes cannot.

Iowa Foam Insulators LLC is a spray foam company that is great for the environment and even better for the consumer. We are a company that can provide a friendly insulation to the environment that used renewable resource, yet can save the user in the end up to 50% on their heating and cooling cost over standard practice of fiberglass insulation.

Iowa Foam is a fully insured company that is a supporter and member of the BBB. Customer services are our number one priority. We strive to make our customers happy at the end of the day. We pride ourselves on arriving in a timely manner, respecting our clients time, communication between the client and our employees, respecting the clients property and leaving it clean and fulfilling your insulation needs.

Let us take a minute to introduce you to our staff. Tony Steffes is our sales man. He is a graduate of Iowa State University with a degree in finance. When Tony is bidding a job he is focused on what the customer's needs and wants are. Brent Bochman is our head sprayer. He is certified and has been spraying since 2005. He joined our team when the company first opened. He has a keen knack when it comes to the spray foam. Justyn Jarnagain is our Lead Foreman for Injection Foam. He has been with the company since 2009. Justyn takes pride in his work and goes the extra mile for the customers. He doesn't leave a job site until the customer is satisfied.


MEET OUR STAFF


Owner
Joe Steffes


Sales
Tony Steffes


Foam Sprayer
Brent Bochman


Injection Sprayer
Justyn Jarnagain

.


HOME COMPANYPRODUCTSBENEFITSVIDEOSPHOTOSREVIEWSBLOGQUOTESCONTACT


COPYRIGHT 2012 - ALL RIGHTS RESERVED - IOWA FOAM LLC.


..
maybe this company can answer questions for you?
 

jomobco

Well-known member
Joined
Nov 12, 2010
Messages
436
Location
Denver, CO
It looks like you've got 6x6 posts plus 2x4 girts. That gives you 8" for insulation before you skin the inside. I was able to bookshelf girt then run R19 insulation stapled horizontally between the girts then skinned with white metal. Same for the roof except I blew insulation on top of the ceiling. R30 up there. If I was in MI I would want even more than that. Especially if I was coming from Houston :) Good luck. Pics in my profile of the girts.
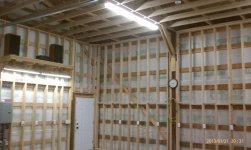
 

samert111

Well-known member
Joined
Feb 28, 2010
Messages
182
Location
Rockford, Mi
Hi Steve, thanks for the detailed reply, lots to think about and some ideas I never would have considered. Give me and engine, paint and electrics and I'm good, this building stuff is going to take some research!!
I will check out the roof when I get back in town (off to Houston for some sun for a few days!!).
I was in Houston for 10 years in the Oil and Gas business now living in Traverse City. I'm originally from England so getting back to having 4 seasons is neat but it does hamper project work over the winter, hence the need for heat.
Where can I get those foam strips to match the siding you mentioned?
Cheers, John

John,
I got my closure strips from the local lumberyard, not the big box stores like Lowes or Home Depot. Or you can get them online. Below is a link.

http://www.mackeymetalroofing.com/Foam-Closure-Strips-p/mmr-acc-hw472.htm.

Steve
 

James-W

Well-known member
Joined
Feb 3, 2013
Messages
12,432
Location
Southeastern Wisconsin
One of the guys on the bowling league built a shed similar to what you have, and he insulated part of it rather than the entire shed. He wanted a place that was heated so he could work on stuff, so he sectioned off a portion of the shed and he made a ceiling at 9 feet. He made the ceiling very strong so that he could use the space above it as a storage area. He put in stud walls and then he insulated them with fiberglass insulation and covered the walls with half inch plywood. He insulated the ceiling as well.

This may not be very practical for you, since you mentioned there are budget constraints. I didn’t ask him what it cost to do what he did, but I suspect it was a substantial amount of money and he only insulated part of the shed. So for you to do what he did, and to do it for the entire building, may very well be cost prohibitive. Still, it MAY be something you might want to consider, if not for now, perhaps at a later date.
 

Highbeam

Well-known member
Joined
Feb 15, 2011
Messages
2,292
Location
Mt Rainier foothills, WA
Your today's update is what I did. I sticked out the bays between the posts and attached R-19 faced FG batts to the framing. Then went over that with OSB. Just finished the insulation and the bottom two rows of OSB yesterday.

I wasn't real keen about allowing insulation to touch the exterior siding and the faced FG allows you to keep the batts from falling back away from the interior OSB. Batts are hard to do right. You need to take your time and eliminate gaps.
 

bullnerd

Well-known member
Joined
Sep 17, 2012
Messages
5,690
Location
Jersey
Have someone post pics of all the seperate batts of insulation and all the extra framing.

Then look at the pics of a roll insulation job.
 

Highbeam

Well-known member
Joined
Feb 15, 2011
Messages
2,292
Location
Mt Rainier foothills, WA
I used the rolls from home depot, 35 feet long and cut to fit exactly by me vs. trying to fit together precut batts. I would much prefer cutting this way because every **** joint is a time sinking opportunity to screw up.

The framing was a lot of effort. I went with 16" OC and 2x6 lumber. You've got to realize that lumber is cheap. The difference between 16 and 24" OC isn't much money and the upcharge from a twisty little 2x4 to a 2x6 is cheap too. I just figured I should do it right rather than saving a few bucks.
 

Attachments

  • IMAG0548.jpg
    IMAG0548.jpg
    95.6 KB · Views: 195
  • IMAG0542.jpg
    IMAG0542.jpg
    92.4 KB · Views: 176
  • IMAG0838.jpg
    IMAG0838.jpg
    80.2 KB · Views: 154
OP
J

JTB

Active member
Joined
Dec 23, 2007
Messages
38
Location
Traverse City MI
Thanks Highbeam, looks like you are planning on using a wood stove to heat the shop? What size shop do you have and what is the stove?

Cheers, John
 

Highbeam

Well-known member
Joined
Feb 15, 2011
Messages
2,292
Location
Mt Rainier foothills, WA
I installed an englander NC30 about a month ago to provide some heat. It was permitted and I wanted to get that inspected before anything else happens in the shop that I don't want the county to see. The englander is made in Virginia by a great company. Sold at home depot for under 1000$. EPA and very low emissions, with a huge firebox. It's a monster, about the best you can do for a huge, durable, clean, stove these days.

Shop is a 30x60 with 14 foot walls. No ceiling yet so no chance of actually heating it. The ceiling will be metal panels with plastic and blown in insulation after the walls are done.
 

Attachments

  • IMAG0830.jpg
    IMAG0830.jpg
    84.3 KB · Views: 95
  • IMAG0828.jpg
    IMAG0828.jpg
    82.7 KB · Views: 90

MyShopBoss

Member
Joined
Nov 30, 2010
Messages
15
Location
Eastern Iowa
I finished my 30x64 pole shed last year. I ran 2x6's horizontally 24" OC between the 6x6 posts then used fiberglass rolls between the 2x6's. It worked well but if I had to do it over again I would staple tyvek to the girts between each post and have someone insulate it with spray foam. If you find the right contractor it's not that much more expensive than fiberglass and it's a lot less hassle. I had it done to my house when I finished my basement and it made a huge difference. You can't get much tighter. I wouldn't spray foam directly to the steel in case you had to replace a sheet (or more) down the road. Just my 2 cents.
 

Gary S

Well-known member
Joined
Dec 27, 2008
Messages
2,972
Location
Bismarck, ND
R19 fiberglass isn't going to fit into 2x4s. You will need 2x6 for that. But, since most heat loss is in the ceiling, you should be OK using 2x4s and R13. The difference between a R13 wall and a R19 wall is small. You want the ceiling to be R40-50 where your heat is mostly lost.
 
To avoid these ads, REGISTER NOW!

samert111

Well-known member
Joined
Feb 28, 2010
Messages
182
Location
Rockford, Mi
Re: Insulation - please comment - increased my budget!!

OK, taking on board all the advice below I need to break open another piggy bank!! How about the following -

- fill in the gaps at the base of the siding with fillers or expanding foam.
- forget the foam insulation against the siding.
- Install 2*4 studs on 2' centers
- install 5.5" or 6.5" thick R19 fiberglass with Kraft facing
- then cover with 7/16" OSB.

Will this be a better option than the foam panels and 3.5" thick R11?

This is walls only, yet to decide on the ceiling.

Cheers, John


John,
It looks like you decided to open up your wallet a little more:thumbup:

I did exactly what you describe above but before studding out the walls I took a roll of Tyvek house wrap and cut and fit it in-between the posts with about a 2" lip stapled to the insides of the posts. My side walls have the 48" Lexan light panels running the entire length and were only 10' high up from the floor even though I have 15' ceiling. The skirt board came up 3 rows so I really only had a little under 9' high to cover which was perfect since the Tyvek roll was 9' wide. This helps knock down the drafts more but more importantly is protects the insulation from getting wet from wind driven rain. Even though you fill in the gaps at the top and bottom, the siding overlaps every 36" and water can still get in under the right conditions. The Tyvek just protects the insulation completely.

I also used 2x6 studs and angled screwed them into the horizontal purlins. This really stiffened up the sidewalls. Don't forget to use treated lumber for the walls bottom plate that sits on the concrete floor.

For the ceiling I installed R30 Kraft faced fiberglass and covered it with the white metal Dura panels. They are lighter weight than the siding and the white really reflects light down.
 

Attachments

  • 100_2185.jpg
    100_2185.jpg
    145 KB · Views: 120
  • 100_2188.jpg
    100_2188.jpg
    149.8 KB · Views: 101

Highbeam

Well-known member
Joined
Feb 15, 2011
Messages
2,292
Location
Mt Rainier foothills, WA
R19 fiberglass isn't going to fit into 2x4s. You will need 2x6 for that. But, since most heat loss is in the ceiling, you should be OK using 2x4s and R13. The difference between a R13 wall and a R19 wall is small. You want the ceiling to be R40-50 where your heat is mostly lost.

R-19 certainly does fit into 2x4s. Remember, the depth of the wall cavity has nothing to do with the dimensions of the studs in a pole barn application like this. It has everything to do with where you put your wall. For comparison I used 2x6 studs but the depth from OSB to the inside of the horizontal girts was 8". I could have used a thicker batt, I believe R-30, but that is not typically available in 16" faced rolls.
 

CNGsaves

Well-known member
Joined
Sep 26, 2012
Messages
13,233
Location
KS and OK
^ ^ HighBeam . . please for your safety's sake . . .
. . . . . move those oxy acetylene tanks AWAY from your wood burner !!! :yikes: . . :shocking: . . .:D
 

Attachments

  • HighBeam_wood_burner_heater.JPG
    HighBeam_wood_burner_heater.JPG
    61.2 KB · Views: 76
Last edited:

Highbeam

Well-known member
Joined
Feb 15, 2011
Messages
2,292
Location
Mt Rainier foothills, WA
^ ^ HighBeam . . please for your safety's sake . . .
. . . . . move those oxy acetylene tanks AWAY from your wood burner !!! :yikes: . . :shocking: . . .:D

I was wondering if someone would see those. They are not there anymore and valves were off. Just like the valves in the pair of 30# LPG tanks on the nose of that RV.

Garage burning has lots of risks.
 

bullnerd

Well-known member
Joined
Sep 17, 2012
Messages
5,690
Location
Jersey
I just dont get the framing? If your going to "frame-in" a pole building, why not frame the whole building? Its like a stud building inside a pole building.

All the insulation gaps, all the thermal bridges...
 
OP
J

JTB

Active member
Joined
Dec 23, 2007
Messages
38
Location
Traverse City MI
Thanks all, wish the weather was a bit warmer so I could get out and insulate the barn to make it warmer.............
 

Highbeam

Well-known member
Joined
Feb 15, 2011
Messages
2,292
Location
Mt Rainier foothills, WA
I just dont get the framing? If your going to "frame-in" a pole building, why not frame the whole building? Its like a stud building inside a pole building.

All the insulation gaps, all the thermal bridges...

Framing those bays is cheap. Really cheap. It's just some lumber and nails.

The difference between building this structure as a pole structure and doing it all stick was very significant. Like double when I had the whole job bid.

The only thing I might do differently is consider internal girts for the internal finish. The cost would have been less.
 

Diesel Dan

Well-known member
Joined
Jul 21, 2013
Messages
2,457
Location
TN
I had the same dilemma about insulating my barn. Started studding the walls and using faced batts of insulation but found out from here about wide rolls of insulation. In a nutshell I found 92.5" wide x 40' long rolls of R19 unfaced fiberglass by Johns Manville from a some what local Morton builder, $110 per roll.

Here is a pic of two blankets hanging:


For the ceiling I am stapling up some plastic for vapor barrier, white tin and blown in insulation on top.
 
Last edited:

NUTTSGT

Super Moderator
Staff member
Joined
Sep 14, 2009
Messages
50,864
Location
Northern Central Ohio
I doubt R7.5 would be enough in a Michigan winter. You're in climate zone 6 so you need a vapour barrier anyway. I would use the foam as you mentioned but use EPS not XPS as you don't want it function as a vapour barrier. Install horizontal framing members between the posts 23" apart, and install 23" wide fibreglass or better yet mineral wool batt insulation over the foam board, vapour barrier over the batts, and drywall/OSB/plywood as you wish.

Most important though is ceiling insulation, as hot air rises.

If it were mine, I'd do something similar. I'd be cutting up some rigid foam panels and put those between the wall girts and get some ceiling insulation done this winter. As the budget gets refilled, continue with framing and insulating the walls.

I'd use regular white polystyrene foam which gives an R value of 5.9 over the pink XPS which has an increased R value of 7.5 but double the money, atleast the pricing I see at HD.

One other thing to consider is possibly looking on CL. These's a guy fairly local selling sheets of 1.25" Rigid Polyiso insulation with foil facing on one side for $12 with bulk pricing too. It's R value should be about 7.5 and sounds like the best deal to me, easy to cut and easy to handle with less breakage over the polystyrene.
 

Highbeam

Well-known member
Joined
Feb 15, 2011
Messages
2,292
Location
Mt Rainier foothills, WA
I had the same dilemma about insulating my barn. Started studding the walls and using faced batts of insulation but found out from here about wide rolls of insulation. In a nutshell I found 92.5" wide x 40' long rolls of R19 unfaced fiberglass by Johns Manville from a some what local Morton builder, $110 per roll.

Here is a pic of two blankets hanging:


For the ceiling I am stapling up some plastic for vapor barrier, white tin and blown in insulation on top.

You still need to put some framing up before interior finish so what did you do? Horizontal girts on the inside? That was plan B for me.
 

Diesel Dan

Well-known member
Joined
Jul 21, 2013
Messages
2,457
Location
TN
Here is a pic with some vapor barrier and steel up. Sorry about the white wash but pic is from a cell phone.
 

Fun pain

Well-known member
Joined
Jan 28, 2012
Messages
111
Location
Crestline, Ohio
I like HIGHBEAMS idea

but you might like how I do it... easier, cheaper, faster, better (then most ways)


http://www.garagejournal.com/forum/showthread.php?t=228691

step 1; seal the wall from ground moisture. (foundation coating works)
step 2; just put 4' on center girts on the inside
step 3; staple up webbing
step 4; fill wall with cellulose

And you can stop there or add more stringers and drywall or osb the walls... thats up to you
 
Last edited:

Highbeam

Well-known member
Joined
Feb 15, 2011
Messages
2,292
Location
Mt Rainier foothills, WA
I considered the loose fill idea but was afraid of bowing out the metal and also if I shoudl ever need to replace a metal panel the stuff would spill out like sand. Even just adding a penetration for a reznor, that stuff would come out.

There are rumors about the corrosivity of cellulose insulation in contact with metal.

Also, I like the idea of a gap between insulation and the metal to allow air to move, water to run, and mice to crawl.
 

Fun pain

Well-known member
Joined
Jan 28, 2012
Messages
111
Location
Crestline, Ohio
HIGHBEAM

that would be some serious packing of cellulose to bend metal..... that would be impressive...


rumors of corrosivity and cellulose has a few factors....

if packed densily against metal there will be almost no condensation on the metal, because there isn't that big of a difference between one side to the other. You can't do that with fiberglass

the gap your talking about is a drainage plain to ALLOW condensation and let it go somewhere. BUT where do you want it to go????

You do not want "air to move".... air movement and fiberglass.... is horrible it will bypass most of the R-value...

You have to box in fiberglass even from natural convection of the cavity...
 
OP
J

JTB

Active member
Joined
Dec 23, 2007
Messages
38
Location
Traverse City MI
djjsr - some truck photos. It's a 1950 F1, probably start a full rebuild next spring once I get my winter project done - rebuilding my Cobra engine. Wish I had a heated garage....


Cheers, John
 

djjsr

Well-known member
Joined
Sep 4, 2006
Messages
4,796
Location
In the cornfields
Love the truck. That little red thing is pretty nice too!

(I must say, that's one of the oddest visors I've seen but it looks like it works!)
 

Highbeam

Well-known member
Joined
Feb 15, 2011
Messages
2,292
Location
Mt Rainier foothills, WA
HIGHBEAM

that would be some serious packing of cellulose to bend metal..... that would be impressive...


rumors of corrosivity and cellulose has a few factors....

if packed densily against metal there will be almost no condensation on the metal, because there isn't that big of a difference between one side to the other. You can't do that with fiberglass

the gap your talking about is a drainage plain to ALLOW condensation and let it go somewhere. BUT where do you want it to go????

You do not want "air to move".... air movement and fiberglass.... is horrible it will bypass most of the R-value...

You have to box in fiberglass even from natural convection of the cavity...

In your wood walled application with bookshelf girts, I think you picked the perfect method. Your wall system is more like that of a house.

It is a myth that you have to box in fiberglass for it to work. You don't want air to move through the insulation but on the cold side of it, that is certainly allowed. Consider an attic with loose fill or batts of insulation.
 
To avoid these ads, REGISTER NOW!
Top Bottom