To avoid these ads, REGISTER NOW!

Jacobs Chuck Restore

Status
Not open for further replies.

OldeTimeEtc

Well-known member
Joined
Aug 16, 2014
Messages
478
Location
Palm springs area in S. Calif
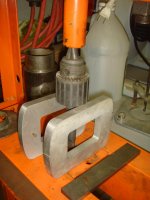
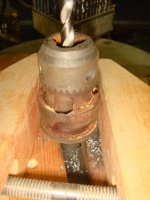
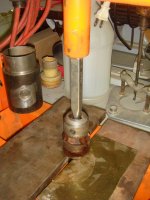
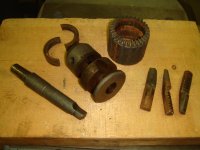
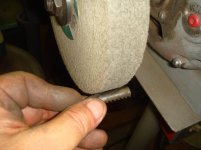
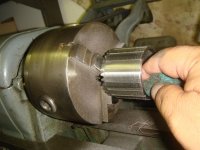
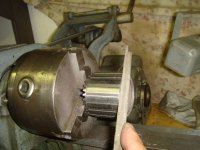
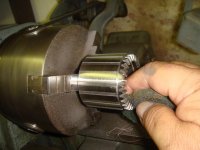
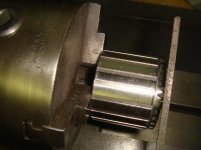
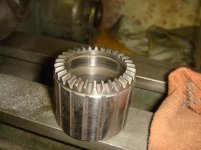
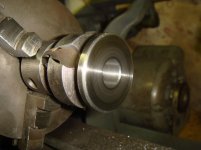
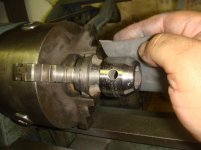
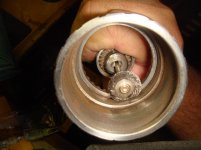
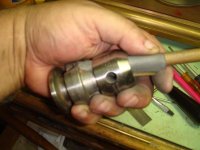
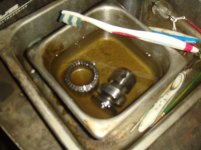
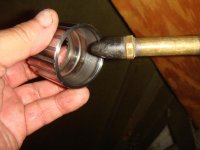
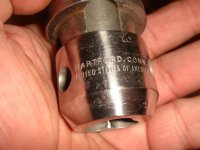
Hello everyone. Recently I visited a local swapmeet and made several tool finds which included a rusty, completely frozen Jacobs Chuck with an attached #2 Morse Taper arbor I bought for $2.
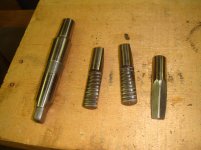
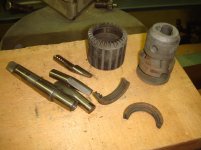
What better project to show being restored for the forum. So first let me introduce you to the Chuck.....
 

Attachments

  • DSC02505.jpg
    DSC02505.jpg
    128.8 KB · Views: 79
To avoid these ads, REGISTER NOW!
OP
O

OldeTimeEtc

Well-known member
Joined
Aug 16, 2014
Messages
478
Location
Palm springs area in S. Calif
Now most non-tool nuts and people in general would toss this in the trash. I can see the potential in this. Plus for my initial investment of $2...I had everything to gain and nothing to lose especially knowing what new ones cost. So I first set about soaking this in my rust remover bucket for a few hours. Here it is after....I could see the rust was not that bad on the outside so I'm hoping the inside is about the same or less rusty.
 

Attachments

  • DSC02507.jpg
    DSC02507.jpg
    131.9 KB · Views: 77
OP
O

OldeTimeEtc

Well-known member
Joined
Aug 16, 2014
Messages
478
Location
Palm springs area in S. Calif
Next task was removing the nut unit. Took just some light taping with a small chisel and hammer...and I mean "light taping"....not enough to damage anything or If anything was more frozen I would have gone to using a brass rod and hammer. they popped off the main body pretty easy.
 

Attachments

  • DSC02510.jpg
    DSC02510.jpg
    144.8 KB · Views: 138
Last edited:
OP
O

OldeTimeEtc

Well-known member
Joined
Aug 16, 2014
Messages
478
Location
Palm springs area in S. Calif
Next was the 3 jaws but first make sure you mark them to make sure they go back in the same holes. Better that way since they are basically "broke-in" already and best to return them to the same place. Found me a punch that worked and again some light tapping and they each slide right out. ALSO I am well aware these chucks and jaws are numbered but this is in case the numbers are worn away and unreadable which I will address later....on this chuck I couldn't even see any numbers under all the rust so mark their position as a precaution.
 

Attachments

  • DSC02513.jpg
    DSC02513.jpg
    137.4 KB · Views: 101
Last edited:
OP
O

OldeTimeEtc

Well-known member
Joined
Aug 16, 2014
Messages
478
Location
Palm springs area in S. Calif
The hard part was removing the arbor without destroying the chuck. It was pretty stuck. I looked inside the chuck with a flashlight to see if it had a center hole to the arbor....no such luck so off to my drill press to make one. Pretty simple chore to drill a small access hole thru the chuck body to the top of the arbor so i could use a punch to tap the arbor out. Unfortunately it was REALLY stuck so I needed more muscle.....off to my shop press.
 

Attachments

  • DSC02514.jpg
    DSC02514.jpg
    143.3 KB · Views: 107
OP
O

OldeTimeEtc

Well-known member
Joined
Aug 16, 2014
Messages
478
Location
Palm springs area in S. Calif
One has to be careful doing this. So as not to damage the chuck body or bend the hell out of your good punch. Also take great care in how the body is mounted on your press and the punch is straight and centered. I had a stubby punch just the right thickness to work.....not too thin and long where a press would bend it. Soaked the body with some more penetrating oil first to help. I only had to move the arbor less than a 1/16" to get it loose so I applied pressure slowly. It finally popped loose with a loud ring...scared the **** outa me. I thought I broke something.

Please note also that I did this task of removing the arbor last since it would have been impossible to remove it with the chuck completely frozen plus I needed access to the inside for drilling. Simple wedges wouldn't have worked. You might try removing the arbor first if the chuck you're restoring isn't as rusty as this one was. Simple intuition and common sense told me looking at how rusty this chuck was that it wasn't going to let go of the arbor easy.
 

Attachments

  • DSC02515.jpg
    DSC02515.jpg
    138.8 KB · Views: 88
Last edited:
OP
O

OldeTimeEtc

Well-known member
Joined
Aug 16, 2014
Messages
478
Location
Palm springs area in S. Calif
Finally the entire chuck disassembled. I then dropped these parts into my rust removing bucket before final cleaning up.
 

Attachments

  • DSC02516.jpg
    DSC02516.jpg
    139.9 KB · Views: 102
Last edited:
OP
O

OldeTimeEtc

Well-known member
Joined
Aug 16, 2014
Messages
478
Location
Palm springs area in S. Calif
While the parts were soaking in rust remover I took the arbor to my lathe to spin clean it with fine sandpaper and then a final clean polish with my Scotchbrite wheel. One thing should be noted here. I didn't sand the Jacobs taper part of the arbor and only cleaned it up with my Scotchbrite wheel since I didn't want to ruin the machined taper or remove too much metal. I also only sanded the rest of the Morse Taper very lightly just enough to remove any raised burrs or rust cancer....for the same reason.
 

Attachments

  • DSC02517.jpg
    DSC02517.jpg
    140.9 KB · Views: 95
Last edited:
OP
O

OldeTimeEtc

Well-known member
Joined
Aug 16, 2014
Messages
478
Location
Palm springs area in S. Calif
Once I felt the remaining parts had soaked long enough I removed them, rinsed them with mineral spirits to remove any water and grease and blew them dry with an air hose....outside of course. I then cleaned them on my fine wire wheel since a coarser one would ruin the machined surfaces. Then a final clean with my Scotchbrite wheel.
 

Attachments

  • DSC02520.jpg
    DSC02520.jpg
    132.8 KB · Views: 88
  • DSC02519.jpg
    DSC02519.jpg
    132.2 KB · Views: 82

HanShotFirst

Well-known member
Joined
Jun 29, 2015
Messages
846
Location
NW Nevada
Atta-Boy!!! Nice job.

I'm like you, if I see a Jacobs chuck, I grab it...I can always clean it up and do exactly what you did. In fact, the two I have for my lathe required nearly the exact treatment. Today they look and work fantastic.
 

jhnlngn

Well-known member
Joined
Aug 4, 2015
Messages
126
Very nice! I did one of these a few years ago from my old Delta DP that I restored.
 
To avoid these ads, REGISTER NOW!
OP
O

OldeTimeEtc

Well-known member
Joined
Aug 16, 2014
Messages
478
Location
Palm springs area in S. Calif
Wow what magic is in your rust remover bucket?

Metal Rescue Rust Remover Bath. I get it at Lowes but beware it will turn metal black if you leave it in too long....so read the instructions Its also reusable till it starts loosing its strength and turns jet black. Works on other metals too for removing oxides and tarnishing such as brass and copper although I use it only for rusty metals. I have others cleaners for brass and copper.

http://www.metalrescue.com/home.aspx
 

Attachments

  • Metal Rescue.JPG
    Metal Rescue.JPG
    51.6 KB · Views: 22

Davefr

Well-known member
Joined
Jan 7, 2010
Messages
11,833
Location
OR
Great restoration job!!

Is that one of the old Hartford chucks? Those are worth saving!!
 
OP
O

OldeTimeEtc

Well-known member
Joined
Aug 16, 2014
Messages
478
Location
Palm springs area in S. Calif
On to the Nut Units. I find these parts interesting because they look like a bearing with threads on the inside and if you have never seen them out of a drill chuck you'd swore they were broken. If you look closely at the one of halves on the edge where they mate together they look broken which is exactly what Jacobs does is break them in half. So they only fit back together one way.....no way you can screw up...although I know a few guys capable of even that.
Cleaning them up was easy.....a going over on my fine wire wheel and then a finish satin polish on their outside. To clean the threads I used a Foredom Tool with a small fine stainless wire wheel that fit on the inside and thin enough to clean deep down into the threads
You really need to take care of these since they are the working heart of the chuck and basically hold the whole thing together too. More to come.....stay tuned.....
 

Attachments

  • DSC02529.jpg
    DSC02529.jpg
    143.3 KB · Views: 50
  • DSC02527.jpg
    DSC02527.jpg
    135.4 KB · Views: 54
  • DSC02526.jpg
    DSC02526.jpg
    132.1 KB · Views: 56
  • DSC02524.jpg
    DSC02524.jpg
    144.7 KB · Views: 53
Last edited:
OP
O

OldeTimeEtc

Well-known member
Joined
Aug 16, 2014
Messages
478
Location
Palm springs area in S. Calif
Great restoration job!! Is that one of the old Hartford chucks? Those are worth saving!!

Thanks.....the chuck is a Jacobs Mod #6A , 0-1/2" w/ #2MT arbor. I don't think they make this exact model anymore but I see the average selling price for used ones on Evilbay are around $60 or more...the arbor would be extra. I think I made a good $2 investment :thumbup:
 
Last edited:
OP
O

OldeTimeEtc

Well-known member
Joined
Aug 16, 2014
Messages
478
Location
Palm springs area in S. Calif
Starting with the sleeve and after looking it over it had dents, scratches and gouges that needed cleaning up. So I chucked it up in the lathe and starting with the sleeve's main outside of the body I took a very flat fine file and filed the body clean again plus any metal stripped gears caused by a chuck key was eliminated and made clean and straight again. I then finished off the body with fine wet dry sandpaper with a few drops of oil to get a finer satin finish. Flipped it around in the lathe chuck to finish off the bottom too.
 

Attachments

  • DSC02539.jpg
    DSC02539.jpg
    141.3 KB · Views: 47
  • DSC02538.jpg
    DSC02538.jpg
    140.6 KB · Views: 47
  • DSC02537.jpg
    DSC02537.jpg
    140.6 KB · Views: 47
  • DSC02536.jpg
    DSC02536.jpg
    143.8 KB · Views: 44
  • DSC02535.jpg
    DSC02535.jpg
    134.9 KB · Views: 46
  • DSC02534.jpg
    DSC02534.jpg
    145 KB · Views: 49
  • DSC02533.jpg
    DSC02533.jpg
    144.4 KB · Views: 53
OP
O

OldeTimeEtc

Well-known member
Joined
Aug 16, 2014
Messages
478
Location
Palm springs area in S. Calif
While I had the sleeve spinning in my lathe I also took some scotchbrite and cleaned up the machined ring inside the sleeve being careful with just a very light cleaning and not removing any metal. This part is very important when reassembling the chuck.

Also for amateurs and professionals alike always be careful anytime your hands and especially your fingers have to be near anything spinning....a lathe, buffing wheel, grinder..etc...Look the project over real good to make sure there's no possibility of your hand or fingers getting caught anywhere. If you're not sure of what you're doing then don't do it.
These are my methods and the risks are mine alone but I am careful about anything sharp or jagged like a burr that could catch or cut something in your hand, is eliminated before working on it. Common sense goes a long way.
 

Attachments

  • DSC02540.jpg
    DSC02540.jpg
    140.3 KB · Views: 43
  • DSC02541.jpg
    DSC02541.jpg
    134.4 KB · Views: 48
Last edited:
OP
O

OldeTimeEtc

Well-known member
Joined
Aug 16, 2014
Messages
478
Location
Palm springs area in S. Calif
Last was the main chuck body that also needed some TLC. The only part of the body I filed and sanded was the outside that's seen when assembled and left the inside alone since I didn't want to add to any wear where all the working parts are located. Once I cleaned up the top of the body I flipped it around and trued up the bottom as seen in the pics....even taking a few 1000ths of an inch off the bottom because it was so dented and chewed up from abuse.
 

Attachments

  • DSC02548.jpg
    DSC02548.jpg
    139.6 KB · Views: 53
  • DSC02547.jpg
    DSC02547.jpg
    136.1 KB · Views: 50
  • DSC02546.jpg
    DSC02546.jpg
    140.9 KB · Views: 49
  • DSC02545.jpg
    DSC02545.jpg
    137.3 KB · Views: 48
  • DSC02543.jpg
    DSC02543.jpg
    140.1 KB · Views: 47
  • DSC02542.jpg
    DSC02542.jpg
    140.4 KB · Views: 47
OP
O

OldeTimeEtc

Well-known member
Joined
Aug 16, 2014
Messages
478
Location
Palm springs area in S. Calif
The sleeve I finished cleaning up its inside with my Foredom tool and a small wire wheel to reach and remove any residual rust from all its nooks and crannys.
 

Attachments

  • DSC02549.jpg
    DSC02549.jpg
    132.3 KB · Views: 44
OP
O

OldeTimeEtc

Well-known member
Joined
Aug 16, 2014
Messages
478
Location
Palm springs area in S. Calif
The last thing I did with the main body was wrap a small piece of find sandpaper and made sure the sliding holes for the jaws where cleaned of any light rust or burrs.
 

Attachments

  • DSC02550.jpg
    DSC02550.jpg
    125.3 KB · Views: 47
OP
O

OldeTimeEtc

Well-known member
Joined
Aug 16, 2014
Messages
478
Location
Palm springs area in S. Calif
I then took both parts for a soak in mineral spirits to remove any metal dust or oil and blew them dry with compressed air.
 

Attachments

  • DSC02552.jpg
    DSC02552.jpg
    127.2 KB · Views: 39
  • DSC02554.jpg
    DSC02554.jpg
    134.8 KB · Views: 36

Dennis Leigh Henry

Well-known member
Joined
Apr 8, 2013
Messages
6,302
Location
South Central, IN USA
Excellent thread.. I'm always concerned when I see a restore with serious chips being made.. but evidently in this case it was necessary. I've never done this, but now I'll be looking for a chuck for cheap in the future, so I can have this same experience.. Nice Job!
 

Todd.Brock

Well-known member
Joined
Jul 15, 2008
Messages
4,250
Location
Cincinnati
I have a Jacobs chuck in a box that I thought was ruined because of the "broken" ring you described. It was in pieces when I bought my drill press. I ended up swapping out with a Rohm. Now you got me curious!
 

lametec

Well-known member
Joined
May 5, 2008
Messages
2,099
Location
Michigan
Next was the 3 jaws but first make sure you mark them to make sure they go back in the same holes. Better that way since they are basically "broke-in" already and best to return them to the same place.

Not only best, but vitally important, or your jaws will not center when tightened. This isn't because they're "broke in", but because the 3 jaws are manufactured different. The threads on the jaws are offset from each other, so that the jaws will line up even though they're at different places inside the nut.

Here's a picture that shows the different thread grinds on the jaws:
jaw-profile-number.png
 
OP
O

OldeTimeEtc

Well-known member
Joined
Aug 16, 2014
Messages
478
Location
Palm springs area in S. Calif
Someone jumped the gun about something I'm already aware of but hadn't had the chance to address yet. So I guess I'll have to pretend its not there or just toss over 2 hours of my work away......so I guess I'll try to continue...
 
Status
Not open for further replies.
To avoid these ads, REGISTER NOW!
Top Bottom