To avoid these ads, REGISTER NOW!

Jacobs Chuck Restore

Status
Not open for further replies.
OP
O

OldeTimeEtc

Well-known member
Joined
Aug 16, 2014
Messages
478
Location
Palm springs area in S. Calif
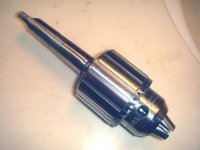
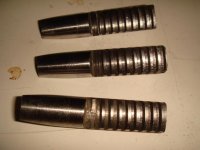
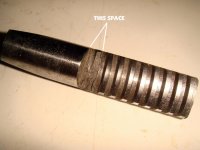
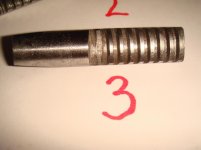
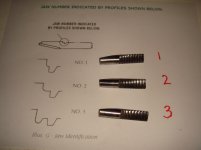
Starting assembly - before any grease is applied I recommend a dry run assembly of the jaws and nut unit. So first order of business is to note what hole position each jaw sits in. First check out the illustration I DLed from Jacobs website. You will notice that although each jaw looks the same there is a small difference at the end of the threads on the business side of the jaws. If you look at the jaws from their side you will see what the illustration is showing..somewhat. I found it doesn't look quite exactly like the drawing BUT...if you will not the spaces are get wider on each jaw.....starting from 1 which is the narrowest to 3 which is the widest. Take a piece of paper and number it like I did.......makes it easier to remember which is which once you identify each one....or simply number them with a sharpie.
 

Attachments

  • DSC02565.jpg
    DSC02565.jpg
    130.7 KB · Views: 29
  • DSC02564 copy.jpg
    DSC02564 copy.jpg
    133.8 KB · Views: 31
  • DSC02563.jpg
    DSC02563.jpg
    133.6 KB · Views: 27
  • DSC02562.jpg
    DSC02562.jpg
    132.7 KB · Views: 32
Last edited:
To avoid these ads, REGISTER NOW!
OP
O

OldeTimeEtc

Well-known member
Joined
Aug 16, 2014
Messages
478
Location
Palm springs area in S. Calif
Now that you have the jaws identified, take a good look on the main chuck body in front of each jaw's position hole and you'll see a number.....each hole should be numbered for each jaw so you know where they go back but just in case the numbers are worn away or unreadable you can fall back on having marked their positions earlier that I mentioned.
In fact on my chuck the number 1 is completely worn away but since 2 and 3 are still readable there's no doubt where #1 goes. If only one number is visible note that the numbers travel around the body clockwise if you're looking at the body from the top....least this is what I've found on several chucks I have already restored...best to not assume and mark them to be sure.
 

Attachments

  • DSC02567 copy.jpg
    DSC02567 copy.jpg
    139.9 KB · Views: 34
Last edited:
To avoid these ads, REGISTER NOW!

Ryan

Administrator
Staff member
Joined
Jan 26, 2006
Messages
5,727
Location
Texas/Hawaii
Someone jumped the gun about something I'm already aware of but hadn't had the chance to address yet. So I guess I'll have to pretend its not there or just toss over 2 hours of my work away......so I guess I'll try to continue...

Hey man, this is a great tutorial... However, I think maybe you are misconstruing "lametec's" post. I don't believe he is trying to hijack your thread at all. He is simply trying to add to it and be helpful.

This is a community... and we try to help each other out here.
 
OP
O

OldeTimeEtc

Well-known member
Joined
Aug 16, 2014
Messages
478
Location
Palm springs area in S. Calif
SORRY FOLKS.......DUE TO DIFFERENCES OF OPINIONS WITH THE ADMINISTRATOR HERE I WILL NO LONGER BE DOING ANY MORE TUTORIALS or even finish this one although I was going to continue on restoring a ball bearing super chuck. . MY APOLOGY TO EVERYONE ELSE HERE....if you have any questions about the restorations feel free to PM me. Here is a pic of the finished chuck.
 

Attachments

  • DSC02592.jpg
    DSC02592.jpg
    128.3 KB · Views: 45

Ryan

Administrator
Staff member
Joined
Jan 26, 2006
Messages
5,727
Location
Texas/Hawaii
SORRY FOLKS.......DUE TO DIFFERENCES OF OPINIONS WITH THE ADMINISTRATOR HERE I WILL NO LONGER BE DOING ANY MORE TUTORIALS or even finish this one although I was going to continue on restoring a ball bearing super chuck. . MY APOLOGY TO EVERYONE ELSE HERE....if you have any questions about the restorations feel free to PM me. Here is a pic of the finished chuck.

Well, that escalated quickly... Wow. Good luck to you and sorry to disappoint.
 
Status
Not open for further replies.
To avoid these ads, REGISTER NOW!
Top Bottom