To avoid these ads, REGISTER NOW!

jar944's fabrication thread

jar944

Well-known member
Joined
Jul 26, 2010
Messages
5,898
Location
Northern VA
I figured this would be a good place to post the stuff I build in my garage.

Rare pic of the entire garage. This before I expanded it and then I filled it with even more ****.

 
To avoid these ads, REGISTER NOW!
OP
J

jar944

Well-known member
Joined
Jul 26, 2010
Messages
5,898
Location
Northern VA
So this was something I saw on another forum and decided to copy. Its a cross between a factory KTM engine stand and one Glen of GWR racing in belgum had built.

It makes tearing down or assembling a bike engine when its out of the frame a much easier.

I just used some scraps I had laying around. The indexing wheel was cut on my lathe then drilled using the bolt hole function in my mill. That seemed to be about the slowest way I could have done it.


Last edited:
OP
J

jar944

Well-known member
Joined
Jul 26, 2010
Messages
5,898
Location
Northern VA
This was a fun one. One of the guys on KTM talk realized you could fit the older RFS engines onto the current (at them time) chassis. The problem is it doesn't quite fit.

The cradle needs cut, and the yoke needs widened and raised


The second problem is that the coolant runs through the center of the frame and and dumps right into the head of the taller engine.


so I made a 90 degree adapter (that looked like ****). Honestly it was too ugly to run on the bike.


Which lead me to make a aesthetically improved version. Its a interference press fit to the original coolant down tube. Mostly because I only had a DC tig at the time.


The final hurdle was the swingarm. The old RFS engine is 18mm wider at the swingarm pivot then the engine it was replacing. The original builder made up a drill powered bushed boring bar (think line boring). I did the same but had excessive chatter and a horrible looking cut when I tried to do it by hand. I assume my tool bit geometry just wasn't up to snuff.

This lead me to a slightly unconventional lathe setup, using the original boring bar I made.


It looks strange but it worked well enough to get the job done.


The rest was just bolt together and not very interesting

hybrid on the left, stock bike on the right


I built a 2nd bike, and realized it was easier to just "swap" cradles from the respective frames. The nice thing about KTM is their measurements seem to stay close over the years.

rfs cradle on a SXF frame


Last edited:
OP
J

jar944

Well-known member
Joined
Jul 26, 2010
Messages
5,898
Location
Northern VA
So one of groups I ride with is mostly made up of hill climbers. These guys typically turn up their noses at anyone running swingarm extensions, or "cheating" as they call it. This is all just for bragging rights, so a even (relatively) playing field makes it fair. That worked well for years, until one of the guys built a extended bike. Not to be out done I decided I needed some swingarm extensions myself to level the field.

I started with 3 feet of 1.25x2.5 6061.


Roughed out


Finishing


Test fit


Finished, after adding a chain guard mount and through holes for the bolts


Most of the time they work fantastic


But if I don't do my part...
 
Last edited:
OP
J

jar944

Well-known member
Joined
Jul 26, 2010
Messages
5,898
Location
Northern VA
Some friends and I had plans to go to punkin chunkin and I wanted to bring by girlfriend (now wife). The only problem was she was and still is, not a fan of cold weather. November in Delaware isn’t known for its tropical weather so I had a problem. After looking around for a few weeks trying to figure out a solution I found a unissued military tent. It was the "arctic" 10 man version complete with liner, center pole and a stove jack. So I ordered it. Then I realized that since it already had a stove jack a woodstove would be a perfect addition, however being cheap I couldn’t just buy one, and being a procrastinator I couldn’t start building it until a few days before we were set to leave.

as an aside if anyone had an inclination to build your own wood stove I recommend "Wood Stoves: How to Make and Use Them" by Ole Wik.

I think it came out well, especially considering I had no plans when I started and ended up working on it all night into the morning for a couple days before we left. I didn’t think to take any construction pics since I was in a hurry.
20121204_214251Medium.jpg
20121101_224559Medium.jpg


It was made of whatever I had laying around my garage, mostly 3/16" plate offcuts, some server racking, and a single piece of sheet metal that happened to be some 4130 from another project. I had 6 of the 3/16 that were about 11.5x23" so that was the easy size to make the stove. since all the offcuts had a corner cut off I used that for the exhaust vent and an internal baffle bypass/damper.

Baffle and bypass/damper lever
20121204_214438Medium.jpg

Bypass Closed
20121204_214309Medium.jpg

Bypass Open
20121204_214327Medium.jpg

Latch and door seal
20121204_214355Medium.jpg

Catch, this is cut at an angle to pull the door tight when its shut
20121204_214407Medium.jpg


It kept it 80 degrees inside the tent all weekend even though the wind was a consistent 15mph+ and the temps were in the 30’s it was also big enough to only need stoking once during the night, and heavy ehough to hold some heat even after the fire died down.
IMAG1611.jpg
20121102_180056Medium.jpg
 

xyster101

Well-known member
Joined
Jul 3, 2013
Messages
640
Location
Upstate NY
That tent is hilarious! I love the build on things. I am one to never sit still and am always making things. I do a lot with wood and want to do more metal. Metal and wood working areas don't really mix well with oil, saw dust and sparks. A mill would be awesome. Did you use CAD or hand work to make the longer arms?
 
OP
J

jar944

Well-known member
Joined
Jul 26, 2010
Messages
5,898
Location
Northern VA
That tent is hilarious! I love the build on things. I am one to never sit still and am always making things. I do a lot with wood and want to do more metal. Metal and wood working areas don't really mix well with oil, saw dust and sparks. A mill would be awesome. Did you use CAD or hand work to make the longer arms?

Ha yeah, that tent got a lot of questions, and then inside tours from curious people camping around us. The swingarm extensions were made with some rough measurements written on a post-it. I had the general design in my head. So I just kind of made it up as I went along.

Its funny you mention wood, I avoided woodwork as much as possible. I Had been around it all my life ( my dad is a carpenter, and my grandfather was a cabinet maker and general contractor.) I just preferred working with metal. That all changed when I started remodeling my kitchen. I started buying tools to have a well equipped wood shop.
 
OP
J

jar944

Well-known member
Joined
Jul 26, 2010
Messages
5,898
Location
Northern VA
In early 2012 I got a good deal on a Craigs list CR 500. already had a 08 ktm roller in the garage. I had always wanted a cr500, and after doing two other bike engine swaps it seemed like a good idea.

The bike was a mess, had sat disassembled in a damp (and possibly flooded basement) for 10 years according to the owner.


When I got it home I dropped the cr5 engine into a 450sxf frame just to see how much work I had. other than some mount interference it wasn't too bad of a fit.
IMG_1255Medium.jpg


So at that point I cut the old mounts cut out and cleaned up the frame, then welded some back in positioned for the 500 engine
IMG_1289Medium.jpg


With the engine fitting in the frame I decided to tear it down for a full rebuild and long overdue cleaning. The head and cylinder were bead blasted. the cases were initially washed in my parts washer, then into a ultrasonic cleaner and finally media blasted using crushed walnut.

IMG_1440Small.jpg

IMG_1506Medium.jpg


Because the cr5 engine is much narrower then the original KTM engine new rear case bushings were turned to position the swing arm (and thereby rear sprocket) in the correct location
IMG_1507Medium.jpg


The coolant pluming was also a issue, the stock cr5 has two outlets in the head and the KTM has one. the solution was to bore out the head and press in an over sized outlet with a larger cross section than both original outlets combined.

IMG_1673Medium.jpg


IMG_1565Medium.jpg


One issue I ran across was the ID of the silencer was too small (it was off a 250) because of this I ordered a larger 1.25" ID perforated core and replaced it. It also needed a new mid-pipe to clear the KTM. It was supposed to be a temporary solution, but its been there for a few years now
IMG_1677Medium.jpg


The rear pipe mount, this picks up the stock KTM mounting point.
IMG_1680Medium.jpg


The pipe had to be cut back to the end of the cone and the flange and rear mount welded in to fit the frame.
IMG_1684Medium.jpg


view of the exhaust once it was completed
IMG_1686Medium.jpg


The completed head stays. These are made from some .250" aluminum since it was what i had laying around. the right plate is flat and the left has a dog leg bend in it to match the different thicknesses of the frame and head mount.
IMG_1679Medium.jpg


the bike as it sat in spring 2012, white is a terrible color for a dirt bike.
IMG_1690Medium.jpg


current pic
 
OP
J

jar944

Well-known member
Joined
Jul 26, 2010
Messages
5,898
Location
Northern VA
I decided to install a rekluse clutch into my cr500, the only problem was they do not make the model clutch I wanted for that bike. They do make one that will fit (mostly) however the clutch wedges are too light for proper lockup. The biggest hurdle (or so I thoughtat the time) was the lack of an available (deeper) clutch cover from the recluse company that would fit thecr 500. I knew I needed to fabricate one for the project to actually move forward. Unfortunately making one took a back seat to a bunch of other things and the project just sat collecting dust.

Fortunately that gave me time to become familiar with the principals behind its operation and better understand the requirements for it to work on a 500.

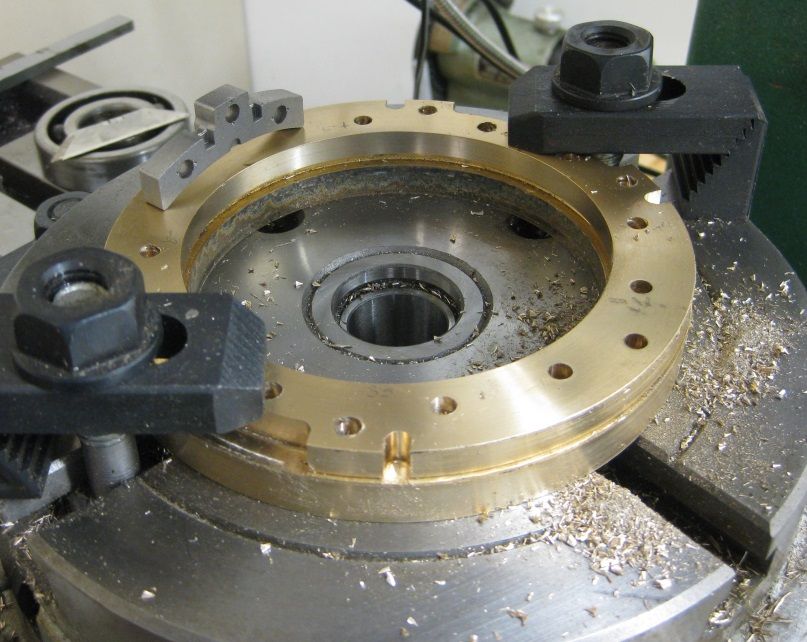
measurements from the exp clutch "ring":

Total wedge weight 159g (factory heavy wedges)
wedge spacing diameter (centers) min 124mm, max 131mm
ramp angle 18.5 deg
opposition spring force (not measured)

engine parameters
primary reduction 2.52:1
idle RPM 1500 rpm


F<sub>c</sub> = m v<sup>2</sup>/r
= m (n 2 ? r / 60)<sup>2</sup>/r
= 0.01097 m r n<sup>2</sup>

where
n = revolution per minute
Or in this case

.01097*m*r*(n*n)
m = .0159kg
r = .062m
rpm = 595

.01097*.0159*.062*(595*595) = 38.3N

Which lead me to wonder how one would calculate how much torque a clutch could theoretically hold (hello unform wear theory)

Uniform wear theory


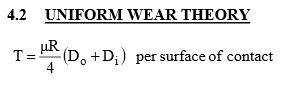
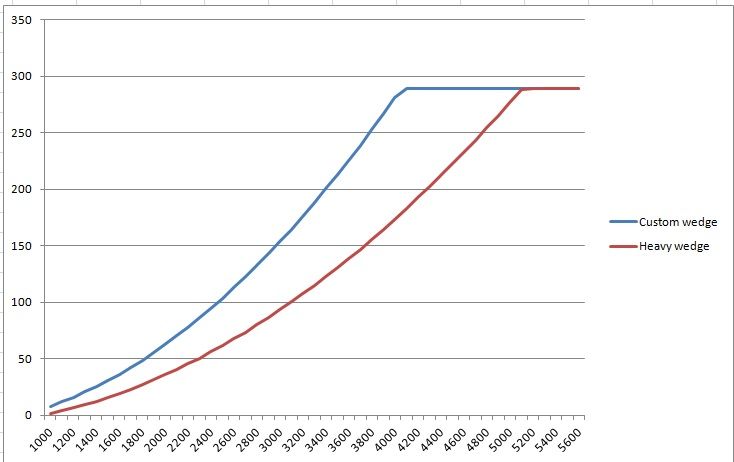
Once I had that I was able to put together a spreadsheet to play around with the clutch parameters


With that done I came to the conclusion that the factory "heavy" wedges were going to slip too much at low RPM. I needed more weight in the wedges but being somewhat limited on space the only viable method in adding mass was to use a more dense material. I had wanted to use a machinable tungsten but it was deemed too expensive. The next best option I could think of was using bronze or brass and making them slightly larger.

I picked up a brass "drop" from ebay for $7 and started machining


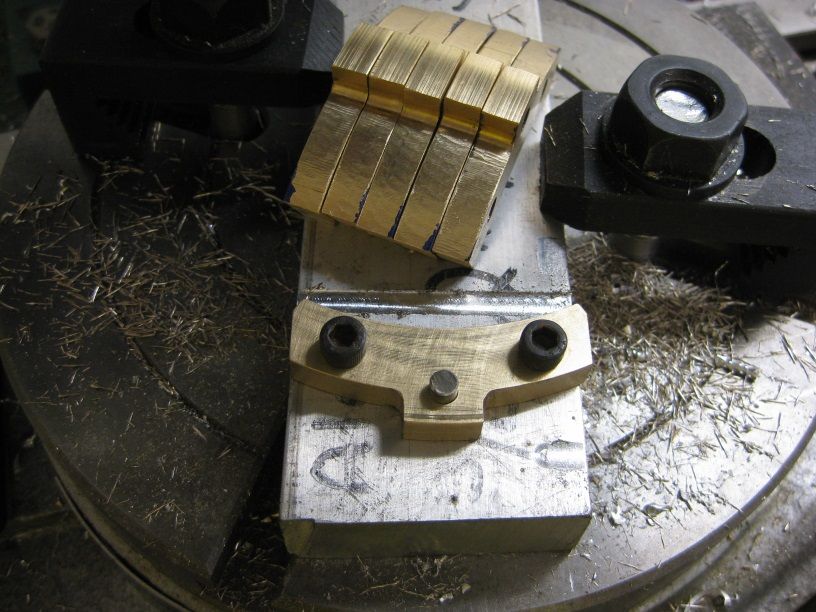
custom wedge finished on top, the original wedge on the bottom


Once they were finished I weighed them and plugged the numbers into my spreadsheet.


Installed in exp ring


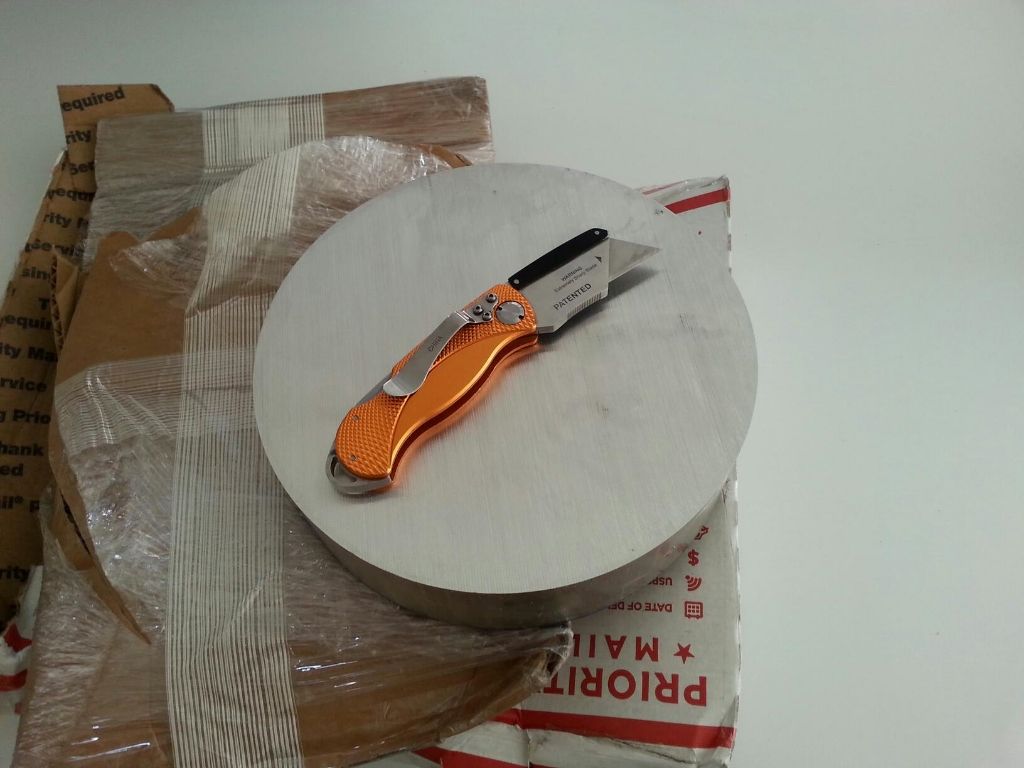
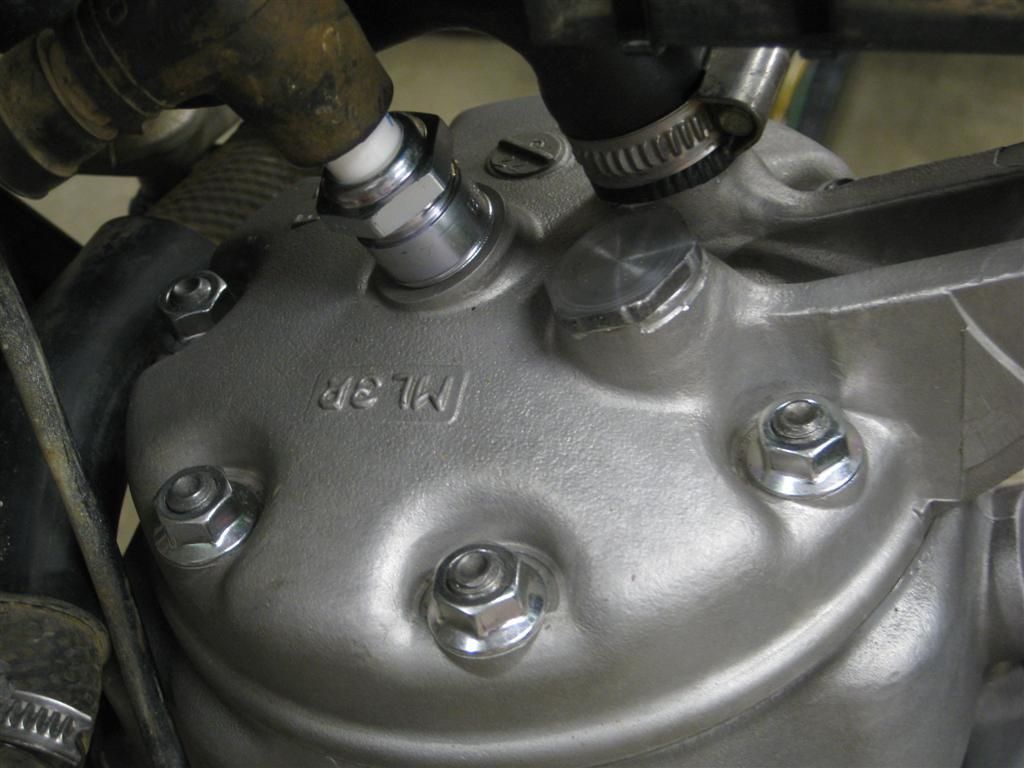
With that done i still needed to make the clutch cover. So i ordered a chunk of aluminum and got started machining it to fit.


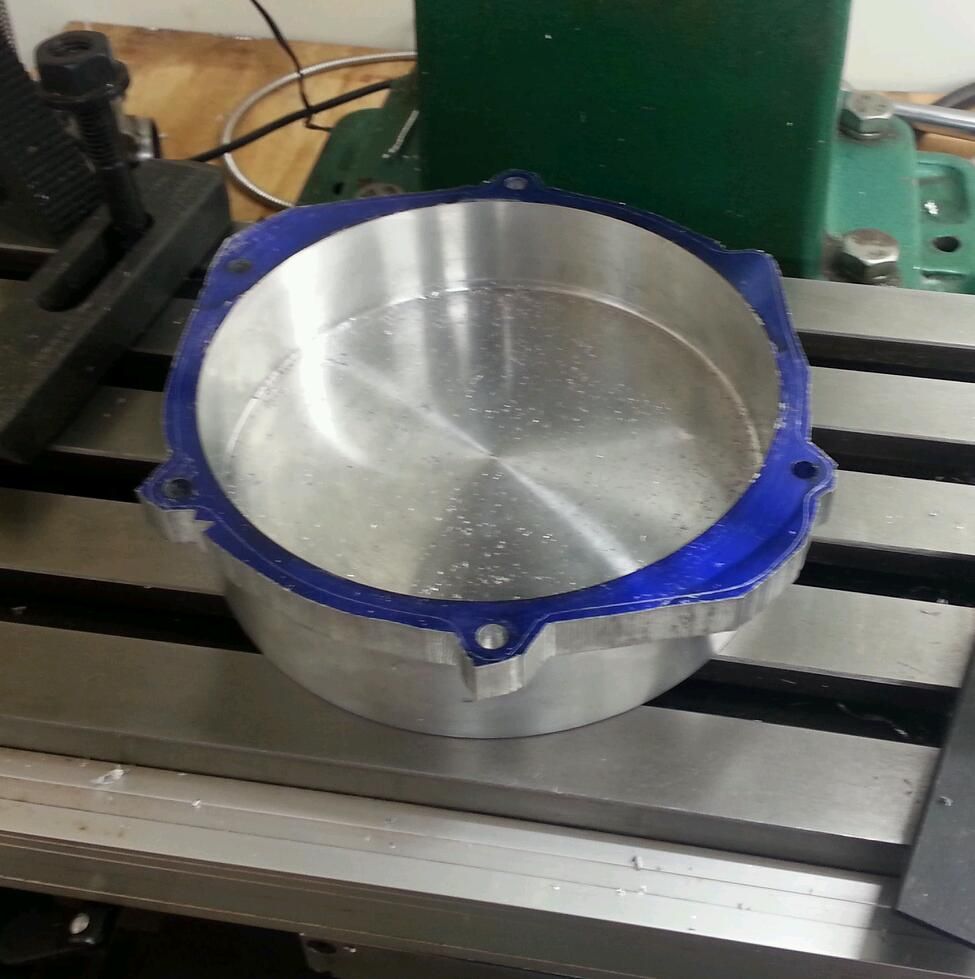
after final machining


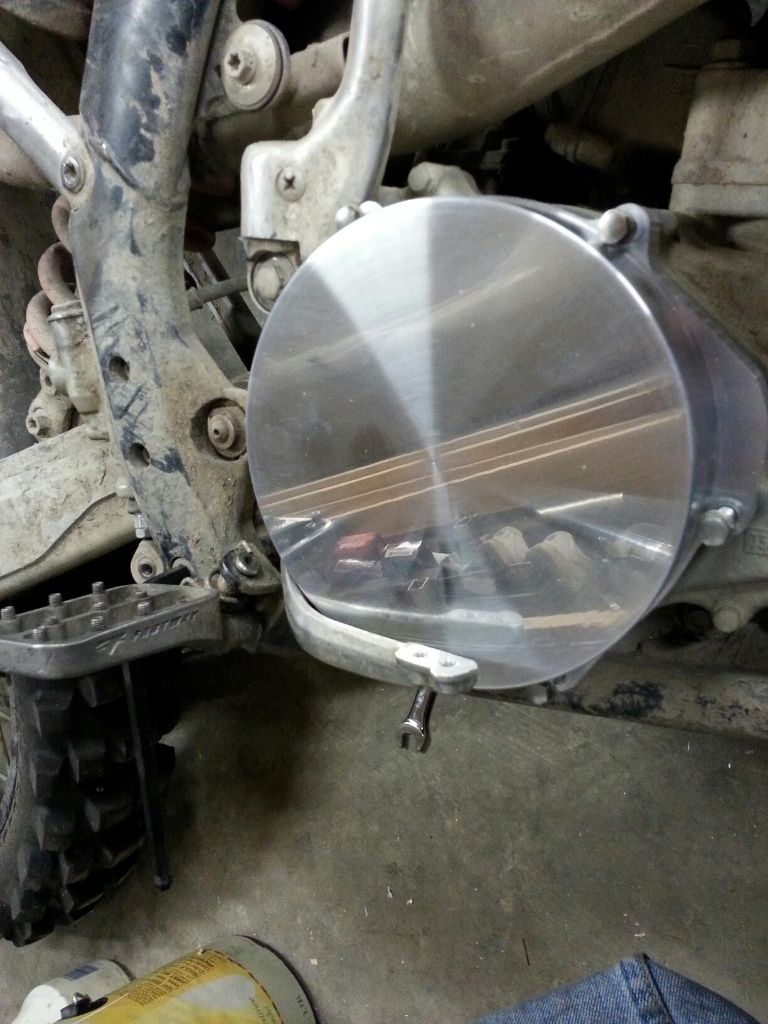
and with the cover finished, the clutch installed and after a test ride.
 
Last edited:
OP
J

jar944

Well-known member
Joined
Jul 26, 2010
Messages
5,898
Location
Northern VA
I bought my house in 2009. At the time I had all sorts of plans for remodeling/updating it. It was a base model builder grade townhouse with no upgrades from the original owners who purchased it as a rental/investment property. That was fortunate for me since the lack of upgrades, and the housing marked being in the gutter, allowed me to get it for a decent price.

I planned on doing a full kitchen/main level remodel. New floors, appliances, cabinets, trim etc... but I would rather be in the garage working on something else so it was postponed for a few years (actually I would never have gotten around to it if not for my wife)

So in the spring of 2013 I *cough* we decided to start on the kitchen.

That could have been simple, go to the store out pick out some cabinets and have them installed... I'm to cheap for that, and I don't plan on living here for very long. After some thought and discussions I decided I wasn't going to replace them, I was just going to paint them. The only problem was I didn't like the layout, and Ive never seen DIY painted cabinets that didn't look like DIY painted cabinets.

This was what the kitchen looked like the day I moved in


Since I didn't like the layout of the cabinets I decided I would move them around and change a couple of the upper cabinets. my plan was build new boxes for two of them that would allow me to reuse the doors. By doing that I thought I could get an acceptable layout. The only problem was I only had a circular saw, and a pos sliding miter saw from HF.

My temporary solution was to drive to my Dads house for the weekend and get him to help me build the two cabinets.


my dad setting the fence on his saw


That actually worked and we almost got both boxes completed over the weekend.


Realizing driving 600 miles round trip wasn't going to be a long term solution I found a table saw locally on Craigslist and picked it up.


It needed some minor adjustment


and some less than minor tune up


Last edited:
OP
J

jar944

Well-known member
Joined
Jul 26, 2010
Messages
5,898
Location
Northern VA
Once I replaced all the bearings in the saw it performed well enough to finish the cabinets I started. I ended up making new face frames. I was planning on reusing the old ones, just like the doors.


about the same time I realized I needed another cabinet for the layout to work so i made another, this time with my newly acquired tools

i used 1/2 birch veneer from Home depot, absolutely the worst plywood i've worked with yet. as soon as you cut it it warps and bows.


Fortunately it was a small cabinet so I was able to work around the plywood.


So the cabinet carcass was complete, but I had the problem of needing a door. not just any door a raised panel door that had to match the existing cabinetry.

I had never made a raised panel door, or any door for that matter. My solution was to buy some routers and a raised panel bit set and try to make a door. The problem i ran into was the rail and stile bit set didn't match the detail of the existing doors at all. my fault i assumed too many things. Somewhere around this time I was watching a youtube video of someone making a beaded frame cabinet and it hit me that I didn't need.

so with lots of trial and error i eventually made something that looked like a door


Now I only needed to paint everything.
 
OP
J

jar944

Well-known member
Joined
Jul 26, 2010
Messages
5,898
Location
Northern VA
Somewhere around that time I snapped the lower guide off my 4x6 bandsaw. It was partly my fault and partly the poorly designed/made casting. I ended up salvaging the upper guide section by milling the broken section flat and then machining a new lower section from some aluminum i had laying around.


To avoid these ads, REGISTER NOW!

NASTYZEN

Well-known member
Joined
Jun 11, 2010
Messages
2,823
Location
St-Colomban,Que. Canada
I'm enjoying this thread Jar. You do some fine fabricating.:thumbup:
I have that same saw of yours. I've had it for about 23 years already...
They need a fabricator to run right, but they can be ultra precise.
 
OP
J

jar944

Well-known member
Joined
Jul 26, 2010
Messages
5,898
Location
Northern VA
cool projects! with a Rekluse in my fe570 was the best bike i ever had.

Thanks. Ive toyed around with the idea of getting a 650 berg, they seem like the perfect bike for people who like to tinker.

I really like the rekluse, and I'd say my Cr500 is by far my favorite "do all" bike. The only time I don't care for it is hill climbing. It makes

excellent documentary
I really enjoyed it

Thank you.

Interesting thread, looking forward to more!

Thanks. lots more to come

I'm enjoying this thread Jar. You do some fine fabricating.:thumbup:
I have that same saw of yours. I've had it for about 23 years already...
They need a fabricator to run right, but they can be ultra precise.

Thanks. Your thread was one of the reasons I decided to start posting here. :beer:

Looking back, it seems strange but that band saw was the first power tool I ever bought.
 
OP
J

jar944

Well-known member
Joined
Jul 26, 2010
Messages
5,898
Location
Northern VA
getting back to the kitchen remodel...

I needed to paint all the cabinets so I thought spraying would be the easiest solution. I already had a Wagner hand held sprayer (that I never used) so I gave it a try. I then remembered why I never used it.

That lead me to buy an airless setup, as I couldn't seem to find (at the time) a setup that would allow me to spray latex or in my case actually a water-born acrylic urethane.

And what was jokingly called the "kill room" by one of my dexter watching friends.


You don't realize how many doors you have in a kitchen, until they are all over your house.


My wife was not a fan of the 2 tone look lower cabinets


I was actually surprised how well the paint laid, and how effective the grain filling (these are oak) worked.


I also needed to build a filler section to take up some space in the new layout. I had seen some of these in the store displays and figured I could build one cheaper. the fact that the uppers are 42" helped in that cost difference.


I wasn't totally happy with how I built it so I made another one (then used both) this one was installed in a normal cabinet though/


It sat this way for awhile.


The plan was to change the 4 cabinets around the sink to glass doors so I cut out the center panels, and made some muntins


and then it sat like this for awhile


One of the things I really didn't like in the original kitchen was how small the island was. my initial plan was to add a wine (beer) fridge and expand the island 24" in length. I ended up deciding against the fridge and planned on making a 4 drawer cabinet. Just because I'd never made a base cabinet, or drawers didn't seem like a good reason not to.


and installed after shifting the cabinet order and entire island location to have equal distance to the fridge wall and sink wall (it was 10" different between the them originally)
 
OP
J

jar944

Well-known member
Joined
Jul 26, 2010
Messages
5,898
Location
Northern VA
I picked up a delta wood shaper a couple weeks ago, after getting it home I noticed the spindle had more runout than I thought it should. The only issue is that most a lot of parts are NLA from delta. Fortunately the grizzly clone takes very similar spindles, only the bottom shank diameter, and drawbar thread size is different.

And the grizzly versions are $12.. I like cheap. I had a free couple of minutes tonight, so I turned down the shanks of the new spindles I ordered.


New 1" spindle


Original 3/4" spindle


New 3/4" spindle


Close enough for me
 
OP
J

jar944

Well-known member
Joined
Jul 26, 2010
Messages
5,898
Location
Northern VA
I had a stack of dismantled pallets...er... I mean unfinished planter box that I promised my wife would be done (before we planted the herbs)..

so I figured it was about time to finish (or start) building it. The only issue is the wood is fill of nails, and I wasn't about to kill a good sawblade for this. so i just used a jig saw for all cuts. I think it came out ok, and she is happy so that was all that mattered.


Stooge

Well-known member
Joined
Mar 24, 2013
Messages
3,533
Location
South Shore, MA
I like it! very cool/ interesting thread and a lot of varied talents to say the least! thank you for sharing.
 
OP
J

jar944

Well-known member
Joined
Jul 26, 2010
Messages
5,898
Location
Northern VA
Thanks. I used to hate working with wood, but don't mind it as much now. I still prefer metalwork though.
 
OP
J

jar944

Well-known member
Joined
Jul 26, 2010
Messages
5,898
Location
Northern VA
Some more of the kitchen.

Island bead-board frame and panel install


installing the base


at that point it was almost done, except for the sink, granite and back-splash.
 
OP
J

jar944

Well-known member
Joined
Jul 26, 2010
Messages
5,898
Location
Northern VA
I bought a home depot rental saw this past sept for $100 in non running condition. it was missing the handle and a coupe screws.

rps20141004_184705_186_zpsvftdsniy.jpg

I got it home, disconnected the visibility broken kill switch and started it right up. Obviously the rental dept had qualified individuals working there.

rps20141004_184757_509_zpsuvve4quz.jpg

I needed the saw for the next day, so I decided the only way it was going to function was to fabricate a handle. I also thought I should finally use by tubing bender that has been sitting unused in a box for 7 years.

rps20141005_015208_535_zpslflowzlf.jpg

I can say it worked well enough.
rps20141005_173911_842_zpsz1notdgu.jpg

I found I really like the saw, but it had a couple issues.

1. It wasn't oiling the chain very well.
2. It marked its spot.

#1 was easy (or so i thought) it was a burned up pump drive
rps20141012_100048_963_zpsjgz4neph.jpg

#2 Is a known issues with this model. The problem is there is no barb on the pump output. It relies on a compression to seal the pump to the line. So I added a barb.

rps20141013_220948_342_zpsv70pia2v.jpg

rps20141013_221029_847_zpsbtleiiue.jpg

That was all well and good but the more I researched, the less impressed i was with the pump design, it had some known flaws the limited the effective bar length to 28-32" depending on the individual pump. I set out to increase the output. It turned out it was relatively easy.

I machined a steeper 25 degree angle on the pump rotor for more displacement (excuse the wonky setup) that gave me more travel
rps20141014_211800_zpsvvvnuthd.jpg

I also machined a new oil control "bolt" to match the rotor. This should also solve the problem of the original plastic bolt wearing down / compressing.

rps20141013_221233_148_zpsbfiydl6j.jpg

rps20141013_221325_zpsauy7jaot.jpg


and wile i'm in there I might as well add a larger bore.

rps20141014_175253_364_zpszpoqsmi5.jpg

and maybe port it
rps20150216_110024_665_zps59uclblj.jpg


Though you should watch out as they tend to multiply
rps20150215_160813_272_zpssclwbaze.jpg

rps20150414_091720_197_zpstm4o13qw.jpg

so far the modifications seem to work well
0153022298573755_8411111670696175936_n_zpsc3g0jzqh.jpg

rps20141223_084533_267_zpsg2hpavwl.jpg


The saw works well as a splitter too.
rps20150506_072323_328_zpsmyy9fmue.jpg
 

bonneyman

Well-known member
Joined
Apr 22, 2010
Messages
8,759
Location
Desert SW
There's another guy on the forum who does wood turning. I'd bet he'd kill to have that chunk of stump for source material!:D
 
OP
J

jar944

Well-known member
Joined
Jul 26, 2010
Messages
5,898
Location
Northern VA
not really fabrication again but all i've been working on lately is my house (except a emergency shear pin for a fence post auger)

My wife bought three wooden spatulas from William$ $onoma... I figured I could do cheaper

Original $30 spatula


some figure


the new "set" next to the $100 set going back
 

bonneyman

Well-known member
Joined
Apr 22, 2010
Messages
8,759
Location
Desert SW
Great work on those salad implements.

And - re-reading the thread - I noticed your retractable spice rack. That set-up is sweet!
 
To avoid these ads, REGISTER NOW!
Top Bottom