You are using an out of date browser. It may not display this or other websites correctly.
You should upgrade or use an alternative browser.
You should upgrade or use an alternative browser.
Jeep garden tractor project
- Thread starter Don Campbell
- Start date
OP
Don Campbell
Well-known member
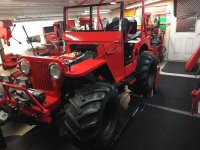
Over the years you could say I do ( All of the above ) lol Most of the time it's each day I just tackle the next phase of the project. I know that sounds crazy and very unorganized but I have always done that. If I over think it that used to stop me from even starting a project. Sometimes I mess up and have to go back and redo stuff because it doesn't look right. I use very few measurements . Often just the overall length width and height and then I figure the scale from those three figures. Everything else I just guess at. This Jeep is one big guessing project. I only used the wheelbase this time. Everything else I just built from the width of the tires and how I wanted it to look . I did see the measurements of the old Willys Jeeps but my Jeep is not any of those specs. I have been very lucky over the years building well over 200 scratch built projects and 99.9% of them looked right when done. I just love puttering .
OP
Don Campbell
Well-known member
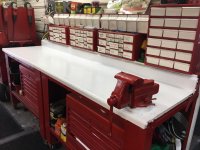
Didn't get to the shop much yesterday but I did get the new windshield frame parts painted and the new step . I also painted my main workbench as it was getting pretty bad. I decided I do not like the hood scoop . I think it takes aways from the old Willys look. So that will come off and be filled back in. I'll route some air to the engine another source. 
Attachments

OP
Don Campbell
Well-known member
Todays pics show the hood removed and the hood scoop gone and me spot welding the piece of metal I cut out a few days ago back in place. I like it so much better without the scoop. Later I will do the body work and get it painted and back on the little Jeep . I worked on some little windshield wipers too yesterday for a little more detail for the go cart. I also did my first steps for the matching trailer. Painted the rims and got the spindles around. The trailer should get built during the winter too.
Attachments


LX-Markham
Well-known member
Wow! Such a cool project! Looks like a ton of fun.
 on the fab skills
on the fab skillsLink or pics to this "old" project? Curious about the grader. I spent the summers in Goderich (ON) where they used to make the Champion graders. Used to see them road testing past the farm all the time.... my old grader project.
OP
Don Campbell
Well-known member
It's been a couple years since I built a project so this is such fun . Not sure if any threads would still be here from the grader project. I built a couple Champion Graders years ago and that prompted me to build this grader until I decided to turn it into a jeep go cart, ha,ha.
Attachments
OP
Don Campbell
Well-known member


Rewind97
Well-known member
I built a couple Champion Graders years ago and that prompted me to build this grader until I decided to turn it into a jeep go cart, ha,ha.
Were those from a kit or did you build them from scratch?
OP
Don Campbell
Well-known member
I built over 200 models over the years and they all started with a flat piece of sheet metal. Many people thought they might be from a kit. I hand shaped all the parts. I had so many fun years in the workshop building them. I still get people wanting me to build them something special . It was great fun but I have more fun puttering, ha,ha.
Roundhouse
Banned
- Joined
- Dec 20, 2017
- Messages
- 507
Very cool project
I got the body work done on the hood and slapped some paint on it . Nothing fancy but it looks so much better with no hood scoop. I also made the right side step , the right side panel and the right side fender step.
YOU are the master builder - I would say it looks good with or without the scoop but I agree it looks better without to my unskilled eye
OP
Don Campbell
Well-known member
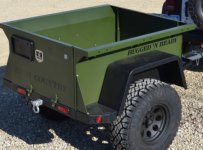
Thanks for the nice comments. Today I should get done roughing in the outside of the Wheelhorse Jeep/Gocart . I made the wood blocks for the hood but not sure if I will put those on or not. Here are two pics of the style trailer I may build to go with the mini Jeep. Mostly for looks as I like how they look and it won't cost much to build with most parts I already have.
Attachments

N2 Many Projects
Well-known member
I like both trailers. If it was my project it would be hard to choose between the two.
OP
Don Campbell
Well-known member

OP
Don Campbell
Well-known member
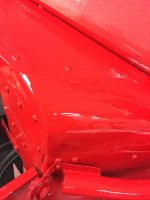
Todays pics show me patching three holes I had not filled in yet. I cut some pieces of steel and bent them to fit in place and I welded them. Then body work and slapped on some paint. Not perfect but pretty shiny for now. These three holes were the worst looking parts of the go cart. The whole body will get wet sanded and another coat of paint eventually. Then wheeled out and buffed. 
Attachments


OP
Don Campbell
Well-known member
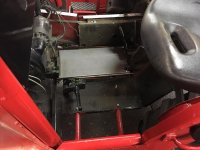
Now that the outside side is all roughed in I can start to see what to do about the inside. The gas tank has to be removed first and then the center dash console has to all come out and much of the main tunnel for a flatter floor for two peoples feet. I will have to design a new exhaust system to go down below the floor. And the whole steering design has to be re designed from center steer to left side steer. But with the big tires the linkage from the gear box to the front spindle can't go straight . I will also trim more old metal from under the hood to make room for a battery and possibly the gas tank. The electrical will be all redone and the dash work will take some time. Even the shifting linkages will have to be altered with the two seats touching each other in the middle. There will be no room for the shifter between the seats. So plenty to keep me busy for a while , it is a labor of love being in the shop. Next month I will rough in the big tire trailer so that project can get done this winter too. It sure looks different than 4 weeks ago. ")
Attachments

XJSuperman
Well-known member
Wow. Just wow. Im a John Deere guy who drives a Jeep, so this fits my interests. The Jeep is cool, but man that grader would be handy to keep around home. Sounds kinda funny when you say "I turned my grader into a Jeep..." Do you get out to many of the John Deere shows/expos?
OP
Don Campbell
Well-known member
The grader was just a rat rod toy , never actually worked, ha,ha. I don't take my little tractors to any shows. They have never left my yard. I just enjoy tinkering building them. Thanks for the kind words.
OP
Don Campbell
Well-known member


OP
Don Campbell
Well-known member
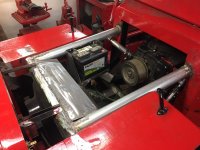
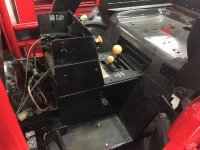
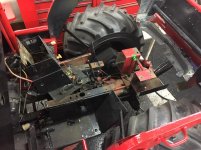
Today I fired up the plasma cutter and started trimming sheet metal on the inside of the frame for mounting the seats. I cut a lot out and fabricated all new frame pieces to support both seats. It's a very tight squeeze for two seats and I already trimmed a inch off the sides of the first seat. I built seat brackets for both of them today too. I sat in the seat for the first time and the view through the windshield was perfect height. I removed the Wheel Horse gas tank too that was mounted under the seat area.
Attachments

OP
Don Campbell
Well-known member
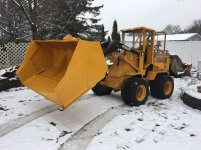
I got the new seat brackets built and both seats mounted in place for the first time. It's a tight fit but pleased how it looks. This week I am working on my mini loader bucket . Been wanting to add a longer floor to the bucket and taller sides. I am adding 16 inches to the bottom of the bucket and raising the sides several inches. Lake effect snow is so light and we get a lot of it , now problem hauling more in the bucket . Wet snow I will just scoop the same amount as before . Here is a bucket I saw today on the internet. Sweet !
Attachments


IMCA38
Well-known member
Hi Don
Long time admirer of your construction models and mini lawn tractors.
This Jeep is going to be awesome as well! You obviously have an artistic gift to be able to get things scaled properly. If I tried something like that, it would end up looking like the embodiment of something drawn by a kindergartener (with all due respect to kindergarteners!)
Please keep posting the updates!
Todd
OP
Don Campbell
Well-known member
Thanks for the kind words. I met so many nice people over the years with my model building and garden tractor hobby. I surprise myself building so many things without any plans and have them turn out looking pretty good, ha, ha.
Today I am puttering outside on my snow bucket extensions. Trying to keep it light as possible. I don't plow much with it , mostly move the snow piles from the front to the rear yard when the snowbanks get too high. I am very limited with piling snow in my front yard. 160" of snow can add up the banks pretty high and make it dangerous pulling out onto the main road. The extensions look rough but will look better in a couple more days.
Today I am puttering outside on my snow bucket extensions. Trying to keep it light as possible. I don't plow much with it , mostly move the snow piles from the front to the rear yard when the snowbanks get too high. I am very limited with piling snow in my front yard. 160" of snow can add up the banks pretty high and make it dangerous pulling out onto the main road. The extensions look rough but will look better in a couple more days.
Attachments

OP
Don Campbell
Well-known member
Snowing outside so back in the workshop to work on the little Jeep . I did more trimming in the center tunnel today. This will give the driver much more leg room. The main drive belt shields will stay so the passenger won't have quite as much leg room. I got the bucket extension finished up and it should work great.
Attachments
volksnick
Well-known member
This reminds me so much of the Wild Willy Jr model kit. I built one a while back and happened to paint it red. It looks almost identical to your build!
OP
Don Campbell
Well-known member
Yes, my grandson has fun at grandpas house. He loves all kinds of machinery. Wild Willy Jr. Jeep sounds great. So many awesome mini Jeep kits to choose from these days.
OP
Don Campbell
Well-known member
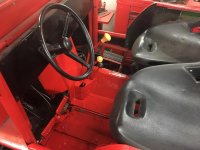
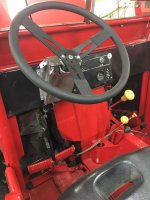
Not working in the shop as much now with the cold weather. But I am working a few hours a day . I got the brake and clutch pedal re located and working nice. Also added new sheet metal to the drivers side and added three fake shifting levers for looks . The two working shifter levers are between the seats. I ordered a 17" steering wheel to help with the manual steering . Next I will work on the passenger side adding new sheet metal.
Attachments
OP
Don Campbell
Well-known member
My new 17" steering wheel came today and that should give me more leverage to steer. If not I may order a Vega style gear box like the hot rod people use. I worked on the first wiring in the dash and trimmed the Wheelhorse dash to fit in the new dash panel. I attached some of the side wiring too and that will get covers over it.
Attachments


My new 17" steering wheel came today and that should give me more leverage to steer. If not I may order a Vega style gear box like the hot rod people use. I worked on the first wiring in the dash and trimmed the Wheelhorse dash to fit in the new dash panel. I attached some of the side wiring too and that will get covers over it.
Don
Looking great as always. For the steering another consideration may be the electric power steering as used in UTV's. I have a 4010 Kawasaki mule that has the electric PS and it may be just the thing for your rig. I don't know what other vehicles use it though.
lg
no neat sig line
OP
Don Campbell
Well-known member
Thanks for the kind words. I will look into the electric power steering option before I order the Vega style gearbox. That would be nice to eliminate all those shafts and u-joints too.
toplessHO
Well-known member
lots of suitable donors in the junkyard for EPS
makes the most sense
makes the most sense
OP
Don Campbell
Well-known member
Thanks , I will try first to use what I have and see if it will work. Today I finished the top two steering shaft bearings and supports for them. Also attached the new steering wheel for the first time. Seemed very comfortable in the drivers seat with the larger steering wheel.
Attachments

OP
Don Campbell
Well-known member
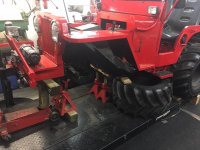
Time to remove the front wheels and the spindles . First look for gear box location . I fabricated a new tie rod today. Once I build the steering box mounting bracket I can get it bolted in place and fabricate the second tie rod parts. All trial and error from left over parts. Always fun to use parts that have sat in the shop for several years. 
Attachments

OP
Don Campbell
Well-known member
Steering FAILURE !! Strike ONE !! I worked all day and got things all connected but the u-joint angles were too tight . So I cut more of the frame out and will start over and mount the gear box in direct line with the steering wheel this time. I still think I can make it work without ordering the Vega parts. I like it when I can make things work without spending much money.
Attachments

Bottlecapdigger
Well-known member
Thanks for the kind words. I met so many nice people over the years with my model building and garden tractor hobby. I surprise myself building so many things without any plans and have them turn out looking pretty good, ha, ha.
Today I am puttering outside on my snow bucket extensions. Trying to keep it light as possible. I don't plow much with it , mostly move the snow piles from the front to the rear yard when the snowbanks get too high. I am very limited with piling snow in my front yard. 160" of snow can add up the banks pretty high and make it dangerous pulling out onto the main road. The extensions look rough but will look better in a couple more days.[.
I made something like that for my compact JD not for snow but for raking the fall leaves into and then dumping it into the field and spreading it around. I made it out of plywood and strap it to the pallet forks. Leaves are pretty light so it doesn't need to made out of steel. Should have taken pictures before I put it away. BCD. /QUOTE]
OP
Don Campbell
Well-known member
I think I saw your project, very smart idea out of wood. Looked like it worked great !!
OP
Don Campbell
Well-known member
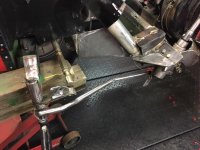
Steering gear box got mounted straight in line with steering wheel today . Worked much better but the big tires rubbed on the tie rod. Friday I will fabricate a bell crank and mount it in the middle and go from there with the tie rods so there won't be any clearance problems.
Attachments

OP
Don Campbell
Well-known member
I decided to hold off on the optional bellcrank design. For now I just put a couple kinks in the tie rod . I also beefed up the bracing for the steering gear box with some 1/4" gussetts. Now I will cut away more of the old grader frame and weld in some new bracing from the front grill to the cowl for more fender support. The new battery box will attach to that. Also the new exhaust will go vertical instead of horizontal out of the engine.
Attachments
OP
Don Campbell
Well-known member
This pic shows more of the old grader frame removed from inside . Looks much nicer now. I got the new fender brace metal cut and attached and I built a battery box yesterday too. I decided to extend the exhaust pipe straight out the side and mount the muffler vertically on the rear of the fender for now. Today I will build a gas tank support frame and get it mounted under the hood too. Then I will have everything ready to start it up after the last of the wiring is completed. Last winter I did not have a big shop project and it is such fun going out and working on this go cart jeep a few hours a day. I run my space heater just 5 minutes every hour to keep the chill out. So it isn't bad working conditions. It heats that little area up quick !! And it is all insulated .