To avoid these ads, REGISTER NOW!

Just Another Workbench...

DocsMachine

Well-known member
Joined
Sep 16, 2006
Messages
1,848
I have a small home machine shop, in which I both modify and repair things (mostly paintball guns :D ) and manufacture parts for same. It's not extensive, it's basically just a warmed-over two-bay garage, and for many years, it's been little more than an ad-hoc workshop for everything from welding to carpentry.

Over the last few years, I've been working hard to finally get all my waterfowl a bit more colinear, and have been trying to ditch clutter, clean and organize work areas, and have been bringing in additional equipment to do my job better.

Things have been going well, but I still have a great deal of clutter to sort out- a lot of it has simply been moved from pile to pile as I've brought in other machines or reorganized existing ones. The upshot of all this blather is this is what the last untouched corner of the shop looked like as of a couple of weeks ago. Women and those with weak constitutions may want to leave the room.

bench001.jpg

Cluttered, disorganized, neither workbench is even accessible, the drill press is unusable, the bandsaw barely approachable, the air tools inaccesible and all the power tools- in the base of the bench on the left- practically entombed.

After a couple days, a literal truckload given away on Craigslist, and, unfortunately, a lot of restacking into other piles, this is what it then looked like:

bench002.jpg

The shiplap back wall was a leftover from an earlier incarnation of the shop, before I moved in, and was one of the first things I wanted to attend to. I moved the old workbenches out of the way, and started stripping it off. Parts of the building had been built around it, so I was forced to slice it off flush at the corners with a multi-tool saw.

bench004.jpg

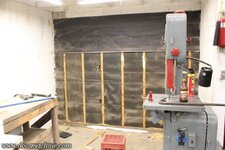
That revealed tarpaper that had been spray-foamed on the opposite side. It was in good shape and rigid, so there was no reason to mess with it.

bench005.jpg

The old bench had a row of drawers along the back edge, which were always inconvenient as they couldn't be used unless the bench was clear in front of it. I pried it off...

bench006.jpg

With the intention of reworking the entire bench into something better, but after pondering it a bit, I realized I'd be just short of building the thing from scratch, so that's what I opted to do. The two old benches were also given away on Craigslist.

Moving back to the wall, I furred out the studs with some 1"x3", as the foamed tarpaper was pretty lumpy since it'd been done over the shiplap.

bench007.jpg

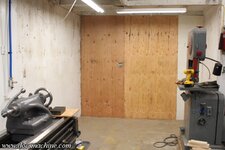
I'd also swapped the 2-gang outlet box for a 4-gang, and then plied it over with two sheets of fabulously expensive plywood, and a half-sheet I'd had left over from an old project.

bench008.jpg

The greasy-filthy wall was Kilz'd...

bench009.jpg

And then everything given a coat of some donated paint, that wasn't quite an exact match to the rest of the shop, but I can't be picky. :)

bench010.jpg

Next up, the new bench!

Doc.
 

Attachments

  • bench001.jpg
    bench001.jpg
    95.8 KB · Views: 30
  • bench010.jpg
    bench010.jpg
    46.9 KB · Views: 21
  • bench009.jpg
    bench009.jpg
    52 KB · Views: 16
  • bench008.jpg
    bench008.jpg
    63.3 KB · Views: 15
  • bench007.jpg
    bench007.jpg
    70.6 KB · Views: 15
  • bench006.jpg
    bench006.jpg
    57.9 KB · Views: 13
  • bench005.jpg
    bench005.jpg
    65.5 KB · Views: 13
  • bench004.jpg
    bench004.jpg
    58.2 KB · Views: 16
  • bench002.jpg
    bench002.jpg
    92 KB · Views: 25
To avoid these ads, REGISTER NOW!
OP
D

DocsMachine

Well-known member
Joined
Sep 16, 2006
Messages
1,848
Okay, not quite the bench yet, but I splurged on a new Husky toolbox, which was just the right length for the short wall opposite where the bench was.

bench011.jpg

I had a table/bench there with a drill press on it, which was too high for the press and the press took too much room which made the bench less than ideal.

Still not sure where the drill will go- I have others- but a new rollaway here will let me empty out and ditch the old ratty mismatched one out by the car bay. Which has non-roller sliders and needs replacing.

After a nice, pleasant hour of peeling off stickers- one of which fought to the last crumb and left a bunch of adhesive behind- and sorting out the included drawer liners, it was ready to start filling.

bench012.jpg

Anyone know what that grid thing at the back of the top space is? It looks sort of like a French Cleat type of thing, but I'm not sure I've ever seen any racks or hooks or anything that go there.

Also, not real thrilled with the "work surface" drawer. I have no need of such a thing, and it makes using that drawer inconvenient. Naturally it's riveted in place, so I may wind up drilling those rivets out and removing it entirely.

bench015.jpg

Now it's time to start on the bench...

Doc.
 

nadogail

Well-known member
Joined
Jan 23, 2009
Messages
31,909
Location
Coronado, CA
Mama Duck has done a good job.

Your Ducks have formed up nicely in a very straight row. The workshop looks great too.
 
OP
D

DocsMachine

Well-known member
Joined
Sep 16, 2006
Messages
1,848
How to build a workbench.

Step one: Build ladder:

bench016.jpg

Step two: Build the rest. :)

bench019.jpg

bench021.jpg

And finally, I had a buddy with a Festool track-saw lop up a chunk of one-side-sanded plywood for the front facia and doors.

bench022.jpg

It was right about here that I discovered I'd made a pretty stupid error, which I hadn't caught 'til now, which meant it was not easily fixed.

It could, however, be hidden. :D

But, the upshot was that I had to manually tweak and fit each individual door- which, as I didn't have my own track saw, meant I had to jump through several hoops to try and maintain those nice straight and square edges.

After a full day of tweaking, adjusting, test-fitting, and a fair expansion of my vocabulary, I got it fully assembled, including latches and handles.

bench023.jpg

The plywood, unfortunately, curled slightly after cutting, so I was forced to attach a brace to the back of each door to keep them straight.

bench024.jpg

And finally, as it was going to be painted rather than stained, I covered all the screw heads with "plastic wood" putty.

bench025.jpg

Once that's dried, I'll give each spot a quick sand, dismantle the doors, and give the works its first coat.

Stay tuned!

Doc.
 

CombatNinja

Well-known member
Joined
Aug 24, 2013
Messages
1,456
Good progress so far. Though considering what you started with, a fire may also have been an improvement.:ROFLMAO:

As to that grid thingy up on top of your Husky box--it is a magnetic area for fixing commonly used wrenches and such.
 

topcok88

Well-known member
Joined
Jun 3, 2013
Messages
660
I have a small home machine shop, in which I both modify and repair things (mostly paintball guns :D ) and manufacture parts for same.
Doc, I’m interested in seeing these paintball guns! Although it has been a long time since I have played I still enjoying watching MWAG CK1/CK2 and Derder videos. My user name is actually from when I first started playing competitively around 2003/2004 using Bud Orr’s Autocockers. I had a BlackMagic Mini (blue to silver matte anodize) with an Eclipse E1 and a full size BlackMagic (gloss blue) with an Eclipse E2. I slowly transitioned to SmartParts with a few SFT Shockers and eventually NXT Shockers (man do I miss my Hybrid NXT Shocker). I continued to play competitively from Chicago, Orlando/Tampa and eventually slowed down and stopped here in Virginia.
 
OP
D

DocsMachine

Well-known member
Joined
Sep 16, 2006
Messages
1,848
Doc, I’m interested in seeing these paintball guns!

-Then check my page. :D I don't have much by way of the newer high-end tourney electros, I'm more of the old-school "make it look cool" airsmith. The Custom Gun Gallery has a nice example selection, although some of those pics are getting pretty old. There's also goodies like this...

veetwin2.jpg

This...

phoongrip1.jpg

And this.

bigredfast.jpg

:D

Doc.
 
OP
D

DocsMachine

Well-known member
Joined
Sep 16, 2006
Messages
1,848
Over the weekend, I got a coat of white primer on the main chassis and doors...

bench026.jpg

And while that was drying, I checked a few other bits off the to-do list. As CombatNinja noted, the grid bit at the back of the top area is indeed magnetic:

bench027.jpg

Not sure I want to actually stick wrenches and the like there, but I'm thinking of some small aluminum "shelves" with a steel back, drilled to hold screwdrivers, nut drivers or allen wrenches, etc. I'm sure I'll figure out something. :D

I also took a moment to drill out the rivets holding that "work surface" hinge in place...

bench028.jpg

And popped that out of there. It leaves kind of a funky feature when the drawer's all the way open, but it's not in the way or anything.

bench029.jpg

After the primer had had a day or so to dry, it was time for the color coat!

bench030.jpg[/URL]

A few years back, I'd had a can of latex custom-tinted to match the grey enamels I'd been using on my machine tools. I'd been working, at the time, on a cabinet for my CNC router, and once that was done, I planned to paint it to match as a sort of machine enclosure.

Well, that never worked out, and I still had the unopened can laying around, so it was time to use it.

The parts at the top aren't the doors- they're pieces to a Homey-Dee 'closet organizer' cabinet which I plan to put over the bench, kitchen-cabinet style. They only had one, and I'll need four total, but as I had the paint out, I figured I'd hit those parts and could hang at least the one.

Unfortunately, I didn't think to degrease the parts, and the front face/door had apparently gotten speckled with a mist of oil or something. The paint 'ran away' from a bunch of spots, like the reverse of water beading up on a waxed fender.

bench031.jpg

So, I'll have to wait a week or so for the paint to fully cure, sand it smooth and hit it again. No big, as it'll likely be weeks or even months before HD has more of those cabinets in stock, anyway.

But, by Sunday night, the second coat of grey was dry enough to the touch I could put the doors back together. I still need to work out a top, but apart from that, she's done!

bench032.jpg

Still plenty to do on this corner, though, so stand by. :)

Doc.
 

zmotorsports

ALLIANCE MEMBER
Joined
Oct 20, 2009
Messages
21,326
Location
Northern Utah
Nice job on the workbench. I built mine in my last shop very similar, framed out in pine with plywood doors and painted gray in color. I liked having the doors on the underside storage as I don't like seeing the items under the workbench. Funny you showed the bracing on the backside of the plywood doors, I had to do the same thing to mine but I used some 1" square tubing to keep the backside as deep as possible and not encroach into the storage area.
 
To avoid these ads, REGISTER NOW!

FMB4

Well-known member
Joined
Jan 19, 2017
Messages
2,926
That's some very sharp work sir (both in clearing stuff out and building an outstanding workbench.
 

Jayman17

Well-known member
Joined
Feb 6, 2017
Messages
3,795
Location
Seattle, Wa
Your before shot looks a lot like my shop minus the Do-All bs and lathe of course. :bounce:
I will use your progress to inspire me. It’s looking good!

Jay
 

CN Spots

Well-known member
Joined
Apr 21, 2016
Messages
3,065
Location
NW Mississippi
-Then check my page. :D I don't have much by way of the newer high-end tourney electros, I'm more of the old-school "make it look cool" airsmith. The Custom Gun Gallery has a nice example selection, although some of those pics are getting pretty old. There's also goodies like this...

veetwin2.jpg

This...

phoongrip1.jpg

And this.

bigredfast.jpg

:D

Doc.
One of these days I'm going to stop being amazed at what some of you guys can crank out in those cluttered and unorganized little work spaces.

Today is not that day.
 
OP
D

DocsMachine

Well-known member
Joined
Sep 16, 2006
Messages
1,848
Funny you showed the bracing on the backside of the plywood doors, I had to do the same thing to mine but I used some 1" square tubing to keep the backside as deep as possible and not encroach into the storage area.

-I'd toyed with the idea of a small chunk of like aluminum angle, as well as the idea of making a 'rack' of some kind that would be both brace and some sort of storage. Couldn't think what I wanted to store there that wouldn't be too thick, though.

This cabinet is for the 'bulky' stuff, though, like my circular saws, the Swazall, the big Hole Hawg, etc. It'll never get packed so tight the ribs will be in the way.

A stainless top would really finish that off nicely

-That was one of my original thoughts, and I talked to the local sheetmetal guy about it. Besides the cost (mostly in his braking) I don't like how thin sheetmetal tops eventually collect a bunch of dents and dings. I have thin Masonite on the benches in the machine room, but that stuff soaks up every drop of oil or moisture.

I've been looking into Formica, but with everyone wanting granite or Corian or tile or whatever, no one locally stocks the stuff.

If you don’t want metal, look for recycled bowling alley lane material (hard rock maple) or lacking that, an IKEA “butcher block” countertop.

-Last local bowling alley closed down and sold out 25 years ago, and no IKEA in the state. Homey-Dee carries butcher-block tops, but not in the dimensions I need. (30" x 8')

One of these days I'm going to stop being amazed at what some of you guys can crank out in those cluttered and unorganized little work spaces.

-Don't let that first photo fool you... well, too much. :D That's not representative of the whole shop. :)

The shop is basically a 2-car garage, but with a side room. The side room has been my machine shop for years, and while cluttered, nowhere near the level of that first pic.

But, over the last several years, I've been trying to expand my shop, and have brought in several new (well, to me) machines, each one requiring moving old clutter out of the way. This work-bench corner simply wound up the repository of all those moves.

It was also the last corner I hadn't repainted over the years, and still had the old ad-hoc shelves from the previous owner. It was time to refresh that, too, so I can get back to doing proper work out there. :)

Doc.
 
OP
D

DocsMachine

Well-known member
Joined
Sep 16, 2006
Messages
1,848
Guess I won't need to sand that door after all. :)

I put that cabinet together, and as I was doing so, I realized the paint was literally falling off of it.

bench033.jpg

It had all the adhesion of cling-wrap, and could be pulled off in literal sheets.

bench034.jpg

The 'speckled' door paint pulled right off, nearly in a single piece.

bench035.jpg

The only place the paint held well was the edges, and even that wasn't all that great. But, on the upside, it's very close to back to clean and white again.

bench036.jpg

I will probably try hanging it as-is, and waiting 'til I can get the other three in (if they ever come back in stock) before trying to repaint.

If/when I do, I'll probably hit them all with a degreaser, then something like 220 grit in an orbital sander, and maybe even a mist coat of spray etch primer, though that might be getting a bit carried away.

I may also try bolting the four together as a unit- no need to paint the end walls if they're going to be joined together. Or for that matter, the tops or far-right end.

On the new workbench, I have all the old tools, plus a few additional choices, back in place, and there's still a ton of room in there.

I think it's gonna work great! :D

Doc.
 

nateo

Well-known member
Joined
Jul 4, 2018
Messages
186
Location
Embrun, ON
If/when I do, I'll probably hit them all with a degreaser, then something like 220 grit in an orbital sander, and maybe even a mist coat of spray etch primer, though that might be getting a bit carried away.
Rough it up and lay down a coat of a shellac based primer. The HD should carry Zinsser BIN, even way up where you are. That stuff dries fast, sands crazy smooth, and will stick to anything. Better yet, any topcoat will stick to it.

I used it to prime a bedroom set I repainted for my oldest. No unexpected issues after almost 3 years of pre-schooler abuse!
 

MoonRise

Well-known member
Joined
Nov 5, 2010
Messages
4,028
Location
NJ
Ahh, you painted right over the 'melamine'.

Interesting how the gray paint did not bond at all and came off like a sheet of plastic wrap.

Interesting, but not unexpected.

Melamine is plastic.

Painting plastic needs to have ALL the proper-paint-prep-procedures-performed-prior-(to)-painting. :)

Clean and degrease. Then scuff sand. Clean again. Use a GOOD primer (Sherwin-Williams recommends their Extreme Bond Primer https://www.sherwin-williams.com/homeowners/products/extreme-bond-primer ). Lightly sand the primer coat(s) and remove the sanding dust. Then you can get to applying the top coat(s).

That whole ProperPlanningPreventsPissPoorPerformance mantra. :lol:

Although I generally like self-etching primer, I don't think that the acid in the etch primer will give you any benefit on the plastic melamine.

Clean it, scuff it, use the Extreme Bond Primer, paint it.

Or learn like the clean white look of the melamine upper cabinets. :lol:
 

Dan in Pasadena

Well-known member
Joined
Feb 18, 2009
Messages
13,106
Location
Pasadena, CA
Yup, I used Behr's high bond primer after sanding my melamine cabinets with (I think) 80 grit. The gray finish is stuck on them VERY well.B7D247CF-FDEC-40E9-A300-5A4B7B48F402.jpeg
 
OP
D

DocsMachine

Well-known member
Joined
Sep 16, 2006
Messages
1,848
Bringing this back up for the moment....

Given that the Homey-Dee cabinets weren't going to work (and still aren't back in stock anyway) I elected to make my own. Being self-employed doesn't really mean that I get a proper long weekend "off", but I took it anyway. :D

bench037.jpg

bench038.jpg

bench039.jpg

bench040.jpg

Hard to believe it's the same workspace. :)

bench042.jpg

'Course, it's also freshly-cleaned and hasn't yet had a chance to get cluttered yet, but still. :)

Doc.
 
OP
D

DocsMachine

Well-known member
Joined
Sep 16, 2006
Messages
1,848
Looking for ideas: What would you ladies and gents do with the space between the upper and lower cabinets? Pegboard? French Cleats? Those little clear plastic parts drawers? Vargas girl pin-ups?

The original plan was a pegboard, with a bunch of most-commonly-used tools arranged on it. Still kind of thinking about that, but I already have such a pegboard in the other room, and a similar display on the passage wall between rooms. There's also two tool chests now, and that would theoretically either require four complete sets of those most-used, or my current collection split up and scattered in two to four different locations.

I have nothing collectible to put on display on that wall, and as I virtually never have visiting customers who would see such a thing.

Any other ideas?

Ditto the end wall between the cabinets and the tool chest. Anything thick sticking out (shelves, racked large tools, etc.) could interfere with the drawers or the cabinet doors, and I don't really want to just put up a bunch of hooks to hang extension cords and the like.

Doc.
 

MOTODOJO

Member
Joined
Mar 14, 2013
Messages
20
Location
Tejas
I covered some MDF in thin, steel flashing to create a combo dry erase and magnetic board. It reflected the light from the bottom of the upper cabinets as well.
 
OP
D

DocsMachine

Well-known member
Joined
Sep 16, 2006
Messages
1,848
I'll probably have a proper whiteboard on the 'blank' wall- I already have several throughout the shop, but one under the cabinets might be an awkward angle/reach to use.

Doc.
 

Jayman17

Well-known member
Joined
Feb 6, 2017
Messages
3,795
Location
Seattle, Wa
I like the results, I would go with French cleats. You can make custom holders for whatever you want to hang there. Beats using generic hooks or hangers for tools imo.

Jay
 
To avoid these ads, REGISTER NOW!
Top Bottom