To avoid these ads, REGISTER NOW!

Just finished installing by Bend Pak HD-9-B!

ovilla

Well-known member
Joined
Dec 18, 2005
Messages
2,342
Location
Plainfield, IL
First of all - THANK YOU JUNKMAN!!! I trully appreciate your emails and phone calls over the last couple of days going over your install tips and helping me build my 220 extension cord. Four of us were able to put this thing together in a little over 5 hours this afternoon.

Okay, ordered it through www.asedeals.com (ask for Brian). Bend Pak HD-9-B (wide) was $2500, plus a rolling air jack (RJ45) for another $1050, with free freight. Ordered it two weeks ago, and it took a week to build and a week to go from CA to Chicago, IL. Had it shipped to a friends warehouse, then rented a Uhaul 12X6 trailer ($29) for the day. I also rented an engine hoist ($44/day), which was the best money I ever spent. The hoist made the whole thing so easy to lift and position into place.

Anyway, Junkman's detailed tips were awesome and allowed for the install to go really smoothly. My buddies also jumped right in and helped out a lot. One friend, Ryan, showed up in his red vette with more tools in the back of his car than I have in my entire full size tool chest. We even needed a 1 3/8 socket for the nut on the cylinder and of course he had one. I just had to send the wife out to get ATF fluid and pizza.

Stats: 10' Ceiling with 914's that are about 47" tall (each). 40 AMP 220 line (soon to be downgraded to a 30 AMP but with same 8 AWG), L6-30R outlet and connectors with a 50' 8-3 AWG extension cord for now (may actually shorten it to 15' and/or move 220 plug to ceiling). Also thinking of installing a 50' ceiling mounted air hose reel really soon.

Here's the pics for now. It's dark out here so I'll take some more tomorrow in the daylight. Feel free to ask any questions you may have. Thanks

Omar
 

Attachments

  • Picture 001b.jpg
    Picture 001b.jpg
    68.8 KB · Views: 398
  • Picture 011b.jpg
    Picture 011b.jpg
    60.8 KB · Views: 404
  • Picture 002c.jpg
    Picture 002c.jpg
    64.4 KB · Views: 379
Last edited:
To avoid these ads, REGISTER NOW!

bobs4092

Active member
Joined
Dec 19, 2007
Messages
38
Just the post I needed for inspiration! :thumbup: I will be buying and HD9 within a few weeks. I think ASE or RB wholesale is the cheapest on these so I'm tire kicking right now for the best deal.

Questions: What will I need to get this thing operational? Fluids & electrical supplies to be more specific. I will go with the 220 volt setup. I need to get it working the same day I install so I don't have to leave my cars out overnight. (can't have that!) :bounce:

Is the electrical hard wired in or does it have a plug? I'm thinking of using some electrical conduit dropped down from the ceiling to the motor. Does that sound like a good idea?

I'm thinking of just hiring a roll back to pick it up at the local Conway terminal and dropping it off at my house. Should be able to slide off the back with bed tipped and driver slowly moving forward. Right? (I don't own a forklift! :lol_hitti )

Any advice or tips for this memorable event are very much appreciated as I hate surprises...

Bob
 

kvom

Well-known member
Joined
Feb 1, 2008
Messages
820
Location
*******, GA
Is the electrical hard wired in or does it have a plug? I'm thinking of using some electrical conduit dropped down from the ceiling to the motor. Does that sound like a good idea?Bob

A friend of mine has his wired this way. I plan to do mine that way as well.
 

Junkman

Well-known member
Joined
Dec 18, 2006
Messages
6,626
Location
Northeastern CT
I was told by WWW.ASEDEALS.COM that the prices were going up after Friday, so if you want the best deal, you might want to think about making the purchase today, if you can still get the old price. I don't know how much of an increase in price there is, but on a major purchase like this, even 5% can amount to a lot of $$$$.
 

milkovich

Well-known member
Joined
Oct 15, 2007
Messages
682
Location
Akron Ohio
This lift is probably in my future too (next year) but I want to call a garage door company to figure out how to move the door.

My cars are a little bigger than 914s :lol:

Looks good!
 

6t7gto

Well-known member
Joined
Dec 6, 2005
Messages
522
Location
bedford,ohio
Ovilla,
if that overhead door is manual, i would put some stops (bolts and nuts) on the tracks so the door doesn't hit the car.

david
 
OP
O

ovilla

Well-known member
Joined
Dec 18, 2005
Messages
2,342
Location
Plainfield, IL
Pricing - When I spoke to Brian (www.asedeals.com) a week ago he said that pricing for my unit would most likely go up about $200, so definitely order it soon so you can lock in the price. I'm sure you can tell them to hold off shipping for a while.

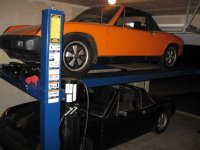
Electrical - The 220 pump does not come with a plug end. You remove a side cover where you'll see two wires (black and blue). These two are the hots and then there's a screw attached to the motor that's the ground. You'll need to create a plug and it will be exiting out of the top of the motor (see my pics). You'll also need to make sure you have a 30 AMP circuit in place with at least 10 AWG going from the panel to your outlet. All of my connectors are L6-30 Twist lock connectors.

Fluids - I used 12 quarts of Dexron III ATF (you can also use hydraulic fluid).

Getting it home - The lift is packaged with what look like oversized steel picture frames at each end and they extend about 4 inches below the bottom most portion of the bottom ramp. Hence, when it's on the floor the only thing touching the actual floor are the steel frames on each end. You could easily have a truck drop it off. There's a lot of rigidity to the whole thing. My buddy put fork lift extenders on a 5K forklift and actually picked mine up from the end with no issue at all (nothing even flexed).

Assembly - Definitely rent an engine hoist. You will only need it for the ramps but your friends (and your back) will thank you. All other pieces can be easily handled by two people.

Junkman's tech tips below (Thanks again Junk!!!)

Column and cross bar assembly - The installation manual says to stand up the columns and then put the cross bar in from the top. Per Junkman, I laid the columns on their sides with each top resting on a chair, then I slid the cross bars in from the top and let gravity take it down to the bottom. The ladder bars (the piece of steel with the square locking points) went in next, just like the cross bar. The trick here is to have one guy holding the top of the ladder bar and moving it around per the direction of the guy lining up the ladder bar into the cross bar ends.

Runways - You'll need to remove the sheaves (aka pulleys by most) from the one and only runway that has these. You'll need a 5mm allen to get these off. Then the double sheaves (or single sheave with spacer) will easily fall down. When assembling this runway on to the cross bars only attach the inner most bolts (the ones on the side on the inside portion of the lift). You DO NOT want to install the bolts on the outside (remember this only applies to the main ramp that has the cylinder) as your cable can and probably will get caught up on these outer bolts. Attach these bolts at the very end after you have completed running your cables through to the cylinder.

Cables - Figure out which cable is A, B, C, and D and then fish them in from the columns through the cross members and to the cylinder ramp. You'll want to fish them through with the non-threaded end going through the safety lock (remember to fish the cable so that it goes around the safety lock pulley and is on the inner most side of that pulley (the cable will NOT be between the column and the white pulley - check out the picture on the installation manual to see what I mean). Anyway, after you run the cable through then push the threaded end up into the top plate of the column and threaded it by hand until it gets stuck in the nylon thread. This will give you the most amount of slack in the cable so that you can fish it around the sheaves (pulleys) and over to the cylinder.

Cylinder - You will need a deep 1 3/8 socket to tighten up the nut on the end of the cylinder (which holds the steel plate, which in turn holds the non-threaded end of your cables). Make sure you have a 3/4 to 1/2 adapter for your 1/2 impact gun as a socket of this size will most likely only come in 3/4.

Extending the cylinder - You will need to extend the cylinder so that you can hook up your wires to the steel plate. There are two hydraulics plugs, one at each end of the cylinder. Go buy a blow gun kit for your air compressor and put the black rubber end on your gun (this is the end that looks like what they fill helium balloons with at stores). Anyway, remove the hydraulic plug on the end opposite the cylinder ram and then wrap a rag around your blow gun (as the hole is larger than your blow gun's rubber tip) and then blow air into the cylinder). The cylinder will start to extend iteself. As one guy is holding the blow gun in place, another guy should remove the other plug on the cylinder. Don't worry it won't go flying through the air. It will just let out a little noise when the plug comes out. Anyway, once you open up the second plug, the other guy can stop blowing air into the cylinder and the cylinder will stay in it's fully extended state. Finally, the reason for removing the second plug is so that the cylinder doesn't automatically retract back into position.

Air lines - These are easy to assemble. If you need to remove an air line from a fitting or cylinder you will need to push the black plastic back towards the fitting and then pull the air line out. If you simply try to pull the lines out, they won't come out and if you do force them out you'll most likely ruin the fitting. Oh, there's a blue Bend Pak air line cutter included with your hardware.

Tips for 1st time use of the lift - The very first time you hit the button to raise your lift, you will notice that nothing will happen for about the first 20-25 seconds. DO NOT PANIC, this is normal. The pump is simply filling the hydraulic lines and cylinder with fluid. You may also notice your pump making what seem like weird noises. This is normal as well since there is still air in the system. As you are pushing the button (which will make your ramps raise) go ahead and also pull the lever to lower your ramps. Doing both at the same time will actually make your lift lower itself. Per the manual, you want to do this a few times to essentially bleed the air from the hydraulic pump, lines, and cylinder.

Making adjustments to locks (after using the lift the first week/month) - As you start to use your lift and put different cars on it, it will soon allow for the cables to loosen up and settle in. This may cause your locks to seem like they are out of sync just a bit. More than likely you will notice that as your ramps are raising, not all of the locks will be "clicking" into the next locking position at the very same time. You may also notice that when lowering your car, your cross beams will come to rest on one column just a little sooner than the column on the other side (of the same one cross beam). This is due to the cables and/or uneveness with your floor. The key here is to first adjust your ladder bar on the column which has the cross beam coming to a full stop at the very latest time (during descent into a locking position - still focusing on one cross beam at a time). It's basically like trying to lay a 2X4 perfectly flat on to the ground. More than likely one side will touch the ground first. That's exactly what the cross beam is doing, with the locks allowing one side of the cross beam to come to a final resting spot a bit sooner than the other side. Anyway, you simply need to raise the ladder bar up (for the side on which the cross beams are coming to a rest late). Do this by tigthening the nut on top of the "top plate" (don't forget to back out the nut below the top plate or the nut on top of the top plate will no longer be able to be tightened). Finally, after adjusting the ladder bar, go ahead and test the operation of your lift. If the locks are still not engaging at the same time, then go ahead and tighten the chain by 1-2 full clockwise turns on the column which is "clicking" late, when compared to the rest of the columns.

David - Great idea on the bolts at the end of the track. I'll be getting that done tonight. Thanks
 
Last edited:

JMURiz

Well-known member
Joined
Dec 6, 2005
Messages
1,483
Location
NoVA
Great looking 914s, glad to really see how much space they need in a 10' ceiling.

Are you on the 914 boards?
 
OP
O

ovilla

Well-known member
Joined
Dec 18, 2005
Messages
2,342
Location
Plainfield, IL
Jim H - I went with the HD-9-B because the regular narrower lift had columns that were too close together for my needs. They would have been narrower than my door opening. I measured my Honda Odyssey and with the mirrors closed I still would have had only a couple of inches on each side. My thought is that if a vehicle can make it through my single bay door, even if I had to fold in the mirrors, then it would have no issue getting on to the lift. Anyway, the extra space makes it really easy to get anything on and off the lift. Plus, you never know, I may still get my military H1 Hummer some day. I haven't used the air jacks yet. I'll be swapping out the shocks on my maxima this weekend so I'll let you know next week.

JMURiz - I do get on the 914 boards every now and then and for sure heavily during the spring and summer. I think I've seen you there too. Your name does look familiar. BTW, they're both 75's. The black one is a 1.8 and the Orange one is a 2.0. Anyway, during the winter I kind of forget about the cars and focus on my basement remodeling. I just finished installing a bathroom and home theater in my basement and also ran a gas line for a fire place. Winter is the only time to focus on the basement as my kids are in Little League and soccer so I'm busy from April-July with sports. Hopefully, I'll be adding a ceiling mounted hose reel and building a workbench in the next week too. I'm getting tired of having to break out the sawhorses every time I need a bench top.
 
Last edited:

jackmcmanus21

Member
Joined
Mar 18, 2008
Messages
19
I always thought you could fir 2 914s in a standard garage....but it still looks weird to see it. Nice work though!
 

Mordi

Well-known member
Joined
Sep 6, 2007
Messages
80
Location
San Diego, CA
Ovilla,

Nice job on the lift and a good write up!

I am planning on a HD-9 ST (standard size) in the near future.

I thought I saw in the manual that all I needed was a 25 amp circuit vs the 30 amp circuit you indicated for the HD-9B? Do you know if the electrical requirements are different for the two lifts?

Thanks,
Mordi
 
OP
O

ovilla

Well-known member
Joined
Dec 18, 2005
Messages
2,342
Location
Plainfield, IL
Mordi, I actually talked to Will (tech support at Bendpak) who told me to wire in a 30 AMP circuit breaker for the 220 motor (which is the same motor in use for the entire HD-9 series of lifts). He said that during start up it may spike somewhere in the 20+ amps but that it would normally not draw more than the teens. I'm going to put my amp meter on mine soon to see what it's actually drawing.

Phatsub - I'd get whatever kind of lift can make working on your cars more enjoyable. Seriously, I don't think there's such a thing as having a bad lift, whether it's a 2-post,4-post, or small lift that just lifts your car a few feet. You can always sell it down the road for most likely whatever you paid for it. With the price of steel and everything else going up each year, it won't be hard to get your money back if you decide to sell it down the road. Also, depending on your garage set up, you may be able to change your roof trusses to give you more height or even just slightly vault your ceilings.

Omar
 
OP
O

ovilla

Well-known member
Joined
Dec 18, 2005
Messages
2,342
Location
Plainfield, IL
JimH - I went ahead and used my rolling air jack today just to verify that it works. I was doing oil changes on all four cars and went ahead and used it on my Maxima. Wow! This baby really works well. During the first time use, it sounded like a jack hammer but was very very smooth going up, just like you would expect from a scissors lift. Going down was very slow (actually slower than my HD-9). The good thing though is that you don't have to hold it to go down as you can lock the handle for that. You do have to hold the manual locking "handle" off to the side or the lock will attempt to engage as the rolling jack is going down. Anyway, during the second and subsequent lifts, it made no more jack hammering noises and worked really smooth. I must say that this thing is so nice, it's a shame that it won't be used more often. I just hate that it's so expensive.

I had an interesting (somewhat scary) scenario play out tonight with the lift. I had lifted my minivan about 3-4" from the very top of my garage ceiling and when I went to lower it, I had not raised the van high enough to allow the air locks to all disengage. Hence, three of the locks disengage and as the van was coming down, the cable on the driver's side front had some slack so the safety lock engaged. It was a little freaky and of course that's exactly when the wife had come out to the gargage, taking a break from her baking. I put on my stern face and said that everything was fine, as it was, but I was a little perplexed at first as to why the one lock was not unlocking. I even thought that the slider was stuck so I sprayed it down with WD-40. Anyway, I got a flashlight and went around to each column to verify the height/placement of each cross member within the column and did verify that my one column was stuck. For a bit I even thought that the one air lock just wasn't engaging all of the way.

Well, leave it to operator error. I was ony about 3-4" away from the ceiling so I was hesitant to lift the van any higher towards the ceiling. After really studying the air locks (by having the wife activate the air locks on and off, again and again) as I went around to each column again and verified that they were engaging, I found out that I just needed to raise the van about another 1/4" inch to allow the air lock to disengage from the column. Once I did that, I was able to let the van down smoothly. Once it was down, I did adjust the cable on that column. Keep in mind folks, that I've only had the lift for a week so I'm still adjusting things.

Side note: I purposely assembled this lift with the help of friends just so that I'd be able to troubleshoot things down the road. If you had your lift installed, do read your manual from cover to cover and get to know your lift well. Finally, do watch movement of the lift at all four columns. I've also gotten into the habit of looking for slack in the bottom of the runway with the cylinder on it (when I can't really see all of the columns - which was the case when I lifted my van today).
 
Last edited:

Junkman

Well-known member
Joined
Dec 18, 2006
Messages
6,626
Location
Northeastern CT
You don't have the locks all positioned the same. They all should lock simultaneously, and all should unlock at the same time. If one post is hanging, then it must be out of adjustment. Listen for the lock engagements as it goes up. If one is out of "timing", then you will hear it. Doesn't take much for one to be off, and it only effects you when you have the car too close to the ceiling. Otherwise, you will not see the effect of the locks during engagement, since all corners of the runways will be higher than necessary to unlock. This is the reason for checking everything after a few uses. The cables have some give to them, and everything settles in where it wants to be. It is up to you to tweak the settings so they are exact all around.
 
OP
O

ovilla

Well-known member
Joined
Dec 18, 2005
Messages
2,342
Location
Plainfield, IL
As usual, great advice Junk! I'll have to pay more attention to the locks as I'm lifting. I'm also going to put a level on the cross bars and also on the ramps to see where things are now that it's been used a bit more.
 

Junkman

Well-known member
Joined
Dec 18, 2006
Messages
6,626
Location
Northeastern CT
Leveling from side to side isn't going to work, unless the floor itself is perfectly level. That is why the ladders are adjustable to compensate for out of level floors. The only way that you could use a level is if you had a transit and shot the elevations of the four corners, and then compensated for each corner in adjustment of the wire rope, and the ladder locks. To do this would be a monumental task as compared to making a simple adjustment at the one column that is off. This is also the reason that there are no locks at the bottom of the lift. The runways are intended to just bottom out when they get to the floor. Don't forget to use the dry lubricant on the wire rope now that it is fully assembled. Also double check the Allen head screws that hold the pulleys to make sure that they are properly tightened.
 

bobs4092

Active member
Joined
Dec 19, 2007
Messages
38
Pricing - When I spoke to Brian (www.asedeals.com) a week ago he said that pricing for my unit would most likely go up about $200, so definitely order it soon so you can lock in the price. I'm sure you can tell them to hold off shipping for a while.


Woudn't you just know it, I'd be a few days too late. :mad: I'm ready to order but see the cost is now $2820! I think it was $2650 or so? I was just holding off until I was sure the major snow storms were over so I could install it.

I wrote an e-mail to Brian yesterday to see if I could get the old price but not counting on much there. (we'll see...) A quick search shows the only cheaper place is Northern tool at $2799.00


Argghhhh! :wtf:
 
To avoid these ads, REGISTER NOW!
OP
O

ovilla

Well-known member
Joined
Dec 18, 2005
Messages
2,342
Location
Plainfield, IL
They all ship from Bendpak in CA so do shop around for the best price. Keep in mind, that long term servicing will be coming from Bend Pak. Anyway, you might also be able to get a better price overall if you go with a package deal by buying accessories along with your lift purchase. I'd ask Brian what he can do.

In general, I have to wonder how long it will be before folks can no longer buy (or simply won't want to consider buying) a 4 post or 2 post lift. I think at a certain price point (say 4-5K), these things will be priced out of the grasp of most folks. For example, I've heard that the backyard buddy 4-post units are the most expensive, costing close to 4K right now. I wonder how much more they'll be going up in cost? By the way, I do like their product (but I really like the safety features and certification of my Bend Pak, which nobody else had) but one of my biggest concerns was that they'd be going the same route as autolifters. This is just my opinion.
 
Last edited:

bobs4092

Active member
Joined
Dec 19, 2007
Messages
38
Well, got a reply but they won't sell for the old price.

I did alot of searching on the net and the lowest I can find now is Northern tool for $2799.00 Looks like they'll be getting my money instead.

I don't think I have to mention how ticked off I am about throwing away $149 dollars for nothing! I could have bought it back in January but was holding off for nicer weather. :mad:

Now I find out that it would cost me $100 to hire a roll back to deliver it from the trucking company to my house. BTW, that's a 3 mile drive! Tried finding a place I could rent a flat bed truck but none around. Would try a moving van but afraid I'll damage the interior floor and end up having to pay for that too! One more option is a tow behind trailer which I'm now checking on...

Not related but to make a point about how my day was yesterday, now Lowes is screwing me over on a $100 dollar gift card for a table saw I recently bought saying I didn't send the reciept in but I did. I'm getting the shaft from all ends and losing money FAST! I can't help but wonder what today will bring...


(sorry for the rant)


P.S. If there are any Bend pak dealers reading this who can beat $2799 on the HD-9, contact me soon. Have CASH (credit card) waiting! LOL
 
Last edited:

RAO-3

Member
Joined
Mar 10, 2008
Messages
22
They all ship from Bendpak in CA so do shop around for the best price. Keep in mind, that long term servicing will be coming from Bend Pak. Anyway, you might also be able to get a better price overall if you go with a package deal by buying accessories along with your lift purchase. I'd ask Brian what he can do.

In general, I have to wonder how long it will be before folks can no longer buy (or simply won't want to consider buying) a 4 post or 2 post lift. I think at a certain price point (say 4-5K), these things will be priced out of the grasp of most folks. For example, I've heard that the backyard buddy 4-post units are the most expensive, costing close to 4K right now. I wonder how much more they'll be going up in cost? By the way, I do like their product (but I really like the safety features and certification of my Bend Pak, which nobody else had) but one of my biggest concerns was that they'd be going the same route as autolifters. This is just my opinion.


Actually the backyard buddy is now about $4200 + shipping.

I just recently ordered a Rotary Revolution, which also has the certification.

Most seem to be going for the Chinese made lifts to save the $$$ as they are about 1/2 the price - I think the last place you want to pinch a $ is with a lift that you will be under.

Ray
 
OP
O

ovilla

Well-known member
Joined
Dec 18, 2005
Messages
2,342
Location
Plainfield, IL
bobs4092 - Sorry to hear about the new price. After you get it and start using it, you won't even care what it cost. Honestly, you'll wish you would have done it years ago. Anyway, if you can pull a trailer, do call UHaul and pay the $29/day for a 12X6 trailer. Also, I know junkman had his lift delivered to a lumberyard so call around and see what they can do.
 

bobs4092

Active member
Joined
Dec 19, 2007
Messages
38
Well, I took the plunge and ordered an HD-9! :thumbup: Should be here in 10-16 business days.

I went with Northerntool for $2795.00

I already picked up the 3 gallons of transmission fluid. :bounce:

Borrowing a trailer to haul it home on.


Bob
http://www.348-409.com/
 

Junkman

Well-known member
Joined
Dec 18, 2006
Messages
6,626
Location
Northeastern CT
Well, I took the plunge and ordered an HD-9! :thumbup: Should be here in 10-16 business days.

I went with Northerntool for $2795.00

I already picked up the 3 gallons of transmission fluid. :bounce:

Borrowing a trailer to haul it home on.


Bob
http://www.348-409.com/


I just found this website tonight. They have the HD-9B for $2695! I don't know if Northerntool has a price guarantee policy, but it is worth a try... This company, Alpha Omega Tools, seems to have the very best prices on Bend Pak that I have found to date.
 
OP
O

ovilla

Well-known member
Joined
Dec 18, 2005
Messages
2,342
Location
Plainfield, IL
bobs4092 - Congrats on the purchase. If you need any guidance, keep in mind that there's plenty of us on the board that now own this lift. Ask them to send you an email with the HD-9 manual so you can start reading it in your spare time. Also, make sure you buy the 1 3/8 socket that you'll need for the nut on the end of the cylinder. I think this only comes in 3/4 so you'll also need a 1/2 adapter so you can use it on your impact gun (the nut's got nylon threads so that's the best way to attach it). Other than that, everything else can be done with regular hand tools and an adjustable wrench. If you're going to anchor the lift, you'll need a 3/4 masonry bit (the anchor bolts are also included in a seperate box). Oh, don't fret about scratches, they even ship you a can of spray paint for touchups in case you need it.
 
Last edited:

bobs4092

Active member
Joined
Dec 19, 2007
Messages
38
Thanks guys! :beer: Love the tip on the 1-3/8 socket ovilla. I can just see me scurrying around trying to find that at the last minute. :confused: Now I can track one down ahead of time. :thumbup:

I will be reading up on all the threads on these today to try and familiarize myself with everything.

Thanks for the link junkman. I just checked and Northern tool does have a 110% price guarantee good for 30 days after a puchase but at the bottom, it says not valid on items with free shipping so guess that's out. :headscrat


Bob
 

tubeman

Well-known member
Joined
Nov 22, 2005
Messages
144
Location
Houston
I just installed a Bend Pak xp 10acx lift and was a little disappointed with the quality of some parts. In discussion with the installer he said that the quality has diminished since they started making the lifts in China! Here I thought I was buying American! It may be a waste of money to pay up for the Bendpak's now that they are made in the same factories as identical lifts for $1000 cheaper.
 

bobs4092

Active member
Joined
Dec 19, 2007
Messages
38
China? Is this really true? If I had known that I would have considered other brands first. Too late in any case for me, it's paid for.

I have a few questions for you guys that have the HD-9:

1) Mine will be picked up at a Conway trucking terminal nearby that has lots of loading docks. Would it be a good idea to possibly unpack everything there and haul this home in say 3 pickup trucks rather than all packaged on a trailer? The longest parts are the 2 runways and while they would hang out 4', that shouldn't be a problem. Was thinking of backing up to a dock and sliding these pieces in. All other parts should be easier to handle, right? Does this sound possible? Would be great if I could avoid using a trailer or paying $100 for a rollback.

2) Would 12/2 gauge wire be appropriate for this or do I need heavier?

3) How long does it take to put one of these together?

4) Ok to NOT bolt it down? I have radiant tubing and am afraid of puncturing the tube.


I downloaded the manual which is 50 pages! A bit scary and hard to understand without actually having the pieces in front of me.


Thanks for any help,


Bob
 

Junkman

Well-known member
Joined
Dec 18, 2006
Messages
6,626
Location
Northeastern CT
If you unpack it, you can get it all into the pick up. Just keep in mind the length of the ramps and how much they will stick out the back. The pump calls for a 10 gauge wire and a 220 volt single phase 30 amp dual pole breaker. You could probably get away with the 12 gauge, but I don't ever recommend something that the manufacturer doesn't recommend, even if I were to do it myself. I would figure that it will take about 4 to 5 hours the first time. A lot less the second time, since you will know what you are doing. I don't have mine bolted down, and don't let the instructions scare you. It is so easy, even a cave man can do it...... Just don't step on the Gecko......:lol_hitti
 

jay50

Banned
Joined
Oct 28, 2007
Messages
3,894
China? Is this really true? If I had known that I would have considered other brands first. Too late in any case for me, it's paid for.

I have a few questions for you guys that have the HD-9:

1) Mine will be picked up at a Conway trucking terminal nearby that has lots of loading docks. Would it be a good idea to possibly unpack everything there and haul this home in say 3 pickup trucks rather than all packaged on a trailer? The longest parts are the 2 runways and while they would hang out 4', that shouldn't be a problem. Was thinking of backing up to a dock and sliding these pieces in. All other parts should be easier to handle, right? Does this sound possible? Would be great if I could avoid using a trailer or paying $100 for a rollback.

2) Would 12/2 gauge wire be appropriate for this or do I need heavier?

3) How long does it take to put one of these together?

4) Ok to NOT bolt it down? I have radiant tubing and am afraid of puncturing the tube.


I downloaded the manual which is 50 pages! A bit scary and hard to understand without actually having the pieces in front of me.


Thanks for any help,


Bob

Dayum; Bendpak is no longer US made but Mao mart type Chinese ****? Was 2 days away from placing my order but will not since reading this. They lost another customer .....
 

Chris J

Active member
Joined
Feb 23, 2008
Messages
30
Yes, it's true. Bend Pak has sold out. These days, if it doesn't say Hunter or Rotary, you should ask specifically were the lift is made, and who knows for how long this will remain true?
 

bobs4092

Active member
Joined
Dec 19, 2007
Messages
38
Funny how they forgot to mention THAT on their website isn't it!

This country is fading fast my friends. I don't know why we don't just move everyone from China over here. They are already making everything for us. This way, we wouldn't have to ship OUR steel over there and then ship the products back over when we buy them!!! :mad:

All I gotta say is if this thing falls on me, it better kill me outright.... :mad:


Thanks for the help guys. I'm going to check with Conway to see if they would let me unpack it there.

I will also pick up the 10 gauge wire and get that partially installed. :beer:


Bob
 

Piper

Well-known member
Joined
Nov 17, 2006
Messages
590
Location
Muskoka, Canada
As a Canadian I fully support my neighbors to the south. Let me say that outright at first. My question is, is the fact that China is where these lifts are manufactured the problem as the US jobs are lost? Is it that you feel that the quality will drop as the lift isn't made in US anymore? Everything I hear from Jeff at Bendpak is that the lift is still certified and will continue to be. If they are certifying it then the quality has to continue to be there doesn't it?

Don't get me wrong. I hate to hear of lost jobs but I just don't understand where the opposition is.

Piper
 

Vicious_Cycle

Well-known member
Joined
Jan 11, 2006
Messages
360
Location
Chardon, OH
Don't get me wrong. I hate to hear of lost jobs but I just don't understand where the opposition is.
From what I've read here, it is a perceived quality problem for most people. I have seen countless references to "I'm not going to trust my life to a cheap Chinese lift just so I can save a few bucks."

I bought a foreign made lift a couple of years ago, and it's rock-solid. I chose to go overkill on the weight rating for my peace of mind... I have a 10k lb lift that typicallly sees a load of < 4k lbs (Buicks) with an occasional load of 6800 lbs (F-250).
 

bobs4092

Active member
Joined
Dec 19, 2007
Messages
38
Well, I kind of feel like I've been tricked to be honest about it. All along, all I ever heard was buy an American made lift like Bend pak. So I've been reading up on them here and checking prices. So I buy one and 2 days later, I find out it's made in China?

I'm looking at the Northern tool catalog right now and it says U.S.A at the end of the description. A bit misleading in my opinion. I sure hope it's at least certified as you mentioned to be just as good. Something to justify the extra money I spent anyway... If I wanted a Chinese lift, I could have saved about a grand and got drip pans and casters thrown in. :wtf:

What scares me most I guess is when I think of how just about anything else made in China is usually made. The quality of the metal in particular. Problem is, this isn't a set of wrenchs, I'm going to have 2+ tons of dead weight hanging over my head.

I won't get into the lost jobs discussion as I'm not a politician and that's a whole other thread entirely.

Well, too late to do anything about it now, it's not something I can just send back...

Odds are, everything will be fine and I just have a bit of Made in China sticker shock, just wish I knew ahead of time. It may have changed my purchase decision. I know I would have looked a bit harder...
 

Vicious_Cycle

Well-known member
Joined
Jan 11, 2006
Messages
360
Location
Chardon, OH
I don't know where your lift was made because I didn't research Bend Pak once I saw the price. But if you were THAT obsessed with buying a USA made lift, you probably should have done a little more homework.

That said, it is interesting to see the lengths that some retailers will go to in order to hide the fact that they are selling Chinese-made lifts! I read everything printed about my lift, and the only place that was mentioned was TEXAS! So I called Texas and browbeat some lady until she confessed to where the lifts were built. I wasn't worried about it being Chinese-built...I just wanted to make an informed decision.
 
To avoid these ads, REGISTER NOW!
Top Bottom