To avoid these ads, REGISTER NOW!

Kennedy Kits 520 Restoration Project.

S-K Tool Fanatic!

Well-known member
Joined
Nov 28, 2022
Messages
776
Location
NE Ohio
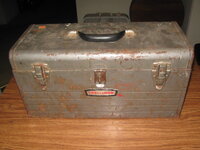
Got this Kennedy Kits 520 tool box from my grandfathers stash, someone painted it very awful so most of it fell off. It needs re-felted and painted, so I need recommendations for both of those.
IMG_0902.jpeg
IMG_0903.jpeg
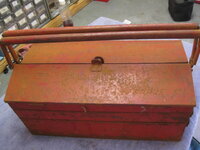
Here it is as I got it.
IMG_0904.jpeg
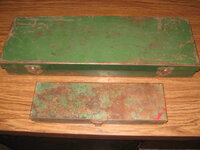
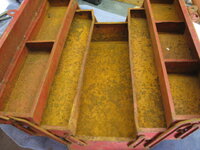
Here it is with the drawers taken out of it.
IMG_0905.jpeg
Here are all of the drawer slides.
IMG_0906.jpeg
This is the paint I’m thinking about using since im not coughing up $40 a can for real Kennedy paint, anyone suggest anything different or have experience with this paint.
-Tommy
 
To avoid these ads, REGISTER NOW!

RTM

Well-known member
Joined
May 13, 2019
Messages
13,162
Location
SF Bay Area
I was told someone’s Leather Brown was close, but someone here recently refuted that opinion recently.

I buy my felt at Joann’s, got red green and blue on the shelf. And several boxes needing help.
 
Last edited:

bmwrd0

Well-known member
Joined
Nov 7, 2010
Messages
5,463
Location
Beaver Fever Oregon
I bought grey felt at an estate sale, but haven't gotten around to doing anything with it. I did once buy a can, at decent expense, of the Kennedy brown crinkle touch up paint. But I was doing a small roller cart, which is much harder too find than a 520, which fits on it quite nicely. I think it was worth it, others might not.
From this:
50196613136_701d0f34c2_c.jpg
to this:
50331379943_a1004a09be_c.jpg
 
OP
S

S-K Tool Fanatic!

Well-known member
Joined
Nov 28, 2022
Messages
776
Location
NE Ohio
Thanks for the advice so far! Keep it up.
Anyone know an approximate date on this? If you guys need a closer pic of the Kennedy Kits tag I can if that would help.
-Tommy
 

d42jeep

Well-known member
Joined
Oct 22, 2014
Messages
16,545
Location
Northern California
I’m not good with dating Kennedy toolboxes but as a rule of thumb if the box has a leather handle it was likely made before 1950. Yours is newer than that.
-Don
 
OP
S

S-K Tool Fanatic!

Well-known member
Joined
Nov 28, 2022
Messages
776
Location
NE Ohio
Anyone know what I should do about the decal that has the model number, because it’s kinda disintegrating but I don’t know where to get a new one.
-Tommy
 

RTM

Well-known member
Joined
May 13, 2019
Messages
13,162
Location
SF Bay Area
Thanks for the advice so far! Keep it up.
Anyone know an approximate date on this? If you guys need a closer pic of the Kennedy Kits tag I can if that would help.
-Tommy
My notes put it between 46 and 67 based on the lock. Unfortunately not many catalogs in that gap. The leather looped handle vs the bracket mount handle is a feature I did not track yet.
 

d42jeep

Well-known member
Joined
Oct 22, 2014
Messages
16,545
Location
Northern California
They were still mentioning leather handles in 1949. I believe that I got the 1950 date from Kennedy customer service.
—Don47CE4570-1970-4B06-88DD-613F662DD26B.jpeg
 
Last edited:
OP
S

S-K Tool Fanatic!

Well-known member
Joined
Nov 28, 2022
Messages
776
Location
NE Ohio
Some progress today.
IMG_0910.jpeg
IMG_0909.jpeg
IMG_0912.jpeg
Got the nasty felt stripped out and the drawer pulls off, broke one but I think I glue it back together, what a pain in the **** to take off.
IMG_0913.jpeg
Got this paint at Mainards, $27 worth.
IMG_0914.jpeg
IMG_0915.jpeg
Got the latches off, found that a Dremel with a little grindy bit works well. It pays to be a hoarder, I had the correct size brass rivets in stock, I think the brass on the brown will look good.
-Tommy
 
OP
S

S-K Tool Fanatic!

Well-known member
Joined
Nov 28, 2022
Messages
776
Location
NE Ohio
Can someone give me advice on painting a tool box like this, how many coats of what, how long between them, any tips on using hammered paint,ect. I’m planning on doing this Wednesday or Thursday because it’s going to be 80+ and Sunny. Any advice is welcomed, thanks in advance.
-Tommy
 

larry_g

Well-known member
Joined
Apr 28, 2007
Messages
16,879
Location
oregon
One note on the felt and its glue. There are white glues that offgas a corrosive vapor that will rust tools. I believe that hide glue is the proper thing to use but please confirm that yourself because my memory is not that good any more.


lg
no neat sig line
 

RTM

Well-known member
Joined
May 13, 2019
Messages
13,162
Location
SF Bay Area
Spraying the drawer, and not the felt, gives you more control. I used cardboard to mask the sides where I was only felting the bottom.

Friend recommended cutting the felt over size, and trim to the edges later. Have not tried it yet.
 

BigTexasYardSale

Active member
Joined
May 28, 2018
Messages
27
Location
Texas Gulf Coast
Hammered finish paint is not the same as crinkle finish. If you are going for the original look first spray it with crinkle finish paint of any color because you won't find the correct brown in crinkle paint. If you've ever painted then you know how important surface preparation is and how any defect will show through. You are going to use that to your advantage here. Practice on something first. Crinkly paints are very sensitive. The thickness of the paint determines the amount of crinkle you get. Then spray your brown color coat on top of that. Just enough to get the color and you won't alter the crinkle. If you have a reference color sample I have had good luck going to Lowes and having them do a color scan and then mixing oil based paint for me. Of course you will need an air brush or touch up gun to spray it.
 
To avoid these ads, REGISTER NOW!

bonneyman

Well-known member
Joined
Apr 22, 2010
Messages
8,796
Location
Desert SW
Cool project!

All I can say is the old adage, "painting is 90% prep and 10% paint". I've done a socket box or two with the hammered green (for S-K). Came out OK. But the prep was killer to get it just right. I've gone back to regular semi-gloss enamel for my user boxes. Not prom queen perfect but a whole lot better than they started out.
Here's my latest 6500 and S-K boxes.
 

Attachments

  • IMG_8096.JPG
    IMG_8096.JPG
    104 KB · Views: 43
  • IMG_8121.JPG
    IMG_8121.JPG
    87 KB · Views: 37
  • IMG_8324.JPG
    IMG_8324.JPG
    112.9 KB · Views: 35
  • IMG_8358.JPG
    IMG_8358.JPG
    93.8 KB · Views: 37

bonneyman

Well-known member
Joined
Apr 22, 2010
Messages
8,796
Location
Desert SW
Yeah, but every minute you spend on prep is equivalent to about an hour of cussing, stripping, sanding, and repainting later.

Looks good.

Here's a gifted FACOM cantilever I restored to give you encouragement. Took ALOT of prep.
 

Attachments

  • IMG_4362.JPG
    IMG_4362.JPG
    105.7 KB · Views: 28
  • IMG_4361.JPG
    IMG_4361.JPG
    126.5 KB · Views: 28
  • IMG_4513.JPG
    IMG_4513.JPG
    101.8 KB · Views: 27
  • IMG_4511.JPG
    IMG_4511.JPG
    115 KB · Views: 29

mogandave

Well-known member
Joined
Nov 4, 2021
Messages
3,052
Location
Bangkok
This:


You get a discount if you buy 100 gallons or more!
I think you can still get quarts at Ace Hardware, but they won't deliver it.

A quart would probably do at least ten of those 520s...
 

mogandave

Well-known member
Joined
Nov 4, 2021
Messages
3,052
Location
Bangkok
It's great. Brush it on, and let it "dry".

I wash it off with soap and water before I paint.
 

RTM

Well-known member
Joined
May 13, 2019
Messages
13,162
Location
SF Bay Area
Had a conversation with a friend on a different topic, which might be helpful here. Never tried, so take it with a chunk of salt.

As noted above, make your felt oversized, and cut after it's in place. But to make placing it easier, this idea may work. Cut a platen the size of your standard drawer bottom. You only have two per chest, occasionally three if you have a handbook drawer, so not too awful. Make it smaller than the drawer bottom by at least to felt thicknesses, maybe chamfer the sides for clearance. Put a handle on it so you can grip it. Maybe add wax paper or foil to prevent glue from seeping thru. Wrap your felt across the bottom of the platen, and up the sides enough to secure it with tape or staples or hold it with your extra fingers.

Apply glue to the bottom surface, or drawer bottom, and then press it down onto the drawer bottom. Allow it to sit a minute (spray sticks fast), then gently remove platen.

This may help prevent getting wrinkles on the bottom, or incorrect positioning of the felt before trimming.

If someone tries this, could you report back if it works? I've got to do a box soon, and it seems like a winner.
 

mogandave

Well-known member
Joined
Nov 4, 2021
Messages
3,052
Location
Bangkok
Had a conversation with a friend on a different topic, which might be helpful here. Never tried, so take it with a chunk of salt.

As noted above, make your felt oversized, and cut after it's in place. But to make placing it easier, this idea may work. Cut a platen the size of your standard drawer bottom. You only have two per chest, occasionally three if you have a handbook drawer, so not too awful. Make it smaller than the drawer bottom by at least to felt thicknesses, maybe chamfer the sides for clearance. Put a handle on it so you can grip it. Maybe add wax paper or foil to prevent glue from seeping thru. Wrap your felt across the bottom of the platen, and up the sides enough to secure it with tape or staples or hold it with your extra fingers.

Apply glue to the bottom surface, or drawer bottom, and then press it down onto the drawer bottom. Allow it to sit a minute (spray sticks fast), then gently remove platen.

This may help prevent getting wrinkles on the bottom, or incorrect positioning of the felt before trimming.

If someone tries this, could you report back if it works? I've got to do a box soon, and it seems like a winner.
I've thought of this, but if I were redoing a box I would just leave the felt out
 
To avoid these ads, REGISTER NOW!
Top Bottom