To avoid these ads, REGISTER NOW!

Killing time in a small "2 car" garage

OP
B

BoilermakerFan

Well-known member
Joined
Apr 17, 2006
Messages
2,188
Location
Indianapolis, Indiana
Looks like you've been busy since the last time I dropped in. Keep up the good work.

Thanks man. Can you see the pics when they are attachments to my posts instead of being embedded DropBox images?

Cause I have a lot of pics to share of the progress we made this week and weekend on the bench top.
 
To avoid these ads, REGISTER NOW!
OP
B

BoilermakerFan

Well-known member
Joined
Apr 17, 2006
Messages
2,188
Location
Indianapolis, Indiana
Pics of the progress in the last week. Filled in a few gaps with finishing epoxy and sanded it flat.

Then I had my son sand the top again for a final coat of oil...
 

Attachments

  • 20200418_135729.jpg
    20200418_135729.jpg
    78.1 KB · Views: 31
  • 20200418_170713.jpg
    20200418_170713.jpg
    109.9 KB · Views: 30
  • 20200418_170734.jpg
    20200418_170734.jpg
    109.5 KB · Views: 26
  • 20200419_230328.jpg
    20200419_230328.jpg
    99.3 KB · Views: 24
  • 20200419_222910.jpg
    20200419_222910.jpg
    111 KB · Views: 27
OP
B

BoilermakerFan

Well-known member
Joined
Apr 17, 2006
Messages
2,188
Location
Indianapolis, Indiana
Then after the last coat of oil was applied and wiped down.

I drilled access holes for the T-track, then counter bored, debured, and polished them.

The top is still weeping excess oil out of the seams and larger open grain pores. Once that slows down significantly I will wax the top and buff it out.
 

Attachments

  • 20200420_161740.jpg
    20200420_161740.jpg
    114.2 KB · Views: 21
  • 20200420_161721.jpg
    20200420_161721.jpg
    116.6 KB · Views: 19
  • 20200420_161710.jpg
    20200420_161710.jpg
    76.4 KB · Views: 19
  • 20200419_212344.jpg
    20200419_212344.jpg
    149 KB · Views: 18
  • 20200419_230222.jpg
    20200419_230222.jpg
    122.6 KB · Views: 19
  • 20200419_212327.jpg
    20200419_212327.jpg
    127.4 KB · Views: 19
  • 20200419_222846.jpg
    20200419_222846.jpg
    151.2 KB · Views: 20
OP
B

BoilermakerFan

Well-known member
Joined
Apr 17, 2006
Messages
2,188
Location
Indianapolis, Indiana
And I'm calling it done.
 

Attachments

  • 20200421_180406.jpg
    20200421_180406.jpg
    152.4 KB · Views: 20
  • 20200421_180434.jpg
    20200421_180434.jpg
    100.7 KB · Views: 15
  • 20200421_193137.jpg
    20200421_193137.jpg
    149.3 KB · Views: 16
  • 20200421_193159.jpg
    20200421_193159.jpg
    153.4 KB · Views: 27
OP
B

BoilermakerFan

Well-known member
Joined
Apr 17, 2006
Messages
2,188
Location
Indianapolis, Indiana
This evening I set the bench top onto my saw horses and removed the legs. I had enough exercise mat to make pads for the legs. Then tonight I cleared out the area in the basement for the bench.

Since we're still under SIP and my neighbor moved about 15 minutes away, it's going to be more work to get the bench into the basement and set up. Fortunately, both my son and daughter are home so they'll be able to help.
 

Attachments

  • 20200422_220452.jpg
    20200422_220452.jpg
    34.1 KB · Views: 20
  • 20200422_230710.jpg
    20200422_230710.jpg
    65.9 KB · Views: 26
  • 20200422_230647.jpg
    20200422_230647.jpg
    91.5 KB · Views: 32
  • 20200422_185714.jpg
    20200422_185714.jpg
    121.5 KB · Views: 26
OP
B

BoilermakerFan

Well-known member
Joined
Apr 17, 2006
Messages
2,188
Location
Indianapolis, Indiana
It's finally in the basement and set up! I'm really sore from fighting the beast, but with help from the kids I was able to get it moved into place.

I still need to finish cleaning up the wiring and mounting the controls.
 

Attachments

  • 20200423_230721.jpg
    20200423_230721.jpg
    94.1 KB · Views: 26
  • 20200423_230614.jpg
    20200423_230614.jpg
    44.7 KB · Views: 29
  • 20200423_225916.jpg
    20200423_225916.jpg
    52.5 KB · Views: 26
  • 20200423_225848.jpg
    20200423_225848.jpg
    45.3 KB · Views: 31
  • 20200423_225749.jpg
    20200423_225749.jpg
    47.4 KB · Views: 36
  • 20200423_194410.jpg
    20200423_194410.jpg
    94.6 KB · Views: 35
  • 20200423_184907.jpg
    20200423_184907.jpg
    48.9 KB · Views: 33

Madone_si

Well-known member
Joined
May 15, 2013
Messages
191
Location
Seattle WA & Middlesex UK
I've lost track of my timeline, but I believe it was this past long weekend I replaced a pipe that went up to the first floor WC because it was leaking at the pipe union I tied into and there was no way to get a wrench on it to tighten it up any more. So I just replaced it with a short piece of 1/2" PEX up into the bathroom above. It's all being torn out this summer for a bathroom remodel/expansion.

Oh, and in order to replace that section to the WC, I had to buy a new Dremel. My old one crapped out. The design of the new one is definitely improved over my old one. And I added the little adjustable chuck.

20200118_144624.jpg


Now I only have one minor leak and it's at the inlet of the whole house sediment water filter. About a third of the reviews mentioned this leak. When you tighten the fitting enough to set the threads, the housing where the female insert is begins to leak. I put a nice bead of silicone caulk around it and let it cure for several days. Still drips a drip about every two to four hours. Not major, but enough to annoy me. So eventually I will spend a little more on a better filter, but for now I'm going to bypass the filter, vent all pressure, and scuff the housing around the fitting. then I'll roll a small bead of magnum steel epoxy and press it into place to fill the gap between the housing and the fitting. After that cures, I'll scuff it all again and apply a nice coat of JB Weld over that. If it leaks after that, well, it won the battle, but I'll win the war when I toss it in my garbage can.

I started removing more of the old pipe last weekend too. I was surprised to discover that the run into the kitchen crawlspace was a complete 20'+ piece of pipe. I couldn't pull it completely out of the crawlspace into the finished area of the basement that is 19' long. So i have to get the recip saw out and cut it into 3 pieces to haul outside. I'm just piling the old pipe out behind my trash cans for now. Too cold or raining to take the time to cut it down into 3-1/2' sections for the trash can.


3 weeks ago this Saturday I went indoor rock climbing for the first time. My arms didn't work a week after the first time. Now I can climb twice a week. My son and I have been going twice a week for the last two weeks and we signed up for a trial membership that includes the gear. Our trial converts to a regular monthly membership on Feb. 4 and we'll need to buy our own harnesses and shoes. The gym offers a 15% discount in their pro shop with the full membership, so we'll buy the harnesses there, but we'll order our shoes from Amazon this time. Once we get better, we'll buy our next shoes from the gym since they only sell shoes for more advanced climbers.


Over the past weekend and this week I've pretty much finished building my trail rig. I'm waiting to order a few more upgrades and one of the guys who makes aftermarket links is going to work up the links I need for my stretched wheelbase to work with my '76 F150 body. He has the truck and the same body, so they'll be dead on the money when I get them.

Last weekend we hit up the LHS for paint for our vehicles. My son picked out a metallic dark blue for the VW Beetle. I grabbed "Racing Green". Wednesday I was in St. Louis and stopped by a shop there and found a light green for my second color.

This truck is the inspiration for my paint colors since it's an original, survivor truck:

20200122_172502.jpg


20200122_172628.jpg


20200122_172545.jpg


Here's the paint I have:

20200122_174811.jpg


The light green is a little too light, but the neat thing about painting Lexan bodies is that you paint them on the inside and then back the colors for the final finish. So depending on the backing color, the main color changes slightly. If you paint a light coat you can really change it with the backer. I'm going to paint the light green in a very light, even coat, then back it with the dark green. That will darken it up a lot and change the tint to be more green as well.


I'm going to just do a simple stripe in the light green down the side of my body. I haven't decided if I'll do the roof in the light or dark green yet. Here's an example that is closer to what mine will look like:

20200122_174421.jpg


The weather here is supposed to be colder on Saturday so I may not get to spray the body this weekend. I might crank up the heat in the garage and bring my heat gun out there too. I'm really wanting to get the body painted. I'm dying to see it on the truck. After the body is painted I can add the magnets to hold it on the chassis. I need to order an interior 'kit" to add more scale detail to the body and I need to make a scale cover for the bed. The final details for the body will be a roll bar from the sister truck to my kit, better rock sliders for the sides, and LED lighting. I need to pick up a front bumper with a winch fair lead too, but that's not critical until I'm ready to take it on some rocks.


Here's the chassis as it sits right now, with the 12.3" wheelbase. It needs to be 12.8" for the F150 body:

20200119_011457.jpg


20200121_000206.jpg


20200121_000132.jpg


20200121_000301.jpg


20200121_000247.jpg


20200121_000038.jpg


20200121_000013.jpg


The shocks will eventually be replaced too. They're great shocks, but too shiny and too blue. I'll either convert over to a bronze/black set or a grey hard anodized/black set. I haven't decided if I'll keep the center spinners on the truck. There are black Nylon locking nuts under them so the wheels are on nice an tight and they look more scale since everything is black. I've had those spinners for years tho, so I put them on for fun. If they stay, i need to add thread lock to them.


In the future I will be swapping out the steering knuckles to these:

samend-4412fs.webp


Screenshot_20200122-215514_Chrome.jpg


Screenshot_20200122-215535_Chrome.jpg


And the rear axle will get brass bearing retainers and scale brake rotors too:

Screenshot_20200122-215621_Chrome.jpg


Screenshot_20200122-215659_Chrome.jpg


I need to order the aluminum drive shafts still too. I discovered that the company that makes them offers them in a bright green in addition to the black or grey:

Screenshot_20200122-195656_Chrome.jpg


I'm tempted to order the green ones, but I'm buying a second '76 F150 body as a basher body that I will run without all of the scale chrome pieces or LED lights and it will be painted with a purple to blue fade in my traditional livery. Not sure the green drive shafts would look good with that... and they'll get scratched up. With the black shafts, it's pretty easy to repair the scratches, or at least hide them with a paint pen.

First of all, great garage thread.

Second really like your RC work, liking the upgrades. One of the things I want to do later this year is getting CNC and 3D printing in place for my projects on vehicles and RCs.
 
OP
B

BoilermakerFan

Well-known member
Joined
Apr 17, 2006
Messages
2,188
Location
Indianapolis, Indiana
Very nice. A question on the setup: why orient it that way and not 180° opposite so you can sit at any point along the front edge?

Thanks.

I can sit along the entire front. The cheap red tool chest is being moved or removed later. I will primarily sit on the right, but there is room to sit side by side.
 
OP
B

BoilermakerFan

Well-known member
Joined
Apr 17, 2006
Messages
2,188
Location
Indianapolis, Indiana
First of all, great garage thread.

Second really like your RC work, liking the upgrades. One of the things I want to do later this year is getting CNC and 3D printing in place for my projects on vehicles and RCs.

Thanks! I still to order a few parts to finish it up, but I've just been focused on getting the bench done and rebuilding the 3D printer.

I'm waiting for another Axial SCX10-3 kit to be released and I'm seriously considering grabbing a Bomber 2.0, just waiting to see if they release it as a kit again too.


This afternoon I cleaned up all the wiring underneath the bench top.
 

Attachments

  • 20200425_191034.jpg
    20200425_191034.jpg
    66.2 KB · Views: 20
  • 20200425_191009.jpg
    20200425_191009.jpg
    80.5 KB · Views: 27
OP
B

BoilermakerFan

Well-known member
Joined
Apr 17, 2006
Messages
2,188
Location
Indianapolis, Indiana
Saturday night and Sunday afternoon I finished oiling my wife's distressed bookcase she's had for a couple years. Originally she wanted to paint it and asked me to prep it for paint. After she saw it sanded down she asked if I could finish it in some way that would preserve the age of it and the grain.

So I put a little dark Danish oil on it to show her and she loved it. Since my bench was out of the way now, I had room to work on the bookcase. She's very happy with the results.

Then tonight I finally got around to securing the power cords for the power strip and I went ahead and secured the cord for the bench too. I think I'll eventually put a receptacle in the wall low for the bench... but for now it works.

I actually finished 2 projects this week! I know! I'm as surprised as you guys.
 

Attachments

  • 20200426_153945.jpg
    20200426_153945.jpg
    148.6 KB · Views: 17
  • 20200426_153959.jpg
    20200426_153959.jpg
    101.2 KB · Views: 17
  • 20200426_154014.jpg
    20200426_154014.jpg
    84.5 KB · Views: 17
  • 20200427_000321.jpg
    20200427_000321.jpg
    113 KB · Views: 23
  • 20200427_000838.jpg
    20200427_000838.jpg
    70 KB · Views: 24
OP
B

BoilermakerFan

Well-known member
Joined
Apr 17, 2006
Messages
2,188
Location
Indianapolis, Indiana
Friday I posted an update in my Custom '81 GL1100 and '81 CX500 thread. Big changes are coming!

And because of those changes, there will be progress on getting the garage purged and reorganized.
 

jon72vega

Well-known member
Joined
Apr 17, 2013
Messages
3,478
Location
Niles Michigan
Saturday night and Sunday afternoon I finished oiling my wife's distressed bookcase she's had for a couple years. Originally she wanted to paint it and asked me to prep it for paint. After she saw it sanded down she asked if I could finish it in some way that would preserve the age of it and the grain.

So I put a little dark Danish oil on it to show her and she loved it. Since my bench was out of the way now, I had room to work on the bookcase. She's very happy with the results.

Then tonight I finally got around to securing the power cords for the power strip and I went ahead and secured the cord for the bench too. I think I'll eventually put a receptacle in the wall low for the bench... but for now it works.

I actually finished 2 projects this week! I know! I'm as surprised as you guys.
The bookcase turned out nice!
 
OP
B

BoilermakerFan

Well-known member
Joined
Apr 17, 2006
Messages
2,188
Location
Indianapolis, Indiana
The bookcase turned out nice!

Thanks John. My wife is really happy with it.


I need to put a new roof on the garage and I've been considering converting to proper storage trusses with a steeper pitch. But I hadn't said anything to my wife about it...

Today on our walk we went past a detached garage with a covered porch (or beer garden as we call them) on the side of it. The roof has a much steeper pitch so it spans the garage and porch. My wife pointed it and mentioned how she would love that for our yard/garage. :thumbup: I jumped on it and told her wouldn't be that hard to do on our garage and it would really tie the garage to the house and make the current garage's location not look so stupid. Which would add to the curb appeal of the whole place. Plus I said I need to reroof the garage this summer anyway, we might as well spend a little more and get a great space in the yard out of it.

I think I can get her to go for it! She's gets a covered patio/beer garden and I get attic storage trusses. Fingers crossed.

If she goes for it, I'm going to recommend we upgrade the siding at the same time since it doesn't match the house at all. Again, for "curb appeal", but really because I hate the siding on it, it's damaged in several places, and I want to add another window and install the window A/C unit on the back wall.
 
Last edited:
To avoid these ads, REGISTER NOW!
OP
B

BoilermakerFan

Well-known member
Joined
Apr 17, 2006
Messages
2,188
Location
Indianapolis, Indiana
Oh, we did do some back breaking work on the garage yesterday, or next to it.

Sunday midday I opened the garage and discovered a mess. The heavy rains earlier made their way into the garage. The rock along the side had filled in wth dirt and the chickens had kicked it up over the siding.

My son was in debt from Epic game V-bucks and he likes to dig holes. So I drafted him to do most of the work. We finished the trenching about an hour before the next wave of torrential rains hit. And I'm so glad we got it done.

Today I checked the trench and it just needed a little clean up work with a small hoe to get a good taper so the water flows towards the front and out onto the "driveway".

A bigger project will be trenching to the location of our filled in cistern to run corrugated pipe to the cistern. Then I can add a couple drains outside the garage and tie in new gutters. I'm hoping my wife agrees with the beer garden addition because then it will be easy to have it all done at once. I'll have my concrete guy form and pour a gully on the side with the incorporated drains.
 

Attachments

  • 20200517_191341.jpg
    20200517_191341.jpg
    143.2 KB · Views: 40
  • 20200517_191346.jpg
    20200517_191346.jpg
    148 KB · Views: 37
OP
B

BoilermakerFan

Well-known member
Joined
Apr 17, 2006
Messages
2,188
Location
Indianapolis, Indiana
And I knocked out a shoe rack for my wife Sunday and last night...

I need to glue it up since it passed her inspection and approval. It will be painted white to match our trim.

Tonight was spent assembling new patio furniture.

The glider, two swivel chairs, and table are done. I just have a loveseat to assemble.
 

Attachments

  • 20200518_225804.jpg
    20200518_225804.jpg
    85.4 KB · Views: 31

rodpoa

Well-known member
Joined
Jan 21, 2015
Messages
165
It's finally in the basement and set up! I'm really sore from fighting the beast, but with help from the kids I was able to get it moved into place.

I still need to finish cleaning up the wiring and mounting the controls.

This looks awesome!!
 
OP
B

BoilermakerFan

Well-known member
Joined
Apr 17, 2006
Messages
2,188
Location
Indianapolis, Indiana
This looks awesome!!

Obligado RP!

I will try to get a few updates posted tomorrow. I didn't realize how much I have done this year since we went Work From Home in March.

I've made some progress in my basement work shop and also in my garage, but I still have a lot to do. And there have been some changes to the plans along the way. Some good, some disappointing for now but MUCH better in the long run for us as a family.

The big one I can share now is that I am not getting the CNC mill. COVID threw a big wrench in the plans and made it very difficult to even get a chance to possibly be able to pick it up and haul it home. Funds for superfluous purchases have also "dried up" so to speak. However, the biggest reason for not getting it was I just don't have room for it, as much as I hoped I could "make the room", I just do not have it.

And we're hoping to move out of here sooner than later. As early as 18 months from now, but definitely within 3-1/2 years. So I didn't want to have to worry about trying to move an 1100 pound mill setup that I may not even have room for at our next place. And we're seriously considering a move to the PNW which means we would have to greatly downsize in order to be able to afford a house out that way. We'll probably have to make an interim move to the Grand Rapids, MI area for the next move, then move to the PNW right before I retire. Financially that makes the most sense. However, we're going to see if we can get the move out west approved by my management team at work and make it happen sooner than later. I'll have a much better idea about the location by the time we start considering the move in 18 months. A very large part of it depends on how things settle out after the COVID pandemic subsides and my clients start to recover/move forward again.

Weighing all of this out, I have also been really focusing on what "stuff" do I really need, want, and use regularly. For the limited free time I have, the mill just wasn't a good fit since I can always find a machine shop to make any parts that I really needed fabricated if I couldn't find a suitable product already for sale. My priorities have shifted a lot the past 6-7 months and will probably change even more during the next 18 months. With the long term retirement location requiring a significant downsizing of our house; I'm focused on purging and simplifying now so it's not a HUGE undertaking later when it's go time.

That said, I have added a few new toys and we're planning to add another big toy for family enjoyment next year that will still be enjoyable for my wife and I when it's just us.
 
OP
B

BoilermakerFan

Well-known member
Joined
Apr 17, 2006
Messages
2,188
Location
Indianapolis, Indiana
Your alive! Good to hear from you.

Bret

Yes Iam! Thanks Bret.

New Toy=camper/RV?

That was my guess!

Way to steal my thunder! :lol_hitti

But I am surprised OD didn't guess a new motorcycle.

Yep. After our last camping trip 2 weekends ago, SWMBO said we should start looking at a small travel trailer. There is one on the next street over that she likes the size of. It's a 17' Venture Sonic Lite. I have been looking at them for over a year already. :D We have a small, family owned dealer nearby that is an authorized dealer for Winnebago, Lance, and InTech. The three top brands I'm considering. Winnebago is the top choice due to model options, weights, and cost. InTech is a close second, but they have a little less options and their cost is higher. Top model choice is the single axle 17' Winnebago Hike. Second is the 17' Winnebago Minnie Drop. Followed by the InTech Sol Horizon. Our requirements are a queen size bed and nice sized dinette area. My son and his friends sleep in a tent, so we don't need the ability to sleep more than 3 as long as the dinette can comfortably sleep a 6' tall person. The bathroom size isn't quite so critical, we're used to not having a bathroom in our pop-up; however, it will be nice to have the option to use the WC in the middle of the night. If the camper doesn't have a built in outdoor kitchen stock, I will just build it in to the exterior storage since that's what the manufactures do, except mine wouldn't be plumbed into the trailer propane tanks...

I sold the KZ650 to a friend and finally delivered it to him about a month ago in Peoria. I put the funds in my savings account for the camper. As much as I would love a new motorcycle, the camper is a better toy for the family. And with a new travel trailer, we will be able to go camping a lot more often since it will have A/C and heat. So the camper will be the new family toy and I'll keep my CX500C for the two wheel fun. I still have the CB350 and KZ440 project bikes as well, so once the CX500 is restored/modded I will have a project to play with.

BoilermakerFan,
Glad you posted with an update!

Howdy Jon. How are you? I haven't been up to MI since late February! We've been extended on WFH until at least the first of the year.


I'll try to get a few more updates posted later. It took me almost an hour last night to get my pics selected, uploaded to Dropbox, and edited. I've been on conf. calls or talking to clients almost all day long today. And more meetings keep being added to my calendar this week.
 
OP
B

BoilermakerFan

Well-known member
Joined
Apr 17, 2006
Messages
2,188
Location
Indianapolis, Indiana
It's been just over 5 months since I've posted here or really been on GJ for that matter. I have hopped on to catch up on a few threads, but for the most part I've just been really busy doing projects around the house. We went WFH in March and it was extended several times. Now it's through at least Jan. 2, 2021. I am able to visit clients that absolutely need me to come on site if it's within an hour drive. No flying, no overnight travel allowed. I have a handful of clients an hour away, but they're hot spots for COVID in Indiana as well so basically I'm still WFH each and every day.

My wife is a third grade teacher and she is in the classroom at school, but we elected to keep my son home this semester and he's doing virtual school since I'm home all day. That's been an interesting experience for all of us, and not all pleasant either. But we're all getting through it. This is my daughter's senior year at Purdue and she is at Purdue, but lives just off campus with 3 roommates who are all being very responsible young adults. We're still worried about her health, but she 's doing everything she can to stay safe.

So, what does a man with ADHD do when he's stuck working from home for months on end? :headscrat Everything, duh! Squirrel!

First project was to rip out some 20yo holly bushes that had just overgrown and overstayed their welcome:

20200618_093102.jpg


And the same goes for an old laurel bush:

20180721_192505.jpg


And a lot of other landscaping bushes in the front beds as well...


We decided that I should put in a patio where the holly bushes were. I have a bunch of pics of the whole process from digging out large stumps, digging out the patio to backfill it with base and level it all out, to setting the pavers. I could pic puke, but I won't. Instead, here's the final result after it was edged, sealed, and back filled with lava rock.


20200620_191706.jpg


That was probably a 3 week project, maybe 4 from start to finish. And that leads into the next project. Lava rock. So much lava rock. My son and I bought, loaded, unloaded, and spread out so much lava rock over the entire front landscape beds. It was almost two full pallets worth, but hauled home 20-30 1cu/ft bags at a time. I think we made nine trips to Menards in total over a 2 or 3 week period. I think I used 5 or 6 rolls of the really good weed barrier under the lava rock too.

20200712_185246.jpg


20200713_194422.jpg


A lot of work, but damn it looks good and really goes well with the house. All our neighbors would stop by and tell us how great it looked.

Oh, I also did something this year for the first time in 20 years. I actually fertilized the yard and applied Weed&Feed. Then applied Weed-B-Gon about six more times throughout the spring and summer. Why was this the first time in 20 years? Two reasons... we tried to stay as organic as possible with the lawn when the kids were little and we always had neighborhood kids running through our yard. Now those kids have all grown up, gone off to college, or moved away. But let's be even more honest here... the main reason I never fertilized the yard is the fact I have grown up to hate mowing the yard. I started mowing yards at age 11 or 12 and had 7-8 regular customers all through middle school and always picked up another 3-5 each week during the summer when neighbors went on vacation. I was making $2K a year or more as a kid in the '80s hustling grass clippings during the season. In the fall, I made even more money, but had to bring reinforcements in the form of my hooligan friends who didn't know how to operate a lawn mower, but could handle a rake.

We all know unfertilized grass grows a helluva lot slower and needs to be mowed less often. :thumbup: But now I had a teenage son who liked to go into "debt" to get video games for the xBox. So I could finally fertilize the lawn without a serious personal consequence of having to mow it! And on a side note, it drives me crazy that my son just turned 15 and has never taken the initiative to hustle our neighbors out of their cash by mowing their lawns for them. The going rate on our street and in our neighborhood is $25 a pop for tiny a$$ yards! He could be making $1K a month for 6 months a year around here. It's fall now too, that's $40 a yard to rake up all the leaves. -SMH-

We have encouraged him and his two best friends to get out there and put fliers out over the neighborhood. A team of three could easily knock out 6-8 yards on a Saturday. But to teenagers these days, WORK is one of the worst four letter words there is. He hasn't figured out that I seriously under pay him to pick up the dog **** and mow our yard. I have no guilt about that either. My dad used to only pay me $5-$8 to mow our yard when I was making $20-$30 from everyone else. Why? Because it was my house too and my dad had paid for the first lawn mower I used to make my money. Once I was driving, I didn't get paid to mow our yard, I just did it because my dad was paying for my insurance. Yeah, I got the better end of that deal!


Whew! Sorry about that. Dang Squirrels! But now I feel better about ranting about teenage boys these days.
 
Last edited:
OP
B

BoilermakerFan

Well-known member
Joined
Apr 17, 2006
Messages
2,188
Location
Indianapolis, Indiana
After the patio and lava rock from hell was done, the yard was actually fertilized, and the weeds started to die... on to the next projects.

First small one has no pics to really show for it, but I took all the dirt I dug out for the patio and filled in most of the holes, divots, and low spots in the front yard. I planted some grass seed and it was doing great until we had two weeks of ungodly hot weather at the end of August. I need to reseed those spots and overseed the whole lawn in the next couple weeks.

The next project was more of a whim. We had bought new patio furniture for the back patio and I hadn't gotten rid of the old stuff. My wife couldn't find anything she really liked for the new front patio so I offered to refinish the old chairs for the front. At first she wanted them refinished in black like they were and I was going to just have them powdercoated, but then we had to shelter in place and my local preferred shop was closed. I suggested that we just paint them for now and my wife agreed. Well, if I'm going to paint them, what color do you want? "I don't know..." How about navy blue? "Eh, I'm not sure..." I had prepped the chairs already and used the rust converting primer. I had a can of navy blue, so I just painted one. She loved it! Phew! I primed another chair and painted it too. Then we bought a small Bistro table in the same style. That took a bit more work with etching primer, but it was done.

20200720_082938.jpg


Not too bad for 10 year old chairs! We love the chairs, they are so comfortable.

Bonus alert! I now had a place I could enjoy a cigar at night during the summer without the smoke wafting in to the house! Our WiFi router is about 10 feet to the right of the right chair in the basement so I have a great signal from the chair on the right. An added bonus when I'm on Zoom calls with my buddies on the weekends while smoking said stogies. :pimpflash


My wife loves to have her morning coffee out front on the new patio on the weekends. I've joined her a few times, but I'm usually still in bed when she's out there. The front patio is in shade in the morning, our back patio is in the shade in the late afternoons and evenings. Happy wife, happy life.
 
OP
B

BoilermakerFan

Well-known member
Joined
Apr 17, 2006
Messages
2,188
Location
Indianapolis, Indiana
Remember the shoe rack I built for my wife? My wife and son painted it and I got it hung up on the wall by the back door in the kitchen.

20201022_000613.jpg


My wife absolutely loves it. But they didn't do a very good job painting it so I'm going to sand off the paint runs and touch it up later this week... :p And I'm going to fill in the gaps in the trim below it before I paint since both are the same color.


But what about the garage? This is the Garage Journal, not Better Homes and Garden Journal! Yeah, yeah, yeah... You have to wait for those updates. The garage has received some love too.

As well as a LOT of purging. From about July through September I have completely filled one of our 75gallon wheeled garbage cans with stuff I've purged from the garage. Anything of use or value that I could give away to charity, friends, salvage yards, recyclers, etc. went that route. The rest was binned. At least six full cans of rubbish over 10-12 weeks. And I'm still purging.
 
Last edited:

bj383ss

Well-known member
Joined
Sep 29, 2011
Messages
3,166
Location
TX
Great updates. I can 100% come to terms with how you feel about mowing the lawn. When I was a kid from age 7 to 16 I mowed and weeded my grandpas Machine shop property. I did other stuff as well like wash cars and later change the oil in them. I only got paid $2 a day.

After that when we moved to Austin I mowed my parents lawn. And just to add insult to injury in the winter my mom would plant winter grass! WTF. I had to mow year around. And I didn't get paid anything but they did let me live their rent free until I was 20.

Needless to say I hate mowing the lawn but when we moved into our new house I did splurge on a very nice lawnmower so that does help some. :D

Bret
 

OutlawDrifter

Well-known member
Joined
Jan 20, 2015
Messages
3,876
Location
KS
Wow, that's an update! We have the EXACT same patio chairs, ours however, are painted hammered bronze (or something like that).
 

Bob Heine

ALLIANCE MEMBER
Joined
Oct 24, 2009
Messages
10,706
Location
Boca Raton, Florida
I feel better now. I started begging my father to let me mow the lawn when I was seven. He caved when I turned nine. It quickly turned into another "chore" on my list. If you love machinery and power tools, you volunteer for stupid stuff -- like ironing the sheets, pillowcases, linen napkins and handkerchiefs on the Mangle Iron. I got $0.25 a week allowance and $0.25 a day when school was in session to cover the cost of the school lunch. When Dad decided to plant Merion Bluegrass in 1953 I made an additional $0.25 an hour for spreading and de-rocking four truckloads of topsoil. I spent my money on important stuff like car models and magazines (eating lunch is so overrated). On or about my 40th birthday I started paying for a lawn service (my management job kept me at work from dawn to dusk). Haven't owned a lawnmower since (36 years and counting). Our large yard with a bunch of hedges is $80 a cut (twice a month). During COVID I give the crew an extra $20.
 
Last edited:
OP
B

BoilermakerFan

Well-known member
Joined
Apr 17, 2006
Messages
2,188
Location
Indianapolis, Indiana
Let's see, what else...

I finally received some 3D printer parts from Biqu from China that I ordered in February. Received them sometime in May IIRC. And haven't installed them yet. I was able to get the printer working well enough to print most of the upgrade parts I needed for the printer:

20200723_231626.jpg


Haven't printed anything on it since mid-August, but I'll be firing it up again in the near future.


On to the garage.

I realized that in order to insulate and put up all the plywood was going to be a major undertaking given the amount of **** I had stuffed into the garage. And the plywood was taking up way too much valuable space. The weather never cooperated long enough for me to be able to even move half the stuff out for a few days. I didn't want to rent a POD either. Good money after bad kind of thing and no good place to drop it on our driveway. No way they could get inside the fence either. So I gave my neighbor almost all of the plywood. He only wanted a dozen sheets. I said it's an all or nothing deal, I need it gone. He took it all. :thumbup:

These two areas probably had 20-30 sheets of 1/4" or 3/8" 4'x8' sheets.

20200909_174813.jpg


20200909_174808.jpg


I only kept 3 sheets of the nicest beaded 1/4" plywood for bookcases I still need to build.

They're back in the space in the first pic but will be used in the next month or so. Hopefully sooner.


While purging **** I realized one of my shelving units was just a catch all for **** and not working for me. Cleared it off and hauled it out of the garage. One of my best friends jumped on my offer of a free shelving unit. I have one more that I'm going to clear out and give to him to. It's right next to the wood storage area in that first pic, partially visible just to the right.

20200910_211457.jpg


With the first shelving unit gone, I could finally move my new tool chest against a wall, out of the middle of the garage.

20200910_211828.jpg


The next step is to mod my steel workbench and make it height adjustable. That is scheduled to be done after the bookcases are built. It will also involve more purging. I run out of trash can space pretty quickly so it will take a couple weeks to get that project done.
 
OP
B

BoilermakerFan

Well-known member
Joined
Apr 17, 2006
Messages
2,188
Location
Indianapolis, Indiana
While purging and sorting in the garage, I came across the remnant of 3/4" maple plywood that was the bottom of my new basement work table. The work table has the heavy duty aluminum T-track along the front and rear edge so I can swap in different sub-bases or plinths for various hobbies I plan to use the work table for.

This remnant looked to be the perfect size if it was cut in half. I measured everything 3 times to confirm the remnant was about 3" longer than I would need for two pieces and it was just under 18" wide. Perfect!

The first plinth I needed to make needed to be heavy duty itself, so I cut the remnant down to the lengths I needed and glued them together.

20201003_223508.jpg


20201003_214017.jpg


Each coffee can weighs 25lbs and I even called in the drill press for reinforcement.

20201004_193625.jpg


Sanded the edges even and checked the fit.

20201004_215431.jpg


More sanding, laid out where all the holes needed to be drilled, drilled the holes, and finished it with Danish Oil.

20201005_205048.jpg


Attached my Inline Fabrication UltraMount. :thumbup:

20201007_212757.jpg


I also had some scrap pieces of BC 3/4" plywood that appeared large enough to be useful... I really wanted a little stand that I could attach to the plinth for additional dedicated storage using more of the Inline Fabrication accessories. One of Dan's wall mounted accessory rails is 16" long. I was able to make the width of my little stand 16-1/2" wide. Perfect!

Glued and screwed it together since it would be holding some serious weight and act as a sort of counter-balance for the entire plinth with the UltraMount at the front.

20201007_111952.jpg


20201006_213547.jpg


I had smaller scraps left over so I built up the back side of the top to 3 layers of of the plywood, making the total thickness of the top section 2-1/4" thick and they rest on the top cross piece in the middle to help transfer the weight to the sides. I attached the first piece with just glue and clamps. Then glued on the second piece and clamped it again.

20201007_141031.jpg


20201007_141105.jpg


Test fit looked great.

20201007_213948.jpg


20201007_213646.jpg


After a LOT of sanding it was time to apply PlasticWood filler.

20201013_220511.jpg


More sanding, more filler, more sanding, more filler...

20201014_193743.jpg


I forgot I had picked up a can of Minwax Sanding Sealer so I decided to give it a try to see how it worked. Boy does it have a ton of VOCs! Glad I was doing this in the garage or SWMBO would have killed me. I was hoping the sanding sealer would prevent the wood grain from showing through the end product, but I wouldn't know if it worked for a few days.

20201015_202732.jpg


After yet more sanding and filler, it was time for primer. I had also discovered that our old patio table was an awesome work surface to paint on! It's blue from painting the chairs and bistro table on it. I was going to trash the table but it's such a great work surface for rattle can painting that I'm keeping it just for that use on future projects. It will just live outside behind the garage until it's needed again.

20201016_182721.jpg


You guys know what followed... more filler. Then light sanding and more primer. Rinse and repeat. Until finally I ran out of filler and deemed it Good Enough. The main point of this repeated sanding, filler, primer exercise was test some techniques and the sealer primer for use on the bookcases I need to make. My first large one that was painted brown for the basement turned out ok, but you can see a lot of the grain and the filled screw holes stand out like sore thumbs. I wanted to get the technique and process improved for these next bookshelves before I paint them.

I decided to use Rustic Mist for the paint. I thought it would be the best finish and match the plinth well.

First coat of paint sprayed. A little of the wood grain was showing through, but much less than I thought would.

20201017_170658.jpg


I had to wait a few days before I could spray the second coat. I decided it needed a third coat so I lightly sanded it and had the opportunity to spray the third coat yesterday when it was 80 degF!

20201021_144922.jpg


Today at lunch it wasn't quite 100% dry, but it was dry enough to bring inside and see how it looked on the plinth. :rocker: 
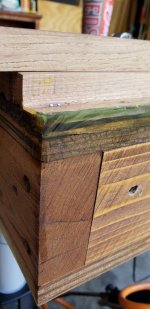
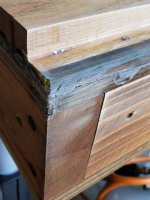
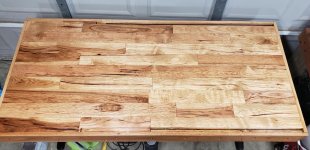
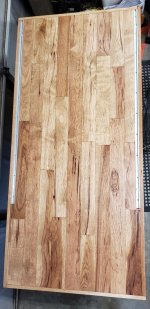
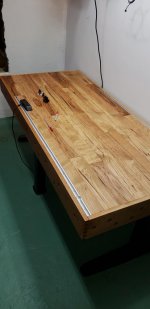
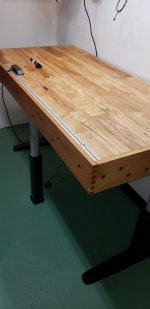
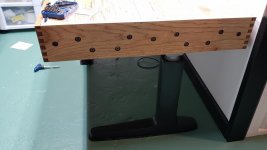
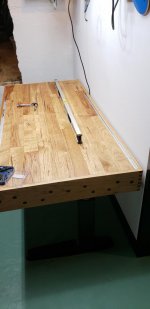
So I'm leaving it where it is for now to finish drying while I wait for the Inline Fabrication accessories I've ordered to arrive. Once they're here I can attach them to the stand and determine it's final position on the plinth and attach the stand to the plinth with cabinet screws.

20201022_224911.jpg


20201022_224833.jpg


20201022_222012.jpg


20201022_224802.jpg


I need to buy more plywood for the next four plinths I plan to build after I draw up some basic plans for them. I need one for a fly tying "desk" or station, one for R/C related endeavors, one for DIY audio and electronics, and probably a smaller one to hold my Dremel vice with a sacrificial insert for more general household repairs use. Eventually I'll likely make one for DIY fishing rod building, but I'm not sure I have enough room on the work table. for that.

I also need to pick up another Husky top chest like this one for the left side of the work top. It's the same unit as the set I have in the garage now.

20191220_132420.jpg


After I have the new top chest, I'm going to be purging this old Craftsman tool chest and give it to a friend.

20200912_135730.jpg


Eventually the "lost" storage from the bottom section will be upgraded and replaced with this... at least that's my goal.

20191108_102418.jpg
 
Last edited:

OutlawDrifter

Well-known member
Joined
Jan 20, 2015
Messages
3,876
Location
KS
That Sunnex box is pretty cool!

Quite the process you have going there. What is the stand for? Small engines?
 
To avoid these ads, REGISTER NOW!
Top Bottom