To avoid these ads, REGISTER NOW!

Lakefront barn - Michigan Carr

To avoid these ads, REGISTER NOW!
OP
C

chevyracer5613

Well-known member
Joined
Dec 16, 2014
Messages
149
Location
Brighton, MI
No barn updates....been working on my computer table :p
 

Attachments

  • 27459869_10210782596457525_8429678587390455191_n.jpg
    27459869_10210782596457525_8429678587390455191_n.jpg
    56.1 KB · Views: 73
  • 27540627_10210782597057540_4466389705515835974_n.jpg
    27540627_10210782597057540_4466389705515835974_n.jpg
    72.8 KB · Views: 101

drivesitfar

Well-known member
Joined
Oct 23, 2013
Messages
36,007
Location
Pacific Northwest
Chevy: pretty smart renting a barn and i hope the little critters didn't get in there and mess up anything.

one tip from the OLD GUY: you might 45 off the corners on your new desk to save yours or a family member's hip or eye if you have little ones.

i bet that will come in handy and be nice to work and play on.
 
OP
C

chevyracer5613

Well-known member
Joined
Dec 16, 2014
Messages
149
Location
Brighton, MI
Drive - I actually left a little extra material on one of the "risky" ends just in case I wanted to do that :)
 

Attachments

  • 27545376_10210796429443341_9070117318145253977_n.jpg
    27545376_10210796429443341_9070117318145253977_n.jpg
    65.3 KB · Views: 92
  • 27459592_10210796428603320_2115304496094675013_n.jpg
    27459592_10210796428603320_2115304496094675013_n.jpg
    48.5 KB · Views: 84

drivesitfar

Well-known member
Joined
Oct 23, 2013
Messages
36,007
Location
Pacific Northwest
Chevy: is that part of a dragster behind your new desk? another option that might be better looking (and likely to take less flesh off you) is to maybe take a jar's lid and draw a radius on the corner so you can maybe jig saw a nice round corner on each side that could get you.

looking good!!
 
OP
C

chevyracer5613

Well-known member
Joined
Dec 16, 2014
Messages
149
Location
Brighton, MI
Drive, it is my a FSAE chassis from college :)

I bought a router not too long ago, thinking about getting a vacuum adapter and making a jig to cut a clean radius....but the mason jar method sounds good too :)

I did work on the barn a little, I turned the heater on and it ran for an hour or so (60k btu) and brought the garage up from mid 20's to a toasty mid 30's before I shut it off.....I am looking forward to getting some insulation!

I basically just installed on more interior light, decided I wanted to run 1 more outlet (maybe tomorrow, and buy another light), installed an exterior light and outlet but I learned how to do it better.

Last time, I cut a hole the size of the blue box (well circle) thinking it'd need to poke through a little.....unfortunately the light only slightly extends beyond it (basically no "trim ring" so if you look close it has some imperfections that will get hidden with sealant.....but, with the 2nd one, I cut the hole only big enough to screw the adapter plate in and it looks much better. I did have to get a little creating on how to get it screwed in....since I ran out of room for my drill....but it worked out.
 

Attachments

  • 27654379_10210824885354721_2300067895762209936_n.jpg
    27654379_10210824885354721_2300067895762209936_n.jpg
    49.7 KB · Views: 54
  • 27752508_10210824885074714_2593543404514773322_n.jpg
    27752508_10210824885074714_2593543404514773322_n.jpg
    26.4 KB · Views: 53
  • 27654534_10210824884474699_4799967008738792867_n.jpg
    27654534_10210824884474699_4799967008738792867_n.jpg
    50 KB · Views: 42
OP
C

chevyracer5613

Well-known member
Joined
Dec 16, 2014
Messages
149
Location
Brighton, MI
So i'll have to update an electrical map at some point.....

I added another overhead outlet but this one with constant (not switched) power...i'll use this as an always on light and to give a little extra light at the front of a car when on an eventual lift

I also added a daytime comparison of what ~50 lumens/sq ft looks like (well plus 50, its reasonably well lit to begin with)
 

Attachments

  • lights on off comparo day time.jpg
    lights on off comparo day time.jpg
    147.2 KB · Views: 159
  • 20180217_142109.jpg
    20180217_142109.jpg
    135 KB · Views: 89

drivesitfar

Well-known member
Joined
Oct 23, 2013
Messages
36,007
Location
Pacific Northwest
Chevy: I bet you could use some HEAT out in the new garage and what's the plan cause i can't recall you saying? I think you had a gas heater mounted to the ceiling of your old garage, but it's been a while and that might be somebody else's garage i'm thinking of. so what's the plan?

good to see you have some light, but it looks mighty cold out there.
 
OP
C

chevyracer5613

Well-known member
Joined
Dec 16, 2014
Messages
149
Location
Brighton, MI
Hey Drive,

Actually there is a heater hanging in there! It is another radiant tube heater, like my last one...it kind of blends in with the garage door tracks in the most recent photos.

2 stage, 60k btu high side, 30' radiant tube heater is an extra insert for the first 10' to help push more heat to the end for a more even distribution.

What I need to do is figure out exactly what I want for insulation, batt+blow in, rigid plus batt, dense pack cellulose etc.....its all a numbers game but if I wait long enough then I won't be cold anymore...until next winter :p

BTW I added a powered socket at the front of the eventual lift, so that I could leave a light on 24/7 (a night light) instead of leaving one of my light zones on. Attached is a quick example. The one fixture is a 2 bulb, using 36 watts at ~4800 lumens
 

Attachments

  • 20180223_180401.jpg
    20180223_180401.jpg
    136.6 KB · Views: 51
  • 20180223_180406.jpg
    20180223_180406.jpg
    142.3 KB · Views: 73

drivesitfar

Well-known member
Joined
Oct 23, 2013
Messages
36,007
Location
Pacific Northwest
Chevy: one of the members just found a deal (he's in Oklahoma) on insulation and T1-11 and he's turning the siding around so he can have sort of plywood walls on his building. here's a link to Fryme's thread if you want to see one member's method of finishing his shop.

https://www.garagejournal.com/forum/showthread.php?t=352388

I like the single night light idea and it's sort of eeeeerry. also good to hear you already have some heat.

have a great weekend!!
 
OP
C

chevyracer5613

Well-known member
Joined
Dec 16, 2014
Messages
149
Location
Brighton, MI
Drive: Thanks for sharing his thread, I do like what he is doing and I wish I could find a deal on blanket insulation like that! The stairs he did are pretty sweet also.

Yes it is kind of eery, maybe it'll keep people out :p. I was going to install a motion/night activated 700 lumen lights....but after installing the one I did (at like 4800 lumens) I am not sure it would have been worth it.....
 

drivesitfar

Well-known member
Joined
Oct 23, 2013
Messages
36,007
Location
Pacific Northwest
Chevy: here's another thread of a member (Walt) that sprayed on insulation and it sounds like he likes it a lot. it's probably more expensive, but maybe there will be less time involved. you might not have to frame in all the walls and ceiling either. i know Walt's company isn't probably working in your area cause he's in Tennessee, but didn't know if you've seen a thread with this on it cause not many members do this maybe cause of the costs.

https://www.garagejournal.com/forum/showthread.php?t=338496

hope you are enjoying your weekend!!
 
OP
C

chevyracer5613

Well-known member
Joined
Dec 16, 2014
Messages
149
Location
Brighton, MI
Drives: Thanks for sharing. Spray foam is definitely the best option as a whole but its "value" is sometimes hard to justify due to it being almost literally double the price of other options. Although I suppose technically speaking, if you consider the fact that you could use it as a vapor barrier (closed cell) and you pay someone else for the work, it might not work out to be too much more once labor is also considered.

I am stubborn and frugal though.....unless I find someone to barter for foam work, it'll just be a choice of doing it myself for choosing a medium priced option.

My research suggest that dense packed cellulose is a good compromise...I am just not sure how well it'd work with a post frame building not having studwalls every 2' or so....plus I currently plan on doing horizontal 2x6 girts.....but still TBD

Small update- 3 x 220v runs are done! I think I might be done wiring now (aside from installing the plugs). Wheeled the air compressor in (forgot to take a pic), maybe tomorrow i'll get it plumbed :)
 
OP
C

chevyracer5613

Well-known member
Joined
Dec 16, 2014
Messages
149
Location
Brighton, MI
So I moved the air compressor around, and thanks to my wife, was able to move my big metal bilstein table from the basement to the shop. A quick pic to show the expected layout. Perpendicular to the table (backed up to the air compressor) will eventually be a 5 ft "war wagon"/pit cart.

Thinking the drill press will go to the left of the table and the welder will go on or below the table. Hoping to have enough room on the back wall for storage and a small area for wood working stuff.
 

Attachments

  • 20180225_162601.jpg
    20180225_162601.jpg
    142.7 KB · Views: 87
  • 20180225_174259.jpg
    20180225_174259.jpg
    152 KB · Views: 65
OP
C

chevyracer5613

Well-known member
Joined
Dec 16, 2014
Messages
149
Location
Brighton, MI
Minor update and not enough pictures but I started running my airlines last night. The RapidAir kits are great, I bought two "starter packs" and have more than enough outlets and hose for everything I want to do and it is extremely easy to work with.

Anyhow, only one picture for now, showing a distribution block so that I can feed down into a hose reel and I am using the extra port as another effective "Tee".

I haven't secured most of the tubing yet (only at the tees), so it should look a little cleaner later :)
 

Attachments

  • 20180226_194913.jpg
    20180226_194913.jpg
    115.3 KB · Views: 49

drivesitfar

Well-known member
Joined
Oct 23, 2013
Messages
36,007
Location
Pacific Northwest
Chevy: keep up the great work. just curious cause i've only seen that one Little Giant type ladder in your pictures so how are you working on the lights and compressor's hose up in the rafters?

is it pretty cold working out in that garage or do you just put on a few extra layers and keep moving? i'm guessing even if you did turn on the heat it wouldn't stay there long since you don't have it insulated yet?

cheers
 
OP
C

chevyracer5613

Well-known member
Joined
Dec 16, 2014
Messages
149
Location
Brighton, MI
Hey Drive,

That little ladder (HF purchased, if I recall correctly) has been great, I have used it for everything so far without issue. It extends, folds and has no issue getting me 12' in the air while supporting my weight with tools and stuff.

Its a little chilly for sure, but a light jacket for the first 10 minutes, with the heater on, then my body heat is sufficient for just a shirt (while working). Which isn't to say it is warm without insulation, but the beauty of a radiant tube heater is that it heats things with thermal mass directly....so it is pretty effective. As opposed to a typical force air unit that would need to heat the entire volume of the garage, or be blowing directly on me. I am a big fan of radiant tube heaters.

Just got back from a week in Texas, Sunday I fly to Italy for a week, then I fly to Arizona for two weeks and then Brazil after a short week or two breather....so I am not sure how much more work i'll get done in the next month or two, but hoping to keep knocking a few things out on the few days I am around :)
 
OP
C

chevyracer5613

Well-known member
Joined
Dec 16, 2014
Messages
149
Location
Brighton, MI
I decided to make a rough/low tech/generalized sketch of everything that I have run (gas/electric/air)
 

Attachments

  • 20180303_184507 - Copy.jpg
    20180303_184507 - Copy.jpg
    147.8 KB · Views: 47
Last edited:

drivesitfar

Well-known member
Joined
Oct 23, 2013
Messages
36,007
Location
Pacific Northwest
Chevy: i'm guessing RED = electric,Blue = Air , and Yellow = Gas?

good to hear the heat source you like works great. Where do you buy a radiant heater that big and is it pretty pricey? i've been looking at a 3 or 4 foot long one for my garage at the home shows around here and it's about $400.

it's getting warmer and dryer here so hope it's doing the same in Michigan even though you won't be there for a while. hope you have a safe and successful trip and I know it's business, but hope you have some fun too.


cheers
 
OP
C

chevyracer5613

Well-known member
Joined
Dec 16, 2014
Messages
149
Location
Brighton, MI
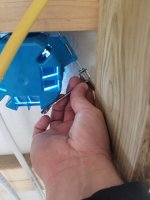
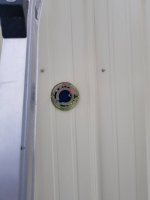
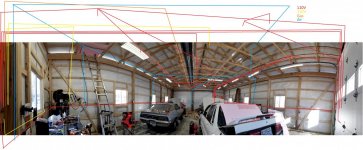
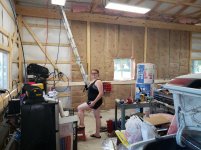
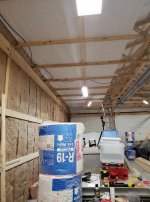
Drive, close! If you look in the top right corner of the pic I have a "legend". Yellow is 220, the hardly visible orange is gas, blue =air and red=110v

There are usually numerous local suppliers, I found a supplier of "Superior radiant products", who I bought my last one from also....very cool guy. Actually I found him on craigslist and started asking a bunch of nerdy questions and he was the only company that would respond with the information that I wanted....after a few email and more research I decided they were the best bet, all around. If anyone wants their contact, PM me, his name is Al.

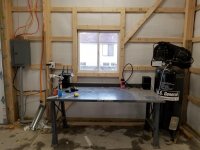
The price really isn't that bad.......I upgraded my unit over my last one, both were two stage 60k btu max output, but this one I got a few extra bits to help more evenly distribute the heat (instead of most being beneath the burner, now the entire 30' run is very similar). I wouldn't say everyone needs this, but considering my work bench is near the end of the run, it was/is beneficial for me. I think I paid like $1500'ish (I might have put the price in another post), but they are sooooo quiet, easy to install and do not blow air around....and IMO they are more efficient.

The efficient comment comes from the fact that they are not directly heating the entire air volume of the garage, with radiant heat, it is heating things with thermal mass (I have plenty......) first...over time those items re-radiate some heat and actually convect some of the heat away which does increase the air temp, but in general you can have the T-stat set lower and be comfortable, since it heats you directly.

It has warmed up some, most of the snow is gone (for now) and I am finally back in town for a bit, which is nice, but I did have fun outside of my 80 hour work weeks...

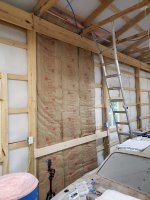
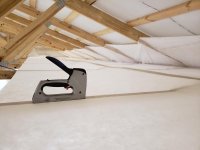
Now that it is warming up a little, part of me wonders if I can hold off on insulation until some company gets desperate for business :p. I am still debating between reclaimed rigid insulation, dense pack cellulose or fiberglass.....I think I can get away with fiberglass and have a very good result since I have the double bubble **** to act as a good air and vapor (once I tape it) barrier....but the other options should provide more sound deadening which my neighbors might appreciate :)
 
To avoid these ads, REGISTER NOW!

drivesitfar

Well-known member
Joined
Oct 23, 2013
Messages
36,007
Location
Pacific Northwest
Chevy: i had to drive our daughter's Honda with hand controls to her in Missouri last week and heard there was more snow heading your way. did you get another cold blast and snow or did it miss you this time?

thanks for the 411 on the heater and the small legend even my big fonts didn't show that well.

cheers
 
OP
C

chevyracer5613

Well-known member
Joined
Dec 16, 2014
Messages
149
Location
Brighton, MI
Wow it has been a while since I have posted on here.......but finally starting to focus a little more attention to the barn since some of the house items are complete (although a new problem just came up.....)

Anyhow, I decided to use HD "express delivery"...which is $80 no matter how much stuff you get....so I added 169 items to my cart and sure enough, it was $80.

So now I have enough blow-in cellulose to get to R40 and fiberglass batts (R19) for the walls.

Currently I am debating with myself (typical engineer) and I am considering the partial removal of some of my "bubble" **** that is on my walls. I want the outside to be an air barrier, technically a reflective (Radiant) barrier can be helpful if nothing is touching it = air gap, but since this is not perforated it is also a vapor barrier (well sort of...the seams aren't taped...so maybe it is OK), which is not good since i'll want/need a vapor barrier on the inside walls also. So, I can cut slits/hole/section out of the bubble wrap and then cover it with a house wrap (which I should have done for the walls to begin with) or "hope" that the untaped seams would be enough to get rid of the vapor/moisture.

Anyhow, hopefully i'll have some updates to share soon :)
 

Attachments

  • 41754850_10212275280013681_9022175483579596800_o.jpg
    41754850_10212275280013681_9022175483579596800_o.jpg
    157.6 KB · Views: 92
  • 41856522_10212275931589970_4410531968148570112_o.jpg
    41856522_10212275931589970_4410531968148570112_o.jpg
    157.7 KB · Views: 94
Last edited:
OP
C

chevyracer5613

Well-known member
Joined
Dec 16, 2014
Messages
149
Location
Brighton, MI
So, right or wrong I decided to cut a few holes in the bubble **** wrap and patch in some house wrap.....I figure if I have any issues in the future, the fix will be to do it the right and only (at that time) easily available option, which will be to remove the outside sheet metal, strip off the bubble and install a house wrap...but doing so actually wouldn't be that challenging if I had a little help, for now i'll go with this method and monitor the situation with a hygrometer :)

Ok now onto the fun stuff, I have 20 bags of 23"x39' R19 faced fiberglass for the walls. I am cutting these into 13' strip and the extra 1 ft is being used as a partial soffit block that will go next to the "netting" installed for the blow-in insulation :)

You can also see the start of me running 2x6's, which will become shelving support...i'll probably install 1x4 pine for a french cleat system on the bottom and likely installing the sheet metal to the columns so that they sit flush with the 2x6 to minimize any lost space in the barn.
 

Attachments

  • 20180915_154302.jpg
    20180915_154302.jpg
    77 KB · Views: 54
  • 20180915_164022.jpg
    20180915_164022.jpg
    110.3 KB · Views: 56
  • 20180915_173136.jpg
    20180915_173136.jpg
    110.2 KB · Views: 55
  • 20180915_180709.jpg
    20180915_180709.jpg
    106.4 KB · Views: 56

drivesitfar

Well-known member
Joined
Oct 23, 2013
Messages
36,007
Location
Pacific Northwest
Chevy: good to have you back posting cool stuff about your garage again. or just posting.

are you ready for winter or what do you have to do to get it ready so you are able to work in your garage/shop this winter?

hope you have had a great summer!!
 
OP
C

chevyracer5613

Well-known member
Joined
Dec 16, 2014
Messages
149
Location
Brighton, MI
Drive: I am glad to be back, around all of my travel and stuff I was a little bummed to not be doing more with the barn.

The insulation, that I am working on now, is really all I "need" to be ready for the barn, but of course I still have a small list of items that I am working on for the near future:

Install R19 batt insulation in the walls, secure furring strip that the wall insulation connects to, install netting in trusses for blow-in insulation, consider moving attic hatch the center of barn to make blowing insulation easier, install two rows of 2x6 for shelving, plan out sheet metal which will go in 3 sections vertically (lots of J trim). Once all of the insulation is done, install 1x4 pine french cleat on the lower 2x6 so that I can start organizing and moving in.....maybe then quickly assemble my whole shop vacuum setup and plan out if I want to separate wood working from everything else....move all of my tools and everything from my attached garage (and hopefully sell a few project cars) and then I should be in a good spot for this winter. Hoping next year to buy a lift :)

BTW as a short list of lessons learned, if I ever do another barn. House wrap beneath the exterior sheet metal (or >R10 rigid insulation) for the walls, either house/bubble for ceiling but consider a vented secondary roof, run the majority of wiring through the center of the barn (like a raceway) and then below the top portion of the lower chord so that I have easy access to add/modify wiring in the future after a ceiling is installed, install more insulation below the concrete and connect any of that rebar to the electrical ground, otherwise I am happy with the decisions I have made so far.

Summer has been good, finished some major interior projects on the house, just have basement windows and a complete master bath tearout/remodel left and then its own to working on the exterior (gutters/landscaping), hopefully you had a good summer also!
 

drivesitfar

Well-known member
Joined
Oct 23, 2013
Messages
36,007
Location
Pacific Northwest
Chevy: in case you do decide to move again might I suggest living in PARADISE here in the great PNW. that way you could build your 3rd garage and have it EXACTLY LIKE YOU LIKE IT. well if that's not in the cards i'm sure you are going to do well in your current spot and congrats on not only getting the permits, but for keeping your bride happy and getting the house remodeled before you spent too much time in your new shop.

in case you get any free time feel free to post a few good words, jokes or comments on my thread and here's the link:

https://www.garagejournal.com/forum/showthread.php?t=381433

enjoy your Sunday!!
 
OP
C

chevyracer5613

Well-known member
Joined
Dec 16, 2014
Messages
149
Location
Brighton, MI
I thought about making a post that says "racecar".....because that is a good word :)

The scam is working well, she actually helped me in the barn today! :)

Although she would not be happy about the idea of moving again, I joked about it a few times of how I can improve things better "next" time :p

A few notes about the pictures, added the housewrap cutouts add a lot of time to the process, but whatever, the 2x6 installation is going well and I am taking a complete guess on how to do the windows with batt insulation, but I think it'll work out b/c of how I plan to trim it...but another challenge for another day.

Now to pictures, everyones favorite part....hopefully i'll have some more next week/weekend.
 

Attachments

  • 20180916_165655.jpg
    20180916_165655.jpg
    151.5 KB · Views: 106
  • 20180916_170018.jpg
    20180916_170018.jpg
    155.2 KB · Views: 136
OP
C

chevyracer5613

Well-known member
Joined
Dec 16, 2014
Messages
149
Location
Brighton, MI
Kyle, thanks!....HE351VGT on the GVR4 (previously HX35)....I keep meaning to list the Eclipse (rolling shell) for sale to fund a new clutch (twin disc) for the Galant :)
 
OP
C

chevyracer5613

Well-known member
Joined
Dec 16, 2014
Messages
149
Location
Brighton, MI
Slowly but surely....I have one wall insulated to R19 now

and since I don't have any other pictures to share....i'll share a picture of a Lambo I took at a carshow the other day, which will be garage art (ordered a 20x30 from my photo place).
 

Attachments

  • 42654191_10212350149645375_6602702809538232320_o.jpg
    42654191_10212350149645375_6602702809538232320_o.jpg
    148.2 KB · Views: 72
  • DSC_4353-Edit.jpg
    DSC_4353-Edit.jpg
    157.1 KB · Views: 74

drivesitfar

Well-known member
Joined
Oct 23, 2013
Messages
36,007
Location
Pacific Northwest
Chevy: great job on the installation of your insulation. it's a tough job, but it will pay huge back to you as you work in your shop/garage during the cold winters in Michigan.

looks like you've got a great garage (AGAIN).

cheers
 
OP
C

chevyracer5613

Well-known member
Joined
Dec 16, 2014
Messages
149
Location
Brighton, MI
Thanks Drive, it certainly is a process. I look forward to seeing how I tie in some of the end pieces and then make everything work nice with the ceiling mesh (planning to install on top of the bottom chord so that I don't have to cut a hole for each socket and light).

Just found a leaking pipe going to my septic in my house....so we will see how much time and money gets devoted to each project....hopefully the house one can be a quick internal patch of the pipe.......
 
OP
C

chevyracer5613

Well-known member
Joined
Dec 16, 2014
Messages
149
Location
Brighton, MI
Got a few rows of netting installed and filled in a few gaps in the fiberglass. Its not hard work but time consuming without help :p

and wow do you go through a lot of staples, starting to think I should have bought an electric/cordless one!
 

Attachments

  • 42861039_10212368999036598_6880852132942053376_o.jpg
    42861039_10212368999036598_6880852132942053376_o.jpg
    108.3 KB · Views: 52
  • 42881023_10212368998676589_7996105807995338752_o.jpg
    42881023_10212368998676589_7996105807995338752_o.jpg
    88.9 KB · Views: 56

drivesitfar

Well-known member
Joined
Oct 23, 2013
Messages
36,007
Location
Pacific Northwest
Chevy: I hate dragging around a hose from my compressor to staple so i use this hammer stapler that you might like that is a lot easier on your hand. unless you are trying to improve your grip then staple away with the stapler you are using.

I just grabbed a quick like showing the type of stapler so do some research on your own if you might want to buy one in your part of the world.

https://www.acehardware.com/departm...MI37DL75_k3QIVgcBkCh0M7AMYEAQYAyABEgJXz_D_BwE

looking GOOD and keep up the great work cause winter will be cozier in the garage if you do. did you figure out the plumbing problem inside your home?
 
OP
C

chevyracer5613

Well-known member
Joined
Dec 16, 2014
Messages
149
Location
Brighton, MI
Actually I own one of those, but its taken a lesson from my 10mm sockets and is hiding pretty well (still not fully unpacked from the move), the extra reach would be useful too. Although I think mine was a HF knockoff that was prone to jamming.

I found out (inspection camera) that the coupling between the hose to the septic and the 3" WYE is now only partially connected (no long sealed)....I don't know how long it has been this way (I have 2 main drains to septic and this particular one is rarely used, until recently) but I put some epoxy around the bottom of the leak to slow it down. I have 3 options, in my opinion, open of the cinder block wall and replace it the correct way, finish patching it internally with epoxy/goo/something, wait a few days for a pro-quote and see if they have anything magical to offer like a form of CIPP (cured in place pipe).
 

Attachments

  • 20180929_102559.jpg
    20180929_102559.jpg
    68.7 KB · Views: 34
  • 20180929_114744.jpg
    20180929_114744.jpg
    53.3 KB · Views: 31
OP
C

chevyracer5613

Well-known member
Joined
Dec 16, 2014
Messages
149
Location
Brighton, MI
No real updates, been working on some house projects.....but I did take a picture of the barn :p

Oh, so they make these wireless kinetically power lights switches that work great when you feel lazy and don't want to run wire...they are a bit pricey (~$35) but sooooo easy (made new cabinets for computer room and wanted to relocate light switch by door)
 

Attachments

  • 44132104_1219564088192399_5351910888725020672_n.jpg
    44132104_1219564088192399_5351910888725020672_n.jpg
    148.3 KB · Views: 39
  • 44052524_10212459722464627_4779712805563531264_o.jpg
    44052524_10212459722464627_4779712805563531264_o.jpg
    140.6 KB · Views: 43

drivesitfar

Well-known member
Joined
Oct 23, 2013
Messages
36,007
Location
Pacific Northwest
Chevy: is the wireless light switch only working on certain lights or do tell?

your deck looks somewhat like my deck i'm going to replace next spring/summer. i've already got my cedar 2x6's from the mill drying in my backyard.

your place looks like a vacation spot. still like it? good neighbors too?

cheers
 

Attachments

  • 7 (2).jpg
    7 (2).jpg
    147.7 KB · Views: 29
  • 8 (2).jpg
    8 (2).jpg
    162.5 KB · Views: 31
OP
C

chevyracer5613

Well-known member
Joined
Dec 16, 2014
Messages
149
Location
Brighton, MI
Right now I just have it for one switch, but technically I can make it work with multiple...or have multiple switches for that one light. Basically you install a receiver in place of the normal switch (or to a hardwired light/fan/device) and it draws a small amount of constant power looking for a signal to either turn on or off. Each receiver and switch gets paired together, but you can pair multiple switches/receivers together. For me, I replaced a light switch with a receiver and put the new switch in a better location.

Nice set of cedar, should be nice when you get it finished. I am debating what I want to do the with the deck, the wood is old (not sagging though) so I could probably get some more out of it just stripping it and sealing it, but I of course am considering if the plastic/Trex type stuff is worth the investment. However, first I have to figure out what I want to do with the concrete slaps that are all kind of tilted. I am unsure if it settled after install (~30 years ago) and never moved, or if there is a leak from one of the gutters causing washout and settling. I plan to cut a small piece out and try to get a feel for the situation, that way I can determine if "lifting" (hydrojacking) will be worth the cost or if I need to do an overlay, or rip it out and start over. That decision (and cost) will influence what I do for the decking :)

I do really like the home and both neighbors, and the view. I am very happy with our choice, everything is a compromise and nothing is perfect but it meets a lot of my needs and wants :)
 

drivesitfar

Well-known member
Joined
Oct 23, 2013
Messages
36,007
Location
Pacific Northwest
Chevy: only thing I like TREX for is to make forms for my sidewalks and cement work. i've yet to see any that didn't fade. not saying that the new product does cause I haven't seen any lately or maybe there is another brand that won't fade, but I've always liked real wood.

take a peak at my thread and you might notice i'm pouring cement over an old sidewalk to make it wider and using some of the old sidewalk as a base while I broke and ripped out a good portion of it do a fresh pour. it's easy enough even with my hand mixing all the 80 pound bags of cement in a wheelbarrow (call it good exercise). anyway I'm sure it's on your TO DO LIST that might be pretty big at the moment so good luck with that.

here's a link to my little DIY and ORGANIZING thread in case you'd like to follow along and maybe give me a few good words.

https://www.garagejournal.com/forum/showthread.php?t=381433
 
To avoid these ads, REGISTER NOW!
Top Bottom