bren5270
Well-known member
Hey all,
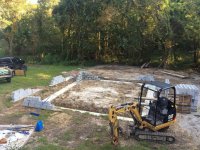
So Ill soon be laying my cement 8x8x16 block stem wall for my garage (about 400 blocks or so), and I was wondering if any of you masons had any tricks or tips for making things easier/better? Ive done some minor block work a while back but I figure with all the experts on here someones probably got some nifty tricks up their sleeves
I know theres obviously different ways to do it according to preference, but here's what Ive been suggested so far:
-Start with the corners after snap-lining the footer, making a pyramid of sorts moving towards the middle course by course
-Mix the mortar in smaller batches (obviously not all at once)
-Don't level every single block 1x1, go in groups of 3 or 4 then level
-Mist the blocks with a hose to keep damp
So do any of you Pro Masons out there have any tricks/tips?
************UPDATE ****************
Ive now done about 3 courses all the way around and heres what I found worked the best:
-Start with the corners, get all 4 corners as level as possible and square, then use mason string from corner to corner pulled nice and tight to reference.
-use a torpedo level to level each block as you go, doesn't have to be perfect but at least within the level lines on the bubble
-Slightly wetter mortar is easier, once you butter it on the sides, the block wicks away some of the moisture so it gets to the right consistency shortly after.
-Use a cheapy 150$ harbor freight mixer to mix a bag of mortar, mix it somewhat wet then dump it into a 5 gallon bucket and pour gallon portions onto your buttering board as you go. If you put a little water on the top of the cement in the bucket, it will give you plenty of time before it starts getting hard.
-I found it a lot easier to just use a decent mallet to get the blocks right, using the trowel took more effort and made kind of a mess
-Butter the side of the block with the block stood up so you aren't trying to butter edges when its vertical, do it with the somewhat wet mortar then let it sit for a bit while you do another block or two so it dries up a tad and sticks to the block better.
Once I got that down it went pretty smoothly.
Good luck to whoever else tries it.
I finally got a mason to come out and do the rest. Apparently I was putting way too much detail and effort into it to get each block good because his blocks weren't level or straight and varied as much as 1/2", but maybe that varies from mason to mason...
Last edited: