To avoid these ads, REGISTER NOW!

Layout questions when tiling a kitchen backsplash

branimal

Well-known member
Joined
May 31, 2016
Messages
1,943
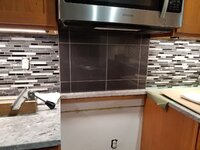
I'm getting ready to tile a kitchen backsplash with 3"x12" x 5/16" thick wavy subway tile. The instructions say NOT to overlap by more than 33% when using a brick pattern.

I think the main objective is to get some type of symmetry around the most visible showpiece in the kitchen - the stainless steel range hood and the flue. Then to avoid little pieces (less than 3" long) anywhere in the installation. Is that a proper approach?

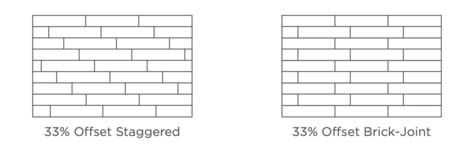
I started calculating some layouts for a 33% offset brick joint (see pic below). I began from the end of the peninsula and worked my way toward the inside corner.
Am I better off marking a line down the center of the range hood and figuring out my layout from there? Tile layouts are always confusing to me.
 

Attachments

  • Screen Shot 2021-12-01 at 1.26.47 PM.png
    Screen Shot 2021-12-01 at 1.26.47 PM.png
    45.8 KB · Views: 79
To avoid these ads, REGISTER NOW!

56Mark

Well-known member
Joined
Oct 26, 2014
Messages
359
Location
Fall Branch, TN
Usually the 1/3 overlap is because the tile are not flat and have a little bow in the middle. This is to reduce lippage. Lay two back to back and see how bad they are. If not bad, I would lay them how ever you want. I have ignored that 1/3 overlap even on floor tile if they didn't have much bow and they came out fine. Personal preference, but I like them laid like normal brick on a backsplash.
 

duneslider

Well-known member
Joined
Jan 20, 2013
Messages
2,268
Location
Riverton, Utah
I personally typically do the offset staggered that you listed. That is pretty much how I always do it.

Layout is very subjective. If you want to center it on the range hood area and as long as you don't end up with a really small piece at the ends I would say go for it. I try to shoot for around a 1/3 a tile as my smallest piece in a case like this.
 
OP
B

branimal

Well-known member
Joined
May 31, 2016
Messages
1,943
I'm getting ready to tile a kitchen backsplash with 3"x12" x 5/16" thick wavy subway tile. The instructions say NOT to overlap by more than 33% when using a brick pattern.

I think the main objective is to get some type of symmetry around the most visible showpiece in the kitchen - the stainless steel range hood and the flue. Then to avoid little pieces (less than 3" long) anywhere in the installation. Is that a proper approach?

I started calculating some layouts for a 33% offset brick joint (see pic below). I began from the end of the peninsula and worked my way toward the inside corner.
Am I better off marking a line down the center of the range hood and figuring out my layout from there? Tile layouts are always confusing to me.
In
Usually the 1/3 overlap is because the tile are not flat and have a little bow in the middle. This is to reduce lippage. Lay two back to back and see how bad they are. If not bad, I would lay them how ever you want. I have ignored that 1/3 overlap even on floor tile if they didn't have much bow and they came out fine. Personal preference, but I like them laid like normal brick on a backsplash.
I prefer normal (1/2 overlap) brick layout as well. heres the bow. Looks like less than 1/16”. Is that too much for a kitchen backsplash?
 

Attachments

  • 6279C35B-5609-49B8-AF71-081EC8B2139F.jpeg
    6279C35B-5609-49B8-AF71-081EC8B2139F.jpeg
    277.5 KB · Views: 71
Last edited:

65ranchero

Well-known member
Joined
Dec 16, 2020
Messages
5,087
Location
Danville, VT left NJ forever
Lay them out on the counter in different patterns to get a perspective of how much the last tile will be.
adjust as needed for a comfortable look.
And also consider if its going to be ended with a bull nose or a finish tile.
And get a 4" wet saw such as this:
If you're close I could lend you mine.
 
Last edited:
To avoid these ads, REGISTER NOW!

Toolfool

Well-known member
Joined
Aug 22, 2011
Messages
4,982
Location
Tallahassee, FL
Pattern always seems to be subjective. I have had customers want it done every way you can think of.
I'll throw this at you. Something I have done several times. To reduce grout joints in the area that gets the dirtiest, I create a large tile pattern that is easier to keep clean. 20191017_174820.jpg
 

Shea

Well-known member
Joined
Sep 19, 2012
Messages
2,867
Location
California
Lots of great advice here! I'm not a pro at laying tile either, but I've done a few backsplashes and floors. I've found that the key with most single placement tiles is to find a layout where you don't end up with small cuts on the edges if you can help it.
 

steves_001

Well-known member
Joined
May 30, 2011
Messages
528
Location
Southern MN / Northern MN
Just a comment on that tile saw. While nice to use, cleaning that particular model might end up being a pita. I have a cheapo wet saw that has an independent tray for the water. Once done cutting, I can remove that and clean out all the clay that accumulates from the cuts. Something to keep in mind.

Similar to this concept:
wet saw
 

cgrutt

Well-known member
Joined
Mar 4, 2016
Messages
8,360
I've gone as far as drawing kitchen (or bathroom) to scale and overlaying a scale drawing of tile over it to visualize how everything looks and figure out where the off cuts land. In general I prefer to start layout in center and work outwards both directions for symmetry but that's not always the best option regarding off cuts. Range and hood area are typically main focal point you should do everything you can to make sure it looks good there. Off cuts aren't just issue at ends of run you have to pay attention where any transitions such as range or sink work into layout you should avoid any small pieces especially in those high work / high visibility areas. Subway tile can be laid out like traditional brick, in thirds or even stacked vertically it all comes down to personal preference. I generally try to have whatever pattern flow around corners, so if you're doing a traditional brick stack and have a full tile run into corner, the one next to it on adjoining wall should be a half tile. Visually this makes it appear the pattern continues around room. Pay attention to the vertical lines on alternating courses you want them to be dead straight up and down I've seen pattern drift off course either due to carelessness of installer or because starting wall was not perfectly plumb and it throws the whole room off. Run a laser vertically to keep courses on track if you have one. Good luck!
 

thunderalley3

Well-known member
Joined
Aug 25, 2019
Messages
460
Location
Daytona Beach Fl
I like to center from the main focal point entering the kitchen. then do a layout to see how I can get the most length of cut tile on the next focal point end wall. I have also "cheated" an inside corner under a cabinet to get a longer tile on a doorway end wall. If you cheat anyplace on having a shorter lap do it on inside corners under cabinets as it is much less noticeable in my opinion.

Layout is subjective and has to please the person who looks at it everyday and is paying the bill!!
 
To avoid these ads, REGISTER NOW!
Top Bottom