To avoid these ads, REGISTER NOW!

Lee's Garage/Shop projects

LeeG

Well-known member
Joined
Nov 29, 2012
Messages
1,525
Location
Phoenix, AZ
Initial post for this thread is something I just finished today. I'll be adding future projects here as well as perhaps going over some old stuff I never posted but that someone may find useful.

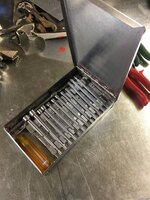
I have a drill press that has a t-slot table, and I have a step block set that matches. I've never had a good place to store this, and since I got my mill (which has different sized slots), I don't use it as much, but I still wanted to keep it handy. I had an extra flat screen TV mounting arm, and this is what I came up with.


It pulls out for easier access.


It is mounted to the drill press column using a piece of 4" thin wall tubing (.125 wall) cut in half and held on with hose clamps. I added an offset to extend the bottom of the base to the level I wanted and keep it away from the height/swivel mechanism on the drill press table. I had to add a piece of 16ga steel to strengthen the somewhat flimsy holder.


I think I am really going to like having this handy, but out of the way.

Lee
 
To avoid these ads, REGISTER NOW!
OP
L

LeeG

Well-known member
Joined
Nov 29, 2012
Messages
1,525
Location
Phoenix, AZ
About 2 years ago, I started building my ideal welding cart. It is 16" wide and has 24" deep drawers. The frame is made from 14ga 1"x2" tubing, and the top and bottoms are skinned with 12ga steel. To get the sharp bends I wanted on the top, I scored the bend with a partial depth cut using my metal cutting circular saw.

The five drawers were made from 16ga steel bent to form the back, bottom, and partial front. The sides of the drawers were welded on. To give an cleaner look, I made the drawer fronts from 12ga steel. I used it in various stages of completion for almost two years. Basically it looked like this most of the time.


Last month it finally started cooling down enough and I decided it was past time to finish it. I built sides with sweeps to store welding cords, and made a solid back. The sides and backs are not welded in place, as that would make it too difficult to work on, so they both screw on to the frame. The sides are inset 1/2" from the face of the frame. I welded some 1/8" flat bar to the frame to give me something to attach to. I replaced the rather cheap wheels and casters with some much heavier duty ones, and had the entire thing powder coated.


I am very happy with how it turned out. After getting it fully loaded with clamps and my fireball squares, I need to add a handle to help move it around. It probably weighs 120-150 pounds empty, so it has some gravity to it when fully loaded.

Lee
 

Ohmthis

Well-known member
Joined
Jan 20, 2013
Messages
3,009
Location
Outside of Louisville KY
Lee, very nice cart. I was going to ask about moving it around and it’s ease. You answered me though. I built a cart years ago for my welders and it’s like your was, used but not finished. Mine needs to cord wraps that you put on yours.
 

Jayman17

Well-known member
Joined
Feb 6, 2017
Messages
3,795
Location
Seattle, Wa
Lee, I don’t know how you managed to paint your cart for your Miller welder Lincoln red! :lol_hitti Looks great though.

Jay
 
OP
L

LeeG

Well-known member
Joined
Nov 29, 2012
Messages
1,525
Location
Phoenix, AZ
I added some additional ground clamps to my Miller 211. i picked up some #4 ground wire from my LWS and some quick disconnects from McMaster. I use the standard clamp usually, but it’s nice to have options.

 
OP
L

LeeG

Well-known member
Joined
Nov 29, 2012
Messages
1,525
Location
Phoenix, AZ
The welding cart was difficult to move, so I added a handle. 1/4”x2” aluminum bar for the side brackets, attached with rivnuts. i knurled the bar out of some 1 1/4” aluminum rod. I am pleased with the look and functionality of the results.

 
OP
L

LeeG

Well-known member
Joined
Nov 29, 2012
Messages
1,525
Location
Phoenix, AZ
This next project solved three problems for me. I had a cart that I had cobbled together over the years to hold various cut offs. When I started this cart, I was mainly doing woodworking projects, and it worked fine.


As I switched to more welding and machining projects, it just wasn't heavy duty enough. Also, I had picked up a Kennedy machinist box at an auction, and had a Harbor Freight lift cart that took up valuable floor space. My goal here was to solve these three problems with a new cart.


The base frame is 1/4" 2x2 angle iron to make a 24x35 base (not going to 36 came back to bite me). The center support and cantilever shelf were made from 11 ga 2x2 and 1x2 tubing. The "floor" is a piece of 3/16 plate. I picked up some 14ga 4x4 tube as remnants , so that made a dandy way to store various lengths of different types of materials. I made 8 24" high, 6 18" and 4 12". I slid a 3/4" piece of rubber matting under the tubes to keep it quieter when dropping stuff in. I had to cut one pair of the 12" bins down to 3" to make them fit. These bins are welded together in 2 sets (the 24" in a set and the others in a set), and the sets are bolted to the base via a strip at the bottom.

I left a gap open between the tubes and the center line divider for sheet cutoffs. I had to put extensions on the casters to get enough clearance for the HF lift cart. I used some 5" double locking casters from Woodcraft for the front, and some 8" wheels with roller bearings from Harbor Freight for the back wheels.

I am still pondering on what to put on the other side. Perhaps I'll add some storage for vice-grips and a tray for very short rems. I just finished it today, but I think it will work well.
 
Last edited:

Bigblue&Goldie

Well-known member
Joined
Mar 12, 2009
Messages
10,670
Location
AZ
I just discovered your thread; I really like what you did with the Teco clamp holder and welding cart.

Where are you going for welding supplies?
 
OP
L

LeeG

Well-known member
Joined
Nov 29, 2012
Messages
1,525
Location
Phoenix, AZ
This weekend I started filling out the other side of my materials cart. I took an idea from another thread Vise Grip Storage. I used a piece of 1" diameter .120 wall tubing I had in the scrap bin, and cut a 7/16" slot in it with my plasma cutter. After cleaning up the edges I welded on some attachment plates and got these.


I prefer to bolt things on rather than weld as it make it easier to change things in the future. I attached these to the underside of my cantilever shelf and now I have room for more clamps!


These are the Breman clamps from HF. Other than the knobs on the end, they look to be identical to the Milwaukee clamps I have. I do like the square recess in the HF clamps that allow it to be tightened with a 1/4" ratchet. I'll be adding some additional fixtures as I get some free time.

Lee
 

DeeDubz

Well-known member
Joined
Nov 20, 2019
Messages
1,431
Location
Socal
This weekend I started filling out the other side of my materials cart. I took an idea from another thread Vise Grip Storage. I used a piece of 1" diameter .120 wall tubing I had in the scrap bin, and cut a 7/16" slot in it with my plasma cutter. After cleaning up the edges I welded on some attachment plates and got these.


I prefer to bolt things on rather than weld as it make it easier to change things in the future. I attached these to the underside of my cantilever shelf and now I have room for more clamps!


These are the Breman clamps from HF. Other than the knobs on the end, they look to be identical to the Milwaukee clamps I have. I do like the square recess in the HF clamps that allow it to be tightened with a 1/4" ratchet. I'll be adding some additional fixtures as I get some free time.

Lee
I did something similar in my shop. I like it!
 
OP
L

LeeG

Well-known member
Joined
Nov 29, 2012
Messages
1,525
Location
Phoenix, AZ
This scrap cart is taking on a life of its own. Uncharacteristically for me, I went cheap on the wheels initially and use some 8" wheels from Harbor Freight. They didn't look horrible - they had roller bearings and were rated for 450lbs each, but they were too soft and deformed enough under load that I the cart was very difficult for me to move.

The replacement wheels from McMaster were rated for 1100lbs each, and had much harder rubber, but the axle was 3/16" longer and wouldn't fit in my existing brackets. It took much longer to unload the cart and flip it over than it did to put the new wheels on. No photos, and it pretty much looks exactly the same as before. The new wheels work much better, but as long as inertia is still a thing, it will probably take some effort to get it rolling.

The bigger project (time wise) was making a handle for it.


I could have welded something on and been done in 10 minutes, but I wanted to try something new. This is a piece of 1 1/4" DOM tube I had laying around. It is attached to the cart via a pair of bolts through the cart frame. I welded a plug into each end of the tube, threaded it, knurled the middle piece, cut off the ends with a 45° cut, and welded them back together to form the handle. Some scotchbrite pads on my die grinder to clean it up and then bolted it on. Very solid.
 
OP
L

LeeG

Well-known member
Joined
Nov 29, 2012
Messages
1,525
Location
Phoenix, AZ
I really hate having to move something to get to something. For the past few years, I have been using Allit brand storage trays from Lee Valley tools (here's the post in the relevant thread) and I added another seven to my collection a while back, and it has been bothering me having them just stacked, so I took care of that with a bit of woodworking.


The one on the far right is the new one. Made from 1/4" and 1/2" baltic birch plywood.
 

Dan99

Member
Joined
Dec 8, 2021
Messages
18
Location
Minnisota St Paul
I just picked up a motor for my bead roller and a spot welder and built this tool case.
I like working in the garage.
 

Attachments

  • IMG_4508-a.JPG
    IMG_4508-a.JPG
    351.2 KB · Views: 110
  • IMG_4510-a.JPG
    IMG_4510-a.JPG
    335.8 KB · Views: 120
  • IMG_4511-a.JPG
    IMG_4511-a.JPG
    342 KB · Views: 117
  • IMG_4512-a.JPG
    IMG_4512-a.JPG
    345.9 KB · Views: 123
Last edited:
To avoid these ads, REGISTER NOW!
OP
L

LeeG

Well-known member
Joined
Nov 29, 2012
Messages
1,525
Location
Phoenix, AZ
I like having a specific location for everything as it makes it much easier to notice if something is missing. I have some 1/4" impact driver bits I generally keep in my truck. I had been storing them in pill vials. This worked to keep them together, but it was difficult to know if they were all there.

I found some 2 3/8 x 2 3/4" plastic jars with screw on lids from McMaster, and I had a piece of 3" Delrin rod. These jars have about 2° of draft, so I cut a matching taper on delrin and this gave it a nice snug fit. I used Fusion 360 to print out a 1:1 scale drawing with the hole locations I wanted, then center punched and drilled them out.


One set contains my SAE hex bit and socket adapters, and the other is my "Ikea kit", with Pozidrive and metric allen hex bits. I'm really happy with the result. The bits are easy to grab and its obvious at a glance if one is missing.


Lee
 
OP
L

LeeG

Well-known member
Joined
Nov 29, 2012
Messages
1,525
Location
Phoenix, AZ
Thanks to the guys posting in the new tools thread, I picked up a set of Torx Plus drivers and a set of Tamper-Proof Torx drivers. I've actually had them a while, but I finally got tired a moving them around the shop and made a home for them.


Pretty basic stuff, but I do make each hole sized to the bit that will go in it, and provide a counterbore for the ferrule. I typically use a piece of 8/4 poplar for stuff like this. I like for each tool to have a specific home so I can easily tell if something is missing.

A while back I added this holder for my Ladyfoot pry bars. This was pretty basic with just a piece of wood cut to the right profile with some aluminum bar stock glued to the front.


Lee
 
OP
L

LeeG

Well-known member
Joined
Nov 29, 2012
Messages
1,525
Location
Phoenix, AZ
Nature abhors a vacuum, and my shop seems to abhor unused space. I have been using the top of my Craftman toolbox as a place to store my sandpaper and such, but it made accessing the contents of the top hatch kind of a pain. My project today was to have the best of both worlds, so I made an "over the top" sliding shelf/drawer.


When I need access to the top hatch, it just slides open.


The sides are made from some 11 ga sheet I had laying around. I used some perforated steel sheet that I had picked up as a remnant for the bottom. I'll probably add a place to store a roll of pig mat over top of everything. Once I get it to final configuration, I'll have it powder coated to either match or contrast with the toolbox.

Lee
 
OP
L

LeeG

Well-known member
Joined
Nov 29, 2012
Messages
1,525
Location
Phoenix, AZ
A few years ago I picked up some sheet metal tools - a shear, a brake, and a corner notcher. I really didn't have any room for them, so when a friend mentioned that he could use them in his shop, I was happy to let him take them for an extended "borrow". Last month he called me to say they were downsizing their shop, and that I needed to come and pick up my stuff.

Well, I already have a ton of stuff, and I had filled in the place where those things previously had been stored with other stuff (good stuff). The shear made it back to mostly where it had been previously. It is a 36" Pexto pneumatic shear that will handle 16 ga mild steel. It is heavy. I welded up a bracket so I could mount my 16ga corner notcher in some of the same footprint of the shear. It looks like it should work.


There isn't a lot of room behind it, but enough that I can use the back gauge that is currently just hanging on the front. The notcher is solid, and with some effort, I can move this around on the quarter-minus I have around my shed.


Next weekend I'll build some sort of lean-to type structure to keep it mostly dry during our infrequent rains.

Lee
 
OP
L

LeeG

Well-known member
Joined
Nov 29, 2012
Messages
1,525
Location
Phoenix, AZ
The 48" brake I had was not a finger brake, and I had been looking for one. I ended up getting a good deal on a Dayton brand 48" finger brake rated for 16 ga mild steel. It is not quite as solid as the USA made one I already had, but I wanted the fingers. I was able to sell my old brake and the change out only cost me a couple hundred dollars.

The only place I had to store it was on the back side of the slab we use for our trash and recycling bins, and I already had two smaller containers there. Here's what I came up with.


I use those HF trailer tongue toolboxes to store offcuts (lower one) and shapes for use on the lathe (hex, round, brass, bronze, 4140, etc). The lower toolbox has standard casters on it. The middle toolbox is on a platform that straddles the lower box. I used the V-groove wheels used in sliding gates for this, as I wanted to be able to slide it back beyond the edge of the slab, and I didn't have any need to move it laterally.

The brake went on a 2nd platform, made similar to the lower one, but much beefier. It uses the same V-groove wheels to allow me to pull it away from the house when I need to make a bend. I haven't used it other than a few test bends, but it seems to work well, and is sturdier than it looks. I don't have any wobble on any axis.


On each of the tracks, there is a backstop to keep it from hitting the house. The old brake was stored under a large grill cover. It worked well enough for the small amount of rain we have, but I might make an extension on the overhang on the house to give it some additional protection.

I was glad to be able to help out my friend, but I am happy to have my stuff back home where I can start making a dent in some backlog projects.

Lee
 
OP
L

LeeG

Well-known member
Joined
Nov 29, 2012
Messages
1,525
Location
Phoenix, AZ
Another organization welding project. I had picked up a bunch of ammo boxes at an estate sale a few years ago, and I use them as outdoor storage for things that can take the heat, but need to stay dry. Previously they had been stacked on top of each other and the one I wanted was always on the bottom. Time to build a storage rack.

The overall size of each shelf will be 4' x 1', so that exactly uses up a stick of angle iron. I cut the 1" x 3/16" angle with mitered corners and get the first one as perfect as I can, then weld on some 2" tabs of 1/8" flat bar so I can use my initial one as the template.


The other 4 shelves are easy to weld up and have exact matches, even if my pieces are cut a little short.


I forgot to snap any photos of the next part, but I welded some expanded steel mesh to fill out the shelves. Expanded mesh gives me a solid backing to slide items over, but allows water to evaporate so as to reduce rusting. I didn't want to weld them up as a single unit, so I used 1 1/4" square tubing with a weld nut on each corner of the shelves to allow me to just use 1x1 square tubing as legs.


I am pretty happy with how it came out. I'll probably take it down and paint or powder coat it at some point, but it makes getting to the ammo boxes much easier.

Lee
 
OP
L

LeeG

Well-known member
Joined
Nov 29, 2012
Messages
1,525
Location
Phoenix, AZ
Hammer Cart/Rack

A few people have asked me about my hammer cart. I didn't get any build photos, but I drew it all up in Fusion, so I can go over the build. Here is the finished product (mostly finished, still needs paint).


I made a template to hold the materials for each rack in the tower. The holders were made from 12" pieces of 2x2 16ga square tubing. There is a 1" spacing between each tube, with a 1 1/2" piece of .120 wall set on a 20° angle for the midpoint. To hold the pieces together, I welded some 1/2" x 1/8" angle across the front and back. The center piece has 1/4-20 nut welded on the inside to allow me to lock it into place on the column.


The base was made from some 2" x 3/6" C channel. To hold the vertical post, I took a piece of 3/4" square bar stock and plug welded it from the bottom to the C channel.


With a little bit of grinding on the interior, a piece of 1" square .120 wall tubing is a friction fit over this bar, so I didn't need to weld the vertical post in, and it is solid with no wobble. I bolted 3" double locking casters to the base. The ends of the 2x2 tubing were capped with some 3D printed covers to keep from damaging the hammers.

I am quite happy with the result. Next time I take a batch of parts to be powder coated, I'll include this.

Lee
 
OP
L

LeeG

Well-known member
Joined
Nov 29, 2012
Messages
1,525
Location
Phoenix, AZ
More tool or specifically, tooling, storage. I have this storage rack that sticks out from the wall (my wife claims the other side, so I can't do much there). For years, I have a grid of storage tubs stored in this rack, and it has worked very well for me. My lathe is kind of tucked in against the wall next to my side of these shelves, and I had finally amassed enough tool holders that I wanted a place to keep them organized.


I decided on a sliding panel in front of my storage bins. To make it work, I cut one side off of some .120 wall 3x3 tubing, and welded a piece of unistrut to the bottom of the remaining U shaped pieces. These U brackets were then screwed into the top beam of the shelving unit. The inside of the U brackets became storage for various sizes of all thread and small diameter round bar.

I then took a scrap piece of laminated MDF left over from my last cabinet build (I use this for most of my shop cabinet tops) and attached it to some strut trolleys with some 5° tapered washers I made. To keep the panel from flopping around, I added a bearing on a piece of bar stock on the bottom of the panel. The weight of the tooling keeps the bearing pressed against the lower rail of the shelving rack.

To hold the tooling, I 3D printed a bunch of BXA tool holders and screwed them to the panel.


I have another batch of tool holders printing now, and I'll leave some space on the panel for other stuff I might want to hold. Time will tell how much I like it, but I am glad to have this little project done.

Lee
 
OP
L

LeeG

Well-known member
Joined
Nov 29, 2012
Messages
1,525
Location
Phoenix, AZ
I got the idea for this next project from YouTuber Outsidescrewball. It is a jig for holding small pieces in the horizontal bandsaw.


I took a piece of scrap 1x3 C channel, ground the top flat and welded on a strip of flat bar to act as a locating stop. With that in place, I cut it off to length and attached the Kant-Twist clamp.


The flat bar allows me to always index it to the same length so the cut line is exactly on the end of the jig.


Lee
 

Bigblue&Goldie

Well-known member
Joined
Mar 12, 2009
Messages
10,670
Location
AZ
That's a great idea! I have the same saw and there are definitely times I'd like to cut a piece that's too short to sit in the vice properly due to how far away the blade is. What did you use for the grinding?
 

LXCam

ALLIANCE MEMBER
Joined
Apr 23, 2013
Messages
19,092
Location
AZ
My first time catching your thread Lee. Nice projects and I'm really digging the visegrip hanger system, I'm going to have to use that idea as well.
 
OP
L

LeeG

Well-known member
Joined
Nov 29, 2012
Messages
1,525
Location
Phoenix, AZ
My neighbor drives truck, and he has to wind the 4” straps several times a day. A couple of years ago, he asked me to make him a better strap winder than the cheap one the company issued.


This was my original build. 1”x3”x3/16” channel, knurled aluminum handle with bearing, bearings on the winding shaft, and a knurled aluminum locking handle. Over the next several months, I made changes as it got used a lot and failure points became known. A brace was welded to the end to stiffen the clamping flange, a better handle was made, and joints on the winder and handle got welded instead of screwed. It has worked great for the past 18 months.

Yesterday he told me that the clamping thread was getting loose And he was feeling some give as he tightened it. Originally, I had used some grade 5 3/8-16 all thread for this piece, but it wasn’t holding up well. After some thought, I took a piece of 1/2” acme threaded rod, trimmed down the ends and threaded it for 3/8-16.


The handle and swivel end then fit without having to be remade.


I figured that the acme thread would be much more suitable for this job. I didn’t have an acme tap, so I turned a nut down to round, drilled out the existing hole to be a press fit for it, and pressed it in to the assembly.


Here is everything assembled. Note the reinforcement on the end and the pressed in bushing. Following is another shot of the finished assembly.


It has been rewarding to be able to use my shop to help out a good friend.

Lee
 
OP
L

LeeG

Well-known member
Joined
Nov 29, 2012
Messages
1,525
Location
Phoenix, AZ
I’ve had my cutoff cart for a couple of years now and other than my tendency to overload it to the point I can barely move it, it has been great. Except for the open area under the clamps. It is a total mess.

Before-Photo-scaled.jpg

I always intended to put drawers down there, but I never felt I had the time. I have a block of vacation time over the Christmas holiday, so it is time. I went back to Fusion 360 and worked out a design based on materials I had or could easily get. My steel supplier sells sheet metal in partial sheets sizes, one being 12″x48″, so that became my drawer size.

Drawer-Plan.png

I picked up several pieces of 16ga and used my Pexto shear to cut them to length. I bent them into a short U shape on my brake, each one got a 2″ strip of 16ga welded to the back, and piece of 3″x1/8″ flat bar welded to the front to make a drawer box.
For the sides and the top shelf, I had water tank mount made from 1/8″ steel that looked to be big enough. I used my plasma cutter to chop it up and got the sides all squared up and tacked in place on my welding table. I attached the drawer slides to the drawers with some 1/4″ 8-32 screws and made a wood jig for marking the hole locations on the sides.

Drawer-Slide-Placement-Jig-scaled.jpg

I used a 1/8″ transfer punch to mark the steel, then center punched those marks to give me a good center point for the drill. The jig not only has the hole spacing, but references off the previous slide for drawer spacing. You can see in this photo the welded on drawer back.

Drawer-Slide-Placement-Tapping-scaled.jpg

Each hole was drilled with a 7/64 bit, then finished out with a 8-32 combination drill/tap. The 1/8″ steel is almost as thick as an 8-32 nut, so I am not giving up much strength, and it is a cleaner look.
Once all the drawers were installed, I tacked in the top shelf, then the entire assembly was bolted into the space on the scrap cart. Once everything was in and aligned correctly, I fully welded the shelf and loaded it back up. The drawer pulls are the standard 4″ wire pulls I use on all my shop cabinets.

After-Photo-scaled.jpg

Much cleaner and more organized. I’ll add labels on the drawers once I get a better idea for what to put in each one. For now I have brass, bronze, and delrin in the top, aluminum in the 2nd, 4140 in the 3rd, 1018 tubes and shapes in the 4th, and basic 1018 cutoffs in the bottom.

Lee
 

Bigblue&Goldie

Well-known member
Joined
Mar 12, 2009
Messages
10,670
Location
AZ
Looks great Lee! I really like how you hung those clamps.

Where are you getting your metal? Looks like IMS's paint coding on some of those pieces.
 

LXCam

ALLIANCE MEMBER
Joined
Apr 23, 2013
Messages
19,092
Location
AZ
You nailed it. I really like their new facility.

Lee
It’s a man’s toy store. The second one they opened was 5 minutes from my shop in riverside, I’ve been a fan boy for a couple decades.
 
To avoid these ads, REGISTER NOW!
Top Bottom