To avoid these ads, REGISTER NOW!

Let's modify a steering wheel

OccupantRJ

Well-known member
Joined
May 15, 2009
Messages
10,962
Location
Eastern North Carolina
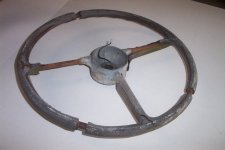
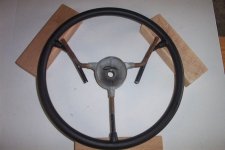
The steering wheel on my forklift was in really bad shape, and it was the only thing not originally rebuilt on the unit. The lift had sat outside before I got it, so the weather had done a number on the steering wheel. Needing the forklift for an impending shop move at the time, it was put on the back burner for 8 years, until I happened to go to Agri-Supply to look around.

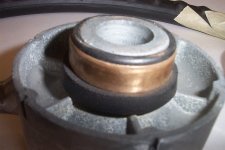
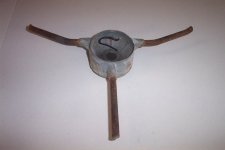
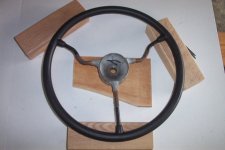
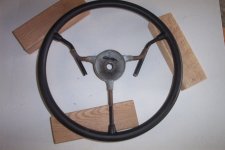
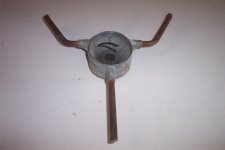
They have general and purpose fit steering wheels for farm equipment, so I picked out one I thought would do me some good. Cost was $20. The steering shaft on my unit is splined, and has a horn, so I wanted to keep the center hub if possible. After carving all the old rubber off and examining the hub, it was found to be of cast Zamac construction, with steel spokes cast in during manufacture.

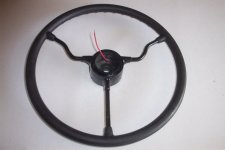
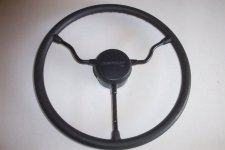
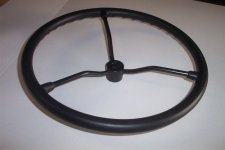
I decided to cut and modify the wheel for my purposes by bending and cutting all spokes in the appropriate places, then welding them together. One wheel's spokes were not evenly spaced, while the other was. This presented some interesting challenges in making things work out. I took a series of pics during the work to show the various stages of construction, and I think the pics will be self explanatory. The welding will be done later, as this is all the shop time I had today, as I am supposed to be remodelling in the house. Any questions, just ask.
 

Attachments

  • Steering wheel 002.jpg
    Steering wheel 002.jpg
    84.4 KB · Views: 172
  • Steering wheel 003.jpg
    Steering wheel 003.jpg
    87.6 KB · Views: 163
  • Steering wheel 004.jpg
    Steering wheel 004.jpg
    83.7 KB · Views: 148
  • Steering wheel 005.jpg
    Steering wheel 005.jpg
    74.4 KB · Views: 146
  • Steering wheel 006.jpg
    Steering wheel 006.jpg
    81 KB · Views: 144
  • Steering wheel 007.jpg
    Steering wheel 007.jpg
    69.5 KB · Views: 146
Last edited:
To avoid these ads, REGISTER NOW!
OP
O

OccupantRJ

Well-known member
Joined
May 15, 2009
Messages
10,962
Location
Eastern North Carolina

Attachments

  • Steering wheel 013.jpg
    Steering wheel 013.jpg
    103.2 KB · Views: 204
  • Steering wheel 012.jpg
    Steering wheel 012.jpg
    91.5 KB · Views: 150
  • Steering wheel 011.jpg
    Steering wheel 011.jpg
    90.6 KB · Views: 138
  • Steering wheel 010.jpg
    Steering wheel 010.jpg
    90.6 KB · Views: 136
  • Steering wheel 009.jpg
    Steering wheel 009.jpg
    70 KB · Views: 132
  • Steering wheel 008.jpg
    Steering wheel 008.jpg
    79.7 KB · Views: 134

Boyd

Well-known member
Joined
Dec 16, 2009
Messages
866
Location
Forney, TX
That's pretty cool! Great job. What precautions did you take to make sure the hub stayed centered?
 
OP
O

OccupantRJ

Well-known member
Joined
May 15, 2009
Messages
10,962
Location
Eastern North Carolina
That's pretty cool! Great job. What precautions did you take to make sure the hub stayed centered?

Nothing special, just measured from the rim to center in two directions while working. Steering wheels for equipment are not the most precisely manufaftured items. Ever noticed one while it is turning?
 

MoonRise

Well-known member
Joined
Nov 5, 2010
Messages
4,028
Location
NJ
Interesting.

Don't melt the low-melting-temp-alloy hub when you weld up the arms! :lol:
 
To avoid these ads, REGISTER NOW!
OP
O

OccupantRJ

Well-known member
Joined
May 15, 2009
Messages
10,962
Location
Eastern North Carolina
I found out that welding my steering wheel to prevent melting either the molded rim or the Zamac hub should not be a problem. My retired neighbor plays with old tractors, and when he saw what I was doing, went to Ag Supply and bought a wheel for me to modify for his B Allis Chalmer.

It was a steel hub wheel with three evenly spaced spokes, so I just cut the old hub out and welded it into the new steering wheel after removing that one. I was going to do the job for free, but he offered the use of his car transport trailer with self contained battery powered winch any time I need it. I think that will be just fine with me. ;)
 
Last edited:
OP
O

OccupantRJ

Well-known member
Joined
May 15, 2009
Messages
10,962
Location
Eastern North Carolina
When I did the neighbor's wheel, it was made a little off center, so I took the liberty of making a redneck steering wheel modification fixture. It consisted of an old cabinet door with a 5/8" allthread stud attached to center the hub. A circle was drawn to align the OD of the wheel, then conduit clamps were screwed to the board to hold the wheel rim in a fixed position. A short piece of 1/2 electrical conduit was slid over the stud to help center the tapered hole over the stud, then the hub was clamped in place and height adjustments made with a couple of washers and hex nuts. It did a pretty nice job of fixturing the hub to the spokes for welding.
 

Attachments

  • Redneck 001.jpg
    Redneck 001.jpg
    108.1 KB · Views: 37
  • Redneck 002.jpg
    Redneck 002.jpg
    71.9 KB · Views: 35

RaymondForte

New member
Joined
Oct 8, 2012
Messages
3
Location
new york
i really appreciate your innovations and skills i just winder why this thought dosent came to my mind but would say this as superb steering
 
OP
O

OccupantRJ

Well-known member
Joined
May 15, 2009
Messages
10,962
Location
Eastern North Carolina
Ok, got some more shop time today, which seems to be rare these days. I welded up the spokes in my modified steering wheel, then ground them to blend. While I was into it, I machined a new horn contact slip ring for the back of the hub, as the old one had worn through from years of use. An adapter was made to adapt the horn button from an old Chevy Blazer I had around. A little rattle can black paint, and all is well.
 

Attachments

  • steering wheel1.jpg
    steering wheel1.jpg
    71.9 KB · Views: 49
  • steering wheel2.jpg
    steering wheel2.jpg
    114.3 KB · Views: 44
  • steering wheel3.jpg
    steering wheel3.jpg
    72.5 KB · Views: 44
  • steering wheel4.jpg
    steering wheel4.jpg
    70.5 KB · Views: 52
To avoid these ads, REGISTER NOW!
Top Bottom