Hey,
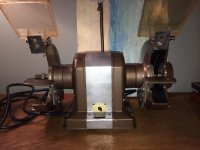
Well this was fun. After tearing down the model 397.19571 all looked good except.. brittle insulation cracking off the wires to the windings.

![NCM_0028[1].jpg](https://www.garagejournal.com/forum/data/attachments/285/285004-b0ebc1486c4cd3a5c088d7b10435ba58.jpg "NCM_0028[1].jpg")
I removed the white wire brittle insulation and was planning on Dual Wall Heat Shrink With Adhesive then cover that with Flame Retardant Polyester Expandable (Braided) Monofilament Sleeving. However, the wire is to corroded and brittle. I normally just take it down to good wire solder a new piece on and heat shrink and sleeve it. Well it extends all the way down into the windings, has anyone done a replacement the wire, I presume I can fish out all the pieces tin a new piece and slip it in place ? After stripping some more insulation on the other two wires I believe they were all subjected to high heat the copper is discolored and corroded so I will have to replace all three wires.:{ Oh and I have been googling and youtubing all night trying to find someone showing how it is done to no avail yet.
Cypher
Well this was fun. After tearing down the model 397.19571 all looked good except.. brittle insulation cracking off the wires to the windings.
I removed the white wire brittle insulation and was planning on Dual Wall Heat Shrink With Adhesive then cover that with Flame Retardant Polyester Expandable (Braided) Monofilament Sleeving. However, the wire is to corroded and brittle. I normally just take it down to good wire solder a new piece on and heat shrink and sleeve it. Well it extends all the way down into the windings, has anyone done a replacement the wire, I presume I can fish out all the pieces tin a new piece and slip it in place ? After stripping some more insulation on the other two wires I believe they were all subjected to high heat the copper is discolored and corroded so I will have to replace all three wires.:{ Oh and I have been googling and youtubing all night trying to find someone showing how it is done to no avail yet.
Cypher
Last edited:


")


![IMG_20150219_105640845_HDR[1].jpg](https://www.garagejournal.com/forum/data/attachments/288/288007-48711d29f136ce9df4e139f913c04686.jpg "IMG_20150219_105640845_HDR[1].jpg")
![IMG_20150219_105720108[1].jpg](https://www.garagejournal.com/forum/data/attachments/287/287975-c40d76d28d4c9ec1d5617a9e5438d6e0.jpg "IMG_20150219_105720108[1].jpg")