
torqueman2002
Well-known member
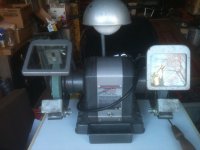
Nice condition pre-Block grinder!Got this at an estate sale today. I passed it up in the morning as the guy was asking too much and its missing the wheel guards and its 1/4HP. Sale was so good I went back in the afternoon and the grinder was still there. I got more goodies and asked if he would do $20 on the grinder and he said ok.
The 1/4-HP ones I've seen, don't have the wheel guard covers, the guards some times have the un-tapped cast bolt hole bosses.
A couple of interesting things: the lamp's goose neck is attached on the rear RH side, and the flanges are very substantial.


 Ooops,