alpinewhite
Well-known member
Let us know if you'd like info/links for any of the remaining pieces.
I'd like the links, please.

Let us know if you'd like info/links for any of the remaining pieces.
There are links for parts and pieces in a separate thread, which is the 1st link in my signature line.I'd like the links, please.

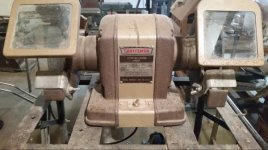
Finally my first block. I watched this one on CL for about a month. They finally dropped the price and brought it to my town. It still has what I think are the original wheels. It came with a rim type stand. Plus another grinder(?) and a Cole vise for about the original asking price of the grinder alone. It was an estate sale and they wanted to sale everything as a package. They had lots of tire kicker but no buyers.. Lucky for me I had some cash at the right time.
It's missing the rubber feet and has the as to be expected forever to stop feature, with no extra charge for the one piece eye guards that are hazy. Hope the guards polish out.
As I've watched this thread I've seen where others have posted the best place to buy bearing and other parts. As you might guess I had no reason to write down the information at the time. Sooo would someone be so kind and save me hours of searching and point me to where I can find this information. Thanks in advance.
A 1/2hp cap start is a very nice machine. Somewhere in this thread someone used a polish on the shields and they came out like new. (Mequiars maybe?) The feet can also be picked up at Lowes, search this thread for Hillman and you should find them.My block began struggling to start and growling a lot during startup. It seemed like the rotor was scrubbing against the armature.
Sure enough, I could loosen the 3 main bolts, shift the relative position of the housing halves slightly, tighten back up, and change the response. Sometimes it was totally stuck, sometimes it was a little better.
Then I had an idea to *force* the air gap to be what it needed to be. I took one half off and inserted 10 thou shim slivers in four quadrants of the air gap. Reinstalled the housing half and the bolts. Snugged them, tapped the housing to equalize, and torqued them down. Pulled the shims out. Now it starts perfectly, no grinding at all.

After doing this I realize it would be best to do this process twice: once when seating the armature to the 1st housing half, and again when installing the second half.
I went looking for common house hold items that can be used. No empty beer cans, but lots of other close items.x2!
I like this idea. Now, what common household item is 0.010"?
Beer can?


I went looking for common house hold items that can be used. No empty beer cans, but lots of other close items.
Thank you!PM me and I'll put some 0.010" shims in an envelope for you!
You betcha.Thanks torqueman for the links. Do you have a preference on the bearings?
McBrownie Pretty happy about my find. There is a link from yesterday that mentioned the Lowes info. I got the Hillman numbers 38902 00393 H#884633. Hope this helps someone else.
You betcha.
I've been using NTN, just because that's what a local bearing supplier matched me up with for my 1st couple of re-builds.
I suppose, USA or Japanese made bearings should be fine.
Chinese ABEC-rated bearings are fine as well for the amount of use a bench grinder ever gets. If it was a machine running 24/7, better bearings make economic sense. And to be honest, I'd rather use modern bearings with modern lube than some >20 year old NOS bearings that have been drying out on a shelf somewhere.
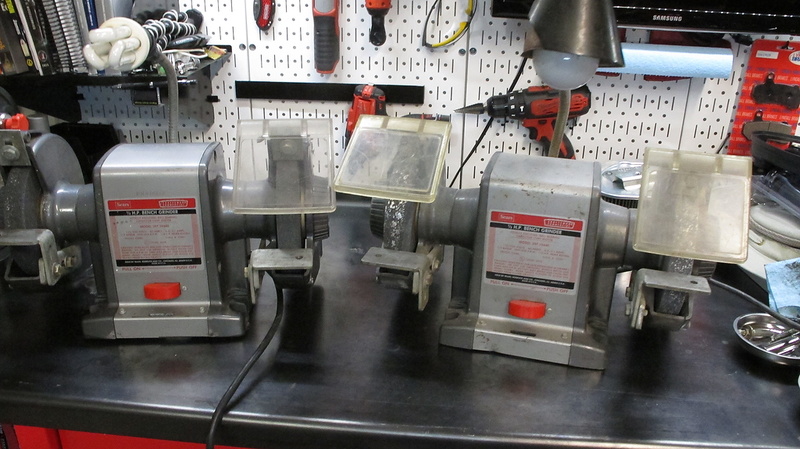

Twin brothers of different mothers!TWINS!!!
Got a second 1/2hp today... happens to be the same model # as my existing one. The new on is on the left, it's missing an eye shield and both are missing quench trays. The one I got today will also need it's lamp stalk and lamp assembly replaced.
The boys are so close together, they were birthed within 2-days of each other.

I agree of course.
But, how can I tell if the NTN are 20 year old NOS bearings or fresh?
Hello Alpine!This thread is evil. I now have 4 blocks (1/3 x 3, 3/4 x 1). Stop me!!!!
In addition, I have the 1HP 10" Dayton.
I need help. "I'm AlpineWhite and I'm a grinder-a-holic and a vise-a-holic".
I don't know!You can't except that if they are USA they are most likely old. Or if you bought them from a private party on eBay.

Less than a week into the restoration and here's where I'm at. New paint, bearings, cord, hardware. Just need stones, tool rests, eye shields and the new label to finish her up.

Here's what she looked like before:

Alpine: you need to read the entire thread and see all the warnings we've made to keep blocks from reproducing in your garage. One cure is to put different wheels on each one so you wont ever have to change wheels. Another is to sell the smaller blocks to members that need one and use the funds to buy bigger ones.
All: anybody have pictures of a block they either shipped or had shipped so i (we) can see how to keep passing these to other members? Im guessing bolting to a piece of plywood for starters. Do you take off all the wheels, shields and maybe the light too or ship as a unit?
All: anybody have pictures of a block they either shipped or had shipped so i (we) can see how to keep passing these to other members? Im guessing bolting to a piece of plywood for starters. Do you take off all the wheels, shields and maybe the light too or ship as a unit?
Has anyone tried installing a LED Flex Neck on their grinder?
Maybe something like:
http://www.amazon.com/gp/product/B00H89JQME/?tag=atomicindus08-20
I like this one because it has the ON/OFF switch next to the bulb, but most of these lights have some kind of AC Wall Transformer that would need to be integrated inside the grinder base somehow.
http://louisville.craigslist.org/tls/5301673245.html
If you guys are in the louisville area the price seems right on this one... just needs a little love


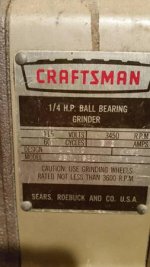
That is a great old Craftsman.Not a Block but I have not seen this style of craftsman / machine plate.
http://www.govliquidation.com/auction/view?auctionId=10322224&convertTo=USD
I did do that. I let the ink dry at least a day then sprayed several light coat of Acrylic Clear matte finish. Then let that dry 1 to 2 days before attempting the install tonight. I'm thinking poor quality paper and/or ink in the printer. Don't know, just a stab at possible problem. ThanksI don't know if this will help, because I haven't done large water decals (only small ones so far). BUT, after printing, and before going into the water, I seal the ink with a light coat of clearcoat spray and let it dry completely before dipping in water.
This might help with the ink damage when installing the decal by stiffening the decal slightly.
It was worth a shot I looked through my links for a thread on decals, but couldn't find it.A week or two ago I posted that I was attempting to make new tags for my 1/3hp 6" Block. This is my first time ever creating water-slide labels. These were printed on an ink jet printer and the water-slide paper is for ink jet paper and coated with Acylic Clear. However four attempts all yielded horizontal cracks in mostly the gray color, there were few in the "SPIT PHASE MOTOR" line.
Top-left is the original tag, top-right is the first attempt on a scrap aluminum. Here the paper curled immediately while submersing it in the water. You can see the heavy horizontal lines.
Bottom row, in order of left to right: This time I inserted each upside-down quickly followed by a steel flat weight to keep the paper flat. Each one created far less cracks, however still horizontal cracks when applied to the aluminum sheet.
Can anyone with some experience chime in here. Am I doing something wrong here, ink quality, paper quality, etc? Is there an alternative solution to making these tags: Litho, vinyl sticker, silk screening, don't know? Thanks all.

Can anyone with some experience chime in here. Am I doing something wrong here, ink quality, paper quality, etc? Is there an alternative solution to making these tags: Litho, vinyl sticker, silk screening, don't know? Thanks all.
I've had success creating water slide labels. Did you spray the acrylic clear on before you transferred it to the metal or after? In my experience, I let the label dry thoroughly after printing then get it wet and transfer it to the metal. This is the stage when the label is the most fragile and can stretch or tear. Once it's dry on the metal then I sprayed with acrylic to make it more durable.
....Don't get discouraged. The labels/machine plates are very time intensive for me. I wouldn't be surprised if you get requests for reproduction tags when you get the 'wrinkles' worked out of your process.
Got pics?I've had success creating water slide labels. Did you spray the acrylic clear on before you transferred it to the metal or after? In my experience, I let the label dry thoroughly after printing then get it wet and transfer it to the metal. This is the stage when the label is the most fragile and can stretch or tear. Once it's dry on the metal then I sprayed with acrylic to make it more durable.