
You are using an out of date browser. It may not display this or other websites correctly.
You should upgrade or use an alternative browser.
You should upgrade or use an alternative browser.
let's see your craftsman block grinders
- Thread starter emeraldcoupe
- Start date
jakemac
Well-known member
Check the assortment bins at your local hardware store. I don't remember the size, but you're looking for a self-threading pan head screw. Short (3/8 long ????).
torqueman2002
Well-known member
Hi, just a couple of thoughts in Blue.
Ok, maybe some one here can verify my next step here with new found issue. This week I'm re-assembling my 1/3HP grinder. Tonight while cleaning the stator, I noticed the insulation on the black wire is brittle and crumbling off. Upon further inspection after removing the rest of the brittle insulation the copper wire is discolored. I assume this is due to overheating, correct me if I'm wrong.
It can also be from age, the insulation dries out and crumbles on old electronics, ie: tube radios, ...
My question, I was able to gingerly pull out 1/4 inch of the insulated wire to try to get better insulation but it too was brittle and kept falling off. While pulling it would also pull an adjacent bare copper wire.
Just an FYI, what appears to be bare copper wire of the windings is coated/insulated at the factory, IIRC it is like a varnish bath, the assembly is dipped into.
Can I just insulate the black wire down to this point? Will there be any issues like a short if I don't get an overlap with the new insulation over the old one. I'll be using the marine grade heat shrink tubing for this, the stuff with the glue inside.
I have used 'regular' heat shrink successfully; the sealant style maybe a bit thick, and not really necessary.
Try some liquid electrical tape on the hard to reach area before you put the heat shrink on. Better to over-do it than risk missing a spot.
Belt and suspenders!
When soldering the 2 wires, be extra diligent to get the wires clean with rosin/flux solder (not acid core).
Hey guys, got my black plastic lamp shade from Sears. It didn't come with a screw however. I now have lampshades for both 1/2 hp grinders but no screws to hold them on. Any idea where or how to get an exact match? Thanks. -John
The length is very important - I have tried a small/short sheet metal screw. The point broke through the top.
Hi, just a couple of thoughts in Blue.
I hate it when that happens.
I just checked one of my lamps and the screw is just shy of 1/4 inch. Take the shade cover when you go to the hardware store.
Thanks. Will do.
torqueman2002
Well-known member
I saw this post on OWWM and thought of your question. I hope it helps.Ok, maybe some one here can verify my next step here with new found issue. This week I'm re-assembling my 1/3HP grinder. Tonight while cleaning the stator, I noticed the insulation on the black wire is brittle and crumbling off. Upon further inspection after removing the rest of the brittle insulation the copper wire is discolored. I assume this is due to overheating, correct me if I'm wrong.
My question, I was able to gingerly pull out 1/4 inch of the insulated wire to try to get better insulation but it too was brittle and kept falling off. While pulling it would also pull an adjacent bare copper wire.
Can I just insulate the black wire down to this point? Will there be any issues like a short if I don't get an overlap with the new insulation over the old one. I'll be using the marine grade heat shrink tubing for this, the stuff with the glue inside.
http://owwm.org/viewtopic.php?f=82&t=159629&p=1078882&hilit=+ge#p1078882
bagged89s10
Well-known member
So I was using one of my blocks to buff today and sometimes if I touched any part of the housing, I would a tiny zap. I'm thinking it could be from static electricity but I don't know. Could there be a bad ground I should look for?
McBrownie
Well-known member
So I was using one of my blocks to buff today and sometimes if I touched any part of the housing, I would a tiny zap. I'm thinking it could be from static electricity but I don't know. Could there be a bad ground I should look for?
You should have a green ground wire that is attached with a screw to the right-side housing just behind the relay. I would think that would take of any static build up as well. Did you replace the cord or is it original?
Edit: Or is it you that is getting statically charged? That could be.
Last edited:
bagged89s10
Well-known member
You should have a green ground wire that is held on by a screw in the right-side housing just behind the relay. I would think that would take of any static build up as well. Did you replace the cord or is it original?
I have not replaced any wiring yet. I'm going to put a new cord on it at least.
Pupuhd
Well-known member
If it's a one time zap then it's static electricity. A continuous zap or tingling feeling is definitely a ground issue. On my 12 inch pedestal grinder, 3 phase using a vfd, I was getting a continuous tingling of 50 volts whenever I touched the housing. I have since then corrected the problem.So I was using one of my blocks to buff today and sometimes if I touched any part of the housing, I would a tiny zap. I'm thinking it could be from static electricity but I don't know. Could there be a bad ground I should look for?
I "see" said the blind man to the deaf man as he picked up his hammer and saw.
bagged89s10
Well-known member
If it's a one time zap then it's static electricity. A continuous zap or tingling feeling is definitely a ground issue. On my 12 inch pedestal grinder, 3 phase using a vfd, I was getting a continuous tingling of 50 volts whenever I touched the housing. I have since then corrected the problem.
I "see" said the blind man to the deaf man as he picked up his hammer and saw.
It's intermittent and only when I use the buffing wheel on the left side of the grinder.
gustsant
Well-known member
Found these Baldor grinder stands on Ebay, if someone is in Virginia might be a good deal. And no, this ad is not mine, if violating any rules please ignore or remove, just trying to pass a deal to someone who may use it.
http://www.ebay.com/itm/Grinder-stands-Baldor-F13-0982-NEW-can-ship-GA16-/151853385012?
http://www.ebay.com/itm/Grinder-stands-Baldor-F13-0982-NEW-can-ship-GA16-/151853385012?
Pupuhd
Well-known member
Definitely static electricity. Check the condition of the existing cord and continuity before replacing. Also like McBrownie says, could be you.It's intermittent and only when I use the buffing wheel on the left side of the grinder.
I "see" said the blind man to the deaf man as he picked up his hammer and saw.
Pupuhd
Well-known member
That much I figured, thank you all. I have since applied Liquid Tape as suggested here followed by heat shrink tubing. Assembled and test run ran perfect and smoothly.The bare-looking wire is magnet wire. Solid copper coated with a certain clear insulation. It's designed to let wound wires pack in tight. The wires do not have to be flexible unlike most other wires.
To date I have the grinder 99% completely assembled. Only missing to install a new machine tag. Waiting for supplies, water slide paper, aluminum etc., to replicate a new one.
However I have a new issue. I purchased a new t-style diamond dresser to dress up the new wheels. Before dressing they werent too bad out of round, almost acceptable. After dressing with the t-style diamond dresser they are now worse. When testing a scap piece of metal on each wheel, I get a lot of chatter.
Any ideas? Should I invest in one of those diamond points that can be affixed to a jig which keeps it positioned and parallel to the front of the tool rest edge?
I "see" said the blind man to the deaf man as he picked up his hammer and saw.
Last edited:
jakemac
Well-known member
It's intermittent and only when I use the buffing wheel on the left side of the grinder.
I use an old table saw motor with arbor adaptors as a buffing set-up and have the same issue with static electricity when buffing. Especially when the air is dry, not so much when the air is humid. My machines are in a line, and when my arm gets too close to the grinder next to the buffer, I get a small zap. I only plug one machine in at a time, so I know it isn't the other machine.
I think your problem is the same. It isn't an issue with your wiring. It has more to do with the buffing pads and air condition.
Last edited:
Looks like my CM grinder family is adding a new member as I am picking up this 397.19350 in the morning (yippee as its a 3/4 hp). And go figure, each one of my grinder purchases was cheaper than the previous and the trend continues as the winning bid on ebay for this one was $27 
Finally in the right location for a local pick up only ad.
Bad photo from the ad, but more details tomorrow including a new family photo.
Not sure what I need with 4, but I am sure to figure something out
Finally in the right location for a local pick up only ad.
Bad photo from the ad, but more details tomorrow including a new family photo.
Not sure what I need with 4, but I am sure to figure something out
Attachments
Looks like my CM grinder family is adding a new member as I am picking up this 397.19350 in the morning (yippee as its a 3/4 hp).
Is that an 8-inch model? Capacitor Start? Looks in pretty good shape
7 inch... not sure on the other specs yet.
Then I'm guessing it's a split phase non-commercial model. It would be great if you could post a pic of the label
xs650shawn
Well-known member
Done for now. Still missing one of the work rests, so may just end up fabbing up two new ones. Also, shield glass could stand to be replaced, but I have not found a source for the safety glass. Tried to reuse as many original pieces as possible. New bearings and replaced all the crumbling cloth covered wiring.
Update: Thanks to some help by Torqueman2002, I got a set of tool rests for my Mailbox grinder. Also pointed me towards some threads here I hadn't read yet. I was having an issue with it starting, it would need a "bump start" it to get it going. Realized on further inspection (and better reference pics) that I had installed the coil/stator upside down- way to go. This fixed the start up issue, but it wanted to run backwards. Swapped the wires on the switch, and now runs the right direction, starts on it's own, but only with one stone. If I have two grinding stones on it, it will need a bump again. Will also start fine with one stone and a wire wheel on it. Is this a common issue with 1/4 HP models, or another issue? I had a Delta 1/4 HP that would start fine with the same two grinding stones on it.
Some additional photos... this thing is in great shape and runs forever after shutdown! I plan to do some minor cleanup, add an extra shade cover from my parts stash and swap it out for the 1/2 HP on one of my CM stands.


torqueman2002
Well-known member
My comments are in Blue, below.
Update: Thanks to some help by Torqueman2002, I got a set of tool rests for my Mailbox grinder.
Glad to help.
Also pointed me towards some threads here I hadn't read yet. I was having an issue with it starting, it would need a "bump start" it to get it going. .... If I have two grinding stones on it, it will need a bump again. Will also start fine with one stone and a wire wheel on it. Is this a common issue with 1/4 HP models, or another issue?
....
Hmmm, odd for sure.
Here's a picture of a 1/4-HP m-397.19400 I found for my brother, it has 2 stones.
Looking at this picture, I now notice the stones are not centered on the arbor. proper size washers can be used to center the stones, and keep them from rubbing on the wheel guards.

I'd check for correct size 6"x1/2". Two OEM CM stones came with the Block, this 60 grit and a 36 grit.

If there is no interference and the stones are the correct size, check for proper bearing fit and 'air-gap' between rotor and stator.
http://www.garagejournal.com/forum/showpost.php?p=5181709&postcount=7017
I can't think of anything else at the moment, except to double check electrical connections are clean and tight.
Some additional photos...
Nice find, YOU ****!
this thing is in great shape and runs forever after shutdown! ....
A long coast down is a sign of dry bearings.
If you'd like to refresh the label, you'll find an editable Word file in post #3 of the first link in my signature line,
OR --> http://www.garagejournal.com/forum/showpost.php?p=4000529&postcount=3
Last edited:
Pupuhd
Well-known member
However I have a new issue. I purchased a new t-style diamond dresser to dress up the new wheels. Before dressing they werent too bad out of round, almost acceptable. After dressing with the t-style diamond dresser they are now worse. When testing a scap piece of metal on each wheel, I get a lot of chatter.
Any ideas? Should I invest in one of those diamond points that can be affixed to a jig which keeps it positioned and parallel to the front of the tool rest edge?
Any suggestions for the above? Thanks.
I "see" said the blind man to the deaf man as he picked up his hammer and saw.
torqueman2002
Well-known member
I'm not sure what to say, except this is the type of dresser I use.Any suggestions for the above? Thanks.
I "see" said the blind man to the deaf man as he picked up his hammer and saw.

http://www.amazon.com/gp/product/B00B10LM6O/?tag=atomicindus08-20
Model A Fan
Well-known member
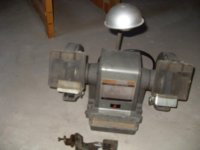
Here is mine, I paid $40 or so for it. I think its 1/3hp, but I would have to go check to verify. It is in decent running shape. I am more of a fan of the blue/gray ones, but the gold one will work OK for me.


I'm not sure what to say, except this is the type of dresser I use.
http://www.amazon.com/gp/product/B00B10LM6O/?tag=atomicindus08-20
I use one of these too. I was skeptical, but even using light pressure it works very well and has held up after dressing multiple wheels.
torqueman2002
Well-known member
That is a very nice 1/4-HP pre-Block.Here is mine, I paid $40 or so for it. I think its 1/3hp, but I would have to go check to verify. It is in decent running shape. I am more of a fan of the blue/gray ones, but the gold one will work OK for me.
I have only seen them equipped as yours; no lamp, no quench tray, no wheel guard covers, and non-grounded power cord.
I usually replace the power cord, bearings, stones, and clean-up/replace the power switch. At the same time, I inspect/repair the wiring for cracked insulation and high resistance connections.
Nice grinder for light duty home shop use: deburring, light rust removal, and cleaning up threads.
Last edited:
Pupuhd
Well-known member
I'm not sure what to say, except this is the type of dresser I use.
http://www.amazon.com/gp/product/B00B10LM6O/?tag=atomicindus08-20
Torque: Same model I also got off Amazon. I use light pressure however after dressing both wheels were more off-round. Like I stated earlier, I not get chatter when grinding a small piece of metal. Do you think I should get a Dressing Wheel to true the wheels then use the Diamond Dresser?
Torque: Same model I also got off Amazon. I use light pressure however after dressing both wheels were more off-round. Like I stated earlier, I not get chatter when grinding a small piece of metal. Do you think I should get a Dressing Wheel to true the wheels then use the Diamond Dresser?
A dressing wheel will not true up the wheels, it will only clean them up. You need to fashion a jig of sorts to hold your diamond tool fixed to your steady rest and gradually work it into the wheel until you get a uniform & concentric wheel.
I'm very frugal so I made my own based on a pic I found on the internet. I used a block of Delrin (a kind of plastic) and a scrap threaded sleeve, and attached a diamond point to it. I run it along the front edge of the steady rest and it trues up a wheel in seconds. Pretty messy though.
Attachments


torqueman2002
Well-known member
Pup, I think (haven't tried it) maxima's method is the right solution.
The tool rest slot and tool's guide need to be made/adjusted to be at right angle to the stone.
Here's another home-made truing guide.
http://tinyurl.com/Grinder-True-Tool
The tool rest slot and tool's guide need to be made/adjusted to be at right angle to the stone.
Here's another home-made truing guide.
http://tinyurl.com/Grinder-True-Tool
Pupuhd
Well-known member
exmaxima1: excellent idea. I was thinking along the same line and saw the same setup online somewhere.
torqueman: thanks for the link.
Both suggestions seem promising. I'll have to fashion something up here around the shop to hold the diamond tool fixed to the tool rest.
Also any recommendations on size of the diamond tool that exmaxima1 mentioned here: length, diameter, diamond karrot. Seems there's a large selection on ebay. Some boasting "karrot" sizes also along with overall length. Thanks again. Looking forward to fixing this issue to start using the grinder.
Also any recommendations on size of the diamond tool that exmaxima1 mentioned here: length, diameter, diamond karrot. Seems there's a large selection on ebay. Some boasting "karrot" sizes also along with overall length. Thanks again. Looking forward to fixing this issue to start using the grinder.
I bought a couple of diamond posts for less than $15 (total) on eBay, each is 1/2 carat, and USA old stock. The shanks were around 3/8", and it's soft so you can turn them or thread them to fit your needs. Unless you plan to use them alot, most any diamond will be fine, and certainly as good or better than those T style dressers.
Pupuhd
Well-known member
Now, a word about the files. Save an original. Then edit a copy, because MS-WORD really struggles with these files. I spent more time on the label than any other part of the restore. The 'fields' move around and distort when the text is edited.
If anyone has a friendlier file, that you don't need sophisticated editing skills and expensive sw, please let me know. I'll share it in my link.
Torque: After long hours on my lunch and other breaks at the work computer, I have finally finished the Craftsman 1/3hp machine tag. I now see what you mean the editing taking more time than the restore. As you mentioned without investing in other more expensive software, MS Word is probably the least expensive but time consuming solution for creating a new tag.
As far as the fields moving around and distorting when editing text, I stumbled onto an effective solution. Create "Text Box" for every single detail and text line(s). Then either insert shapes, symbols or text and edit as you please. After that you can move the text box next to, behind, in front, near another text box without the fear of either one moving or distorting on you.
Please let me know, if the tag pictured below looks good. The font style, length, width, height, etc. is about 95%+ accurate, including the position and location of the different details/texts as compared to my original tag. I'm still working on getting the "gray" field shade correct.
When complete I will post here and may make available for sale these reproductions on aluminum, but that's a different story.
Attachments

Last edited:
torqueman2002
Well-known member
That looks good, real good! And thanks for the tips.Torque: After long hours on my lunch and other breaks at the work computer, I have finally finished the Craftsman 1/3hp machine tag. I now see what you mean the editing taking more time than the restore. As you mentioned without investing in other more expensive software, MS Word is probably the least expensive but time consuming solution for creating a new tag.
As far as the fields moving around and distorting when editing text, I stumbled onto an effective solution. Create "Text Box" for every single detail and text line(s). Then either insert shapes, symbols or text and edit as you please. After that you can move the text box next to, behind, in front, near another text box without the fear of either one moving or distorting on you.
Please let me know, if the tag pictured below looks good. The font style, length, width, height, etc. is about 95%+ accurate, including the position and location of the different details/texts as compared to my original tag. I'm still working on getting the "gray" field shade correct.
When complete I will post here and may make available for sale these reproductions on aluminum, but that's a different story.
Funny thing, here are pictures of two 1/3-HP m-397.19580 Blocks I gave to my nephews.


Same model number, only 1 is Industrial Rated.

Last edited:
bagged89s10
Well-known member
Torque: After long hours on my lunch and other breaks at the work computer, I have finally finished the Craftsman 1/3hp machine tag. I now see what you mean the editing taking more time than the restore. As you mentioned without investing in other more expensive software, MS Word is probably the least expensive but time consuming solution for creating a new tag.
As far as the fields moving around and distorting when editing text, I stumbled onto an effective solution. Create "Text Box" for every single detail and text line(s). Then either insert shapes, symbols or text and edit as you please. After that you can move the text box next to, behind, in front, near another text box without the fear of either one moving or distorting on you.
Please let me know, if the tag pictured below looks good. The font style, length, width, height, etc. is about 95%+ accurate, including the position and location of the different details/texts as compared to my original tag. I'm still working on getting the "gray" field shade correct.
When complete I will post here and may make available for sale these reproductions on aluminum, but that's a different story.
Looks amazing!
Here's a nice little upgrade. Take out the 3 or 4 screws holding on the side guard covers and replace with 8-32 studs and flange nuts. It lets you easily pop the covers off and on without having to line up bolts. You also don't have to thread in and out of the soft casting all the time -- the nut and stud takes the wear.

trijeff
Well-known member
Great suggestion, JZ! I am definitely doing that [emoji106]