To avoid these ads, REGISTER NOW!

let's see your craftsman block grinders

Bobioz1

Well-known member
Joined
Jun 26, 2013
Messages
821
Location
Northern il. (For now)
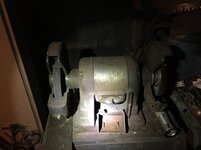
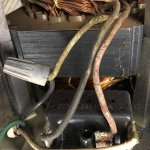
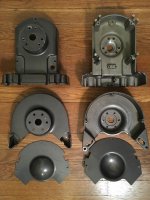
Bought a 4” 1/4hp today from the same vendor I got the 6” 1/3hp. No switch, looks like a replacement power cord. Missing the tool rest and shield I swapped off it onto the 1/3. Had three rubber feet still on it, so now I see where they go. He was asking $15, but we settled on $12, with a 6” Klein adjustable wrench for good measure.
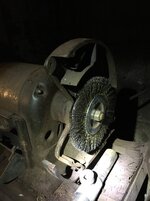
Question: with the guards off, 6” wire wheels would work, right?

6” is correct but 1/4hp is weak for wire wheeling. I had a 1/3hp and was unimpressed.
 
To avoid these ads, REGISTER NOW!

tym

Well-known member
Joined
Mar 5, 2016
Messages
2,431
Location
MA
You don't mention the model number, but the 1/4-HP round top Blocks I've seen, 6" wheels/stones should fit.
My 1/4hp block came with a 6" wheel on it, so I can confirm that they fit.

Thanks also for the link to the parts listing on the Classifieds!
 

LesserSon

Well-known member
Joined
Feb 7, 2016
Messages
5,058
Location
PA USA
My 1/4hp story took a turn for the worse. It ran fine plugged in, but when I took the cover off to pound out a dent, I noticed insulation on the wires leading into the wraps was cracked. Probably would have been less worse, but whoever upgraded the power cord from 2prong to 3prong neglected to put a grommet in the entry hole, which has allowed repeated tension to flex the rigid insulation. Plus, looks like corrosion in there. Definitely corrosion on one trrminal, and the corroded ends that led into a wire nut just broke away when I tried to untwist it. I’m not sure of the feasability of replacing the wires that lead into the wraps.
It’s a shame, because every other component is in great shape.
 

Attachments

  • CC5A788D-9897-4D5A-AB45-53B911062C62.jpg
    CC5A788D-9897-4D5A-AB45-53B911062C62.jpg
    99.3 KB · Views: 50
  • A88940B3-25B6-4167-8626-973C71594A29.jpg
    A88940B3-25B6-4167-8626-973C71594A29.jpg
    147.5 KB · Views: 50
  • 39C7A9EA-706B-48F2-B54E-C4328DF89DA2.jpg
    39C7A9EA-706B-48F2-B54E-C4328DF89DA2.jpg
    131.8 KB · Views: 46
Last edited:

LesserSon

Well-known member
Joined
Feb 7, 2016
Messages
5,058
Location
PA USA
Well, as long as I have it apart, I figured I’d give it a thorough cleaning. Here’s the lovely dark gray slightly metalic, slightly hammered parts. Really beautiful, despite some wear.
 

Attachments

  • 3932934D-D804-45E8-834D-96A772AB3849.jpg
    3932934D-D804-45E8-834D-96A772AB3849.jpg
    97.3 KB · Views: 42
  • 698B8B91-0F12-4F71-8061-2A58E04EBA07.jpg
    698B8B91-0F12-4F71-8061-2A58E04EBA07.jpg
    80.5 KB · Views: 42

chrisnazzy

Well-known member
Joined
Apr 20, 2013
Messages
1,671
Location
Arizona
Here's a pic of my newly acquired 397.19590 Craftsman Commercial 1/2 HP on an original pedestal. I've yet to find some time to get it all cleaned up.

It's pictured next to my 397.19580 1/3 HP and a little Baldor I've set up as a buffer.3a04e6dc04029db5c1fbc0d4eec7ff64.jpg

Sent from my SM-G930P using Tapatalk
 

Attachments

  • 3a04e6dc04029db5c1fbc0d4eec7ff64.jpg
    3a04e6dc04029db5c1fbc0d4eec7ff64.jpg
    68.1 KB · Views: 1

greg86z28

Well-known member
Joined
Dec 14, 2015
Messages
159
Location
Madison, WI
Finally finished up my grinder (well mostly). Stripped all the paint off and repainted. Also replaced the bearings while I had it apart.

I need to replace the power cord and attach the gooseneck lamp. I also need to replace the eye shields. Then I'll be on the lookout for a stand.

yVPeyFbY_knMPnT8fnYwkPH8_kQc4Iw274DiYpE-9K1gEZ-iJuEoDTUugf-NpVJlEc6T_X6DrLG48_Pf3dShXPu8YoP3VTlL6F0aE5QNTqt11qb61GIOsbCAXBOChD3-xVNBkOUXg0xpL_ct27PwwGApAEQvcWGsU3rm0GbTdZIAudohvF1xYrFjmUc_nFFCSa2a6DN9urhZm9fa5Mdvt4isP1bz5xN_Chj909osz4dHEENb2emUwyF9otQ-OPGYaxhALZ45dXS-C-keg0aruyN2AT0FnkSjTD1KRn2P3kvV_-QeuUtXMQHEysAxc9uaWQ1oKkxdhzcjirUHzcJhikTpL3-TAudad9tiuPHrXk4I_IbxueoKdYY1p-p5QDV-JJiN-MZ8oEprKyrHX9XlNU_KrwEd9i3iFm3FNKAxA7eZliA-YMapGXmD60lgGrvlpPI16ti5wx4xWp_Y4sDer6id_V1o73Re0SAIj_w5bUdX9btbVGwD3q9Q3VMATisjv9zgRTdB9O3eo-NGptJHNOW1Z9S8DTDdOcKA2MX2HXDGy0Cq7puYQ3zihgQS676b1LVOP9EjVeNw5PxfT_oVrK_T4n22GR0Bbm9sBYQjo9-225wntwPTG7yigtgn1P6buKbqbvo34y-a9YYS1v7NMb4dY609lu3PI42UwVXwk78pTELtPtFYIxTO=w1264-h948-no

G_jWB5e6-vvKmdiuojvS8M0X5HOHtY3brmFTyzuRzRutuY4dJpGd5LAn8IjjerylGBZ3fz0lrQzj2L9gqn48-kxJfrniikzriFhePxj5cU87RCZC7_lNTI_rxiyO6O9L7PL3YNNWdmXlrrngzG5L1OVp6eO64ZXWL361LfBWIwEe6wBYGiZ58ldxElpT1v2j6fvcFNx2Q4WhXSNYp-RFWmb9gybcvzJlzN2H3ObN211L-cb-E6eS3lVe55dDo__O8H2fr8VCKB1x82rZxDOqLSQ7aJJ2jmqDd1NpGCPmTduOu5issfamGfq3PZmzBLZFdVWKh2iZ0P2iJnWT3ySSh3AzS6B7PQvHovt13omGcRYGVHXgA8sLugvzy4_qOuRW3RFy1MSCmUD8sxO0vyx7PP2Hjs4OelWsW8GtcAHOAOWsTs3f8ZJWYCkR5bAW7mdYb8PWkXVvxoScWMRZgK4CT-KW7Sg25fpJ5Nt4YWUAG9buVMTuRrXMYFPUD5wZ9wdHWN0CjnrWfflRv8hnIWWl5qmmhQ9QVKT2CTTPCgOAChvSh6GA6MwODZx9VE-vhPgy9PfqKz2Ly9UrEYaLWNzBEuRBrxKdnaJ2VfWZpujJXNSXB7Gne3DKbP7qDcm9eSeQgHXEf8lt-lhpaHSsc7ikHrto8voA-V058AJtW-1l7VhyROIorCYu6NXJ=w711-h948-no


Some "before" pictures:
 

LesserSon

Well-known member
Joined
Feb 7, 2016
Messages
5,058
Location
PA USA
Looks great! Assuming it is the lighting that gives the two photos a different cast. What paint/colors did you use?
 

greg86z28

Well-known member
Joined
Dec 14, 2015
Messages
159
Location
Madison, WI
Looks great! Assuming it is the lighting that gives the two photos a different cast. What paint/colors did you use?

I started with a Rustoleum primer. Then it's colored with Rustoleum Satin Nickel and Rustoleum Hammered Grey. I then followed up with Rustoleum Crystal Clear.

Sadly, that's not a lighting difference. That's a result of poor lighting conditions during painting (i.e. bad paint job). Ugh.

I'm going with a wire wheel on one side, so when I put the wire wheel on I'll respray that side and re-clear it.
 

greg86z28

Well-known member
Joined
Dec 14, 2015
Messages
159
Location
Madison, WI
Looks great! Assuming it is the lighting that gives the two photos a different cast. What paint/colors did you use?

I started with a Rustoleum primer. Then it's colored with Rustoleum Satin Nickel and Rustoleum Hammered Grey. I then followed up with Rustoleum Crystal Clear.

Sadly, that's not a lighting difference. That's a result of poor lighting conditions during painting (i.e. bad paint job). Ugh.

I'm going with a wire wheel on one side, so when I put the wire wheel on I think I'll respray that side and re-clear it.
 

Enigma

Well-known member
Joined
Sep 2, 2010
Messages
861
Location
Florida
here are my two. not sure which to keep. kinda wish i had a guard for the other side on the older one. they both work fine.

couldnt i do the same things with my cman 100 15" drill press? with dp have speed control from 175rpm to 10000 plus. do i even need a grinder now? there are shanked stones and wire wheels available for dp. would that work just as well or better?
 

Attachments

  • 20181023_133855.jpg
    20181023_133855.jpg
    64.6 KB · Views: 38
  • 20181023_133817.jpg
    20181023_133817.jpg
    138.9 KB · Views: 50
  • 20181023_133838.jpg
    20181023_133838.jpg
    99.3 KB · Views: 40
  • 20181023_134352.jpg
    20181023_134352.jpg
    58.9 KB · Views: 34
Last edited:

LesserSon

Well-known member
Joined
Feb 7, 2016
Messages
5,058
Location
PA USA
Nice to have a pair of 1/2hps.
“As good or better” for WHAT PURPOSE? What are you grinding, does it need a tool rest?
Depending on what drill press you mean, the chuck and spindle may be designed to handle some lateral thrust. But generally, a DP is intended for boring, not milling. The ones with the 34-33C chuck (which screws on so it doesn’t suddenly fly off under lateral load) are intended for woodworking, allowing you to do some drum sanding or use wide-cutting bits, but I would keep the grinder for grinding.
I’m not an expert - just my 2 cents. I think it may come down more to safety, than capability.
 
Last edited:

LesserSon

Well-known member
Joined
Feb 7, 2016
Messages
5,058
Location
PA USA
I took a closer picture of the cracked and corroded leads I’m fretting over on my 1/4hp. I don’t see a way to replace the leads without also removing the winding. The corrosion and brittleness makes me think the leads could break off too close to the windings to allow a soldered repair.
This is not my area of knowledge, so I’m asking before attempting anything, but I wonder : if I remove the insullation, clean as much corrosion off as possible, might I splice on extensions to the leads, maybe put some heat-shrink insulation snugged up to the wrappings? As good as can be hoped, or is there a better way?
And WHAT caused the corrosion in the first place? The rest of it is clean. Could the PO’s addition of a ground have done it? Could maybe the hot and neutral hookups have been reversed, and then the addition of a ground cause a current leak?
 

Attachments

  • AB3AD943-E9E4-44EB-A545-C83A2451B4A7.jpg
    AB3AD943-E9E4-44EB-A545-C83A2451B4A7.jpg
    53.5 KB · Views: 30
  • C2F09752-BEAC-458A-B02C-061ACB27BD5F.jpg
    C2F09752-BEAC-458A-B02C-061ACB27BD5F.jpg
    139.3 KB · Views: 36
  • 70AA99B4-20C6-401A-B4EC-BA9E1962CD77.jpg
    70AA99B4-20C6-401A-B4EC-BA9E1962CD77.jpg
    149.8 KB · Views: 9
  • 9376D0C8-0652-4B5B-B25B-5029149C67DC.jpg
    9376D0C8-0652-4B5B-B25B-5029149C67DC.jpg
    137.7 KB · Views: 6
  • 8D08E614-8D94-4023-815B-2F59ACB73546.jpg
    8D08E614-8D94-4023-815B-2F59ACB73546.jpg
    113.8 KB · Views: 7
  • 89B15B3B-F3DE-49CB-9E39-468A5FFF8106.jpg
    89B15B3B-F3DE-49CB-9E39-468A5FFF8106.jpg
    100.4 KB · Views: 11
  • 704AAEE3-ADE1-4268-A5CE-CF52EC57B67B.jpg
    704AAEE3-ADE1-4268-A5CE-CF52EC57B67B.jpg
    91.7 KB · Views: 7
Last edited:

tym

Well-known member
Joined
Mar 5, 2016
Messages
2,431
Location
MA
This is not my area of knowledge, so I’m asking before attempting anything, but I wonder : if I remove the insullation, clean as much corrosion off as possible, might I splice on extensions to the leads, maybe put some heat-shrink insulation snugged up to the wrappings? As good as can be hoped, or is there a better way?
That's what I'd do.
And WHAT caused the corrosion in the first place? The rest of it is clean. Could the PO’s addition of a ground have done it? Could maybe the hot and neutral hookups have been reversed, and then the addition of a ground cause a current leak?
I think there were two contributors: moisture and dried/brittle insulation. 50 years is a long time.
 

XJSuperman

Well-known member
Joined
Jan 26, 2018
Messages
3,087
Location
Central Iowa
A gift from an uncle. It's the smoothest running grinder I have ever seen.07f32de4352046425a2a92490850a1b1.jpg
 

Attachments

  • 07f32de4352046425a2a92490850a1b1.jpg
    07f32de4352046425a2a92490850a1b1.jpg
    67.5 KB · Views: 3

Asport

Well-known member
Joined
Feb 10, 2017
Messages
112
Location
Chicago area
Here's my modified common 1/3 HP 397.19580

I made an adapter plate to fit a side table from a Baldor 6" Carbide grinder that I snagged for cheap. I wanted the side table to grind HSS lathe bits. It works out great for that!

-Roger
 

Attachments

  • IMG_2066.jpg
    IMG_2066.jpg
    148.4 KB · Views: 59
  • IMG_2057.jpg
    IMG_2057.jpg
    137.3 KB · Views: 66

Rabid Badger

Well-known member
Joined
Apr 2, 2018
Messages
1,338
Here's my modified common 1/3 HP 397.19580

I made an adapter plate to fit a side table from a Baldor 6" Carbide grinder that I snagged for cheap. I wanted the side table to grind HSS lathe bits. It works out great for that!

-Roger

Can you post some pictures of the adapter plate? I've been thinking about doing something similar.
 

MissileBear

Well-known member
Joined
Oct 3, 2016
Messages
339
Location
Western NY
They did make a few different models that had a table on the side...most were rebranded models made for other companies, meant as sharpening grinders.
 

Attachments

  • 0GSS2z4.jpg
    0GSS2z4.jpg
    78.3 KB · Views: 57

Asport

Well-known member
Joined
Feb 10, 2017
Messages
112
Location
Chicago area
Can you post some pictures of the adapter plate? I've been thinking about doing something similar.

I'll see if I have time over the weekend to pull it apart and take pics.

They did make a few different models that had a table on the side...most were rebranded models made for other companies, meant as sharpening grinders.

Thanks for sharing. I never seen one like that. I like having the miter slot on mine.
 

torqueman2002

Well-known member
Joined
Jun 3, 2009
Messages
6,139
Location
SE Michigan
Uggh...
So anyone else bust the plastic lamp visor / heat-shield before realizing how it’s attached?
My item has a Sep 26 1974A birthday. Black plastic - ABS? Anyone know for sure?
Any repair ideas? I’m sure JB Weld will hold at room temperature and stand up to the heat, too. But I hear ABS expands way more than JB Weld as the temp climbs, so it might fail that way. ....
I have the same failure on the lamp shade cover on a 1/2-HP Block.

I decided to give J-B Quick Weld Steel a go. I'll put it on my most used Block to test it's bonding ability for this application.
attachment.php

attachment.php

Looks like I didn't use enough epoxy, or it shrunk. ^^

attachment.php
attachment.php
attachment.php

First coats with what I had hanging around. Outside temps this time of year are hovering around the low 50s. Not ideal, but subsequent coats gave a nicer finish.

I'll give it a few days inside the house to harden, before putting it to 'work'.
:)
 

Attachments

  • Fi P1120641.JPG
    Fi P1120641.JPG
    63.2 KB · Views: 387
  • Fi P1120638.jpg
    Fi P1120638.jpg
    41 KB · Views: 17
  • Fi P1120643.JPG
    Fi P1120643.JPG
    98.4 KB · Views: 380
  • Fi P1120632.JPG
    Fi P1120632.JPG
    118.4 KB · Views: 382
  • Fi P1120636.JPG
    Fi P1120636.JPG
    103 KB · Views: 19
  • Fi P1120644.JPG
    Fi P1120644.JPG
    90 KB · Views: 382
  • Fi P1120642.JPG
    Fi P1120642.JPG
    65 KB · Views: 375
To avoid these ads, REGISTER NOW!

chrisnazzy

Well-known member
Joined
Apr 20, 2013
Messages
1,671
Location
Arizona
They did make a few different models that had a table on the side...most were rebranded models made for other companies, meant as sharpening grinders.
I thought that was the disc sanding attachment that was available as an add on. I've been looking for one for awhile with no luck. 91eb66bc1b21e1714f2e33e0cd64b1db.jpg

Sent from my SM-G930P using Tapatalk
 

Attachments

  • 91eb66bc1b21e1714f2e33e0cd64b1db.jpg
    91eb66bc1b21e1714f2e33e0cd64b1db.jpg
    93.8 KB · Views: 3

MissileBear

Well-known member
Joined
Oct 3, 2016
Messages
339
Location
Western NY
I thought that was the disc sanding attachment that was available as an add on. I've been looking for one for awhile with no luck.

There were both....397.19395 came with the sander disc as part of the stock config. I believe there were 2 other models that also had it...not 100%
 

EOC_Jason

Well-known member
Joined
Jun 25, 2012
Messages
11,388
Location
Bentonville, AR
If the outer coating just flakes off, maybe clean it off as well as you can carefully. Spray some corrosion inhibitor (like you use for your car battery), then use some heat-shrink tubing over it. Unless it breaks as it goes into whatever that is, then you will have a real fun time...

It's corroded just probably from the moisture in the air, and I'm sure that paper type insulation also helped wick in more moisture.

This is not my area of knowledge, so I’m asking before attempting anything, but I wonder : if I remove the insullation, clean as much corrosion off as possible, might I splice on extensions to the leads, maybe put some heat-shrink insulation snugged up to the wrappings? As good as can be hoped, or is there a better way?
And WHAT caused the corrosion in the first place? The rest of it is clean. Could the PO’s addition of a ground have done it? Could maybe the hot and neutral hookups have been reversed, and then the addition of a ground cause a current leak?
 

Outlawmws

Well-known member
Joined
Aug 9, 2011
Messages
39,207
Location
The Badlands
I took a closer picture of the cracked and corroded leads I’m fretting over on my 1/4hp. I don’t see a way to replace the leads without also removing the winding. The corrosion and brittleness makes me think the leads could break off too close to the windings to allow a soldered repair.
This is not my area of knowledge, so I’m asking before attempting anything, but I wonder : if I remove the insullation, clean as much corrosion off as possible, might I splice on extensions to the leads, maybe put some heat-shrink insulation snugged up to the wrappings? As good as can be hoped, or is there a better way?
And WHAT caused the corrosion in the first place? The rest of it is clean. Could the PO’s addition of a ground have done it? Could maybe the hot and neutral hookups have been reversed, and then the addition of a ground cause a current leak?

That's what I'd do.
I think there were two contributors: moisture and dried/brittle insulation. 50 years is a long time.

LS your approach should work. you can leave enough of the old lead to re-connect, use new wire with new insulation; but I'd add one more thing before the shrink tube - they use varnish to insulate the windings: soak in several coats of varnish at the junction (or possibly liquid tape/insulator, but I have less faith in that stuff), and then do the shrink tubing. you should be good to go.
 

LesserSon

Well-known member
Joined
Feb 7, 2016
Messages
5,058
Location
PA USA
LS your approach should work. you can leave enough of the old lead to re-connect, use new wire with new insulation; but I'd add one more thing before the shrink tube - they use varnish to insulate the windings: soak in several coats of varnish at the junction (or possibly liquid tape/insulator, but I have less faith in that stuff), and then do the shrink tubing. you should be good to go.

(And really, to ALL WHO RESPONDED) Thanks for the suggestions and observations. Couple follow-ups:

“Varnish”=polyurethane or shellac? I have either of those, but not old-school oil varnish from the pre-poly days.
“Junction”=where I splice new wire, or down into where the old wire disappears into the sleave and windings?
 
Last edited:

Outlawmws

Well-known member
Joined
Aug 9, 2011
Messages
39,207
Location
The Badlands
(And really, to ALL WHO RESPONDED) Thanks for the suggestions and observations. Couple follow-ups:

“Varnish”=polyurethane or shellac? I have either of those, but not old-school oil varnish from the pre-poly days.
“Junction”=where I splice new wire, or down into where the old wire disappears into the sleave and windings?

From Wikipeadia:
Although described as "enameled", enameled wire is not, in fact, coated with either a layer of enamel paint nor with vitreous enamel made of fused glass powder. Modern magnet wire typically uses one to four layers (in the case of quad-film type wire) of polymer film insulation, often of two different compositions, to provide a tough, continuous insulating layer. Magnet wire insulating films use (in order of increasing temperature range) polyvinyl formal (Formvar), polyurethane, polyamide, polyester, polyester-polyimide, polyamide-polyimide (or amide-imide), and polyimide.[3] Polyimide insulated magnet wire is capable of operation at up to 250 °C. The insulation of thicker square or rectangular magnet wire is often augmented by wrapping it with a high-temperature polyimide or fiberglass tape, and completed windings are often vacuum impregnated with an insulating varnish to improve insulation strength and long-term reliability of the winding.

So fir your purpose, I'd sat you can use polyurithare, since its not really doing more than preventing chafing.

"Junction" = Yes - Clarified - "where I splice new wire close down into where the old wire disappears into the sleave and windings."

I once reconnected a blown winding wire on a Taiwan made grinder, and insulated the splice with my then girlfriend's (Now SWMBO) nail polish. Lasted about 20 years or so until something else blew... Since yours will see more flex in vibration I would not use nail polish - too brittle.
 
Last edited:

BRWEIDEM

Well-known member
Joined
Sep 4, 2017
Messages
46
Location
Phoenix, AZ
Picked up this combo for $80 today. Not a home run but my first stand and third block grinder. Was considering selling the grinder but now I might restore it. Been A while since I posted here, I’m going to have to catch up on all the Resto methods for these grinders...
 

Attachments

  • 8B7E0ED6-BD08-4172-B24E-60EF84635EC2.jpg
    8B7E0ED6-BD08-4172-B24E-60EF84635EC2.jpg
    20.6 KB · Views: 49
Last edited:

larry4406

Well-known member
Joined
Jan 27, 2006
Messages
19,216
Location
Northern Virginia
Last edited:

Asport

Well-known member
Joined
Feb 10, 2017
Messages
112
Location
Chicago area
That is some nice work. I like how you machined in registers where the Craftsman and Baldor parts meet the adapter rather than just drilling some holes in a round plate. :thumbup:

Thanks!
Thank you.

Can you also show some picture (top, bottom, etc) of the table?

Edit - Found this link with some very clear pictures of the table:
https://www.ebay.com/itm/BALDOR-TOO...vip=true&rt=nc&_trksid=p2047675.m43663.l10137
https://picclick.com/BALDOR-TOOL-TABLE-For-6-CARBIDE-GRINDER-202464465874.html#&gid=1&pid=6

That's exactly the same as mine.
 

hemifalcon

Well-known member
Joined
Jan 4, 2013
Messages
708
Location
Union Grove, Wisconsin
Let me begin this post by apologizing as I know the pictures that follow are not a block grinder.. (forgive me GJFather as I’m about to sin...)

But—all you grinder whores, myself included, can you give some info on the age of this Craftsman grinder? I believe it’ll take an 8” wheel.. I first thought it was a belt-driven unit based on its age and condition—but it is a heavy duty grinder pre-block or mailbox design.. the current owner is interested in selling it-but it was missing the right side guard-and he was confident about having it and agreed to call me when he finds it.. any generous info would be much appreciated. (I apologize for the picture quality-almost zero lighting in the building...)

0955bc0daf3059942b8cb798d4c05fd9.jpg

89d25c1db0e1803673ab5f62d651fba6.jpg

da205b10ecf605298e8564d8e9892b9d.jpg

a804aea3eb3fc9fb2560737880b69f7e.jpg


Sent from my iPhone using Tapatalk
 

Attachments

  • 0955bc0daf3059942b8cb798d4c05fd9.jpg
    0955bc0daf3059942b8cb798d4c05fd9.jpg
    436.8 KB · Views: 1
  • da205b10ecf605298e8564d8e9892b9d.jpg
    da205b10ecf605298e8564d8e9892b9d.jpg
    389.5 KB · Views: 1
  • a804aea3eb3fc9fb2560737880b69f7e.jpg
    a804aea3eb3fc9fb2560737880b69f7e.jpg
    478.3 KB · Views: 1
  • 89d25c1db0e1803673ab5f62d651fba6.jpg
    89d25c1db0e1803673ab5f62d651fba6.jpg
    489.9 KB · Views: 2
To avoid these ads, REGISTER NOW!
Top Bottom