To avoid these ads, REGISTER NOW!

Let's see your small workshop

ARFLY

Well-known member
Joined
Jul 28, 2013
Messages
848
Location
NW Arkansas
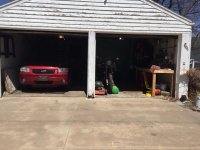
There are some amazing garages and workshops on here with some really large spaces. A lot of us do not have the luxury of a large work space due to either circumstance or choice. I fall into both categories. I like a smaller work space and ended up with mine at just over 120 sf through compromise to meet the family's needs. The smaller the space, the more creative you have to get with storage and tool usage. There are some really good ideas online for making small spaces workable. Then there is a lot of stuff marketed as the miracle "space saving" solution for small work spaces. If I had the space for some of that stuff, I wouldn't need the miracle space saving solution.

I know what is considered small or large for work space is subjective, so let's see what you have that is 200 sf or less. 1 car garages, sheds, basements you name it, show off what you are working or playing in.

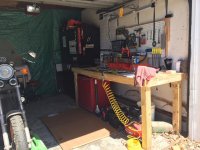
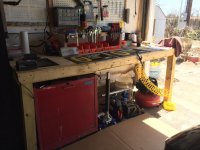
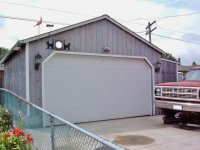
Here is mine. I have added more stuff since this picture was taken.
View media item 85315
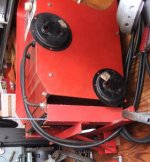
 
To avoid these ads, REGISTER NOW!

LeeG

Well-known member
Joined
Nov 29, 2012
Messages
1,525
Location
Phoenix, AZ
What specifically is your goal? What kinds of things do you plan to work on or build?

My space is considerably larger at about 330sf. I have a removable awning that I can extend out over the driveway to give me more work space. I also built a small (120 sf) shed in the back yard to store 'overflow' tools.
 

Outlander

Well-known member
Joined
Jul 30, 2010
Messages
5,154
Location
Quebec, Canada
What specifically is your goal? What kinds of things do you plan to work on or build?

My space is considerably larger at about 330sf. I have a removable awning that I can extend out over the driveway to give me more work space. I also built a small (120 sf) shed in the back yard to store 'overflow' tools.

I like the awning idea. I usually use my outdoor workbench in the summer (2 sawhorses and an old piece of plywood).
 

lilredex

Well-known member
Joined
Apr 29, 2006
Messages
5,945
Location
Toronto
This was mine a few years back. I took the space beneath a balcony and filled it in, making a very compact work space. In addition to what you can see there was a post mounted vise, a DP, my oxy-acet. set up, small welding table, and a bit of storage under those stairs. I have since moved on to a double garage.
 

Attachments

  • Work Shop Door  1.jpg
    Work Shop Door 1.jpg
    73.2 KB · Views: 203
  • Work Shop Door  2.jpg
    Work Shop Door 2.jpg
    75.3 KB · Views: 218
  • Workshop - Air Comp. + Welder.jpg
    Workshop - Air Comp. + Welder.jpg
    150.1 KB · Views: 313

LeeG

Well-known member
Joined
Nov 29, 2012
Messages
1,525
Location
Phoenix, AZ
I happen to have it all set up today, so I snapped a photo.

View media item 86420
The awning is a 12' x 16' sun shade from www.customshadesails.com
. To set the posts, I dug holes on either side of the driveway and filled them with concrete leaving a cutoff from my post inside each. (coat it with oil and it will slide right out afterwards).

View media item 86419
The other end of the awning is set into eye bolts through my overhang. I use basic tie-down ratchet straps to tighten everything. It takes less than 10 minutes to set it all up. Since my garage faces due south, I get a lot of morning and afternoon sun in around the overhead shade. For that, I run an another ratchet strap between the house and the pole, and drape a 7x12 tarp from Harbor Freight over it, and attach it to the sun shade with clip clamps.

I have an additional HF tarp I can deploy on the other side for when I am working later in the day and need to block the western sun. The additional shade really makes it much less unpleasant to work during our brutal Arizona summers. When it is down, there is really no way to tell that it ever was up.
 

LeeG

Well-known member
Joined
Nov 29, 2012
Messages
1,525
Location
Phoenix, AZ
LeeG :: Roughly, how deep did you go with the concrete; diameter?

I used an 8" sonotube and went down about 14" - that was as deep as I could get in this caliche - then packed the dirt back around and tamped it in. I'd have liked to have gotten about 6" deeper, but it wasn't worth the effort.
 

lilredex

Well-known member
Joined
Apr 29, 2006
Messages
5,945
Location
Toronto
Lilredex: I really like the compressor and welder mounted up high like that!

It is a huge space saver. When I moved twenty-seven years ago, I continued on with the same theme, with the same brackets, in my next place............
 

Attachments

  • Tool Hanging 1E.jpg
    Tool Hanging 1E.jpg
    157.1 KB · Views: 304
  • Compressor (2).jpg
    Compressor (2).jpg
    82.9 KB · Views: 287
  • Channel Siding 1B.jpg
    Channel Siding 1B.jpg
    139.7 KB · Views: 253
Last edited:
To avoid these ads, REGISTER NOW!
OP
A

ARFLY

Well-known member
Joined
Jul 28, 2013
Messages
848
Location
NW Arkansas
LeeG
The awning looks good. It makes a lot of shade.

lilredex
I still have to get my Lincoln welder mounted on the wall. How Did you attach it to the wall. That is a lot of weight.
 
OP
A

ARFLY

Well-known member
Joined
Jul 28, 2013
Messages
848
Location
NW Arkansas
Outlander
It looks like you have 2 brake light on your wall above a window. What are they for?
 

Outlander

Well-known member
Joined
Jul 30, 2010
Messages
5,154
Location
Quebec, Canada
Outlander
It looks like you have 2 brake light on your wall above a window. What are they for?

Pure decoration :) I have them connected to a 12volt power supply I made as a project, from a computer power supply. Sometimes, when I am out there at night I turn them on for effect. I should put them on a timer, probably would make the place look "interesting" through the windows!
 

dRayner

Member
Joined
Aug 30, 2018
Messages
7
Location
GA
Here's a link to my small 10x16 workshop.

I just bought a new house and it comes with a whopping 10x18 garage! Now's my chance to really make it something special....:)

M

Sounds a nice new house and garage! Congrats
 

thejunkmanadv

Well-known member
Joined
Aug 14, 2013
Messages
1,682
A quick video tour of "The Craft Shed" which is more of a storage space that I can work on small projects in.


lilredex

Well-known member
Joined
Apr 29, 2006
Messages
5,945
Location
Toronto
lilredex
I still have to get my Lincoln welder mounted on the wall. How Did you attach it to the wall. That is a lot of weight.

The bracket was made from 2 X 2 X 1/4" angles, including that back spine, which reaches about half way up. A few lag screws hold it to the wall studs. I just took a guess at what might be needed, bracket wise, and that is what I came up with.......and it works, it is not really that heavy. Those feet added to the front of the welder and the spine plywood spacer were added to compensate for that wall not being exactly plumb.
 

Attachments

  • Welder Bracket.jpg
    Welder Bracket.jpg
    107.2 KB · Views: 118

el monte slim

Well-known member
Joined
Apr 4, 2018
Messages
243
Location
Midwest USA
Here is my small work space in the basement. I still have a garage for auto work but down here I'm setting my metal working area. It sure is small!

Excellent use of the available space for your metal working area! You can't beat having a mill, lathe, band saw, and bench grinder for that type of work. I see just one area of concern. The bench grinder can produce a lot of fine metal dust that you don't want getting drawn into that furnace when the latter is running. Considering the small space and close proximity, do you take any precautions to minimize that from happening?
 

intillzah

Well-known member
Joined
Sep 1, 2017
Messages
168
Location
Larned KS
Here's a repost of my shop:

And the thread with the rest of the pictures here
 

Attachments

  • IMG_1015.jpg
    IMG_1015.jpg
    152 KB · Views: 143
  • IMG_1016.jpg
    IMG_1016.jpg
    150.2 KB · Views: 130
  • IMG_1022.jpg
    IMG_1022.jpg
    150.4 KB · Views: 119
Last edited:
OP
A

ARFLY

Well-known member
Joined
Jul 28, 2013
Messages
848
Location
NW Arkansas
The bracket was made from 2 X 2 X 1/4" angles, including that back spine, which reaches about half way up. A few lag screws hold it to the wall studs. I just took a guess at what might be needed, bracket wise, and that is what I came up with.......and it works, it is not really that heavy. Those feet added to the front of the welder and the spine plywood spacer were added to compensate for that wall not being exactly plumb.

Thanks. I have to get my Lincoln set up when I have time.
 
To avoid these ads, REGISTER NOW!
Top Bottom