To avoid these ads, REGISTER NOW!

Lets see your Tool Carts/Service Carts

FlatHeads_Suck

Well-known member
Joined
Sep 1, 2012
Messages
116
The 2107 comes from snap on with the two 1" upper drawers.
The 4107 comes from snap on with the two 1" upper drawers.
The 4107 comes with double slides on the 8 inch bottom drawer.

The 2107 will take a little over 1300 lbs worth of tools. Thats like stacking 11 bare ls1 blocks on your toolbox. If you have over half a ton of tools, dont look at a heritage series. LOL.

The drawer slides are different , but they are both medium duty.

A new set of casters and 1 more set of slides and that 2107 could hold as much as a 4107.


Negative ghost rider. The 4107 use double slides on the top 4" drawer, then 2nd and 3rd drawer are the 2" drawers. See the link I posted.
 
To avoid these ads, REGISTER NOW!

Trbobuick

Well-known member
Joined
Jul 1, 2012
Messages
128
Location
White Lake , Michigan
Buy the matt for the lid. I have it on mine and its great. The edge has a fairly high ridge so nothing rolls off :
875042851c8c763.jpg
 

bobcatdan

Well-known member
Joined
Jan 4, 2011
Messages
9,948
Location
Kaukauna,WI
My problem is, there is a box on cl that has the 2 small drawers at the top, and according to the so site, that makes it a 2107. But I see a lot of people here referring to a 4107 with 2 small drawers at the top. The differences are substantial enough that I'm not interested in a 2107.

Earlier 4107 had the small drawers on top, later box this switched. The 4107 and 2107 are basiclly the same box, the 2107 is cheapen up. 4107 has 6 x 2 casters where as 2107 has 5 x 2. The lock is different, drawer trim and slides maybe. It was bascially a value line to their value line. I think some 2107 were 6 drawers, no shallow. The easy way to tell the two apart is the casters, although, early 4107 and I'm talking '96 '97 had 5" casters.
 

JASTECH

Well-known member
Joined
Oct 21, 2009
Messages
2,671
Location
Gering, NE
Does that 4107 have considerable more room then my Blue Point that is over stuffed? This is before I added another 200lbs. of tools to it. I can't even roll it w/o the legs looking like a giraff getting a drink!
 

Attachments

  • Blue Point Tool Cart 03.jpg
    Blue Point Tool Cart 03.jpg
    39.9 KB · Views: 151
  • Blue Point Tool Cart 04.jpg
    Blue Point Tool Cart 04.jpg
    40.1 KB · Views: 172
  • Blue Point Tool Cart 02.jpg
    Blue Point Tool Cart 02.jpg
    35 KB · Views: 175
  • Blue Point Tool Cart 01.jpg
    Blue Point Tool Cart 01.jpg
    26.5 KB · Views: 145
Last edited:

laskt9

Well-known member
Joined
Dec 22, 2011
Messages
154
And yes. That is a tag team belt. The owner of the store owns sheds and when they get repod its like christmas.

Sent from my SGH-I927 using Tapatalk 2
 

Steve-O-08

New member
Joined
Jun 3, 2012
Messages
3
Thought I would share:

Since I got my cart I've been wanting to add a a folding shelf to my cart but wasn't about to spend $200+ on the Snap On shelf and adapter plate. Found this shelf by Homak for $40 and made an adapter plate for it from a scrap piece of aluminum and mounted her up.

B6B30CE9-B3DC-434E-A30C-EC0841CAD99B-332-00000016A4CC456F_zpsa4595e4d.jpg


F91AAA71-60A3-429A-B499-B567C061FC18-332-00000016AC649E82_zpsbdb07a5a.jpg
 

smogtech

Well-known member
Joined
Jun 28, 2011
Messages
336
Bought this matco master service cart from a coworker for $400. Best money I ever spent. It's pretty full now but I am pretty much able to do everything needed at a honda dealership. Theres a few more things I need to add but not too much. Going to get a main box. Probably one of those really wide single bays I see at diesel shops alot will hold more specialty stuff like testers, and diagnostic equipment.
 

Attachments

  • IMAG0054.jpg
    IMAG0054.jpg
    143.6 KB · Views: 401
  • IMAG0053.jpg
    IMAG0053.jpg
    147 KB · Views: 484
  • IMAG0052.jpg
    IMAG0052.jpg
    147 KB · Views: 482
  • IMAG0051.jpg
    IMAG0051.jpg
    151.9 KB · Views: 491
  • IMAG0050.jpg
    IMAG0050.jpg
    150.5 KB · Views: 536
  • IMAG0057.jpg
    IMAG0057.jpg
    141.3 KB · Views: 552
  • IMAG0055.jpg
    IMAG0055.jpg
    143 KB · Views: 379

smogtech

Well-known member
Joined
Jun 28, 2011
Messages
336
Last bottom drawer. My snap on 18v CT6850 impact is missing from my power tool drawer was out for repair just got it back today.
 

Attachments

  • IMAG0056.jpg
    IMAG0056.jpg
    142.1 KB · Views: 245
To avoid these ads, REGISTER NOW!

sjlee

Well-known member
Joined
Sep 26, 2012
Messages
107
Location
WI
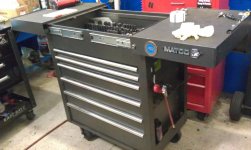
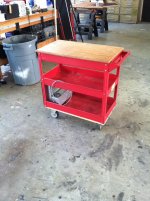
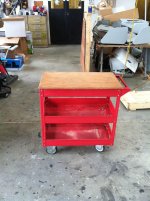
The instructions for the mid height frame shows that the end pieces should be on top of the side pieces, mine simply wouldnt go together that way, nothing lined up unless I did it the other way round.

Thank you very much for posting up the pictures and explaining the assembly. I bought the same tool cart earlier this week and finally got around to assembling it last night. Two things you mentioned really helped me out alot:

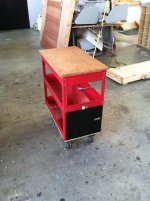
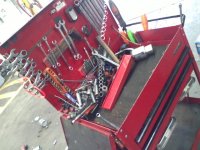
1. Removing the drawers during assembly. I did it by myself last night and doubt if I would've been able to complete it with the drawers still installed.

2. Mid height frame pieces. After following your advice about switching the pieces around (not following the manual), everything went together very nicely. I don't know if I would've thought about doing that without you pointing that out.

:beer:

I've read some people had to drill to get holes to line up right, but everything else lined up just fine. I did notice that I have my gas struts installed opposite than you have pictured, but I doubt it'll make a difference.

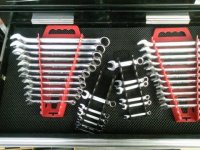
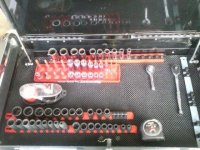
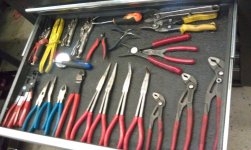
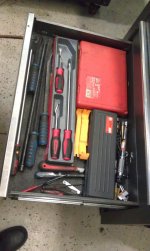
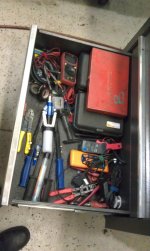
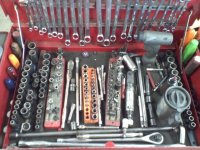
I'll probably start moving my tools into it a little at a time until I figure out exactly how I want it organized. I'll also pump a little grease into the zerks on the swivel wheels.

I do have a couple questions (for you or anyone else who has this tool cart):

1. Do you find it easier to move around with the swivel wheels near the handle (as the instructions have you do) or would it be easier to have them on the opposite side (like a shopping cart)?

2. How often would you recommend that I grease up the ball bearings?

Thanks again. :thumbup:
 

O_M_Jeep

Banned
Joined
Jul 24, 2012
Messages
424
Location
South central Wyoming
I'm very glad I was able to help, I put my struts on the opposite side to make more room where the holes are, there is plenty of space in the open part of the top. I put the swivel casters at the handle side, if youve ever had a heavy loaded down shopping cart you know they dont turn well, always better to be able to us lateral force to turn rather than twisting force at the handle. I havent had mine long enough to answer the question about greasing though, sorry.
 

sjlee

Well-known member
Joined
Sep 26, 2012
Messages
107
Location
WI
I'm very glad I was able to help, I put my struts on the opposite side to make more room where the holes are, there is plenty of space in the open part of the top. I put the swivel casters at the handle side, if youve ever had a heavy loaded down shopping cart you know they dont turn well, always better to be able to us lateral force to turn rather than twisting force at the handle. I havent had mine long enough to answer the question about greasing though, sorry.

Thanks.

I actually meant the struts were upside-down... I didn't even notice that you had them on the opposite side to get more room where the screwdrivers go (good idea BTW). I haven't put my tools into it yet, but I'll keep that in mind if I find that I need more room there.
 

JASTECH

Well-known member
Joined
Oct 21, 2009
Messages
2,671
Location
Gering, NE
smogtech, You can still gain lots of room by useing a plier rack. Moving other tools closer would help too. Nice cart.
 

jxm7202

Member
Joined
Jul 31, 2011
Messages
21
Location
south dakota
i have a krsc40a and need more drawers. there was talk of SO offering a 3 drawer kit to replace the large single drawer, anyone have a part# or pic of it?
 

3xpendable

Well-known member
Joined
Sep 10, 2012
Messages
475
Location
Evans Ga.
Ok so here is my second hand HF cart. I helped the buddy I got it from build that top when it was new. He got out of the R.V. Tech world and his tools have been just setting around I got the cart a kobalt rolling seat and HF creeper for like 50 bucks. I wanted to make a rolling test bench for 12v furnace,water heaters and what ever else I want to test before re/installing in the unit. So I modified lower shelf and moved mid shelf up and installed a repaired converter. Face plate of converter was brown so I painted it black. No pic but I installed a 12v battery on other side of bottom shelf. almost forgot had to cut and install 3/4 plywood to bottom shelf because cheesy HF cart started to bend shelf from putting a roof A/C on it. Its boss now. I will be adding a 7 way bargman plug to the converter to test lights and 12v trailer brakes without pulling unit to shop or hooking up the truck.
 

Attachments

  • After 4.jpg
    After 4.jpg
    145.8 KB · Views: 241
  • After 3.jpg
    After 3.jpg
    145.2 KB · Views: 321
  • After 2.jpg
    After 2.jpg
    144.6 KB · Views: 233
  • After 1.jpg
    After 1.jpg
    145.8 KB · Views: 239
  • Before 2.jpg
    Before 2.jpg
    145 KB · Views: 226
  • Before 1.jpg
    Before 1.jpg
    144 KB · Views: 261

JASTECH

Well-known member
Joined
Oct 21, 2009
Messages
2,671
Location
Gering, NE
3xpendable, Here I thought them HF carts were tuff? Must just be the 5 drawer service cart and tool boxs eh?

Good use of one though, better then me trying to carry Optimas around and a tool bag of trailer wires, plugs, adapters, switches and tools.
 

3xpendable

Well-known member
Joined
Sep 10, 2012
Messages
475
Location
Evans Ga.
3xpendable, Here I thought them HF carts were tuff? Must just be the 5 drawer service cart and tool boxs eh?

Good use of one though, better then me trying to carry Optimas around and a tool bag of trailer wires, plugs, adapters, switches and tools.


Not this thing it's cheap
 

sjlee

Well-known member
Joined
Sep 26, 2012
Messages
107
Location
WI

How did you mount the magnetic tool holders onto the top? Did you drill holes and bolt them to the top?

I bought the magnets thinking they would just stick to the top, but I didn't realize that they had a metal bracket attached to the back of them that was too thick for that.
 

O_M_Jeep

Banned
Joined
Jul 24, 2012
Messages
424
Location
South central Wyoming
How did you mount the magnetic tool holders onto the top? Did you drill holes and bolt them to the top?

I bought the magnets thinking they would just stick to the top, but I didn't realize that they had a metal bracket attached to the back of them that was too thick for that.

Yes, I drilled holes and riveted them in place so that there wouldnt be a huge bolt or screw head sticking out the top, and I did the same thing, I bought them thinking the would stay in place via the magnets.
 

sjlee

Well-known member
Joined
Sep 26, 2012
Messages
107
Location
WI
Yes, I drilled holes and riveted them in place so that there wouldnt be a huge bolt or screw head sticking out the top, and I did the same thing, I bought them thinking the would stay in place via the magnets.

I like the idea of having a magnetic tool holder on the lid, but I don't really want to drill any holes. I might stop by HF later today and see if they have any magnets available that I could stick on the lid, then stick the magnetic tool bars to them.
 

O_M_Jeep

Banned
Joined
Jul 24, 2012
Messages
424
Location
South central Wyoming
you may be able to take the magnets out of the metal rail, but the polarity of the magnets make it unlikely that tools will stay on the line of the magnet if its holding to 'ground' on both sides.

I'm not all that versed in magnetics, but I know on the ones I have the magnetic fields interfere with each other due to proximity, wrenches will slide if not held in place if you get the magnets too close or change the polarity,
 

03protege

Well-known member
Joined
Sep 13, 2012
Messages
3,104
Location
Louisiana
I think I am going to use 3m automotive double sided tape to attach the magnets to the lid. Should be strong enough.
 

O_M_Jeep

Banned
Joined
Jul 24, 2012
Messages
424
Location
South central Wyoming
I have to stop in to work tonight and grab some drill bits, I'll get a pic of both sides of the lid, so you can see how minimal it is if you decide you should go that way.
 

jsaw

Well-known member
Joined
Oct 11, 2008
Messages
1,777
Location
Geneva, N.Y.
I like the idea of having a magnetic tool holder on the lid, but I don't really want to drill any holes. I might stop by HF later today and see if they have any magnets available that I could stick on the lid, then stick the magnetic tool bars to them.

Just a word to the wise, I used to have magnetic bars stuck to the lid of my cart. the weight of a couple of wrench sets, and a couple of socket holders add up. I had probably 15 pounds of magnets & tools hanging on the lid of the cart. It was very top heavy. One morning as I wheeled it across the floor, one of the wheels caught a crack. Being so top heavy, over it went. I spent an hour picking up and reorganizing tools. I also noticed that the stays, or whatever you want to call the brackets in the open position were all worn and loose from being over loaded for so many years

I still hang a couple sets of wrenches on the lid, now hang things lower on the cart.
 

Attachments

  • 120803_0001.jpg
    120803_0001.jpg
    123.8 KB · Views: 669
  • 120803_0000.jpg
    120803_0000.jpg
    122 KB · Views: 653
  • 121005_0001.jpg
    121005_0001.jpg
    140.6 KB · Views: 714

sjlee

Well-known member
Joined
Sep 26, 2012
Messages
107
Location
WI
Just a word to the wise, I used to have magnetic bars stuck to the lid of my cart. the weight of a couple of wrench sets, and a couple of socket holders add up. I had probably 15 pounds of magnets & tools hanging on the lid of the cart. It was very top heavy. One morning as I wheeled it across the floor, one of the wheels caught a crack. Being so top heavy, over it went. I spent an hour picking up and reorganizing tools. I also noticed that the stays, or whatever you want to call the brackets in the open position were all worn and loose from being over loaded for so many years

I still hang a couple sets of wrenches on the lid, now hang things lower on the cart.

Thanks for the advice. I don't plan on putting a whole lot onto the lid... just a handful of open-ended wrenches and a couple of adjustable ones (basically the ones I use the most).
 
To avoid these ads, REGISTER NOW!
Top Bottom