To avoid these ads, REGISTER NOW!

Lets see your workbench

mdbeck1

Well-known member
Joined
Mar 7, 2010
Messages
2,297
Location
Norman, OK
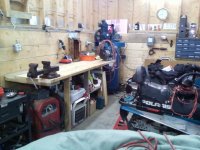
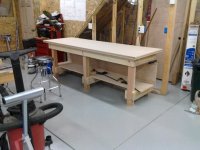
I added some undershelves to the workbenches. This one and another just like it.
4HPIGp0l.jpg


The plan, of course, is to eliminate the clutter on top of the workbench, however the way these things always seem to work out is that it's just double the space for clutter which will expand to fill it all.

Get some plastic tubs that fit on the shelf. Tell yourself that they are drawers for organizing. Then do what everyone else does and put all the stuff from the top in them when you need to work on another project.

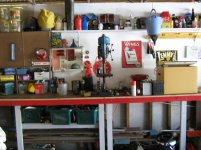
Hey, at least all the stuff is together...
 
To avoid these ads, REGISTER NOW!

hanly2

Well-known member
Joined
Feb 19, 2012
Messages
153
3b7ed3500d10775b6ad9730bb0118cc7.jpg
finally started putting mine together. Still have some more work to do but its getting there.
 

hanly2

Well-known member
Joined
Feb 19, 2012
Messages
153
The "ceiling" is 7'6" i think the work bench is 38 or so I would have to measure if you need to know exactly.
 

Radio Ron w4ron

Well-known member
Joined
Jan 23, 2013
Messages
867
Location
Radio Heaven (near Charlotte NC)
I like this pic a lot. I am doing the same thing in my garage.

There are some tools like drill presses that are not used on a daily basis. Having them portable means they can spend most of their time in less valuable areas of the garage. When needed they can be rolled over to the 'prime real estate' work area.


That was why I came up with the lazy susan on one of my workbenches,
it holds my belt sander, bench grinder and buffer. I wish it had a bit more
room so I could mount my small drill press on it too.
It works pretty good except that it's kinda hard to turn, I wish I had put better rollers under it, these get clogged with sawdust and it can be a bear
to turn. I put holes for a lock pin to hold it in place when I first built it,
but as hard as it is to turn they're really not needed. :(


.
 

Attachments

  • P1040804a.jpg
    P1040804a.jpg
    109.5 KB · Views: 382
  • P1040807a.jpg
    P1040807a.jpg
    101.5 KB · Views: 344
  • P1040811a.jpg
    P1040811a.jpg
    112.7 KB · Views: 343
  • P1040814a.jpg
    P1040814a.jpg
    114.3 KB · Views: 314

Geek

Well-known member
Joined
Nov 13, 2010
Messages
271
Location
8000'
G'day gents!
I just bought a house with a garage and a separate workshop this past summer up at 8000 feet in the mountains of Colorado. I am still working on getting everything functional but here's a photo or two of the work bench island I threw together. Right now I'm just building things out of whatever scrap I already have laying around until I have time to "do things right".

The east side of the bench is an existing cabinet. Rough lumber frame and then a horse stall matt on top as a work surface (I've been using these for years and they work great for me).

I made it so that my motorcycle lift can be retracted into the bench out of the way when I need more floor space or pulled out when I need more bench space (or need to wrench on one of the motorcycles).

i-9Zfw3vf-L.jpg


Here you can see it partially pulled out when I needed some more bench space while wiring in the lights
i-qgnNZPz-L.jpg


I find the stall matts to be a great general worksurface. I buy two at a time. They last for years (if you don't spill chemicals on them they'll last indefinitely :thumbup: 
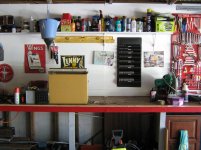
). I use one on the floor and then when I finally screw up my work surface enough I swap the one from the floor to the bench (the floor one never wears).

i-bnxPZzr-L.jpg


Overall I put in about 80,000 lumens of light but I really like having the lowered quad light hanging right over the bench (I have it on steel cables) making the bench a "shadow free" environment.

Now that my workbenches are functional it is time to move on to insulation/drywall/etc.
:willy_nil

cheers,
Ed.

p.s. when I need a "more precise" worktop, there is a granite counter top on my toolbox that provides a truer surface.
 
Last edited:

swissguy

Well-known member
Joined
Mar 4, 2014
Messages
121
Location
Switzerland
Made from 4" thick solid wooden doors (220 pounds each) and some ikea cabinets.
Didn't have time to mess it up yet.

a>


<a href="http://s1253.photobucket.com/user/1swissguy/media/Garage/IMG_2702_zpsa4e1121e.jpg.html" target="_blank"><img src="http://i1253.photobucket.com/albums/hh597/1swissguy/Garage/IMG_2702_zpsa4e1121e.jpg" border="0" alt=" photo IMG_2702_zpsa4e1121e.jpg"/></a>

<a href="http://s1253.photobucket.com/user/1swissguy/media/Garage/IMG_3153_zpsbe4c6c32.jpg.html" target="_blank"><img src="http://i1253.photobucket.com/albums/hh597/1swissguy/Garage/IMG_3153_zpsbe4c6c32.jpg" border="0" alt=" photo IMG_3153_zpsbe4c6c32.jpg"/></a>
 

John in OH

Well-known member
Joined
Jun 2, 2007
Messages
2,444
Location
SE Ohio & Eastern Virginia
G'day gents!

Overall I put in about 80,000 lumens of light but I really like having the lowered quad light hanging right over the bench (I have it on steel cables) making the bench a "shadow free" environment.

cheers,
Ed.

Ed, How about a pic or two of the cable set-up for adjusting your light height?
 

jesse72

Well-known member
Joined
Sep 26, 2011
Messages
352
Location
California
That is a great idea and execution, I have been thinking of trying something like that for a buffer and a grinder (more of a rectangle) but yours is awesome. Thanks for sharing!

That was why I came up with the lazy susan on one of my workbenches,
it holds my belt sander, bench grinder and buffer. I wish it had a bit more
room so I could mount my small drill press on it too.
It works pretty good except that it's kinda hard to turn, I wish I had put better rollers under it, these get clogged with sawdust and it can be a bear
to turn. I put holes for a lock pin to hold it in place when I first built it,
but as hard as it is to turn they're really not needed. :(


.
 

Geek

Well-known member
Joined
Nov 13, 2010
Messages
271
Location
8000'
Ed, How about a pic or two of the cable set-up for adjusting your light height?

Hi John,

The cable I used I found at HD:
http://www.homedepot.com/p/Everbilt...-Security-Cable-803182/203958878?N=5yc1vZc288

...and it turns out it was the perfect length hanging from my 12 foot high trusses (literally looped around and through itself).

On the rare occasion I want to raise the light out of the way, I create a loop in the wire and clip it with a clamp at the height I want.

Nothing fancy (yet) as I consider my entire shop setup "temporary" at this point (until I get windows, insulation, drywall, etc installed)

cheers, :beer:
Ed

edit: p.s. I wired the lights up with 4 light switches. 3 of them turn on/off the pairs of overheads and then the 4th switch just turns on/off the lowered island's light.
 
Last edited:

Geek

Well-known member
Joined
Nov 13, 2010
Messages
271
Location
8000'
Finally got mine finished up or nearly so last night. The top is 4x douglas fir beams, machined into a nice flat work surface. The base is old science lab cabinets bolted together and repainted. Everything was sourced from craigslist.


How do you like the "L" shaped bench? :thumbup:

Your photo got me to thinking. I currently have a wall bench and a seperate island, but perhaps I should do a "t-shape".

If I run benches down the 24 foot wall and have my "island" T-into the wall bench like you have there, it would give me two distinct work areas. Maybe one for an ongoing motorcycle build project and then the other for maintenance projects.

hmmmmmmm... :beer:
 

Geek

Well-known member
Joined
Nov 13, 2010
Messages
271
Location
8000'
quote:
3b7ed3500d10775b6ad9730bb0118cc7.jpg


Are you happy with the height? How deep did you make the "loft" ? It looks like maybe 8 foot but it is difficult to tell with lens distortion.

I was considering doing exactly this. I have 12 foot to the truss (16 to the center) and on 1/3 of my shop I was thinking of putting a storage area at 9 foot (giving 2+ feet above) as I often work with 8 foot long materials.

I was going to run two levels of shelves - allowing things like plywood to lay flat on the lower and then long stock like 2x4s and 80/20 above.

I keep debating on whether I want more space or less space up above.

:beer:
 
Last edited:
To avoid these ads, REGISTER NOW!

n2ocamaro

Well-known member
Joined
Aug 3, 2011
Messages
183
Location
Clarksville, IN
Here is mine. The two upper cabinets and the large base cabinet are metal kitchen cabinets from the 50's that I refinished. The small cabinet on the left end is a bathroom vanity that we ended up not needing for the house reno so I reinforced it and added a 3/4" plywood top and base with casters on the bottom. I can pull it out and I use it for a miter saw stand when needed. I have added wrench handles to the base cabinet since the photo was taken.

200147_579478658763975_1536590642_n.jpg


Also has a hitch mount for my vice and grinder.
16608_755660007812505_8925377684202901788_n.jpg

10007479_755660034479169_5394943552068262046_n.jpg
 

hanly2

Well-known member
Joined
Feb 19, 2012
Messages
153
I havent been doing much out there besides putting the shop together, but I like the heiht I have under the loft. 71/2 feet is plenty for me. The loft is 8x12 built with 2x8s.
 

jesse72

Well-known member
Joined
Sep 26, 2011
Messages
352
Location
California
Great work and nice bench! If you don't mind, how did you attach/mount the receiver under the work bench? I am interested in doing pretty much the same exact thing on my wood bench. Thanks!

Also: do you get any wobble/play in the vise or grinder since there is usually a little play in a receiver hitch? Thanks again


Here is mine. The two upper cabinets and the large base cabinet are metal kitchen cabinets from the 50's that I refinished. The small cabinet on the left end is a bathroom vanity that we ended up not needing for the house reno so I reinforced it and added a 3/4" plywood top and base with casters on the bottom. I can pull it out and I use it for a miter saw stand when needed. I have added wrench handles to the base cabinet since the photo was taken.

200147_579478658763975_1536590642_n.jpg


Also has a hitch mount for my vice and grinder.
16608_755660007812505_8925377684202901788_n.jpg

10007479_755660034479169_5394943552068262046_n.jpg
 

MyHybridBurnsGasandTires

Well-known member
Joined
Sep 3, 2014
Messages
82

n2ocamaro

Well-known member
Joined
Aug 3, 2011
Messages
183
Location
Clarksville, IN
Great work and nice bench! If you don't mind, how did you attach/mount the receiver under the work bench? I am interested in doing pretty much the same exact thing on my wood bench. Thanks!

Also: do you get any wobble/play in the vise or grinder since there is usually a little play in a receiver hitch? Thanks again

The receiver tube is sandwiched between two 2x4s with 2 3/8" bolts going through the 2x4s and receiver tube. I used a Bosch oscillating tool to cut a square opening in the face 2x4 in the front of the bench. There is a little wobble but I plan to weld a nut on the tube for a bolt to tighten it down like referenced in the post above. I have the same set up on my welding table, only the receiver tube is welded on.
 

theyardy11

Member
Joined
Nov 25, 2014
Messages
16
Location
Missouri
Man so many inspirations, I have a workbench but you guys wont be able to see it, it's located in the back right corner. I'm in the process of cleaning up my garage and installing cabinets so I can get all that **** off of my project. Hopefully after thanksgiving I can post a finished picture.
 

Attachments

  • Garage.jpg
    Garage.jpg
    57.7 KB · Views: 557

TwoBytes

Well-known member
Joined
Mar 14, 2014
Messages
789
Location
Canberra, 'Stralia
VERY COOL!

Four generations involved in the making of this workbench. What a great family heirloom. You'll have have the honor of passing it along to your "helper" and his family in the future.

Thanks rrud, I hadn't actually thought of it like that before, but I like it a lot, a "four generations workbench", that's fantastic!
 

NakeDiesel

Well-known member
Joined
Sep 6, 2007
Messages
2,727
Location
oklahoma
Here is my new main workbench that I put together over the last few weeks. It's a 20' bench made out of square tubing, angle iron and a plywood top with 3 44" harbor freight tool boxes built into it and a section for drills/power tools and a section for air tools with 2 shelves on the end.

Design plan

15511439687_9c3aa94973_b.jpg


End clamp storage

15234713783_58f1f40c99_b.jpg


Top stained and sealed black with 2 valved coiled air lines

15852369031_59d314166a_b.jpg


Opposite end view where the shelves are. Still need to cut out the shelves out of some scrap diamond plate I had left over from my race truck

15843934941_d9a607749e_b.jpg


Air tool storage on sliders for easy access and 50' hose reel

15853745772_7eb068c5da_b.jpg


Corded and battery tool storage with a slide out drawer on the bottom

15854379045_93d9af6a60_b.jpg


View with the tool boxes

15187573023_610719d3af_b.jpg


Labeling tool storage

15877685261_414927fe4c_b.jpg


This is my other workbench in the shop, it's 5' x 3' made out of square tubing with a 3/8" plate top. It now has a drill press mounted on one corner, and a 4" vice on the opposite corner. It's on wheels for easy maneuvering in the shop

521785506_37c2fb541e_b.jpg
 

theyardy11

Member
Joined
Nov 25, 2014
Messages
16
Location
Missouri
90ZCar the dash is for a 1993 240SX. The original was cracked so instead of just renewing it I am making a modern looking one with parts from different nissan vehicles. I have vids on youtube (240sx dash prep).
 

jmarkwolf

Well-known member
Joined
Jan 15, 2013
Messages
1,809
Location
Southeast Michigan
Posted these pics in another thread also, but now I'm fishing for ideas for a top surface.

Am building this new bench for my new shop, using 4x4, 2x6, and 2 layers of 3/4in oak ply, measureing 8ft long, 32in wide, 33in tall.

To keep the edges from getting destroyed over time, I'm thinking maybe aluminum angle or oak trim around the perimeter, then a top surface of 1/8in masonite or something.

Any ideas gratefully received.

attachment.php


attachment.php
 

Attachments

  • Garage_Bench2_23NOV14.jpg
    Garage_Bench2_23NOV14.jpg
    135.9 KB · Views: 3,940
  • Garage_Bench1_23NOV14.jpg
    Garage_Bench1_23NOV14.jpg
    136.3 KB · Views: 3,926

Colin HD

Well-known member
Joined
Jan 23, 2011
Messages
86
Location
Your mumma's house - Brisbane Australia
Love to do one of those fancy Panoramic type photos.
 

Attachments

  • IMG_0115.jpg
    IMG_0115.jpg
    144.6 KB · Views: 422
  • IMG_0116.jpg
    IMG_0116.jpg
    142.8 KB · Views: 391
  • IMG_0117.jpg
    IMG_0117.jpg
    145.3 KB · Views: 368
  • IMG_0118.jpg
    IMG_0118.jpg
    146 KB · Views: 372
  • IMG_0119.jpg
    IMG_0119.jpg
    139.3 KB · Views: 346
  • IMG_0114.jpg
    IMG_0114.jpg
    146.2 KB · Views: 5,240
To avoid these ads, REGISTER NOW!
Top Bottom