dittle fart around
Well-known member
View media item 42392Here are two that I put in this last week.
The final test for any new workbench is the "can it hold a beer" test.


View media item 42392Here are two that I put in this last week.
That's quite a nice improvement.
I'm confused, your copper pipe looks new, but I haven't seen anybody use copper for a long time. How old is the piping?
Im liking the added 'crate' drawer, more so the stencil left intact.It's getting there.
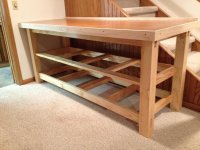
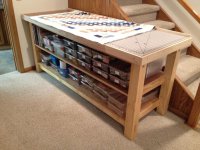
From this...Now this...

...Started with a solid core door from the Habitat ReStore ($5) for the top and cut it down slightly to fit the space. Legs are 3 layers of 2" x 3" glued and screwed together. Stretchers are only screwed in place so it can be knocked down if required. Shelf supports are built with pocket screws (no glue). Top is held on with 6 hanger bolts - wood screw-like on one end and 1/4-20 bolt on the other.
Very heavy and probably overbuilt for her use but the weight makes a very steady and nice work surface.
I like the fan, what is it?
I'm a fellow fan lover. You can see some of my fans here;
http://radioheaven.homestead.com/Fan_Collection.html
AnEv942 said:Im liking the added 'crate' drawer, more so the stencil left intact.
If I had that copper pipe over my workbench, I'd HAVE to polish it. Yeah, I know, I know, it IS OCD. Can't help it.


Looks nice. Did you use mortice and tenon joinery? Looks like it. If so, impressive and well done!


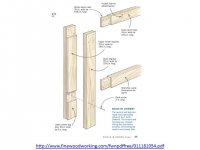
It's pseudo - mortise-and-tenon joinery. I adapted a technique from a Fine Woodworking article and plans (http://www.finewoodworking.com/fwnpdffree/011181054.pdf ). See attached picture from the referenced plans.
Fun little project and a technique that I would use again.
My wife is into serging now for the holidays and needs a work area similar to yours to prep the fabrics for sewing and such. Thanks for the finewoodworking PDF link now I have to look for some tools to get the job done. What did you use for yours? Thanks
It's getting there.
From this...

Now this...

It's getting there.
From this...
Now this...
If I had that copper pipe over my workbench, I'd HAVE to polish it. Yeah, I know, I know, it IS OCD. Can't help it.
 That is not just copper drainpipe, that right there is artwork. Shine it up and show it off


Really pretty basic tools in that I used a Milwaukee 10 in. power miter saw (fixed, not slider), and a vintage (1951) bench top Craftsman drill press for most of the structure. Used a Kreg pocket jig for the shelf support cross-pieces.
Here's mine in my one car garage
The new lumber cart I built on the right
Sent from my iPad using Tapatalk


I've got questions too
My good friend has a nice very old garage (has a loft and very small for a two car, might be pre-automobile). He needs a bench frame 2' x 6'. He'll supply the top.
I've got a few old reclaimed skid pieces, 2-1/2" x 3-1/2" actual dimension oak. Appearance is largely unimportant, rough and ready is fine (as a matter of fact it'd fit the garage), I'm just concerned about durability.
I was thinking this style (thanks wintermute):
http://www.garagejournal.com/forum/showthread.php?t=128019
But considering my lumber dimensions I can't just use metal hangers on the bottom supports. Any suggestions?
Also should I notch the cross braces?
What about height - 36"? 32"?
Thanks
Pete
Questions:
1. What are you planning on using the bench for? The design requirements are different for working on computer motherboards than for rebuilding transmissions.
2. Is there a reason to make it "super portable"? Do you want to be able to reconfigure the space without unbolting the bench from the wall or is that not an issue?
3. Is weight an issue? Do you need to be able to fold it up and put it in the back of your truck/car?
4. The height of the workbench is also somewhat subjective. If you are putting a tall stool at the bench you want a tall workbench. If you are fairly short you will want a short workbench. Match the height to the main work. Working for hours at a workbench that is too short will give you backaches.
One other note:
I have a workbench similar to the one linked to. I didn't dado the legs in (4X4s) or anything special. I used long deck screws to attach the 2X3's for the top apron and the shelf. I've used it for all kinds of stuff. Light little stuff and heavy/nasty stuff. I've even considered using it for a tall jack stand. It's not pretty but it works.
The only thing I've decided is, he's shorter than me (I'm 6') so I'm going 32".Man I love those rows of toolboxes!
Sorry I wasn't clear. Car work for sure! With 'projects' as well. It needs to be strong. It doesn't need to be portable or moveable at all, once installed it'll probably be there the life of the garage.
After consideration I've rethought a little. I can't just do the type of notching winter did because the rails are the same dimensions as the posts. Half and half rails/posts or thereabouts? I assume the post's 3-1/2 dimension should go side to side. Though if I put it back to front I could notch the post 2" and the rails 1/2" or thereabouts. 1-1/2 and 1?
Oh heck I don't know what I'm doing
Pete
 ..Next is a built in wood bench that was in the garage when we moved in. Right now this one has a few live steam projects on top. It is just high enough to stuff my 6 inch planer under. Last is my maple top table with about half of an old Veco Chief built on it.


Just re did a few in my garage. The sink bench has a few coats of poly urethane, and the workbench is just oiled with tung oil.

was able to sneak the drain for the sink between the drawers

What brand of cabinets are those?Just re did a few in my garage. The sink bench has a few coats of poly urethane, and the workbench is just oiled with tung oil.
was able to sneak the drain for the sink between the drawers