To avoid these ads, REGISTER NOW!

Lets see your workbench

tjdux

Well-known member
Joined
Feb 4, 2014
Messages
801
Location
Southern Nebraska
Company i bought it from draged it out of their fab area with a forklift, and hoisted it up with a 5 ton electric chainfall. Backed an international rackbody in and lowered it down.

used a forklift to take it off.
Man this bench deserves it whole own post and write up.. also aboit 100 or more photos... somebody has had to see that before. Its just too awesome.

Love to know its detailed history

Sent from my SM-G900V using Tapatalk
 
To avoid these ads, REGISTER NOW!

stonesg

Well-known member
Joined
Jun 13, 2016
Messages
249
Location
SE Georgia
So there I was.... In a confluence of chores, wants and material.

I had just bought this Harbor Freight Lift :

111008f2474acdab19b753ca67299bd7.jpg

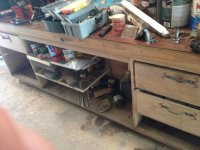
And then wanted to finish getting my bench installed. To back up a little; a friend had been remodeling his kitchen and gave me his cabinets to use as a base for my bench. A lucky strike at IKEA scored me two solid oak counter tops. I had to cut the backs of the cabinets to fit over the blocks of the stem wall but that was all to be done done at this point.

4866a07441fae3ad60a2b68120e4ebee.jpg

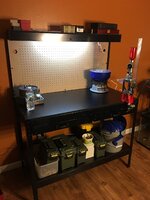
Once I finally go the cabinets set in place, I could finally move on to getting my non-pegboard pegboard up. I wanted to use a sheet of plywood instead of pegboard.

All of a sudden the light bulb goes off and I try this....

913f267bf6f53342af9d62326c545923.jpg

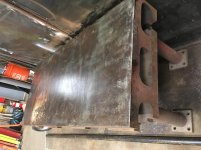
Yup... That sheet that looks to be birch plywood is the top from the Harbor Freight lift crate.

I found the studs and put it up and here was the first cut at tool organization...

7ec545409339b2971a6eb62be1ecd017.jpg

Then as I'm standing there thinking about the pegboard shelf brackets I have and the fact that I'd like a place for my soldering stuff and other small things that would clutter up the bench....

306c9051e62fc61a5d853c0bc4b54a93.jpg

Yup.... That's the end panel of the Harbor Freight lift crate. It even has an inset panel on the top that keeps small items from rolling off.

For instance I had to disassemble that fan that was on the bench to clean it and the shelf nicely held all the screws
Here's the close to finished bench with vice and power strip installed.

5f1c37bbc36406ff554925f9f22ea29b.jpg

Now I just have to final organize and I've got my nice working spot.

Life is good.

TG
 

Attachments

  • 111008f2474acdab19b753ca67299bd7.jpg
    111008f2474acdab19b753ca67299bd7.jpg
    56.2 KB · Views: 4
  • 4866a07441fae3ad60a2b68120e4ebee.jpg
    4866a07441fae3ad60a2b68120e4ebee.jpg
    88.4 KB · Views: 4
  • 913f267bf6f53342af9d62326c545923.jpg
    913f267bf6f53342af9d62326c545923.jpg
    41 KB · Views: 4
  • 7ec545409339b2971a6eb62be1ecd017.jpg
    7ec545409339b2971a6eb62be1ecd017.jpg
    47.8 KB · Views: 4
  • 306c9051e62fc61a5d853c0bc4b54a93.jpg
    306c9051e62fc61a5d853c0bc4b54a93.jpg
    45.4 KB · Views: 3
  • 5f1c37bbc36406ff554925f9f22ea29b.jpg
    5f1c37bbc36406ff554925f9f22ea29b.jpg
    68.7 KB · Views: 14
Last edited:

stamanti

Well-known member
Joined
Apr 19, 2011
Messages
291
Location
Massachusetts
Couple more photos attached.

Took a light pass to clean up the top, and try out my new eastwood sct. Probably needs the rougher grit wheel that is on back order, but not bad for a quick pass.

Photos show the t shaped notches in the oval hollows. There also appears to be 3 holes at the far end that were filled with steel slugs.
 

Attachments

  • 2017-03-03 16.18.24.jpg
    2017-03-03 16.18.24.jpg
    138.2 KB · Views: 431
  • 2017-03-03 16.17.56.jpg
    2017-03-03 16.17.56.jpg
    138.8 KB · Views: 451
  • 2017-03-03 15.51.24.jpg
    2017-03-03 15.51.24.jpg
    138.2 KB · Views: 491
  • 2017-03-03 16.18.58.jpg
    2017-03-03 16.18.58.jpg
    138.8 KB · Views: 404
  • 2017-03-03 16.19.18.jpg
    2017-03-03 16.19.18.jpg
    127.8 KB · Views: 385
  • 2017-03-03 16.18.34.jpg
    2017-03-03 16.18.34.jpg
    141.1 KB · Views: 404

mrobins297aaa

Well-known member
Joined
Sep 20, 2010
Messages
3,283
Location
south east michigan
This pic is from a couple of houses ago, I was getting ready to put my 350 back into my 79 corvette. It was right to the point where everything is just such a mess that you stand back and say I've got to clean this **** up because I can't find a dam thing......lol I'm sure there are others on this board that can relate to that situation ..........lol

noplacetoputanythingdown-1.jpg
 

drivesitfar

Well-known member
Joined
Oct 23, 2013
Messages
35,988
Location
Pacific Northwest
Stam: not only do you own one of the coolest steel benches around, but you show a brand new tool i haven't seen and i need to know more about. do tell? also looks like you have a very well built Mag drill laying on it's side behind the new box and i'd like to know if that will drill a hole in that bench?
 

Emory

Member
Joined
Oct 2, 2016
Messages
11
Here's the workbench portion of my garage. Still working on all of it. So far it's 2x6 construction 12 feet long 30" deep with the top consisting of 2 layers of 3/4" maple and obviously everything stained. I was going to build cabinets for above but found a pretty solid deal on the Rubbermaid units shown. Electrical sub panel added to the garage not shown, but the bench has two dedicated 20A circuits. Compressor is mounted outside with just a regulator and reel inside as is my 55 gallon mounted shop vac. It's ducted in just below the ceiling and will be plumbed over to the table saw soon. I added a big window and behind the "Giants" painting is a 'window mount' air conditioner. Entire garage is insulated with R19 walls and R36 ceilings and a commercial garage door with R11. All in all its coming along nicely, I'm enjoying it. Adding a row of magnetic tool storage this weekend between the bench and cabinets as well.

bench.jpg
 

Stampede

New member
Joined
Mar 3, 2017
Messages
2
This my new bench, it's not done. The top 3/4" plywood 2 layers.

Thanks.
 

Attachments

  • 0225171616.jpg
    0225171616.jpg
    148.4 KB · Views: 301

SMOKEYBEAR

Well-known member
Joined
Jan 3, 2016
Messages
447
I recently purchased this work bench. The top is 6' 6" by 3' by 10". Anyone seen anything like it before?

I'd love to know some history on it, and what it may have been made out of, or what it was originally for. Seems like it was fabricated out of something else at some point in it's history.

Tag says property of USN. the top and bottom of the slab is a minimum of 2.5" thick. I guess it weights somewhere close to 2 tons.

You must own a fork lift! How did you ever manage to move it?
 

kaymccampbell

Well-known member
Joined
Feb 27, 2015
Messages
29,402
Location
Upstate New York
I get a kick out of how clean some of these shops are, floors and bench tops included

Floors are clean because I don't want to kill myself getting around in the shop. Metal bench is clean, because I snapped it just after wiping it down on completion of a task. There are two open project tubs and a new bottle of gojo on it now. Tubs should be gone within 2 weeks on project completion. The gojo will stay. The wood side has lumber staged for processing in the pic. That has since been milled and delivered and there are a new set of boards staged for the next project. The floor is still clean, as I swept it before I quit for the day.
If I don't keep it organized I am unable to work in it. Mess confuses me.
 

iagsxr

Well-known member
Joined
Jan 10, 2010
Messages
1,497
Location
Vinton, Iowa
Here's the workbench portion of my garage. Still working on all of it. So far it's 2x6 construction 12 feet long 30" deep with the top consisting of 2 layers of 3/4" maple and obviously everything stained. I was going to build cabinets for above but found a pretty solid deal on the Rubbermaid units shown. Electrical sub panel added to the garage not shown, but the bench has two dedicated 20A circuits. Compressor is mounted outside with just a regulator and reel inside as is my 55 gallon mounted shop vac. It's ducted in just below the ceiling and will be plumbed over to the table saw soon. I added a big window and behind the "Giants" painting is a 'window mount' air conditioner. Entire garage is insulated with R19 walls and R36 ceilings and a commercial garage door with R11. All in all its coming along nicely, I'm enjoying it. Adding a row of magnetic tool storage this weekend between the bench and cabinets as well.

bench.jpg

I like that.


I'm dumb about stain and wood finishing. If you'd like to go more in depth about how you finished it I'm all ears.
 

Stampede

New member
Joined
Mar 3, 2017
Messages
2
The work bench is about the only clean thing in the garage, the pic doesn't show the whole story. I've been getting rid of most of my I could use that some day ****, I can almost walk around in the garage now.

Thanks.
 
Last edited:

EOC_Jason

Well-known member
Joined
Jun 25, 2012
Messages
11,388
Location
Bentonville, AR
Question for everyone... My garage is sloped, but I like my workbenches to be level.

I've always built my benches with same-length legs and just shimmed with scraps of wood as necessary. Sometimes I move a workbench around re-arranging so I figured this would be the smartest thing.

Do you guys cut your workbench legs even lengths, or custom-fit for their location and the contour of the floor?
 

manwithtools

ALLIANCE MEMBER
Joined
Aug 24, 2015
Messages
13,639
Location
Lebanon, TN
Question for everyone... My garage is sloped, but I like my workbenches to be level.

I've always built my benches with same-length legs and just shimmed with scraps of wood as necessary. Sometimes I move a workbench around re-arranging so I figured this would be the smartest thing.

Do you guys cut your workbench legs even lengths, or custom-fit for their location and the contour of the floor?

I use adjustable feet on equal length legs, but I make my benches from steel.
 
Last edited:

iagsxr

Well-known member
Joined
Jan 10, 2010
Messages
1,497
Location
Vinton, Iowa
Question for everyone... My garage is sloped, but I like my workbenches to be level.

I've always built my benches with same-length legs and just shimmed with scraps of wood as necessary. Sometimes I move a workbench around re-arranging so I figured this would be the smartest thing.

Do you guys cut your workbench legs even lengths, or custom-fit for their location and the contour of the floor?

Tee nuts driven in the bottom of the legs. You might call them prong nuts.

Elevator bolts for leveling feet if the floor's just a little irregular. Carriage bolts for leveling feet if the floor really slopes.

Tee nut:


Elevator bolt:

 
Last edited:

tjdux

Well-known member
Joined
Feb 4, 2014
Messages
801
Location
Southern Nebraska
Question for everyone... My garage is sloped, but I like my workbenches to be level.

I've always built my benches with same-length legs and just shimmed with scraps of wood as necessary. Sometimes I move a workbench around re-arranging so I figured this would be the smartest thing.

Do you guys cut your workbench legs even lengths, or custom-fit for their location and the contour of the floor?
Google hockey puck feet. Its basically a 4x4 with a 5/8 (i think) hole drilled in the bottom with a coupler bolt hammered in. Then get a hockey puck, drill into it about 3/8 inch the diameter of the head of a 1/2 carrige bolt, just deep enough to leave the square top accessible by wrench. Then you have permanent adjustable rubber cushion feet.

Signiture; Check out my garage progress http://www.garagejournal.com/forum/showthread.php?t=352703
 
To avoid these ads, REGISTER NOW!

Borntoolate

Well-known member
Joined
Feb 25, 2017
Messages
50
Location
Baton Rouge Louisiana
We flooded out in august and my workbench went diving for a few days. So no pics at the moment. I wanted a large, flat, rigid top. Size roughly 4'x8'. So butcher block would work but would be heavy and pricy to buy or labor intensive to make. If you are in a similar situation google "torsion box construction". This has served my well and it as a minimum will be salvaged from my drowned work bench.
 

Emory

Member
Joined
Oct 2, 2016
Messages
11
I like that.


I'm dumb about stain and wood finishing. If you'd like to go more in depth about how you finished it I'm all ears.

I'm the same. I grabbed the stain I thought looked good, a clean rag, dipped said rag in stain and wiped it all over. When I was done I took another clean dry rag and wiped off any excess. Allowed it to dry for a day or two and that's it. Super easy
 

drivesitfar

Well-known member
Joined
Oct 23, 2013
Messages
35,988
Location
Pacific Northwest
ALL: just an FYI. SAFETY TIP 101: rags with stain on them need to be put in a metal bucket with a cover on them or outside to dry in the air on a line cause they can self ignite if left in a wad on a wood bench. many a garage and house has burnt down cause of not disposing or taking care of rags correctly so BEE CAREFUL!!

nice looking shop benches everybody and thanks for sharing!!
 

Squ1d

Well-known member
Joined
Jun 11, 2014
Messages
181
Is it easier to lower the saw or lift the wood and cut it up there??
 

tjdux

Well-known member
Joined
Feb 4, 2014
Messages
801
Location
Southern Nebraska

tjdux

Well-known member
Joined
Feb 4, 2014
Messages
801
Location
Southern Nebraska
yes, with 8' or more extensions on each side plus dust collector.
It looks like its already got 5 or so ft extensions now... i have 6ft on each side of my miter saw and that's plenty. One side buts to the wall and the other is infinite with rollers out the door. I figure if im cutting more and 6ft off something o can use circular sawnor just buy different length lumber.

Signiture; Check out my garage progress http://www.garagejournal.com/forum/showthread.php?t=352703
 
Joined
Jul 16, 2012
Messages
15
Not mine but I just found a new favorite.
Http://oldgas.com/forum/ubbthreads....79[\URL] Sent from my iPhone using Tapatalk
 

Borntoolate

Well-known member
Joined
Feb 25, 2017
Messages
50
Location
Baton Rouge Louisiana
Yes this bench brings back lots of memories. I thank God that I had a thing for both of my grandfathers stuff, shops and old machinery from a very young age. I have several things from both and also my father.

The first picture is of the large Columbia vice that my grandfather bought and was out side of my dads first shop. It was mounted on an old tree stump for at least 50 yrs.
The second is my grandfather's (on mother's side). This vise was in an old wooden box car that was his shop.
The third is of the drill press's that belonged to the grandfathers. The red one is from the box car and was mounted on the outside by the door. It was all froze up and took several months to restore.
The blue one was in my dad's shop and was my grandfathers. This is what I used to drill holes with until I was old enough to use dads big old Craftsman 1/2 horse of a drill. I restored both of these post drills in the 1980's along with the blue vise. I got the large vise when my dad pasted in 2005.

Seems like there needs to be an Anvil and Coal forge nearby to fit in with those post vices? Maybe?
 

Borntoolate

Well-known member
Joined
Feb 25, 2017
Messages
50
Location
Baton Rouge Louisiana
I get a kick out of how clean some of these shops are, floors and bench tops included

Me too. When clean my shop will never look as good as some of these. BUt I am more in to functionality than looks. Course I have no shop at the moment. Demo'd it after the flood, metal building on order. Just a slab and a smoke stack at the moment. 6-8 weeks should be in business and then the work starts, electrical, lights, vac system, tools brought back etc....
 

Borntoolate

Well-known member
Joined
Feb 25, 2017
Messages
50
Location
Baton Rouge Louisiana

Attachments

  • IMG_1282.jpg
    IMG_1282.jpg
    140.2 KB · Views: 325
  • Band saw.jpg
    Band saw.jpg
    138.7 KB · Views: 289

EOC_Jason

Well-known member
Joined
Jun 25, 2012
Messages
11,388
Location
Bentonville, AR
Got tired of how grungy my workbench was getting so I took everything off, sanded it down and put on a few coats of some polyshade (stain+urethane) I was wanting to use up. Going to put a few more clear coats of urethane on the table to give it extra protection. Still have to also do the top shelf but ran out of room to put all my junk so it's getting done in stages... lol.
 

Attachments

  • 20170305_171721.jpg
    20170305_171721.jpg
    153.2 KB · Views: 348

Project_shadow

Well-known member
Joined
Jun 14, 2014
Messages
677
My new winter work bench is ready to go
c7b4ca750e125659a2e14352702e336d.jpg


Sent from my iPhone using Tapatalk
 

Attachments

  • c7b4ca750e125659a2e14352702e336d.jpg
    c7b4ca750e125659a2e14352702e336d.jpg
    598.9 KB · Views: 6

Emory

Member
Joined
Oct 2, 2016
Messages
11
No thanks on lifting that miter saw up there

Is it easier to lower the saw or lift the wood and cut it up there??

No kidding, I was thinking the same thing. Seems like a tool for that lower shelf under the workbench.

Signiture; Check out my garage progress http://www.garagejournal.com/forum/showthread.php?t=352703

Being that the Kobalt saw pictured is a 7 1/4" saw weighing 23 pounds with some lightweight pine as its bench totaling maybe 40-45 pounds I personally find it rather easy to stick up there. I suppose I'm a bit lucky to not be the smallest guy around and be rather tall as well. Simply put I use the thing maybe monthly at best, I love the room it saves.
 
To avoid these ads, REGISTER NOW!
Top Bottom