To avoid these ads, REGISTER NOW!

Lifted the garage, now what?

guestimate

Banned
Joined
Jul 21, 2014
Messages
24
Greetings All.

I bought a property a few years back with a 1 car garage with vinyl siding that was sinking into the lawn. It was built off the pad and nothing connecting it to the pad in any way. The sill just sat in the dirt and thanks to mother nature's elements, rotted away, as were the stud ends that sat upon. The garage had a sway-back in the middle because of this.

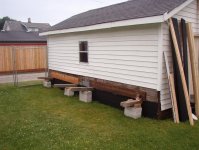
I found some 2 x 8's and bolted/screwed them horizontally to the studs, inside and out, at the far ends. There was about 4 feet distance between the inner ends and by jacking up, was able to get most of the sway-back out. I'm only doing one side for now although the other side needs some care too, due to a refuse pile between mine and the neighbor's garage.

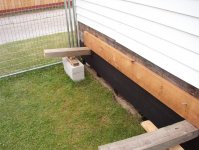
Anyway, the lifted side shows daylight. I dug a 1' trench beneath where the sill used to be and added 4 inches of pea gravel. Now to the tricky part, which exposes my ignorance.

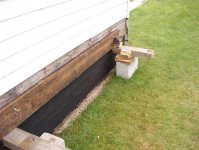
A marine friend suggested I nail 1' high plywood runner to the lower studs and just fill the gap between the outer siding and plywood, between the studs, with concrete. It's elegantly simple and I liked the idea, which I had full intention of doing, until a buddy who builds houses mentioned my lack of a sill. I mentioned that if there WERE a sill, I couldn't pour concrete as I'd intended to create the new footing. THEN learned that wood in contact with concrete, rots quickly, even IF it's above the dirt level. I THOUGHT the concrete would stick to the wood and offer support just by it's adhesion. I did add some 1' 2x4 pieces to the bottom of the rotted studs (alas, not treated lumber), screwed and bolted. I painted everything with 2 coats of asphalt driveway sealer and was thinking of giving it an extra coating of drylock.

Some have mentioned lining all the wood with plastic or sill foam to prevent the concrete from contacting the wood, but that gives zero adhesion. The absence of a sill does worry me, what then holds up the garage when the concrete dries?

My builder buddy gave me some 2x12's to use instead of plywood, he said to just screw them into the studs where they rest on the pad, which he said is adequate to support the garage because it's relatively light as garages go.

Do any of you experienced folks have suggestions or advice I should consider to avoid future regrets?
 
To avoid these ads, REGISTER NOW!

SteveCh

Well-known member
Joined
Dec 21, 2012
Messages
1,053
Did you cut all the rotted parts? If not, I would drench them with wood preservative, perhaps copper-based. Otherwise, that rot can continue to move up the studs, if more slowly without ground contact.

Otherwise, while a bit crude, what you are planning might just work.
 
OP
G

guestimate

Banned
Joined
Jul 21, 2014
Messages
24
I cut away much (if not all) the rot away, thinking the 1' pieces added would be adequate, biting into 6" of still good lumber, and was hoping the driveway sealer (asphalt/latex) would do the job of a preservative. (Curious why wood in contact with concrete doesn't petrify vs. rot.)

Also the pad's upper edge is clean, but below has lots of bulges & convolutions below the dirt, which the new concrete will key and lock into. My understanding is that's not necessarily a good thing, as fresh curing concrete has a different expansion rate than old. The idea of the pea gravel is to let the garage shift & float, but that won't happen with what I have. And no, I can't cut the edge flush, at least not without lifting the garage to a horrible angle it may not sustain, and renting a cement saw. (I probably shouldn't be so cheap.)
 

Leaflessshadetree

Well-known member
Joined
Aug 1, 2013
Messages
7,175
Location
Don't ask.
Pour the footing, are you going to have rat or stem walls? Poured or block?
You can either install anchor bolts when doing the concrete or drill and install anchors.
Put a foam separator between the concrete and the sill (pressure treated). Toe nail the studs to the sill.
 

1grnlwn

Well-known member
Joined
Jan 19, 2012
Messages
186
Location
Central Illinois
I think you will be fine if your 2x material that contacts concrete is pressure treated. Pinning or bolting could be easily accomplished before pour or after. If you Jack it up, say 3/4 of an inch too high, pour crete and then lower 3/4 into crete you may be able to eliminate air gaps between sill and crete. 1 car garage is basically a shed. Should be fine.
 
OP
G

guestimate

Banned
Joined
Jul 21, 2014
Messages
24
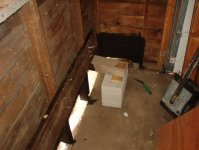
Oh, you like pics? Here's some...
 

Attachments

  • IM001237.jpg
    IM001237.jpg
    142.2 KB · Views: 455
  • IM001238.jpg
    IM001238.jpg
    144 KB · Views: 403
  • IM001239.jpg
    IM001239.jpg
    133.8 KB · Views: 389
  • IM001240.jpg
    IM001240.jpg
    147.2 KB · Views: 379
  • IM001241.jpg
    IM001241.jpg
    146.2 KB · Views: 367
  • IM001242.jpg
    IM001242.jpg
    141.6 KB · Views: 391
  • IM001247.jpg
    IM001247.jpg
    139.2 KB · Views: 393
Last edited:
OP
G

guestimate

Banned
Joined
Jul 21, 2014
Messages
24
It may not be clear in the pics, the short 2x4's screwed in to bottom of the studs, for my painting them with driveway sealer.

My builder buddy suggested I put in a new sill, which I didn't understand how to do at first. Then it occurred if I nail AL flashing on the outside and pour the concrete on the inside (as originally intended) I could pour just up to the level of the pad (uses less concrete, too), then just take a multi-tool and cut the lower stud ends off to accomodate the thickness of the new sill. Still there's nothing holding the garage to the sill. Toe-nails? What about screws? And I'm all for embedding vertical threaded rod or connectors in the fresh concrete, but getting the sill pieces (I bought 4 treated 8' 2x4's today) to slide over them would involve raising the garage higher, something I'd rather not do.
 

My Old Tools

Well-known member
Joined
Jun 4, 2014
Messages
5,446
Location
Hamrick Lake, TX
Dig a deeper trench. Pour a concrete footer in the trench with anchor bolts. Trim the 2x6 ends as necessary to elimante rot. Sister on new ends for correct height. Set a treated sill on the footer and secure with anchor bolts. Lower the building onto the sill and toenail the studs into the sill. Repeat on the other side and end if needed. If you can't do anchor bolts for some reason, shoot the sill plate down with a .22 cal concrete nailer, about $40 at HD.
 
Last edited:

bczygan

Well-known member
Joined
Nov 4, 2009
Messages
22,002
Location
DETROIT! Arsenal of Scrappers
OK, your language is confusing and your photos don't tell me enough, but here is what's what.

First, where are you? Foundation requirements will be dictated by that as well as your governing jurisdiction. What are their requirements?

You need to rebuild this detail at the wall, floor, foundation junction in a standard way to provide drainage, separation from grade and structural support.

You need a treated sill plate sitting on sill seal on a concrete footing of the appropriate depth. Studs that are damaged need the damaged portion removed and new pieces scabbed on. Damaged siding needs to be replaced.

Since the original grade was too low, the new sill needs to be higher.
It is unclear to me from your description whether or not there is an existing foundation. If there is, and it is adequate, but not high enough, You can form and pour an addition to it, doweled in to the existing, or lay block.

I would also caulk the joint between the sill and concrete.

Understand?

Now, I like the idea of sitting a structure on gravel, if that is what you are describing, but I know of no jurisdiction that allows it. Frank LLoyd Wright did a development of houses that used that detail. It's all gone now. It would have to be well drained in freezing climates to avoid heaving. And that might end up being as expensive as just pouring a trench footing.
 
OP
G

guestimate

Banned
Joined
Jul 21, 2014
Messages
24
bczygan:

I'm in anytown, (midwestern) USA.

My city/town allowed who/whenever built the garage to do what they did, this isn't a new build, so should be grandfathered as to codes. They built off the pad without any bolts or attachments. Anything I do has to be an improvement.

The pea gravel is for drainage.

Had no foundation to speak of (but an inner concrete pad.) Basically I'll be adding an outer, wider edge to the pad. If I pour it up to the surface level of the pad, I can trim the stud ends and install a new sill (8 ft. sections, not continuous piece.)

I might still go with the 2x12's screwed to the studs at floor level to get support from the old pad.

MyOldTools:

How deep of a trench do you think is necessary? The pea gravel mostly fills the 1' trench I dug.

Can I piece a sill together with anchor bolts coming up between the two-by ends? Then I could just drill a hole in another section and slide over the embedded, vertical threaded rod, tighten the nut and nail the section to the sill.
 

bczygan

Well-known member
Joined
Nov 4, 2009
Messages
22,002
Location
DETROIT! Arsenal of Scrappers
What is the soil like.

Here we have clay. A trench filled with gravel becomes a french drain that doesn't drain.
In the winter that water freezes and expands in uneven ways and will push the sill plate up. The solution is to find a way to drain the trench to daylight or a french drain of enough capacity to accept all the water. That problem is solved by a concrete foundation wall that goes below the freeze level of the soil. Here it is 42". But harsh winters like the last one we had freeze the soil deeper and cause damage. Our old cast iron gas pipes were severely tested and damaged in many places in the city.

Dealing with water in areas that have freezing weather is a problem. How are you dealing with the runoff from the roof of the garage and rain falling on the siding. How are you getting that water away from your new type of foundation?

The idea of making the existing slab support the wall is an interesting solution for support. 2 lag screws at each stud for a connection?

I'm still trying to figure out a detail that sheds water away from the structure and still supports the wall, unless you intend the 2x lagged to the studs to be the entire support.
 

My Old Tools

Well-known member
Joined
Jun 4, 2014
Messages
5,446
Location
Hamrick Lake, TX
You don't need gravel if you put the footer in below the frost depth. The top of the footer should be above any standing water. If water stands on that side you either need to regrade the area or put in a french drain outside the foundation.

You can piece the sill plate, but the bolts need to go through solid sections through drilled holes. Just drill after the anchor bolts are dried in place. Tighten the nuts, and toenail.
 
Last edited:
OP
G

guestimate

Banned
Joined
Jul 21, 2014
Messages
24
bczygan:

Here we have a foot of black loam followed by tawny brown clay. I think the problem was no footing to speak of, just rocks, a few bricks & dirt; but only the width of a 2x4 doesn't give much for fresh concrete to key into the existing pad, or for support. I'm getting the sense that filling up most of my 1' trench with pea gravel was a mistake. I only left maybe 5" depth for the new pad edge, maybe I should remove some gravel for a deeper footing. Menard's has 60lb. bags of concrete for $2.50 each, it's not so much about the money as the work involved.

OK, for your own case, pouring cement between the outer siding and a 2x10 or 12" screwed into the studs. I trust the 4" screws, at least 4 per stud. I'm only using 3 per stud now, and it is holding the garage up [and 4 pieces of 3/8" threaded rod] ...More is better! :)

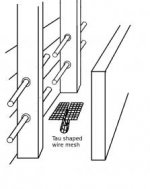
Additional support can be had by putting 1' lengths of threaded rod through the studs, a nut and washer both sides. Once the concrete is poured in and embeds the rod, it should support the studs in concrete. The problem is protecting the wood from the moisture in the concrete, that's why I was thinking of drylock paint, or maybe plastic sheeting stapled in, and maybe some hose sections over the threaded rod. Final thought-- some wire mesh tau shapes over the threaded rods would embed in the cement and offer more support (better if the mesh were plastic coated.) I'm just a newbie so free to think outside the box?
 

Attachments

  • garage_studs.jpg
    garage_studs.jpg
    10.2 KB · Views: 95

bczygan

Well-known member
Joined
Nov 4, 2009
Messages
22,002
Location
DETROIT! Arsenal of Scrappers
he 2x, lagged (Not screwed, screws aren't good in shear) to the studs is good enough to support the building, then I am wondering why all the worry about what is under the wall. Just fasten a board to close it off and let it cantilever. You have basically a floating slab with a wall cantilevered off the edge. The trench of gravel is just inviting water to get adjacent to the existing slab to undermine it and crack or lift it when it freezes.
If you pour a concrete strip, it could break up under the load of the wall against uneven resistive force of the gravel and frozen water trench. Keying it into the existing slab by drilling holes every foot or so, and epoxying in dowels to tie the new concrete to the old, may help. Running a continuous rebar the length of the new concrete will cause it to be a kind of bond beam, which will resist cracking. Doing both would be even better, to create one monolith. I would lay thick plastic sheeting all around the building to guide water away from the foundations. Slope the grade and cover the sheeting with the topsoil so water runs away. You have an overhang, which helps. It's all about getting water away from the building. How high is the top of slab above surrounding finish grade?
 
OP
G

guestimate

Banned
Joined
Jul 21, 2014
Messages
24
MyOldTools:

Well I wish I'd known that before I filled the trench with 5 bags/25 gallons of pea gravel. My pad is above the lawn so drainage isn't a problem for me, but the siding was actually below the soil, and raising the garage any higher to put a sill in, over anchor bolts, is a problem. Why can't I run sill boards up to the anchor bolts and then install another 2by over that, tightening the nut & nailing them together? Also, are there any code considerations about pieced sills? I don't want to finish and then have a city inspector visit me to tell me I have to do it over.

bczygan:

So are you also suggesting I remove the pea gravel and refill with the original dirt? ...or pour a new footing as I'd intended? Again, the pad edge has lots of bumps & bulges.

You guys talk about water but that hasn't been a problem for me, just an old structure with no footing, sinking into the quicklawn.
 
Last edited:

bczygan

Well-known member
Joined
Nov 4, 2009
Messages
22,002
Location
DETROIT! Arsenal of Scrappers
Don't worry about city inspectors...NONE of what you are doing will meet their approval.

What you have is a structure that was probably built on some misc. stones. Later a slab was poured inside.

Everything you are trying to do is an improvement.

We aren't talking about flowing or standing water. We are talking about the water that is present in your topsoil and the clay beneath it. This water, in northern climates like ours, expands when it freezes and causes things to move. It is also bad for having it contact structural wood, as you know.

If it were me, and I thought it would ever get inspected, I would dig a legal depth trench and put a proper footing in. Otherwise, do the bond beam, doweled into the existing slab, run some sill seal, lay down a treated sill plate and drop the wall down on it. You needn't take out any gravel. The bond beam can be taller than the slab. It just needs to be 6 to 8" thick for the steel to be encased.
 
OP
G

guestimate

Banned
Joined
Jul 21, 2014
Messages
24
bczygan:

OK, I appreciate all the suggestions...

but this bond beam and dowels thing, I'm clueless what you are talking about.

Do you mean I should rent a concrete drill and actually drill horizontally into the pad just to install some rebar? Is it that important that the new footing and existing pad be monolithic? Frankly I'm more concerned about support. Also, what if I didn't tie the sill down with anchor bolts? The structure could have blown away by now, but it hasn't. (If something that big comes through we'll all be looking to our insurers anyway); and whoever built the garage was a real wood-butcher, if it lasts another 10 or 20 years, I'll be happy.
 

volleyball

Well-known member
Joined
Aug 29, 2011
Messages
4,127
Location
NY, not NYC
I wonder what are the limitations of this project? Does it have to be low buck? Is it just to keep it from falling down? Or you want to fix it right?
You could move the building or jack it higher, fix the foundation, maybe lay some block, put a new sill plate higher on the wall and then put the garage back on.
 
To avoid these ads, REGISTER NOW!

DEnd

Well-known member
Joined
Oct 25, 2008
Messages
218
I'm going to second what Old Tools said, though I'd add a capillary break between the foundation and the sill (piece of metal, sill seal, etc...). You don't have to tie the foundation to the slab. Tie the sill down however, I'd guess the added cost would be something around $100 or less.

The bond beam is basically just extending the slab out to below the sill. Having done something similar I'd just dig out for a real foundation. I'd also build up a wall out of concrete and basically shorten your wood wall so that it is above grade by 10-24"

Here is the basic detail. I did not show rebar or sill anchor bolt details.
34ew0le.jpg
 

bczygan

Well-known member
Joined
Nov 4, 2009
Messages
22,002
Location
DETROIT! Arsenal of Scrappers
bczygan:

OK, I appreciate all the suggestions...

but this bond beam and dowels thing, I'm clueless what you are talking about.

Do you mean I should rent a concrete drill and actually drill horizontally into the pad just to install some rebar? Is it that important that the new footing and existing pad be monolithic? Frankly I'm more concerned about support. Also, what if I didn't tie the sill down with anchor bolts? The structure could have blown away by now, but it hasn't. (If something that big comes through we'll all be looking to our insurers anyway); and whoever built the garage was a real wood-butcher, if it lasts another 10 or 20 years, I'll be happy.

OK, you want more temporary. I understand how the difficulty and expense of a proper foundation for an old garage would be daunting. A lot of sheds have no foundation and aren't even tied down. But make no mistake. These standard details are standard for a reason. Like your garage, I have seen garages where inadequate foundations have allowed the structure to sink into the ground, tilt and when the tilt was enough, collapse. I've seen inadequate structure of the roof cause swayback that caused the door to bind and the side walls to blow out. I've seen bad details at the eave cause water infiltration and damage to the wall framing that eventually destroyed that framing.

Buildings float on a very dynamic and moving surface. Foundations allow it to float evenly. Uneven support tears a structure apart.
My first priorities for every building are keeping water away and even support. Every detail is examined to see how that is being accomplished. I try to shed water with steeper roof pitches and good overhangs. I keep slabs 8" above adjacent grade and slope that grade away. I set the structure on a compacted pad with organic matter removed from beneath it. Doing this creates an even support for the slab to eliminate structural cracks.
The foundation wall goes to below the frost line for the same reason, to avoid differentials in the support of the foundation that will crack it and then cause movement and damage to the structure above.

Get what I am saying?
Keep the grade beam separate from the slab. No doweling. The reason for suggesting that was to make up for the tiny foundation by reinforcing it with the slab. Now you should separate the two with an expansion joint or at least building paper when you pour the foundation.

Make the bond beam at least 8"x8" and run a #4 rebar continuous in the middle of it. You may get some cracking over time, but it should be more cosmetic than structural.

Do the other things I described above to keep water away. Use the sill seal and treated sill. Set anchor bolts if you like, but the weight and mass of this bond beam doesn't really hold the building in place though. If you are worried about wind use some mobile home screw anchors.

Oh, and remove that 2x that rests on the slab. You don't want 2 independent things supporting the wall.
 
Last edited:

My Old Tools

Well-known member
Joined
Jun 4, 2014
Messages
5,446
Location
Hamrick Lake, TX
I would dig the trench about 2 feet deep by 6" or a foot wide, wide enough to set the wall on for sure. Some rebar would be a good idea. I would dig under the slab slightly to key it in if you can. I would set anchor bolts. If you absolutely can't get the wall high enough to clear the sill over the anchor bolts (you only need 2.5 inches) then I would shoot the plate into the footer, or use a wedge bolt. A sill is just a 2x treated. I would also do the other side now. And I wouldn't use sackrete. I would call around and find a place that will do small pours. Most places now have a small concrete mixer with the concrete that you tow home, do your pour, and bring it back. Otherwise, get the whole perimeter ready and call a concrete truck. To do it right, find a small time concrete guy that can do the trench (which acts as most of the form), tie the rebar, and do the pour. Shouldn't cost much since there is no finishing really.

I did something similar to an old dirt floor garage (circa 1908) that I had one time. It was originally set on 6x6 sills sitting on the ground. They were rotted out as were the bottoms of the studs. I jacked the whole thing up by the top plates, one side at a time, and got a new treated 6x6 under it all the way around. I used those as my forms and poured a concrete floor inside. It wasn't elegant, but it worked. I even dug a little under the 6x6's to allow the concrete to flow under a bit. It wasn't a structural slab, but it helped tie everything together. You do what you have to do sometimes.
 
Last edited:

Tyberius

Well-known member
Joined
Nov 26, 2013
Messages
312
Location
Wilmette, IL
There's been some talk about "grandfathered in" and "doing things to code" so I thought I'd throw my 2c in:

Don't assume that something built without permits and inspection will automatically be allowed after a certain amount of time. Don't assume something built with permits and a proper inspection will still be allowed after a certain amount of time (the code may change, and your current adjustments may remove any "grandfathering" if there ever was some.

Ok, assuming that everything is absolutely cool with the old building and you actually want it to pass code (but not deal with any code issues or inspections or anything) then not only must you build it to the code when it will be inspected, but also you must be able to prove that it is built to the current code. That means that when you go to court 12 years from now, and you don't want to have to tear out all the old work, you have to prove that the work meets the current (12 years from now) code: meaning an engineer's report or some such and that means documentation, pictures of depths of footers, pictures of rebar, pictures of sill ties, you get the idea.

I wouldn't count on the good will of the municipality to allow the changes even though those changes might contribute to the overall improvement of the property.

That said, I'd probably just do it off permit anyway.
 
OP
G

guestimate

Banned
Joined
Jul 21, 2014
Messages
24
Tyberius:

Points well taken. I have a city-worker living just over the fence and he sees everything from his deck. He called cops for my working on my car on the street, but I got away with putting up a kennel fence with removable posts vs. poured concrete, stationary posts that would have required a permit. I'm winging it with the busy-body next door.

MyOldTools:

I appreciate your experiences, but the 'right' way you describe is way more than I'm physically or financially able to take on. Here's a sketch of my intention.
 

Attachments

  • garage_footing.jpg
    garage_footing.jpg
    7.4 KB · Views: 146

Zeke

Well-known member
Joined
Aug 13, 2009
Messages
17,176
Location
Long Beach CA, the sewer by the sea.
Tyberius:

Points well taken. I have a city-worker living just over the fence and he sees everything from his deck. He called cops for my working on my car on the street, but I got away with putting up a kennel fence with removable posts vs. poured concrete, stationary posts that would have required a permit. I'm winging it with the busy-body next door.

MyOldTools:

I appreciate your experiences, but the 'right' way you describe is way more than I'm physically or financially able to take on. Here's a sketch of my intention.
Might as well use block if you're dead set on doing that way. Personally I think there's a lot of wrong here and not much right. You say anywhere midwestern town. Any wind in this anywhere town. Just because a building was built w/o being secured to the ground doesn't that's the way it should stay.

You've jacked up a garage before even thinking about what you were going to do. Your original ? was:

"Lifted the garage, now what?"

Don't go inside.
 
OP
G

guestimate

Banned
Joined
Jul 21, 2014
Messages
24
Zeke:

(LOL), well sometimes a person has to step out in faith that solutions will present themselves, especially when there's no choice BUT to act.

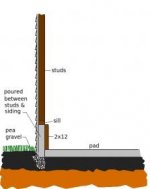
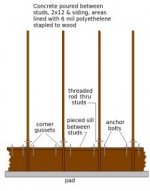
Here's another sketch of what I intend. There's two points of contact-- the 2x12 with the pad (for support) and the poured wall sills with anchor bolts, holding the studs to the sill which is anchored to the poured walls, which have set to the pad. So the garage IS anchored.

Something got me stoked today. I discovered Home Depot sells a 7" concrete circular saw blade that fit on a $10. Harbor Freight portable grinder. (The grinder is 4.5" but the guard comes off.) Another customer said he cuts concrete that way and the risk of a spinning steel diamond disk is very small. So with that I was able to trim the edge of my pad, all the bulbuosities and convolutions gone.
 

Attachments

  • garage_footing2.jpg
    garage_footing2.jpg
    9.7 KB · Views: 106
Last edited:
OP
G

guestimate

Banned
Joined
Jul 21, 2014
Messages
24
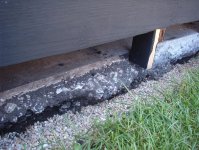
Before & after...
 

Attachments

  • IM001239_1.jpg
    IM001239_1.jpg
    149.6 KB · Views: 192
  • IM001240_1.jpg
    IM001240_1.jpg
    149.1 KB · Views: 181
  • IM001247_1.jpg
    IM001247_1.jpg
    144.9 KB · Views: 191

DEnd

Well-known member
Joined
Oct 25, 2008
Messages
218
Do Not do what you have drawn, it will rot again. You have had multiple people tell you the correct ways to fix your problem. This is not an expensive fix even hiring it done should be around $2-3 grand DIY should be around a grand or so depending on your concrete cost maybe a few hundred more... I figure you need somewhere between 6 and 11ish yards depending on how you do it. Rebar is cheap, as are anchor bolts.

If you are not going to do it right then tear it down and get rid of the hazard.
 

volleyball

Well-known member
Joined
Aug 29, 2011
Messages
4,127
Location
NY, not NYC
$2 -3k can be a mountain to some people. We all had time when we cannot spend that. We also would not tear it down.
It seems that the OP thinks he can do this for $50 and be done with it. That isn't going to happen. You can scrounge a lot and do a lot but it will still cost money.
I think he thinks what others here think as a preservation repair as a permanent fix.
 

bczygan

Well-known member
Joined
Nov 4, 2009
Messages
22,002
Location
DETROIT! Arsenal of Scrappers
Tyberius:

Points well taken. I have a city-worker living just over the fence and he sees everything from his deck. He called cops for my working on my car on the street, but I got away with putting up a kennel fence with removable posts vs. poured concrete, stationary posts that would have required a permit. I'm winging it with the busy-body next door.

MyOldTools:

I appreciate your experiences, but the 'right' way you describe is way more than I'm physically or financially able to take on. Here's a sketch of my intention.

Your sketch has me worried. That is a bad detail in a couple of ways.Pouring concrete against wood isn't good. You need to separate them with a barrier.
Pouring it that tall and thin creates a hinge point.

It will work. Your building will sit there. But it isn't as good as it could be.

So I will tell you for one last time.

Pour an 8"x8" (Minimum) continuous concrete footing or grade beam or whatever you want to call it. Use the 2x on the inside as a temporary form if the top of the concrete is above the slab. A couple inches higher is OK. Form any part of the outside that is above grade. Run the #4 rebar in the middle of it.
The idea is to create a stable base for the wall to sit on. You do NOT want to encase wood in concrete. You want this foundation wall to stick down into the ground as much as possible. You don't want it too tall and skinny and tippy. I don't know what the distance from bottom of trench to top of slab is, so I can't tell you what the exact dimensions should be.

And what about the garage door? Have you coordinated the height of this so the existing door will work with the slab?

Do you understand?

You are getting advice from experienced and qualified builders. You need to listen, rather than trying to reinvent the wheel.

So let's go step by step.
Answer these questions.
Is the existing door usable?
With the structure lowered so that the door sits on the concrete slab, where would the bottom of the sill plate be? Is there even any sill plate left?

Your first task is to rebuild the bottom of that wall by scabbing on new framing to the existing studs and replacing the sill plate with a treated one.

Then, determine where the bottom of that plate needs to be to allow the door to rest on the slab.

Then jack up the structure enough for you to have working room to pour the footing to that level. I actually recommend that you pour just to the top of slab, which means you need no forming on the inside.

What is the dimension from the top of slab to top of grade outside? Does the grade slope away from the building?

What is the dimension from the top of pea gravel to top of grade?

Give me these dimensions and I will draw you the detail you need to use.
 

Hpozzuoli

Well-known member
Joined
Dec 11, 2013
Messages
3,428
Location
Rhode Island
I will get some photos eventually of the work in progress. This garage started as a 2 car 25x20. It's now 25x35 and lifted 6ft. My dad is looking for another rv as we speak and if he gets it I will be raising the joists inside 6" and bumping the front out another 3ft. Anything possible with the right equipment.
 

Attachments

  • image.jpg
    image.jpg
    143 KB · Views: 58

DEnd

Well-known member
Joined
Oct 25, 2008
Messages
218
$2 -3k can be a mountain to some people. We all had time when we cannot spend that. We also would not tear it down.

I hate to be callous, but 2-3k is on the cheap end of home repairs. And like I said the DIY solution would probably be half that or less. If he went with bc's minimum solution, which I recommend he not do due to his likely frost depth and likely rot from splash back, it uses less than 2 yards of concrete. If he can't swing that home ownership probably isn't right for him.

Guesstimate: I'm really not trying to be a jerk here. I've made plenty of mistakes, for example I allowed my subs to talk my dad into doing things I didn't like at the time, living in the house now I know the problems those decisions caused, I am looking at spending 5-10k to fix those issues and possibly more. The extra cost to have done it right the first time was maybe 2k probably a lot less. The knowledge is out there on how to fix things like this, it is cheap or free, please use it. If you don't have the time or ability then hire it done. Your repair will then allow the structure to last and be safe with minimal maintenance costs.
 

My Old Tools

Well-known member
Joined
Jun 4, 2014
Messages
5,446
Location
Hamrick Lake, TX
Another possibility is to dig some post holes into the sill area to give you some depth and support. What you have drawn will likely just roll sideways pretty soon. Pouring some small post hole pads (2 feet deep x 6-9 inches diameter) and setting a treated 6x6 on them for a sill would be a little better. If you want to do what you have drawn, forget the concrete and buy a treated 6x6 and set it on the gravel.
 

p_mori7

Well-known member
Joined
Mar 23, 2010
Messages
3,340
Location
Montreal, QC., Canada
Wow. OP, you have quite the structural problem there.

If it were me:

1- I would lift the garage even higher (like 2 feet more) to give myself some room to work.

2- I would cut away all the rotted bottoms of the existing studs, then sister-in 2x4's at every stud, and then screw in a pressure treated 2x4 sill plate, making sure that my cieling to bottom of sill plate measurement is the same all the way around the building.

3- I would remove all the topsoil and about 1 foot of the clay about 12" wide all around the building. I would then backfill and compact 0~3/4" crushed stone about 12" thick in the trench.

4- I would pour a concrete grade beam all around the building, using rebar as reinforcement. This grade beam would be about 12" wide at the bottom, tapered upwards on the outside so that the top of the grade beam is about 6" wide, and the top of the taper is flush with the outside edge of the new sill plate. This grade beam would be taller than the concrete pad (6~8"), so it also acts as a stem wall to prevent water intrusion.

5- I would then put down the foam pad, and lower the building onto the grade beam, and lock in place with some anchor bolts.

It will be far from the proper way of doing it if it was a new build, but it should last a very long time a be quite stable.

OP, if you want sketches, send me a PM.

~Phil.
 
OP
G

guestimate

Banned
Joined
Jul 21, 2014
Messages
24
DEnd:

I'm not helpless and I can think for myself. Not right for homeownership? FU. How often do folks put $2-$3K in your pocket? Too often, perhaps... Sure it'll rot again, eventually. In a century you'll be mouldering in dirt too. I'm doing a cheap fix that should last 10 or 20 years. Everyone moves on, while those coming up get to remake what's here to their liking.

The previous owner buried 3 or 4 blocks along the pad edge for support, on the side I'm currently working on. They're too much work to dig out so am just leaving them. They leave about 4" of pad exposed while the rest shows 6" sitting on pea gravel. Pouring between the studs will create 4" x 18" x 24" blocks (9 total) to hold the garage down from winds and hold it up. These poured blocks will sit in pea gravel all on a side and enclosing two corners, and on those buried blocks mentioned. All wood will be protected from moisture of the concrete by 6 mil plastic sheet. In some places the pours will be a lot shallower. Pieced sill between the studs with the angle-brackets mentioned. Call it a floating footing. More than one way to do a thing. No it's not what they teach in civil engineering, god forbid anyone violate conformity.

Since a marine gave me the idea, I can't believe none of you have seen it.

bczygan:

Yes, the existing garage door is usable (although the auto-opener needs refocusing). I've only lifted to where the garage should/used to be when first built.

MyOldTools:

The investment in materials was made last week. I'll probably need a lot more concrete than the 6 bags I bought. Total investment about $200.

I can post more pics as this progresses if anyone gives a damn.
 

p_mori7

Well-known member
Joined
Mar 23, 2010
Messages
3,340
Location
Montreal, QC., Canada
guestimate;

instead of pouring a concrete grade beam, you could also use large R/R ties. I think you can get them in 12x12 or 10x10. Since they are soaked in creosote, they should last a good 10 years if sitting on top of pea gravel. And they are usually pretty cheap.

You can anchor the R/R tie to the ground with some 3' sections of Rebar pounded through the Tie and into the ground (need to drill thru the Tie first).

That would also allow you to install a sill plate, and then secure the walls to the R/R ties with some lag bolts.
 

bczygan

Well-known member
Joined
Nov 4, 2009
Messages
22,002
Location
DETROIT! Arsenal of Scrappers
DEnd:

I'm not helpless and I can think for myself. Not right for homeownership? FU. How often do folks put $2-$3K in your pocket? Too often, perhaps... Sure it'll rot again, eventually. In a century you'll be mouldering in dirt too. I'm doing a cheap fix that should last 10 or 20 years. Everyone moves on, while those coming up get to remake what's here to their liking.

The previous owner buried 3 or 4 blocks along the pad edge for support, on the side I'm currently working on. They're too much work to dig out so am just leaving them. They leave about 4" of pad exposed while the rest shows 6" sitting on pea gravel. Pouring between the studs will create 4" x 18" x 24" blocks (9 total) to hold the garage down from winds and hold it up. These poured blocks will sit in pea gravel all on a side and enclosing two corners, and on those buried blocks mentioned. All wood will be protected from moisture of the concrete by 6 mil plastic sheet. In some places the pours will be a lot shallower. Pieced sill between the studs with the angle-brackets mentioned. Call it a floating footing. More than one way to do a thing. No it's not what they teach in civil engineering, god forbid anyone violate conformity.

Since a marine gave me the idea, I can't believe none of you have seen it.

bczygan:

Yes, the existing garage door is usable (although the auto-opener needs refocusing). I've only lifted to where the garage should/used to be when first built.

MyOldTools:

The investment in materials was made last week. I'll probably need a lot more concrete than the 6 bags I bought. Total investment about $200.

I can post more pics as this progresses if anyone gives a damn.

We all give a damn, or we wouldn't spend so much time trying to outline solutions that meet your needs and leave the structure in a fair condition, not just for you, but future owners.

We've given our best advice. It's obvious you have decided to go another way.

Let me make one more suggestion. It seems you are resisting the cost of ordering ready mix concrete. So instead of the difficulty of mixing up and placing some bagged concrete in a few voids and making a proper redo more difficult for the next owner, why don't you just return those bags, or keep them for another project.

Then purchase a few concrete block and 4x8x16 concrete solid block, and use them to support the wall every few feet. You will need to use the 2x12 that you mentioned, as that will keep the wall rigid at the bottom by acting as a beam to span from block pier to block pier. Of course you still need to rebuild the wall framing including the treated sill.

If you feel the need to strap the building down, you can use a couple of mobile home screw anchors. Personally I wouldn't even worry about it.

This way, all that needs to be done in the future is to lift the structure and do a permanent job.

Bill
 
OP
G

guestimate

Banned
Joined
Jul 21, 2014
Messages
24
Like I said, the investment in materials has been made, some scrounged or donated. The garage is a bare shack, certainly not worth the money so many of you want me to throw at it. Even the appraiser when I bought the house winked at me to tear it down, which is what the new homeowner will get to deal with. The blocks I pour will remove easily from their plastic envelopes, and they can replace the pad too, which has a crack in it.

Let me make one more suggestion. It seems you are resisting the cost of ordering ready mix concrete. So instead of the difficulty of mixing up and placing some bagged concrete in a few voids and making a proper redo more difficult for the next owner, why don't you just return those bags, or keep them for another project.

Then purchase a few concrete block and 4x8x16 concrete solid block, and use them to support the wall every few feet. You will need to use the 2x12 that you mentioned, as that will keep the wall rigid at the bottom by acting as a beam to span from block pier to block pier. Of course you still need to rebuild the wall framing including the treated sill.

If you feel the need to strap the building down, you can use a couple of mobile home screw anchors. Personally I wouldn't even worry about it.

This way, all that needs to be done in the future is to lift the structure and do a permanent job.

Bill
 

bczygan

Well-known member
Joined
Nov 4, 2009
Messages
22,002
Location
DETROIT! Arsenal of Scrappers
Like I said, the investment in materials has been made, some scrounged or donated. The garage is a bare shack, certainly not worth the money so many of you want me to throw at it. Even the appraiser when I bought the house winked at me to tear it down, which is what the new homeowner will get to deal with. The blocks I pour will remove easily from their plastic envelopes, and they can replace the pad too, which has a crack in it.

Sounds like a plan.

Don't forget to post lots of photos......We LOVE photos!

Bill
 
To avoid these ads, REGISTER NOW!
Top Bottom