To avoid these ads, REGISTER NOW!

Lifting a 2x6 stud wall on a two block high stem wall

To avoid these ads, REGISTER NOW!

Firstram

Well-known member
Joined
May 16, 2017
Messages
1,392
In the film industry, we call those ”Fat Boy Courtesy Jacks”, all of our walls are built on them. There’s no reason to work on the floor when 24 inches is so much more comfortable!
 
OP
W

WI/MI Border

Well-known member
Joined
Jan 27, 2025
Messages
196
In the film industry, we call those ”Fat Boy Courtesy Jacks”, all of our walls are built on them. There’s no reason to work on the floor when 24 inches is so much more comfortable!
Haha. They could also be called old boy courtesy jacks!
 

Firstram

Well-known member
Joined
May 16, 2017
Messages
1,392
Haha. They could also be called old boy courtesy jacks!
Well, you aren’t wrong. I have worked around a familiar group for 40 years. Over the years our coolers have shifted through beer-gator aide-vitamin water- pedialite and we’re in the ensure range now!
 

mikegt4

Well-known member
Joined
Sep 12, 2005
Messages
3,277
Location
sw ohio
I built my 26x48 garage with 8' tall conventional walls mounted on poured concrete stem walls. I made each 48' wall out of three 16' sections pre-made in my parents backyard and transported them to the build site on my boat trailer. The complete sections (framing and skin) were light enough for 3-4 people to carry. I used my FIL's backhoe to lift them into place. A friend and myself along with the backhoe were all I needed to assemble the entire garage. My garage is "railroad" style so the 48' walls are continuous and the doors are on each end.
 

carcruse

Well-known member
Joined
Apr 7, 2007
Messages
218
Location
SE Michigan
Here's how I did mine:
 

Attachments

  • garage may0013.jpg
    garage may0013.jpg
    60.7 KB · Views: 68
  • garage may0011.jpg
    garage may0011.jpg
    60.2 KB · Views: 70

Bob Peach

Well-known member
Joined
Apr 23, 2007
Messages
134
Location
Cape Cod ,Ma
I know this is 180 degrees outside of methods being discussed here. I have built many buildings, solo, over the years. I toenail the 4 corner posts to the bottom plate, brace them. Same with a stud 16' from each corner. Install the top plate and fill each stud in place vertically. Work around all 4 walls. Sounds cumbersome but it goes pretty quick- nail all tops on one wall first, than get down and toe in the bottoms, next wall , etc.

No time spent building lifts or temp platforms to equal hgt of stem wall. No extra equip to buy. Yes I have to sheath after, but that's only 1 pc at a time too. If there are any framing errors you can correct before sheathing.

In the end working solo you may spend no more time on it.
This is exactly how I just built a 28 ft addition on the back of my shop. Sheathed the 10 ft 2x6 walls after. Too old for heavy lifting.
 

carcruse

Well-known member
Joined
Apr 7, 2007
Messages
218
Location
SE Michigan
Yes, 2"x4" stakes every 8 feet for the 60 long wall.

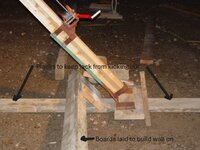
Edit: I think I misread your post. The comment above was for the backside of the stem wall the wall was going to sit on, they prevented the wall from sliding off the stem wall while being lifted. I put planks on the ground at the jack's back to the other stem wall to keep the jack pads from kicking out toward the far wall.
 
Last edited:

Bill T

Well-known member
Joined
Mar 28, 2009
Messages
140
Location
Easley,S.C.
Many ways to skin this cat..., The last two shops I have built, I built by myself. I built the walls on the pad. Before I set the studs, I gang drill the studs for wiring. Lot easier than using a Hole Hawg angle drill with walls in place. I build my walls in 10-12' sections so that an old man with a bad back (me) can stand them up. I use straps cut out of the banding the lumber company uses to deliver the material. Th straps are nailed to the PT sill and the bottom plate to form a "hinge". I have braces installed on the outside of the pour to hold the walls. I also use c-clamps fasten the braces to the wall stud. This way, I can straighten the wall sections after all are up.
One advantage of building on a stem wall of block is that I have the opportunity to use termite shields on the block. I also pretreat the soil with the best chemical I can get, I use some of the chemical in the block cavities.
 
OP
W

WI/MI Border

Well-known member
Joined
Jan 27, 2025
Messages
196
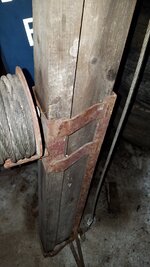
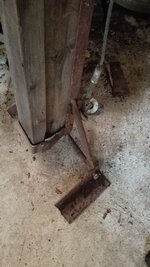
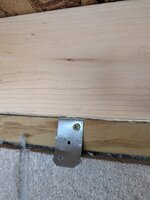
Close up of jack base. Normally it would be nailed to a wood floor.
That is very interesting. I am impressed with the pivot/hinge on the base of the jack timber. And mounting the winch "sideways" eliminates my concern that cranking the winch as the top plate passes would cause an interruption.

Is your timber a lamination of 2x4s? It looks like there may be some ply in the center.

Thanks for your example...
 
To avoid these ads, REGISTER NOW!
OP
W

WI/MI Border

Well-known member
Joined
Jan 27, 2025
Messages
196
Not laminated,just standard 2x4's.
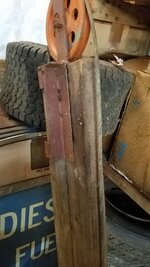
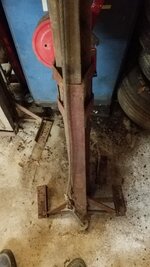
Thanks. Can you tell me about the top of the jack timber? Is there a pulley? what did you use to make sure the cable worked around 180 degrees?

I'm thinking about old garage door cable pulleys. Though they are not rated very highly I think I could easily add two or three additional bolts to hold it together. Not a good idea?
 

carcruse

Well-known member
Joined
Apr 7, 2007
Messages
218
Location
SE Michigan
Thanks. Can you tell me about the top of the jack timber? Is there a pulley? what did you use to make sure the cable worked around 180 degrees?

I'm thinking about old garage door cable pulleys. Though they are not rated very highly I think I could easily add two or three additional bolts to hold it together. Not a good idea?
I'll get some pictures of it for you later today.
 
OP
W

WI/MI Border

Well-known member
Joined
Jan 27, 2025
Messages
196
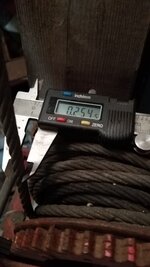
Nice. I have to find some nice pulley wheels like that. The mic on the cable is good. The other photos make it look much larger.

Thanks...
 
OP
W

WI/MI Border

Well-known member
Joined
Jan 27, 2025
Messages
196
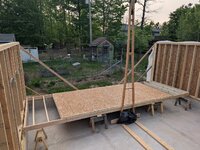
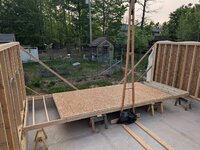
I finished the wall lifting with a modified a-frame device with an 880lb hoist. Lifts were two - 12' 2x6 sheathed/house wrapped wall, two 16' (one with three 30" x 48" window framing), a 24' end wall and a 16' wall with 9x7 door framing and an 8' wall with 36" service door framing.

The hoist easily lifted each with one attachment point. They were all built on a two block high stem wall and the top was supported by several small saw horses. It was really nice having the wall up ~ 18" off the floor. I used Simpson MSTA straps to act as a hinge to hold the wall from moving off the chalk line.

Thanks to everyone here that gave me advice.

Now to repurpose my a-frame as a sheathing/shingle lift...

24' lift ready to go
1000000465.jpg

880lb hoist. As pictured, you can see a 2x6x8' screwed under the center lifting point to reinforce the nearby wall seam and sheathing seam.

Simpson strap initially bent at 90 degrees
1000000441.jpg

Then the strap is hammered down against the sill plate and screwed in place. I'll probably cut them off inside before sheathing the interior walls.
1000000442.jpg
 

Attachments

  • 1000000465.jpg
    1000000465.jpg
    820.6 KB · Views: 28
  • 1000000446.jpg
    1000000446.jpg
    587.5 KB · Views: 56
Last edited:

finn

Well-known member
Joined
Mar 27, 2005
Messages
16,348
Location
The UP, God's country
I guess a follow-up to my question might be...

I won't have a slab or block stem wall built until May. Should I go with one block high instead of two? What purpose does the block serve? I expect my ceiling will be higher inside the garage and the blocks will protect the sole plates from moisture. Otherwise is there really a need? I can still redesign that part. Actually the whole garage!

Thanks, Tim
I ended up using three blocks. That plus regular old 8’ 2”x6” studs in a 30’ section of my garage and ten foot 2”x6’ studs in a 24’ wide portion gave me a ten foot ceiling i a 30’ wide part of the garage and a 12’ ceiling in a 24’ wide portion of the 32’ x 54’ garage so a lift would work. (We actually used full length members instead of stud length. That coupled with the sill and top plate gave me a few mor inches of height.)

I used split faced block, so it minimizes the “industrial” look, even with steel siding.

In my case, the inspector wanted to see at least one course of block to keep snow melt away from the bottom sill. We went three to gain wall height and minimize stud and steel sheeting, plus, I like the aesthetics of the split faced block.
 

bcsaltchucker

Member
Joined
Jun 4, 2025
Messages
12
What a wonderfully helpful thread!

I have stemwalls at various heights for the garage I am building. 1/2 of the stemwall perimeter is 6 inches over slab, but then 14 ft is at 2 feet and 34 feet at 3 feet (building into a slope). I was first thinking I would end up building just a few studs and plates and some kicker braces enough that wife and I can lift it, then toenail the rest of the studs in later. A 10 ftsection with three 2x6 x10' studs and a cross member only weighs maybe 80 lbs.

I never thought to have two plates on the bottom, mudsill plus a hinged 2nd bottom plate, and the raised 'tables' or horses is great idea too. So I think I'll do that, put in all the studs while laid down, hinged double plates on the bottom, and just use conventional wall jacks.

i-xVTgGzt-L.jpg
 
To avoid these ads, REGISTER NOW!
Top Bottom