To avoid these ads, REGISTER NOW!

Lighting Layout Help

shubox56

Well-known member
Joined
Dec 27, 2019
Messages
125
Location
IL
Hi Guys,

After rereading the "Best Light Fixture Ever!", I've decided to go with the MaxLite LSS2XT8USE4803. This inexpensive fixture allows me the freedom to dial in both the temperature and output (simple tube change), something that is important to me. Why important? Because vision and opinions can change with time. I'm also considering the Greentek GT-T8-12W1200 tube mentioned in the post (he actually suggested the 18W tube).

With the above said, I still need guidance. I’m considering 10 4’ foot fixtures and 1 2’ fixture. The tube mentioned is 5000(K) and 1680(lm) for a total unadjusted output of 33,600(lm). First off, considering that this is a working garage that is used extensively (detail work), is 33,600 a good overall number? If not, please help me dial in the number.

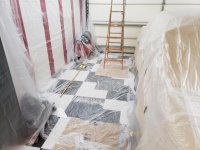
I also need the advice of experts as it relates to the staggered ceiling height. As you will see in the pics, on one side of the beam it is actually recessed in the area when the ceiling gets lower. Creates a lightbox effect, kinda.

Should I keep all the 4’ fixtures uniform --- same tube? And yes, above the workbench there’s also a 2’ fixture which will increase the overall output a tab.

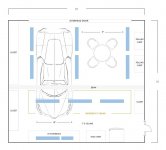
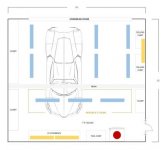
Is the basic lighting layout shown in the diagram reasonable? The diagram shows the car pushed to the far left as is the case most of the time. When I get “busy” on the car it will be parked dead center. Ample working room on both sides.

Here's the garage basics:

1) Size: 21’ X 21’

2) Ceiling Height: Varied -- The front most portion of the garage is a low 7'5". The remaining 3/4 of the garage is 8'5".

3) The ceiling is a bright white and the walls will soon be a light gray.

4) The garage stores my 56 Chevy hotrod. It's a working garage, but decked out for entertainment. Widescreen TV, awesome stereo, black & white checkered floor -- yada yada -- you get the picture. The table and chairs shown in the diagram are of the folding type that can be stored when I have the car parked in the center.

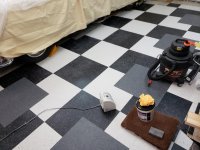
5) The floor was installed 18 years ago and after 3 motor changes and a boatload of OTHER stuff, the floor was screaming for repair. I have been replacing tiles as time allows. That project continues.

6) My son-in-law and I will be adding outlets which includes one 240 circuit. This in addition to “Project Lighting” that leads to this post. The lights in the garage will be controlled by 2 independent switches.

The room has its challenges: a beam stretching across the room and staggered ceiling heights. Though not the best of diagrams, hopefully you will be able to get a decent idea. I will include a few additional pics to help you envision my lighting needs.

Thanks for listening!
 

Attachments

  • G_LIGHTING_1.jpg
    G_LIGHTING_1.jpg
    72.5 KB · Views: 122
  • Cieling.jpg
    Cieling.jpg
    81.5 KB · Views: 89
  • Car.jpg
    Car.jpg
    156.2 KB · Views: 77
  • Floor.jpg
    Floor.jpg
    150 KB · Views: 76
To avoid these ads, REGISTER NOW!
OP
S

shubox56

Well-known member
Joined
Dec 27, 2019
Messages
125
Location
IL
Would changing the direction of the center tubes create a better distribution of light?
 

Attachments

  • LightingIdea2.jpg
    LightingIdea2.jpg
    62.6 KB · Views: 71

cybrdyke

Well-known member
Joined
Sep 9, 2014
Messages
3,442
Location
USA
shubox-
Normally, 9 fixtures in that size space looks very good. Yes, keep the lamps all the same. The 1' difference in ceiling height isn't significant. Also, the amount of total lumens doesn't matter. Changing the direction of them wont make any noticeable difference.
Good luck,
CD
 
OP
S

shubox56

Well-known member
Joined
Dec 27, 2019
Messages
125
Location
IL
shubox-
Normally, 9 fixtures in that size space looks very good. Yes, keep the lamps all the same. The 1' difference in ceiling height isn't significant. Also, the amount of total lumens doesn't matter. Changing the direction of them wont make any noticeable difference.
Good luck,
CD

I truly appreciate the feedback. I have never thought twice about lighting until now.

This room is very important to me, especially now --- my wife left me which ended in divorce (Nov 2019). That said, garage time and my 56 will be my main source of entertainment and stress reduction. Something to do. Something to keep my mind occupied.

After rereading the archived posts about lighting layout (a collection of layouts with recommendations), what I THOUGHT was enough Lumen became questionable. Some of the layouts of similar sized rooms had recommendations of 50,000 to 75,000 lumen, this being considerably more than what I projected. So if my fixture count is reasonable, then my tube selection is not. I'll need to run roughly 5000 lumen per fixture to reach the lower end of that range. My fear with that is hot spots and glare --- to bright of a light with an 8'5" ceiling. An issue with a shiny work surface like my 56?

I wish I had the modeling tools to create the cool 3-d layouts. They are quite cool to look at and really do help visualize the direction --- proposed or otherwise.

Anyway, thank you for taking the time to respond. :)

Happy New Year to you and your family.
 
Last edited:

cybrdyke

Well-known member
Joined
Sep 9, 2014
Messages
3,442
Location
USA
Because of the beam being where it is and because your ceilings are low at 7.5 to 8.5 feet, I see your garage as 2 spaces, one is 21x12 and the other is 21 x 9 (roughly). Plus, you are smartly using task lighting over your bench.
With lower ceilings, you want to keep the lumens per tube down, but you could get away with a 2000 lumen lamp. Normally, I would light the floor evenly by spacing the lights evenly, but in your case, if you want to focus more on lighting the car area, it's OK to move the center row to one side. It wont make that much of a difference. If you work on the car in the center of the garage, then space the lights evenly.
A real working garage would probably have 2 more fixtures in the larger space for a total of 8. If you were to choose to do this, then put in separate switches for different areas. Your relaxing areas will be too bright for chilling out with all those lights on.
FYI-the total lumens figure doesn't mean anything in lighting so dont worry about how many you have.
CD
 

GRB

Well-known member
Joined
May 6, 2014
Messages
828
Location
SoCal
Just go with two 4' fixtures connected over the workbench. You can benefit from the extra light and the small improvement in light distribution and not have to deal with one pair of odd tubes or an odd fixture.
 
OP
S

shubox56

Well-known member
Joined
Dec 27, 2019
Messages
125
Location
IL
Thanks CD! Helpful!

I totally agree, it’s like lighting 2 independent spaces. The ceiling is a pain!

Regarding Spacing: I think I will stay with the staggered off-center lighting. With a low ceiling, I don’t care for lights directly above the roof of the car. I do, however, LOVE light directly above the engine bay.

In the NEW pic, you’ll see that I slightly shifted the car to the right which will represent “work mode”. A solid 4’ on the left side (to storage closets), and roughly 8’ to the rolling cabinets on the right. As you mention, light orientation isn’t going to make a huge difference (if any) in this space, so I changed the lights to run parallel to each other in the back of the garage. This should create even lighting on each side of the car and light above the engine bay. In addition, I changed the task lighting to 2 4’ fixtures per GBR’s recommendation (thanks!). You will also see a new wall mounted task light fixture that straddles the rolling cabinets. The rolling cabinets are the base for a drill press and a large disk sander. During the summer months I can roll the cabinets outside to reduce debris. Otherwise, the wall mounted task light will be helpful when doing small projects inside.

FYI: The round red fixture is a retro gas pump lighting globe that sits atop the garage fridge. This is obviously decorative but does add light in the garage entryway.

Regarding Tube Selection: If this was you, running the MaxLite fixture, you would go with the Greentek GT-T8-15W1200 (or something similar) with an output of 2100 lumen VS the Greentek GT-T8-12W1200 (1680 Lumen)? My eyes are a little sensitive to glare and I’m not sure if these frosted tubes with this fixture will create an issue. Lacking a wrap, will the frosted tubes be enough to cut down on glare? Any opinion? And should I use the same tubes for the task lights?

I hope to create my shopping list today and place my orders. As it stands, I’m still leaning towards the MaxLite LSS2XT8USE4803 and the Greentek tubes. The tubes are roughly $8.50 each, are there as good or better tubes for less? Have a favorite that would work well with this fixute?

I think I’m getting close --- I hope. ;-))
 

Attachments

  • Lighting5.jpg
    Lighting5.jpg
    17.1 KB · Views: 45

cybrdyke

Well-known member
Joined
Sep 9, 2014
Messages
3,442
Location
USA
Thanks CD! Helpful!

I totally agree, it’s like lighting 2 independent spaces. The ceiling is a pain!

Regarding Spacing: I think I will stay with the staggered off-center lighting. With a low ceiling, I don’t care for lights directly above the roof of the car. I do, however, LOVE light directly above the engine bay.

In the NEW pic, you’ll see that I slightly shifted the car to the right which will represent “work mode”. A solid 4’ on the left side (to storage closets), and roughly 8’ to the rolling cabinets on the right. As you mention, light orientation isn’t going to make a huge difference (if any) in this space, so I changed the lights to run parallel to each other in the back of the garage. This should create even lighting on each side of the car and light above the engine bay. In addition, I changed the task lighting to 2 4’ fixtures per GBR’s recommendation (thanks!). You will also see a new wall mounted task light fixture that straddles the rolling cabinets. The rolling cabinets are the base for a drill press and a large disk sander. During the summer months I can roll the cabinets outside to reduce debris. Otherwise, the wall mounted task light will be helpful when doing small projects inside.

FYI: The round red fixture is a retro gas pump lighting globe that sits atop the garage fridge. This is obviously decorative but does add light in the garage entryway.

Regarding Tube Selection: If this was you, running the MaxLite fixture, you would go with the Greentek GT-T8-15W1200 (or something similar) with an output of 2100 lumen VS the Greentek GT-T8-12W1200 (1680 Lumen)? My eyes are a little sensitive to glare and I’m not sure if these frosted tubes with this fixture will create an issue. Lacking a wrap, will the frosted tubes be enough to cut down on glare? Any opinion? And should I use the same tubes for the task lights?

I hope to create my shopping list today and place my orders. As it stands, I’m still leaning towards the MaxLite LSS2XT8USE4803 and the Greentek tubes. The tubes are roughly $8.50 each, are there as good or better tubes for less? Have a favorite that would work well with this fixute?

I think I’m getting close --- I hope. ;-))

I would use the lower lumen tubes based on what you're saying about your dislike of glare and your low ceiling. The frosted tubes are good at diffusing the light and spreading it out, which helps eliminate contrast and shadows. There are hundreds of brands of tubes out there, but only a few manufacturers. I use mostly Universal and Eiko. I shy away from James, TCP, and Feit. I have no experience with Greentek, other than knowing that they exist. Maxlite is fine for the body.
 
OP
S

shubox56

Well-known member
Joined
Dec 27, 2019
Messages
125
Location
IL
I would use the lower lumen tubes based on what you're saying about your dislike of glare and your low ceiling. The frosted tubes are good at diffusing the light and spreading it out, which helps eliminate contrast and shadows. There are hundreds of brands of tubes out there, but only a few manufacturers. I use mostly Universal and Eiko. I shy away from James, TCP, and Feit. I have no experience with Greentek, other than knowing that they exist. Maxlite is fine for the body.

Thanks again for the feedback and suggestions. Even with a lower watt tube such as that mentioned, the total output for the entire space would be over 40,000 lumen which is more than double my makeshift setup. A doubling of light should get the job done while controlling glare. The "Best Fixture Ever" post mentioned this tube, but outside of that I don't know anything about the company or the quality of there products. And like you mention, there's only a few companies making these tubes, so who the heck knows.
 

slimpickins

Well-known member
Joined
Mar 27, 2011
Messages
2,404
Location
Canada
Hi Shubox,
Have a look at this site for some general guidelines for lighting levels. http://sihoenergy.com/index.php?m=content&c=index&a=show&catid=30&id=13 Scroll down to the indoor lighting section. According to this site a mechanical shop should be around 750 lumens or higher (1000-2000) for more detailed work. (Lumens = lux per square meter)

This is all rough calculations without trying to take into account ceiling height etc. but it should give you a good thumb rule to follow to know if you're on track. I think most of the light manufacturers state the lumens at 1 meter distance from the fixture, so the higher your fixture, the more the light spreads out, and lower the lumens, etc.

Your garage is about 41 square meters so at 750 lumens you should have about 30,750 total lumens (lux).
If you went to 75,000 lux total, you'd be at 1,830 lumens.

My shop is about 156 sq m. (41x41 interior) with 13'6" ceilings. I put in 114,000 lux with dimming capability which gives me 733 lumens. I find this is a very good light level for general garage lighting and I doubt I'll be using the dimming much except when in "party" mode (when I finally get my garage finished). I will be adding task lighting over workbenches to raise the level to 1500 lumens or so over those areas where needed.

So in short, I think you're on the right track. :thumbup: My only comment is to consider dimming capability or separate "party" light fixtures :beer: so you won't blind your guests.

Cheers!
 
OP
S

shubox56

Well-known member
Joined
Dec 27, 2019
Messages
125
Location
IL
Hi Shubox,
Have a look at this site for some general guidelines for lighting levels. http://sihoenergy.com/index.php?m=content&c=index&a=show&catid=30&id=13 Scroll down to the indoor lighting section. According to this site a mechanical shop should be around 750 lumens or higher (1000-2000) for more detailed work. (Lumens = lux per square meter)

This is all rough calculations without trying to take into account ceiling height etc. but it should give you a good thumb rule to follow to know if you're on track. I think most of the light manufacturers state the lumens at 1 meter distance from the fixture, so the higher your fixture, the more the light spreads out, and lower the lumens, etc.

Your garage is about 41 square meters so at 750 lumens you should have about 30,750 total lumens (lux).
If you went to 75,000 lux total, you'd be at 1,830 lumens.

My shop is about 156 sq m. (41x41 interior) with 13'6" ceilings. I put in 114,000 lux with dimming capability which gives me 733 lumens. I find this is a very good light level for general garage lighting and I doubt I'll be using the dimming much except when in "party" mode (when I finally get my garage finished). I will be adding task lighting over workbenches to raise the level to 1500 lumens or so over those areas where needed.

So in short, I think you're on the right track. :thumbup: My only comment is to consider dimming capability or separate "party" light fixtures :beer: so you won't blind your guests.

Cheers!

Happy New Year! This is good info --- thank you. I do have interest in a dimmable solution, thanks for the suggestion. That could be a great option based on how I use the room. The space will never be top-shelf due to budget constraints, but will look good from 10', and serve a purpose beyond working on my hotrod. A space big enough to kick back with the boys (and hopefully girls) and play. At those moments, slightly dimming the lights would be nice. :))
 
Last edited:

Ronaldjack

New member
Joined
Dec 30, 2019
Messages
2
Location
us
A good lighting setup might be the difference between a good and comfortable from a bad awkward-looking living room. It is not an easy task to decide and choose the right lighting setup for your interior design, but here in this article you will find some tips on how to get that right...
 
OP
S

shubox56

Well-known member
Joined
Dec 27, 2019
Messages
125
Location
IL
I was about to place an order with ShineRetrofits for the MaxLite fixture previously mentioned, only to find out that it is back ordered --- mid to late Jan (maybe longer). That is not the end of the world for me, I can wait. That said, though, I asked if MaxLite had a reasonable priced wrap fixture, and as luck would have it, they have a NEW wrap which isn't listed on their site (yet) that can be bought for $35.50. That's a decent price and worth consideration. Do you guys think it would be worth spending a little more to get a decent warp fixture considering my staggered ceiling height of 7.5 and 8.5? Will a wrap significantly cut down on glare? Will a wrap help spread the light beam through diffusion (less shadows and such)?
 

cybrdyke

Well-known member
Joined
Sep 9, 2014
Messages
3,442
Location
USA
OP
S

shubox56

Well-known member
Joined
Dec 27, 2019
Messages
125
Location
IL
https://secureservercdn.net/166.62.112.150/6m3.baa.myftpupload.com/wp-content/uploads/2018/09/Surface-Wrap-LED-Tubes.pdf
https://www.eiko.com/sharedassets/productdocuments/L-34%20Tube%20Ready%20Wrap.pdf
Others make them....
Here's one from TechBrite and one from Eiko. The Eiko is a little more shallow than the TechBrite.
The wraps will cost you about 5%-ish in light due to the lens, but the lens does a nice job of spreading out the light even more.

Thanks for the added links. The Eiko is comparable in size and price. I think I will switch gears and go with a wrap. Easier on the eyes and does a better job at spreading the light. That sounds like a winning combo that will be worth an extra $200 (or so) upfront.
 

Platonic Solid

Well-known member
Joined
Nov 29, 2014
Messages
3,587
Location
CT-USA
I wish I had the modeling tools to create the cool 3-d layouts. They are quite cool to look at and really do help visualize the direction --- proposed or otherwise.
Here: Dialux Evo (link). It's free, but has a significant learning curve.

I think I will switch gears and go with a wrap. Easier on the eyes and does a better job at spreading the light. That sounds like a winning combo that will be worth an extra $200 (or so) upfront.
Keep in mind that the Toggled lamp you're considering is already diffused and has very wide distribution. While you may prefer the appearance of the EIKO wrap fixture, the prism lens it comes with was originally designed for fluorescent bulbs. It will not "improve" light distribution of the Toggled lamp. Once the point light source of the LEDs is diffused, to diffuse it further only serves to reduce lumen output. Expect a 10% lumen loss and less even distribution result from the wrap diffuser. Additional diffusing will not reduce shadows (with the caveat that reduced lumen output does reduce shadow contrast). The best way to reduce shadows is to increase fixture quantity.
 
OP
S

shubox56

Well-known member
Joined
Dec 27, 2019
Messages
125
Location
IL
Here: Dialux Evo (link). It's free, but has a significant learning curve.

Keep in mind that the Toggled lamp you're considering is already diffused and has very wide distribution. While you may prefer the appearance of the EIKO wrap fixture, the prism lens it comes with was originally designed for fluorescent bulbs. It will not "improve" light distribution of the Toggled lamp. Once the point light source of the LEDs is diffused, to diffuse it further only serves to reduce lumen output. Expect a 10% lumen loss and less even distribution result from the wrap diffuser. Additional diffusing will not reduce shadows (with the caveat that reduced lumen output does reduce shadow contrast). The best way to reduce shadows is to increase fixture quantity.

Solid info, P-Solid. Thank you! I just assumed that the wrap would spread the light more and be easier on the eyes when looking up. So you think the lumen output of the Toggled tube in a non-wrap fixture will not be to harsh on the eyes with a low ceiling? A pair of these tubes would be 4000 lm per fixture (roughly).
 

Platonic Solid

Well-known member
Joined
Nov 29, 2014
Messages
3,587
Location
CT-USA
Since you'll be taking advantage of the dimming feature of the Toggled lamp, if you find it too bright, you can dim them. Better to have the option of higher lumen output when you want it. Remember that my 21x21x8 test showed that 16 fixtures (32 lamps) achieves 92fc @ 30" workplane. Your plan has 10 fixtures (20 Lamps). 93fc @ 30" workplane is the IES recommendation for mechanical work.
 
OP
S

shubox56

Well-known member
Joined
Dec 27, 2019
Messages
125
Location
IL
Since you'll be taking advantage of the dimming feature of the Toggled lamp, if you find it too bright, you can dim them. Better to have the option of higher lumen output when you want it. Remember that my 21x21x8 test showed that 16 fixtures (32 lamps) achieves 92fc @ 30" workplane. Your plan has 10 fixtures (20 Lamps). 93fc @ 30" workplane is the IES recommendation for mechanical work.

What effect does dimming have on light temperature and CRI? A little more schooling needed. Interesting stuff, actually.
 
To avoid these ads, REGISTER NOW!

Platonic Solid

Well-known member
Joined
Nov 29, 2014
Messages
3,587
Location
CT-USA
Warm is a CCT measurement in degrees kelvin: 2700K and 3000K could be considered warm. 5000K is 5000K regardless of dimming level. Keep in mind that lower illuminance appears more natural at lower CCT levels. Higher illuminance appears more natural at higher CCT. Dimming 5000K to low illuminance levels will appear more blue and feel unnatural. You have to pick which is more important to you: The dimly lit man cave or the brightly lit workshop. If both are equally important, then I'd suggest dropping down to 4000K bulbs. If workshop takes priority then most are happy with 5000K.
 
OP
S

shubox56

Well-known member
Joined
Dec 27, 2019
Messages
125
Location
IL
Warm is a CCT measurement in degrees kelvin: 2700K and 3000K could be considered warm. 5000K is 5000K regardless of dimming level. Keep in mind that lower illuminance appears more natural at lower CCT levels. Higher illuminance appears more natural at higher CCT. Dimming 5000K to low illuminance levels will appear more blue and feel unnatural. You have to pick which is more important to you: The dimly lit man cave or the brightly lit workshop. If both are equally important, then I'd suggest dropping down to 4000K bulbs. If workshop takes priority then most are happy with 5000K.

No question -- shop time is far more important. That said, though, before committing to a CCT level, or Toggled vs whomever, I think I will run a small test. I have an old T8 fixture installed, I'll bypass the ballast and install a pair of 5000K Toggled lamps and a compatible dimmer. It's not going to tell me what the space will feel like when ALL fixtures are installed, but it will give me insight into the Toggled lamp as it relates to beam angle and the feel as the lamps are dimmed. The Toggled lamps are readily available at HD, so it's something I may do today if time allows. It will also give me insight into wrap vs non-wrapped. My old fixture is wrapped, so I can test with and without the wrap.
 

Platonic Solid

Well-known member
Joined
Nov 29, 2014
Messages
3,587
Location
CT-USA
Here are a few CCT controllable LED edge lit flat panel fixtures to make your decision even more complicated. Even without the CCT changing option, flat panels would look very nice.

Commercial Electric 1 ft. x 4 ft. 50W 4000 Lumen Dimmable White Integrated LED Edge-Lit Flat Panel Flush Mount Light with Color Changing CCT
3000K - 4000K - 5000K controlled via flicking wall switch On/Off within 3 seconds. $99.97 (link)
Fixture does not require surface mounting box and dims via line voltage dimming.

Liron LED CCT Tunable Flat Panel, 1x4 Foot, 40 Watt 4000 Lumen, Dimmable $71.98
Spec sheet says nothing about how 3000K - 4000K - 5000K CCT is controlled.
Fixture does not require surface mounting box. Dims via 0-10VDC.

Archipelago LED Wireless Color-Tune, 1x4 Foot Flat Panel, 40 Watt 4800 Lumen, Standard Lens, Dimmable *Case of 4* $71.50 ea. + $22.88 surface mounting kit
Remote or custom wall switch CCT control 3000K - 3500K - 4100K - 5000K.
Fixture requires surface mounting kit. Wireless dimming option.

If interested in the Archipelago, it's worth asking ledlightingwarehouseinc about price and availability of their low glare LPRF14-40-LG fixture.
 

Platonic Solid

Well-known member
Joined
Nov 29, 2014
Messages
3,587
Location
CT-USA
No question -- shop time is far more important. That said, though, before committing to a CCT level, or Toggled vs whomever, I think I will run a small test. I have an old T8 fixture installed, I'll bypass the ballast and install a pair of 5000K Toggled lamps and a compatible dimmer. It's not going to tell me what the space will feel like when ALL fixtures are installed, but it will give me insight into the Toggled lamp as it relates to beam angle and the feel as the lamps are dimmed. The Toggled lamps are readily available at HD, so it's something I may do today if time allows. It will also give me insight into wrap vs non-wrapped. My old fixture is wrapped, so I can test with and without the wrap.
This is really difficult to test based on a single fixture.
 
OP
S

shubox56

Well-known member
Joined
Dec 27, 2019
Messages
125
Location
IL
Here are a few CCT controllable LED edge lit flat panel fixtures to make your decision even more complicated. Even without the CCT changing option, flat panels would look very nice.

Commercial Electric 1 ft. x 4 ft. 50W 4000 Lumen Dimmable White Integrated LED Edge-Lit Flat Panel Flush Mount Light with Color Changing CCT
3000K - 4000K - 5000K controlled via flicking wall switch On/Off within 3 seconds. $99.97 (link)
Fixture does not require surface mounting box and dims via line voltage dimming.

Liron LED CCT Tunable Flat Panel, 1x4 Foot, 40 Watt 4000 Lumen, Dimmable $71.98
Spec sheet says nothing about how 3000K - 4000K - 5000K CCT is controlled.
Fixture does not require surface mounting box. Dims via 0-10VDC.

Archipelago LED Wireless Color-Tune, 1x4 Foot Flat Panel, 40 Watt 4800 Lumen, Standard Lens, Dimmable *Case of 4* $71.50 ea. + $22.88 surface mounting kit
Remote or custom wall switch CCT control 3000K - 3500K - 4100K - 5000K.
Fixture requires surface mounting kit. Wireless dimming option.

If interested in the Archipelago, it's worth asking ledlightingwarehouseinc about price and availability of their low glare LPRF14-40-LG fixture.

Holy Moly --- the list of options grows ever larger. LOL Thanks for the links and info.

Have you experienced any of these options in real life? I have an electrician buddy in CA that dislikes the flat panel fixtures, but that's just the opinion of a single person.

My biggest concern with all of the integrated fixtures is the "throw away" component if a fixture goes bad. If that happens years down the road, it may lead to replacing a unit with something different because the original is discontinued. Yes, it's a shop, but being the **** person that I am, it would bug me.

I'm assuming you are also an early riser like me? I don't sleep much. Up most days by 4:00 am.
 
OP
S

shubox56

Well-known member
Joined
Dec 27, 2019
Messages
125
Location
IL
Here are a few CCT controllable LED edge lit flat panel fixtures to make your decision even more complicated. Even without the CCT changing option, flat panels would look very nice.

Commercial Electric 1 ft. x 4 ft. 50W 4000 Lumen Dimmable White Integrated LED Edge-Lit Flat Panel Flush Mount Light with Color Changing CCT
3000K - 4000K - 5000K controlled via flicking wall switch On/Off within 3 seconds. $99.97 (link)
Fixture does not require surface mounting box and dims via line voltage dimming.

Liron LED CCT Tunable Flat Panel, 1x4 Foot, 40 Watt 4000 Lumen, Dimmable $71.98
Spec sheet says nothing about how 3000K - 4000K - 5000K CCT is controlled.
Fixture does not require surface mounting box. Dims via 0-10VDC.

Archipelago LED Wireless Color-Tune, 1x4 Foot Flat Panel, 40 Watt 4800 Lumen, Standard Lens, Dimmable *Case of 4* $71.50 ea. + $22.88 surface mounting kit
Remote or custom wall switch CCT control 3000K - 3500K - 4100K - 5000K.
Fixture requires surface mounting kit. Wireless dimming option.

If interested in the Archipelago, it's worth asking ledlightingwarehouseinc about price and availability of their low glare LPRF14-40-LG fixture.

Hey, here's another thought. If you look at my crude room layout design pic --- "Lighting5" --- you'll notice that the front of the garage is a lower 7.5' ceiling with a 4' X 16' (roughly) recess (there's a picture above of the recess), maybe it would be interesting to use the dimmable multi-CCT flat panels in the recess and a standard surface mount fixture (Maxlite) and tube in the larger portion of the garage. And a Maxlite fixture above the 8' workbench. When in party mode, I can turn off the Maxlite fixtures and dim (and change the CCT) the fixtures in the recess. The recess will be on a separate switch. Sound like an interesting solution?
 
Last edited:
OP
S

shubox56

Well-known member
Joined
Dec 27, 2019
Messages
125
Location
IL
I'm liking this idea, at least in my head. Though it will add to the cost, I could see adding 3 2 X 4 low profile flat panels in the recess which would look great and perhaps solve the dual purpose of this space.
 

Attachments

  • Cieling.jpg
    Cieling.jpg
    81.5 KB · Views: 31

Platonic Solid

Well-known member
Joined
Nov 29, 2014
Messages
3,587
Location
CT-USA
We have flat panels in the lab and I really like them. Yes, they are of the budget variety with no glare reduction which doesn't bother me. I like the look of the extremely even solid panel of light. There are glare reduction options (at a cost) that appeal to a larger audience. Unfortunately you'll have to judge that one for yourself. You could buy one of the Commercial Electric ones and test it. HD is really good for accepting returns if you don't like it.

No easy answer for the integrated "throw away" issue, other than suggest you buy 1 extra fixture. Most budget fixtures are rated at 50,000 hr. life = 24 years @ 40 hrs./wk.

Higher quality fixtures can be purchased with estimated LED life (L70) of 180,000 hrs and more. For those fixtures it's best to have an independent replaceable driver. The Commercial Electric and Liron have integral non-replaceable drivers. The Archipelago has an L70 of 75,000 Hrs. and replaceable drivers (hence the need for the surface mounting box). Take notice that the Archipelago has better efficiency than the other two. Better Lumens per watt (L/W) efficiency = less heat = longer LED life.

Yes, I'm usually up early. Not quite 4:00 AM early though.
 
Last edited:

Platonic Solid

Well-known member
Joined
Nov 29, 2014
Messages
3,587
Location
CT-USA
Hey, here's another thought. If you look at my crude room layout design pic --- "Lighting5" --- you'll notice that the front of the garage is a lower 7.5' ceiling with a 4' X 16' (roughly) recess (there's a picture above of the recess), maybe it would be interesting to use the dimmable multi-CCT flat panels in the recess and a standard surface mount fixture (Maxlite) and tube in the larger portion of the garage. And a Maxlite fixture above the 8' workbench. When in party mode, I can turn off the Maxlite fixtures and dim (and change the CCT) the fixtures in the recess. The recess will be on a separate switch. Sound like an interesting solution?
Yes, the recess opens up some creative lighting options. From your previously expressed desire to avoid the minor additional wiring for 0-10VDC dimming, I didn't think you'd be up for the more involved multiple switching route. FYI: 0-10VDC wires have no risk of injury, thus can be routed anyway you please = no conduit required.

The best way to test concepts like this is to model your space in Dialux.

Here's a crude dimming option using 2-Lamp strip lights: Wire the left lamp in each strip light to switch 1 and the right lamp to switch 2. Or wire 7 of the bulbs to switch 1 and the remaining 13 to switch 2 giving you 35% - 65% - 100% step dimming.
 
OP
S

shubox56

Well-known member
Joined
Dec 27, 2019
Messages
125
Location
IL
Yes, the recess opens up some creative lighting options. From your previously expressed desire to avoid the minor additional wiring for 0-10VDC dimming, I didn't think you'd be up for the more involved multiple switching route. FYI: 0-10VDC wires have no risk of injury, thus can be routed anyway you please = no conduit required.

The best way to test concepts like this is to model your space in Dialux.

Here's a crude dimming option using 2-Lamp strip lights: Wire the left lamp in each strip light to switch 1 and the right lamp to switch 2. Or wire 7 of the bulbs to switch 1 and the remaining 13 to switch 2 giving you 35% - 65% - 100% step dimming.

Good stuff. I will noodle these ideas. I don't know anything about Dialux, and I'm sure that the learning curve would be steep. By the time I figured out the software, I could have the fixtures installed. Well, maybe not! ;-)) It would be cool to see a mock-up like that on paper, though.

For the sake of K.I.S.S, I thing I will key off of what already exists. I have 2 switches currently, one to the lights above the workbench, and another that drives the lighting in the back of the garage. So I think I will stay with that setup. The only real change would be to add a dimmer to ONE of the switches (the switch that drives the workbench light). That switch will no longer control the workbench lighting, but rather, the recessed lighting.
 

Platonic Solid

Well-known member
Joined
Nov 29, 2014
Messages
3,587
Location
CT-USA
For the sake of K.I.S.S, I thing I will key off of what already exists. I have 2 switches currently, one to the lights above the workbench, and another that drives the lighting in the back of the garage. So I think I will stay with that setup. The only real change would be to add a dimmer to ONE of the switches (the switch that drives the workbench light). That switch will no longer control the workbench lighting, but rather, the recessed lighting.
That sounds workable without too much wiring. Will you be using surface conduit?
 
OP
S

shubox56

Well-known member
Joined
Dec 27, 2019
Messages
125
Location
IL
Thus any edge lit flat panel would require a surface mounting kit anyway.

Agreed. I will check out the fixture you mentioned that required the kit. Maybe they have a 2 X 4 bigger brother? If not, a 1 X 4 works too.
 

slimpickins

Well-known member
Joined
Mar 27, 2011
Messages
2,404
Location
Canada
Hi Shubox,
How's the lighting installation going? Anything to report? How about some pics?
Cheers!
 
OP
S

shubox56

Well-known member
Joined
Dec 27, 2019
Messages
125
Location
IL
Hi Shubox,
How's the lighting installation going? Anything to report? How about some pics?
Cheers!

Sorry for the LONG delay. Health issues slowed progress. Though still fighting health demands, I'm slowly finishing the garage which includes lighting.

I chose vapor tight lighting that will be surface mounted. I just finished installing the conduit and hired an electrician to complete the wiring. I added 2 20a circuits to the garage breaker panel (independent circuit in each bay) with all the lights running off the original 15a circuit. I took the high road and pulled a building permit -- inspection passed, so I'm proceeding with the project.

I'm currently painting the garage ceiling, so no pictures to share YET, but soon. :)
 
OP
S

shubox56

Well-known member
Joined
Dec 27, 2019
Messages
125
Location
IL
Sick of repairing drywall and sanding. Painting has finally stated on the ceiling.
 

Attachments

  • ShopRehab1.jpg
    ShopRehab1.jpg
    148.3 KB · Views: 30
To avoid these ads, REGISTER NOW!
Top Bottom