To avoid these ads, REGISTER NOW!

Lista bench design project.

Dick in Wisconsin

Well-known member
Joined
Mar 3, 2012
Messages
3,048
Location
Shawano, Wisconsin
akdiesel;2641012 [B said:
Wallcontroll Peg Board[/B]

The steel peg board is from Wallcontrol.

I've been considering steel peg board for my garage and shop.

You have the round holes and the slots. Do you use the slots often? Are they worth the extra cost?

Nice job. Very nice.
 
To avoid these ads, REGISTER NOW!
OP
A

akdiesel

Well-known member
Joined
Aug 8, 2008
Messages
2,617
Location
Wasilla, AK
shopnut

Thank you. Slowly but surely. I've had to ask the wife twice to fasten the two 20' struts to the ceiling, other than that it is a one person show. I like to work at my own pace.
Some of the pieces are unpainted so it looks like a frenkinstein scene, not to mention welding slag, grinding dust and tools all over.

**** in Wisconsin

Thank you. I have some of the standard round pegs I had for the old white board but have yet to use them if I even do. I really like the slot system in that it locks into place on its own very well. The tool holders a nice but they are limited. I am only keeping the most common hand tools and larger items out on the board and keep the rest in the drawers.
Long story short is I am very happy with the slotted pegs. They have given me the look I wanted.
 

Al Bundy

Well-known member
Joined
Aug 1, 2011
Messages
2,026
Location
Upstate NY
Joe

I love working with this stuff. Lots of possibilities.
As for what I plan on lifting with the trolley, the table saw, portable air compressor, etc..., which I plan on storing in the future Lista cabinets (that have the slide trays) where the white peg board and wood bench are currently. But another reason for the trolley track is for a library ladder I am building with strut. I have the ladder built now and tried it out last night but was disappointed when it would not roll correctly due to twisting the wheels. I worked on a little fis to help keep thing straight and true with some Teflon blocks I had laying around. Much better but still some tweaking to do.
The upper Lista cabinets are held in place with their upper cabinet supports. They were easy to install and line all three up straight.
I will be using the 7/8" Unistrut to hold the future cabinets against the wall and from tipping when putting heavy items in them, just like I did with the bench.

Please post some pictures of this when you get it perfected. I've been considering it myself since my upper cabinets go all the way up to the 11' ceiling.
 
OP
A

akdiesel

Well-known member
Joined
Aug 8, 2008
Messages
2,617
Location
Wasilla, AK
Al

I will get some pics of it all cleaned up.

Steevo

Thank you. Your bench build and length inspired me. I like the function of it and the space.
 

Trey T

Well-known member
Joined
Aug 3, 2011
Messages
3,749
Location
Houston, TX
Good stuff. Looking forward to build me a long 10' bench in my garage.

That unitstrut for leg is excellent idea because I want power and air just like you go.

I wonder where I can get those plastic cover and outlet for the unistrut legs. Does HD or Lowes have them?
 
OP
A

akdiesel

Well-known member
Joined
Aug 8, 2008
Messages
2,617
Location
Wasilla, AK
Trey

Thank you. The only place I could find the Unistrut outlets was at Lord and Sons out of California. I could have got them from our local Unistrut supplier but their cost (for what ever reason) is about double. I did have to use the local supplier for the plastic cap strips and those are not cheap. Lowes and Home Depot do not sell the cap strips but Macmaster Carr does in a black color and those are less expensive then the grey color ones I got (found out too late, but I like the color scheme).
 

Trey T

Well-known member
Joined
Aug 3, 2011
Messages
3,749
Location
Houston, TX
akdiesel,

Just checked out McMaster-Carr .... you're going to inspire a lot people with the unistrut concept because you can get the channel at local home improvement and accessories at McMaster-Carr.

Awesome!
 
OP
A

akdiesel

Well-known member
Joined
Aug 8, 2008
Messages
2,617
Location
Wasilla, AK
Jib Crane

Finally got one of the jib cranes finished and installed. Still need to add an additional strut to add for support at the top plate to give me a 5 point harness system at the ceiling. The load is not so much pulling ON the ceiling but rather pulling against the ceiling. I have strut from one end to the other for support points for the trolley and I also have strut support vertical from the concrete floor to the ceiling, I just need to add the additional strut from the wall to the upper plate.
Well for a one person show it was quite a task to get the crane up there and fastened in place.
The spindle is 1 1/2" sch 80 steel pipe that is approx. 45" tall. I had to make room to clear the over head door track so I was only able to install the 1/2" x 1/4" support strap at 3'6" on the double strut track. I wanted to make it to at least 4' but this will work.
The double Unistrut is 7'2" long so with an angle strut used on the end to stop the trolley from coming out the end it gives me 7' total length.
I used an additional 18" x 3" x 1/8" steel plate to help with supporting the double strut on the spindle.
Each end has one 1/2" lock nut on the inside and one regular 1/2" nut on the outside of a 1/2" plate that is welded on the ends. I then ground down the outer nuts down a 1/16" of an inch lower then the thrust bearings and the washers for them. The nuts also aid in keeping the thrust bearings and washers centered since they have a 1" inside diameter. The top and bottom are held in place with 1/2" grade 8 bolts. The top plate and bottom plate are the same strut fittings (P1950) but I welded an additional (P4377) to help with support loads. I am planning on replacing the P4377 with P1377 which is the same size as the 1 5/8" strut instead of the 7/8" strut the P4377 is.
The double strut was found on Craigslist and was being used to store material. It has a green powder coating but will be powder coated black like the rest of the strut materials. The double strut can hand a uniformed load of up to 1370 lbs with a deflection of .39 inches. I am hoping for a 500 lb load capacity. I tested it out with two different loads today. One was the dewalt table saw. I assume it weighs in around 50 lbs. and then I tried my stainless mobile fuel tank I need to load into my truck to fill up every once in a while. I have a digital weight indicator that showed it weighing in at 190 lbs. The tank is mostly empty right now and it can hold approx 40 gallons so full the load should be in the 450 lbs range +/- 20 lbs.
I do alot of things in the shop on my own so these additional creations will help me work better since I am not getting any younger.
 

Attachments

  • Rob's Ipad 051.jpg
    Rob's Ipad 051.jpg
    143.8 KB · Views: 352
  • Rob's Ipad 061.jpg
    Rob's Ipad 061.jpg
    132 KB · Views: 3,253
  • Rob's Ipad 060.jpg
    Rob's Ipad 060.jpg
    41.8 KB · Views: 360
  • Rob's Ipad 057.jpg
    Rob's Ipad 057.jpg
    140.1 KB · Views: 414
  • Rob's Ipad 055.jpg
    Rob's Ipad 055.jpg
    143.4 KB · Views: 372
  • Rob's Ipad 054.jpg
    Rob's Ipad 054.jpg
    146.8 KB · Views: 421
  • Rob's Ipad 052.jpg
    Rob's Ipad 052.jpg
    144.4 KB · Views: 412

machine_punk

Well-known member
Joined
May 14, 2011
Messages
2,540
Location
Napa Valley, California
That is a very nice implementation...I've always wanted a jib crane in the garage, I was planning on putting strut / trolley tracks in my garage, but it never even occurred to me to make the jib out of the strut.

Hmmm...
 
OP
A

akdiesel

Well-known member
Joined
Aug 8, 2008
Messages
2,617
Location
Wasilla, AK
Center Drawer

I finally got the center drawer to match the rest of the cabinet done today. I found some 3" x 2" angle bracket that is used for garage door opener frame work that has various holes for different attachment points. I had to file out some a couple of the holes to accommodate the Lista hooks but it hold great. I also added a screw to the front edge to help keep it from lifting up.
The drawer is the 2" 28" x 28" drawer. I had to order the side brackets extra so it would fit correctly. The height is just right to be able to sit on the stool and work comfortably at the bench.
 

Attachments

  • Rob's Ipad 086.jpg
    Rob's Ipad 086.jpg
    146.1 KB · Views: 485
  • Rob's Ipad 084.jpg
    Rob's Ipad 084.jpg
    152.6 KB · Views: 367
  • Rob's Ipad 085.jpg
    Rob's Ipad 085.jpg
    145.5 KB · Views: 241
  • Rob's Ipad 082.jpg
    Rob's Ipad 082.jpg
    118.4 KB · Views: 197
  • Rob's Ipad 081.jpg
    Rob's Ipad 081.jpg
    118.7 KB · Views: 196
  • Rob's Ipad 079.jpg
    Rob's Ipad 079.jpg
    143.7 KB · Views: 196
  • Rob's Ipad 078.jpg
    Rob's Ipad 078.jpg
    167.1 KB · Views: 202
OP
A

akdiesel

Well-known member
Joined
Aug 8, 2008
Messages
2,617
Location
Wasilla, AK
Tape Measure

Some small but useful measuring guides mounted on the bench. I found this on Amazon. The tape was a 12 foot self-adhesive tape by Kreg.
The tape is 1/2" wide and sticks to the surface very well. It can be cut very easy for a custom length.
I think I will order another one and simply make it the full length of the bench to make measuring easier for cables, wood, etc...
 

Attachments

  • IMG_1911[1].jpg
    IMG_1911[1].jpg
    140.3 KB · Views: 245
  • IMG_1912[1].jpg
    IMG_1912[1].jpg
    142.6 KB · Views: 194

shopnut

Well-known member
Joined
Feb 22, 2006
Messages
4,237
Location
Florida
Very nice akdiesel! Where is the vise going eventually? I would find it difficult to drill through that nice countertop :)
 
OP
A

akdiesel

Well-known member
Joined
Aug 8, 2008
Messages
2,617
Location
Wasilla, AK
shopnut

Thank you. I have a plan that will incorporate the corner brackets on the sides of the bench next to the front outlets. I have to weld a receiver that will bolt to the center hole and be able to spin so that the vice can sit up or rotate down to the front and lock into place on the Unistrut.
 

Attachments

  • DSC_2143.jpg
    DSC_2143.jpg
    150.5 KB · Views: 193

don long

Well-known member
Joined
Mar 31, 2012
Messages
8,841
Location
southern california
akdiesel
Just read thru the thread. "WOW"
nice work on the shop.
makes me want to scrap all my boxes and benches
and start over again. (allmost)
it sure looks great and I love the swinging arm.
should make working alone a lot easier.
Thanks for sharing this super project.
Stay Warm.
Don
 
OP
A

akdiesel

Well-known member
Joined
Aug 8, 2008
Messages
2,617
Location
Wasilla, AK
don

Thank you. Your bench, rather your shop is a work of art and something we all admire. This bench is just another version of what I wanted. There are lots of very creative and highly wanted shops on this site.
Mother Nature has decided to give us a dry cold winter start. I want snow.
 

shopnut

Well-known member
Joined
Feb 22, 2006
Messages
4,237
Location
Florida
I missed the reply about the jib crane until now - I was a bit preoccupied with something when you posted it as you will soon find out in my build thread. Anyways, allow me to make a couple comments.

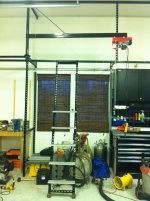
First of all, it looks very functional and I’m sure you will get a lot of use out of it.

I’m putting my engineer hat on now so God help us :eyecrazy:
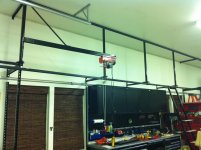
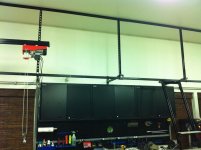
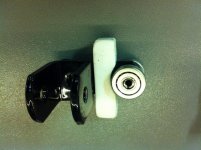
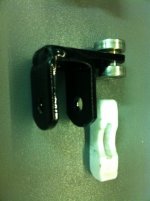
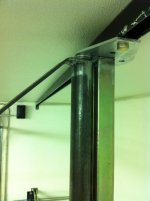
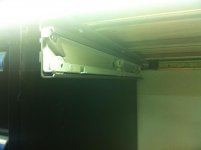
. Using your numbers of a 84” beam, tension strap connecting to beam at 42” out and maybe running up at what appears to be a 45 degree angle, I calculate 282# of load in the tension strap for every 100# of load out at the end of the jib beam. I’m just guessing on the strap angle and I’m leery about that 42” number since it doesn’t appear to attach to the beam at the midpoint - it looks closer to the column in the pictures. That would push that 2.82:1 ratio even higher. And the tension strap looks bigger than 1/2 by 1/4 - maybe 1-1/2 x 1/4?

If trying to maximize the lift capacity, I would suggest adding a gusset were the tension bar welds to the top of the vertical column. If that bent strap straightens out under extreme loading, the beam will droop and it's all downhill from there (literally :)).

attachment.php


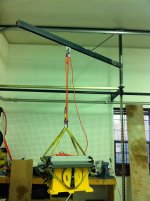
The other thing I would consider is some type of limiter in the track when you are lifting something really heavy and don’t need to roll it out all the way to the end. If the jib beam starts deflecting more than you expect, it could get away from you and roll uncontrollable downhill. I wouldn’t suggest using the standard Unistrut nuts since they bite into the channel right on the same surface the wheels roll on, but I'm sure you can come up with something easyto lock down when needed.

Since you have that nice digital scale, it would be interesting to see some numbers from a quick load/deflection test. Put a couple different load out on the beam at a known distance and measure the deflection at the end of the beam. It will help you predict deflections at any given load, if you are curious.

At the end of the day, only you really know what this thing is capable of and what you feel safe using it for. Use your best judgment and be safe :thumbup:
 
OP
A

akdiesel

Well-known member
Joined
Aug 8, 2008
Messages
2,617
Location
Wasilla, AK
shopnut

This is exactly what I need or needed. Thank you for your information.
I have to admit it was your jib crane that got me wanting one but I don't have the support beam and limited with obstacles so custom was the way I went.
I have the items getting powder coated right now so mods to the crane would effect that but safety is a bigger concern then looks, so if change is needed I will do it.
The tension strap is 1 1/2" x 1/4" and I was only able to get to approx 36" due to the garage door track.
I have a 3" strap that I wrapped around the turret and welded to the strut out approx 8" each side for additional stress support and attachment.
I will be using an angle piece to stop loads at the end as well.
 
To avoid these ads, REGISTER NOW!

BigGMC

Well-known member
Joined
Jun 6, 2012
Messages
278
Location
Land of Confusion - NY
akdiesel -
Very nice! your creations are awesome..... once moved into my new garage I plan on fabbing a lifting tray storage rack like you've built.
Anyway, looking over your pics and reading shopnut's input, I'm wondering if you have considered the amount of extra force being exerted on the crane as you pull down on the block/tackle. The digital scale is reading the wieght of the load, but to pick the load your downward force on the rope is applieing a given amount of additional load on the crane assembly.
 
OP
A

akdiesel

Well-known member
Joined
Aug 8, 2008
Messages
2,617
Location
Wasilla, AK
shopnut

No problem. Your information is still valuable. I'm not an engineer but I tend to over engineer things. I guess that is good if your funds can afford. I sometimes get tunnel vision on projects and forget the budget.

BigGMC

Thank you.
I thought about that. That was the only way I had to pull items up so as I did it I tried as much as possible to pull smooth and steady withou jerking.
I ordered one of those Northern tools 550 lb single line hoist for this crane and will make an attachment system for it to hang centrally on the trolley.
 

24hours

Member
Joined
Jan 21, 2012
Messages
15
Outstanding progress thus far. By chance are your initials C.A. and do you own a Unimog? Your attention to detail, use of high quality materials etc reminds me of someone up there.
 
OP
A

akdiesel

Well-known member
Joined
Aug 8, 2008
Messages
2,617
Location
Wasilla, AK
Jib Crane

Update on the Jib Crane process. The pieces have been powder coated by a local shop with Gloss black just like the rest of the frame work around the bench. I painted some of the longer pieces with gloss enamel paint, but the pieces I had powder coated will be getting more use so I opted for a more durable product. I need to touch up some of the paint I did on the longer pieces. The crane works very well. I lifted a 2001 Yamaha MM 700 (the pig) and it worked very well. The crane pivots well being on upper and lower pivot points with thrust bearings and bearing washers.
I know there are better ways to pivot a jib crane but I opted to use 9/16" bolts on the upper and lower sections. The shear strength for the bolt exceeds the lifting capacity (500 lbs) I have in the design. There were some sounds during initial testings but after all the parts were in place no sounds of wood creaking or sheetrock cracking were displayed, even with the crane used in all ranges.
I still need to install stops to keep the crane from impacting the other frame work. I also need to build the other crane for the far end of the bench area. This crane will be an identical one like the one in use now.

The hoist itself is powered by a Northern Tools 550 lb single line lift capacity.
I opted to utilize the 2:1 function since the speed at a single line is too fast when lowering objects and slams them down. I am thinking of rewiring it with a restate for speed control. I also need to rewire the the outlet plug to extend the plug reach to the lower bar that goes back to the wall. I am installing another Unistrut plug on the upper and lower strut piece since the back wall with the outlet will be covered with cabinets.
The crane roles on two Unistrut trolley wheel brackets and a fabricated bracket to join the two trolley wheels.
For those that have not had any interaction with these hoists, they appear to be well engineered for the money. Longevity will have to be determined, but it has a brake and a two block incorporated into it along with a rocker switch for up and down travel. The unit is powered off of 110v electrical outlet with a ground wire. These can come in various lifting capacities with a reasonable price range.
 

Attachments

  • IMG_2046.jpg
    IMG_2046.jpg
    145.5 KB · Views: 309
  • IMG_2044.jpg
    IMG_2044.jpg
    137.8 KB · Views: 253
  • IMG_1999.jpg
    IMG_1999.jpg
    127.9 KB · Views: 298
OP
A

akdiesel

Well-known member
Joined
Aug 8, 2008
Messages
2,617
Location
Wasilla, AK
Library Ladder

Please disregard the mess.
This ladder was brought to my attention by a member on this forum. Thanks to Shopnut for the inspiration.
The ladder is built mainly out of Unistrut. I utilized four of my old roller blade wheels for the lower section to role on the floor. I still need to install a one more level of tread but I ran out of angles. The height of the #5 tread allows me to almost reach the top of the Unistrut that is attached to the ceiling.
I had to tighten up on the bolts that hold the roller blade wheels due to too much free spin when walking up the ladder. It almost rolled out from beneath me once. More tension keeps them from kicking out from below.
The treads are from McMaster Carr and are out of 1/4" aluminum with a nice tread pattern. They came in 3' length but I cut them to my size of approx 18" wide giving me a total of 6 treads. They are also about 4" deep for a comfortable stance. I like the feel and look of them but I am planning on upgrading to stainless and utilizing my new dimple dies I got from NASTYZEN and placing the dimples up for a traction purpose. Five project at a time though.
The ladder is held in place with two Unistrut trolley sincle wheels. One on eash upper corner. I also incorporated some Teflon pads to help keep the wheels on track. This seem to have helped but some times I have to pull the ladder away from the wall to get it back on track. I ASSUME the ladder can hold approx 500 lbs since it is out of steel rather than aluminum or fiberglass like most ladders and the following the spec charts on Unistrut website. I feel the limiting factor may be the roller blade wheels, but we will see. Trial and error.
Along with the trolley wheels is a hinge on both corners. This allows for height differences on the floor and to be able to remove the ladder when needed or fold out of the way.
The ladder follows along the Unistrut channel that follows the depth of the shop and the turns to go along a shelving unit that hold long items. I currently have to climb the shelving unit to get stuff from the top level, but with the ladder it can be done more safely since I am getting older and my kids need to have a safe culture in the shop as well.
the Modine heater need to be raised approx 5" to allow for the curved Unistrut piece to be installed since it will go just below the heater. I have not been able to find an easy way to raise the heater with out having to go into the attic area yet.
 

Attachments

  • IMG_1999.jpg
    IMG_1999.jpg
    127.9 KB · Views: 256
  • IMG_2001.jpg
    IMG_2001.jpg
    142.9 KB · Views: 338
  • IMG_2047.jpg
    IMG_2047.jpg
    122.9 KB · Views: 272

shopnut

Well-known member
Joined
Feb 22, 2006
Messages
4,237
Location
Florida
Library Ladder
This ladder was brought to my attention by a member on this forum. Thanks to Shopnut for the inspiration.
Thank you for the mention. I guess I now have to actually finish mine one of these days! :eek:

Did the ladder treads come with brackets to mount directly to the Unistrut? Or did you fab something up? Regardless, they're pretty cool and I'd say they will do just fine until the SS versions are made.

I'm assuming the teflon pads you mentioned were to keep the wheels from swinging in the strut, correct? I would like to see a close-up of that if you get the chance to snap a shot sometime.

One thing to keep in mind when you get to the curved part of the track - I suspect the lower ladder wheels may try to bind or skid a little as it makes the corner (bottom trying to pivot more or less on a single point, the center of the rail radius). Probably no big deal, since you can just pick the ladder up a bit around the corner, but I bet you can come up with some slick way to deal with it if you give it some thought.

Fantastic job on the crane and ladder. Having them will definitely make jobs easier and safer for all involved. :thumbup:
 

ket-tek

Well-known member
Joined
Jan 28, 2009
Messages
1,289
Aww yeah this build is very nice. You guys are getting me motivated again, haha!
 
OP
A

akdiesel

Well-known member
Joined
Aug 8, 2008
Messages
2,617
Location
Wasilla, AK
shopnut

Thanks for the words, support, and your motivation. You are correct about the Teflon, it is to reduce binding inside of the track. Some of that may contributed to the paint used. If it was powder coated it would allow for a more smother glide but these tracks are 20' long and they cant get that length in their oven plus the extra cost was not justified. I can get some close up pics of the wheel setup with the Teflon installed, but it will be a little bit. Still not sure if the pads will bind on the curved section yet.
The treads came with machine screws. I had to bend the Unistrut angle pieces slightly to get my 4:1 ratio (same as an A frame ladder) then welded them to the frame work. To give it a more finished look I will add some bolts to mimic the other two brackets that will be later installed to hold them in place for the sixth tread. I will also add some plastic covers like the ones on the bench to close the frame work up.

ket-tek

Thank you. Just saw your bench project and it looks great.
 

BigGMC

Well-known member
Joined
Jun 6, 2012
Messages
278
Location
Land of Confusion - NY
They make curved 'strut? damn!
looks great! I thought the jib crane was going to roll the length of the storage area..... or did I misread an earlier post?
 
OP
A

akdiesel

Well-known member
Joined
Aug 8, 2008
Messages
2,617
Location
Wasilla, AK
BigGMC

The jib cranes will be in a permanent location on each corner of the shop. The strut channel will be used for the library ladder and the trolley system to lift heavy items and transport from one end of the shop to the other. The jib cranes will be used to lift my fuel tank in and out of the truck and also to lift snowmachines etc...
 
Last edited:
OP
A

akdiesel

Well-known member
Joined
Aug 8, 2008
Messages
2,617
Location
Wasilla, AK
library ladder bracket

This is a pic and description of the bracket I had to fabricate for the rolling ladder. The ladder would bind when pushed on the side or pulled from the side to put into another location. The wheels would start to twist inside the channel instantly. So I came up with the idea to use some Teflon I had laying around to aid in keeping the wheels straigh.
This addition helped the movement of the ladder considerably.

shopnut

Sorry it took so long to get this picture for you. I finally got my Modine heater raised up to clear the Unistrut track and also have most of the track positioned now. I tested the ladder in the curved section and it works fairly well dispite some obsticles and what nots in the way.
The Teflon pieces are about 2 1/2" long with a slight groove cut into it to clear the bearings. It friction fits over the flat bar and stays put just below the bearings. I puta slight angled edge on both ends to help with any variations in the track.
 

Attachments

  • image.jpg
    image.jpg
    144.4 KB · Views: 130
Last edited:
To avoid these ads, REGISTER NOW!
Top Bottom