To avoid these ads, REGISTER NOW!

Lista bench design project.

OP
A

akdiesel

Well-known member
Joined
Aug 8, 2008
Messages
2,617
Location
Wasilla, AK
Library Ladder / Trolley Track

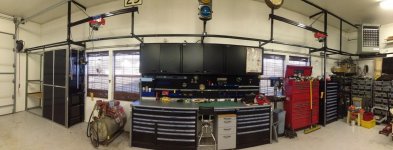
So I finally got the Unistrut track installed and functional.
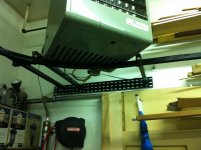
I had to raise the massive Modiine heater approx 5 inches up to clear the curned part of the track. That consisted of me and my wife balancing the heater on the 8' A frame ladder with wood cribbing, then strapping it with a utility strap to lift it up. Or going into the attic which I did not want to do. The curved track makes the access panel to the heater unaccessable so I cut a 1 1/2" access hole for the pilot light. The Unistrut framing in the corner was a little more involved since the wall studs did not get the memo as to where they needed to be.
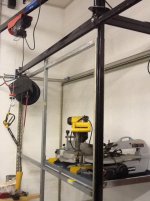
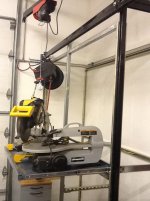
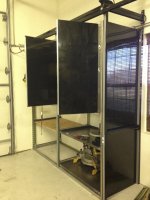
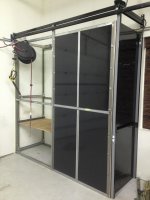
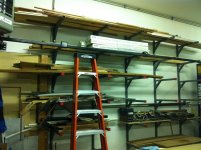
The Library Ladder tracks well, but needs a little adjustment here and there when rolling probably due to the bottom wheels out of alignment. Nothing to major. It is slightly snug at the support brackets also, but I can sand them down slightly to travel smoother latter on. You can also see in one of the pictures there is a three hole bracket on the track. I have one on each side of the ladder so I can transport heavy loads when needed.
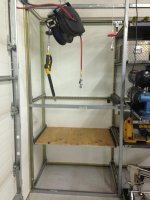
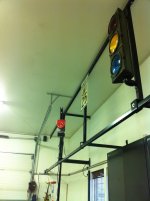
The wires for the heater were simply hanging in air when I purchased the place so now I have a frame work to support the wiring and protect it.
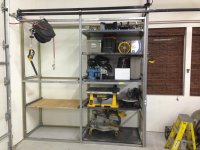
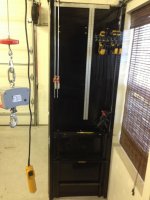
The last picture is of the second location for the other jib crane I have being powder coated now. It will also have a 500# capacity like the first one.
 

Attachments

  • IMG_2089.jpg
    IMG_2089.jpg
    143.9 KB · Views: 179
  • IMG_2086.jpg
    IMG_2086.jpg
    132.1 KB · Views: 153
  • IMG_2088.jpg
    IMG_2088.jpg
    148.8 KB · Views: 150
To avoid these ads, REGISTER NOW!
OP
A

akdiesel

Well-known member
Joined
Aug 8, 2008
Messages
2,617
Location
Wasilla, AK
Long Stock brackets and Unistrut Extension

The is the end of the Unistrut track. For 6 years I have scaled the grey bracket, attached to the wall holding long stock, to reach the top level. I finally raised the brackets up approx 1 foot to match the level of the Unistrut track. This allowed me to re-install the lag bolts where some have started to pull out. I made sure they all were into the studs. Previous owner did not.
there are five brackets and they skip a stud each so the so the length of the brackets ends up approx 128" long.
I had to lift them with some of the stock still in place since I have manged to loose space in this shop. Amazing huh. One piece of wood happened to kiss me on the ear. I let it know how much I loved it.
I used Unistrut Trolley brackets P1834 skinny and P1834A wide were attached to some 1 1/4" square tube with flat brackets P1034 with a 7/16" nut welded on the inside to lock the trolley bracket in place. The end piece is a temp until I get one more trolley bracket (skinny) to cap it off. The 1 1/4" square tube fits nicely into the 1 1/2" grey bracket. I then drilled and installed some 3/8" rivet nuts (I think that is the name of them) to hold the 1 1/4" tube in place.
I forgot to mention in the previous post, the curve strut section was purchased from McMaster Carr. They have various radius sizes to order for a curved track system, and it comes in 12 gauge for the strength as long as the strut is supported correctly. So one could track 600 pounds if needed with a safety factor.
 

Attachments

  • IMG_2090.jpg
    IMG_2090.jpg
    142.7 KB · Views: 301
  • IMG_2084.jpg
    IMG_2084.jpg
    130.7 KB · Views: 241
OP
A

akdiesel

Well-known member
Joined
Aug 8, 2008
Messages
2,617
Location
Wasilla, AK
Additional Goodies

The wife was on her rounds stumbled across some traffic items. She sent me a picture of them and asked if I was interested and I quickly said He!! Yeah.
I've been wanting these for a while after looking at some of the shops on here.
I figured they would go perfectly on the strut frame I installed for the trolley system.
I wired it to my cabinet led undermount lights and will install an plug in adapter so when the wife wants me to come in for dinner she can wirelessly flash the red light to stop my work.
I was also able to go back and pick up some street signs. I have not installed them yet though.
We stumbled across an old tin Texaco fuel truck and trailer (about 2 1/2 feet long) in an antique shop and it appeared to be in great shape, but the price was $450. I am not sure of the correct cost of those but I walked away from that one.
 

Attachments

  • IMG_2091.jpg
    IMG_2091.jpg
    138.6 KB · Views: 213
  • IMG_2092.jpg
    IMG_2092.jpg
    132.8 KB · Views: 158

shopnut

Well-known member
Joined
Feb 22, 2006
Messages
4,237
Location
Florida
I wired it to my cabinet led undermount lights and will install an plug in adapter so when the wife wants me to come in for dinner she can wirelessly flash the red light to stop my work.
Cool - No one likes to be late for dinner! Just don't let her get carried away with that remote :)

Thanks for the close-up of the roller slides - pretty slick!

Looking good :thumbup:
 
OP
A

akdiesel

Well-known member
Joined
Aug 8, 2008
Messages
2,617
Location
Wasilla, AK
shopnut

Thanks. I try to keep good relations with her since she does so much for me.
I am toying around with the idea of closing off the strut frame work for storage, and making my own sliding doors with bearing rollers and handles. Not sure if I really want to enclose the area though, but it is a great location for storage.
 
OP
A

akdiesel

Well-known member
Joined
Aug 8, 2008
Messages
2,617
Location
Wasilla, AK
Unistrut Storage Cabinet

I finally started my storage project using Unistrut.
This project has been in the works for about a year now. I was originally going to purchase some Lista roll out tray storage cabinets but cost and shipping put a change on that, plus I wanted to utilize my space as best as possible so I choose to custom build roll out storage cabinets out of Unistrut.
The size is 94 1/2" tall x 94 " wide x 31" deep. It will have 10 roll out trays that can support upwards of 250# each. I will be storing my table saw, chop saw, tile saw, nail guns, hydraulic pumps, portable air compressor, and anything that is bulky and heavy.
I plan on using 1/2" UPDM black sheet for the doors since it will keep its shape with minimal bending and is easy to form with help from others on this site for inspiration.
The project will take another couple of months to finish due to work schedule and parts availability. I had to shop around for full extension drawer slides to get the best deal on price and shipping.
I plan on using the same bench top I used for my bench project for the roll out trays. They are 30" deep and are 12 gauge material. A little forming will be needed to get the side ready for the drawer slides.
I will also be adding LED lighting inside triggered by a door switch.
I have the JIB crane on the corner post for help with heavy items to removal or placement.
The side of the cabinet will also house a peg board for my larger T squares and levels.
Like all projects fitment is needed then off to powder coating.
 

Attachments

  • IMG_3901.jpg
    IMG_3901.jpg
    131.4 KB · Views: 168
  • IMG_3899.jpg
    IMG_3899.jpg
    132.9 KB · Views: 172
  • IMG_3904.jpg
    IMG_3904.jpg
    137 KB · Views: 151
Last edited:

shopnut

Well-known member
Joined
Feb 22, 2006
Messages
4,237
Location
Florida
Wow! That's going to be some nice storage. It's always hard to deal with the bulky items, but it sounds like you got them covered. And with the crane close at hand - sweet!

Looking forward to seeing the progress. Keep the camera handy!

So what's the final plan for the reels? And I see some space up above the new cabinet - any plans for that?
 

CudaChick1968

Member Emeritus
Joined
Jul 1, 2011
Messages
1,800
Location
Northwest Tennessee (38230)
Very cool project for sure! I couldn't help but notice you live in Alaska ... do have a lot of powder coaters there? Just curious because I've got a couple customers from Juno and I guess I just assumed they didn't have a lot of choices.
 
OP
A

akdiesel

Well-known member
Joined
Aug 8, 2008
Messages
2,617
Location
Wasilla, AK
shopnut

Thanks. It's going to be a slow process.
The reels will be in the way when one of the cabinets door is open so the air reel will be set at the same location, only higher, and the pressure washer reel will be positioned in between the overhead doors on the header. The fairlead will be set at head height on the center post. This will allow the center post to still be raised or removed, giving me a 25' overhead door opening.
I've got a list for all this stuff, but its not in written form.


cudachick1968

Thank you. There are two local powder coaters in my town that I know of. Not sure about Juneau. They are a secluded town. You do good work, but the shipping would kill me.
 

Attachments

  • image.jpg
    image.jpg
    60.1 KB · Views: 115

CudaChick1968

Member Emeritus
Joined
Jul 1, 2011
Messages
1,800
Location
Northwest Tennessee (38230)
Thanks! :D I'm happy to see one of us knows how to spell! LOL @ me yesterday totally butchering the state's capital and leaving an important word out of my question. I'm sure glad you listen to what I mean instead of what I type .......
 
OP
A

akdiesel

Well-known member
Joined
Aug 8, 2008
Messages
2,617
Location
Wasilla, AK
storage Cabinet Frame Work

Got all but two cross braces complete.
The total system will house 10 roll out shelves. The smaller 7/8" strut is 14 gauge and the 1 5/8" strut is 12 gauge. With the 10 shelves of a total weight load of 2500 lbs (250 lbs each shelf), it puts the strut support at of its total support rating since there are two 12 gauge and four 14 gauge in the vertical position and multiple 14 gauge horizontal position supporting the loads.
One 14 gauge slotted Chanel will support 2600 lbs in a vertical load, evenly distributed.
 

Attachments

  • image.jpg
    image.jpg
    134.6 KB · Views: 142
OP
A

akdiesel

Well-known member
Joined
Aug 8, 2008
Messages
2,617
Location
Wasilla, AK
Storage Cabinet Rollout Tray

Finally got back to working on the storage cabinet. Gathered up some parts to start working on the shelves.
I got 28" full extension drawer slides. I was going to go with the 500 lbs slides but the cost was over double the 200 lbs slides were and the shipping was even more as well. So I figured the amount of items I put on each shelf will be in the 200 lb range including the shelf itself.
I got a 48" x 30" Edsal shelf (the same shelf material I used for my Lista bench). I had to cut it down to 44-" to fit between the slides.
The photos show the shelf with the upper lip still in place. I will cut them off to allow for more room since it takes up an inch on each side.
The chop saw will be on the lower shelf but for testing and photo ops it is used to show the function. I had to use the jib crane to help lift it up, but that was part of the reasoning behind the jib crane anyways.
There will be a total of 10 shelves. The shelves on the left side of the cabinet will need to be about 4 inches shorter due to the (brain fart in my part) garage door track being in the way. I plum forgot about distance of the full extension slides coming into contact with the track. But I can use that extra space for some sort of flat sheet storage or something.
 

Attachments

  • IMG_0757.jpg
    IMG_0757.jpg
    83.6 KB · Views: 172
  • IMG_0758.jpg
    IMG_0758.jpg
    87.5 KB · Views: 173
  • IMG_0760.jpg
    IMG_0760.jpg
    93.1 KB · Views: 155
OP
A

akdiesel

Well-known member
Joined
Aug 8, 2008
Messages
2,617
Location
Wasilla, AK
Light at the end of the tunnel

Finally got some good work done on the storage cabinet. I got four more shelves cut and bent to finish the right side. It does not look like much but now all my items will have a place and maybe keep the shop clutter free so I can do other projects.
The frame work is all done. I just need five more shelves to finish the left side. I just got to sheets of white PVC peg board. I bent two sides of one sheet and they will be going on the right side where the clamps are staged for now. This will house my long rulers and clamps. I will need to paint them black to match.
I am still waiting on 4 48" x 24" x 1/2" HDPE sheets in black to do the doors on the right side. I figured this would be easier then getting sheets of 20 gauge metal and bending it then painting it.
The left side of the cabinet will be slightly narrower then the right due to the garage door track. I have to make room for the doors next to the wall since they will be double hinged to clear the trays.
I will also be adding some door switches to turn on LED lighting to light up the cabinet inside.
I figured I could use the area above the cabinet to house tires. I will add a pan on top to keep clean. I will use the Jib crane to lift the tires up or down when needed.
I also used the Jib crane to lift the trays so I could put them in the tracks. The crane will also be used to lift or lower items to be placed on the shelves since I do most of my work alone anyways and some of that stuff is a little heavy.
 

Attachments

  • IMG_4097.jpg
    IMG_4097.jpg
    137 KB · Views: 157
  • IMG_4093.jpg
    IMG_4093.jpg
    141 KB · Views: 159
  • IMG_4092.jpg
    IMG_4092.jpg
    138.7 KB · Views: 181
  • IMG_4090.jpg
    IMG_4090.jpg
    137.7 KB · Views: 182
  • IMG_4089.jpg
    IMG_4089.jpg
    141.6 KB · Views: 210

shopnut

Well-known member
Joined
Feb 22, 2006
Messages
4,237
Location
Florida
It's coming along nicely and it looks like its already became useful. Using that space at the end of the cabinet for those long items is a great idea. I tend to use my bar clamps a lot so having them handy is important.

Looking forward to more progress and soon, maybe even some LED lighting!
 
OP
A

akdiesel

Well-known member
Joined
Aug 8, 2008
Messages
2,617
Location
Wasilla, AK
shopnut

THank you. The cost of the cabinet will be around the same as two of the Lista cabinets of the same function (minus shipping), but I would loose space due to their set sizing. Custom building mine gives me the maximum space and creativity.
I picked up three of the HDPE panels today so hopefully I can get a couple of the doors finished soon.
Winterizing and Hibernation is coming for us up here soon.
 
OP
A

akdiesel

Well-known member
Joined
Aug 8, 2008
Messages
2,617
Location
Wasilla, AK
Cabinet Doors

Finally had some time to work on the doors. The doors are made of 1/2" Black HDPE. Figured the cost to have metal doors would be more than the HDPE sheet. The sheets are very easy to work with and cut form just like wood. They can be scratched but will not dent easy, will not rust, and the color is true through out.
The door edges are protected and held true with aluminum C channel. The right sides are 1/2" C channel and fit tight so no screws were needed. I simply hammered it in with a rubber mallet.
The left sides are a wider aluminum C channel for a handle to open the doors. They are held in place with wood screws that are counter sunk.
the Piano hinges are held in place with black 1/4" machine screws and they also hold the doors as well. I did not have to chase the HDPE sheet for the machine screws. I simply had to drill the holes to a close size, so they would not split and then screwed them in. They screws fit nice and tight.
Powder coating of the Unistrut frame will take place later in black. Still up in the air as to what color to use on the aluminum pieces. Maybe black or gray like the plastic inserts on the sides of the Unistut. I tried find as many parts in the black color to minimize painting.
There is one Fupa on my part with doors, but I will see if you guys can find it.
Hint - Measure twice...Cut once. Oh a few choice words were used and that screwup.
 

Attachments

  • IMG_4260.jpg
    IMG_4260.jpg
    138.7 KB · Views: 235
  • IMG_4261.jpg
    IMG_4261.jpg
    140.1 KB · Views: 209
  • IMG_4274.jpg
    IMG_4274.jpg
    137.8 KB · Views: 233
  • IMG_4276.jpg
    IMG_4276.jpg
    139.4 KB · Views: 256

70C-10

Well-known member
Joined
Mar 14, 2013
Messages
201
Location
Mn
Cabinet Doors


There is one Fupa on my part with doors, but I will see if you guys can find it.

akdiesel did you mean FUBAR? F*#ked up beyond all recognition
Fupa - Fat upper ***** area. Google it :lol:
 
To avoid these ads, REGISTER NOW!
OP
A

akdiesel

Well-known member
Joined
Aug 8, 2008
Messages
2,617
Location
Wasilla, AK
Journaler
Thank you.

BHR4CE1
I have been very happy with the Lista cabinets.


70C-10
Never heard of that FUPA acronym. I've always used it to describe a screw up like FUBAR.
 

shopnut

Well-known member
Joined
Feb 22, 2006
Messages
4,237
Location
Florida
The doors look great ak and I can't spot the flaw (if there really is one :)). I would paint the trim in a contrasting color if it were mine. I actually like the aluminum color best next to the black. Any shade of silver or gray would look fine though.
 
OP
A

akdiesel

Well-known member
Joined
Aug 8, 2008
Messages
2,617
Location
Wasilla, AK
70C-10

Thank you. I'll try not to FUBAR any more to eliminate any confusion.

shopnut

Thank you. I actually cut them to short so I had to splice the pieces is. I think it was "lilscorpion" who said that this material can be glued just like the ABS pipe, so I will go that route later.
I do like the aluminum color but maybe the gray to match and keep the color scheme to a minimum. Besides I don't want to have to search for the opening when needed.
 
OP
A

akdiesel

Well-known member
Joined
Aug 8, 2008
Messages
2,617
Location
Wasilla, AK
Strutting My Stuff

Some Pun there. Finally getting things organized and set in place.


Hose Reels
Got the air hose reel and the pressure washer hose reel relocated to their new locations. The air reel had to be raised up to clear the upcoming doors for the cabinet and I wanted the pressure washer reel to be reached from either bay so it was attached to the removable door section with quick connects if needed. I just need to run some more 1/2" .049 stainless tubing to reach the pressure washer reel.

Peg Board
Got the PVC peg board painted and installed on the side of the cabinet. Perfect location for the longer items to rest and the Dewalt table saw stand just happens to fit perfectly on the strut support I had in place earlier. I cut to size and slide a section of 1/8" sheet of black HDPE to enclose the cabinet side and aids in support for the peg board.

Things to move
The Husky tool box is empty and just waiting for my son to get his garage ready to take ownership of it.
The stainless fuel tank is on wheels and will be moved to the other side of the shop.
The rolling storage racks will be emptied when I am able to get some more Lista cabinets.
I found two Lista three drawer cabinets on Craigslist for $75 and put casters on them. One is in the main garage and the one under the bench will be used to transport tools to the lift when needed and painted black of course.
 

Attachments

  • IMG_4315.1.jpg
    IMG_4315.1.jpg
    156.1 KB · Views: 483
  • IMG_4330.1.jpg
    IMG_4330.1.jpg
    140 KB · Views: 249
  • IMG_4316.1.jpg
    IMG_4316.1.jpg
    142.2 KB · Views: 298
  • IMG_4308.1.jpg
    IMG_4308.1.jpg
    134.3 KB · Views: 218
  • IMG_4314.1.jpg
    IMG_4314.1.jpg
    163.9 KB · Views: 362

shopnut

Well-known member
Joined
Feb 22, 2006
Messages
4,237
Location
Florida
Yes, its great to see the entire wall in one shot like that akdiesel. Nice clock up there - what's the story on it? The pegboard looks good in that gloss black and really finishes off the cabinet end nicely. So what's next, the other half of that big cabinet?

And glad to hear your son is getting his own garage set up. What a nice young man he is. How far does he live from you?
 
OP
A

akdiesel

Well-known member
Joined
Aug 8, 2008
Messages
2,617
Location
Wasilla, AK
shopnut

The clock is a 1940's Western Union Navel Clock. I found it at one of the local picker shops and had to get it because of my eye sight being bad (19" diameter) and the history behind these. I still need to work on getting it to power up.
Need to gather some more metal to make the drawers and doors.
Then I will work on the far side where the Vidmar cabinet is and replace with a 56" wide x 59" tall Lista cabinet and make another roll out tray cabinet on top of that to reach the 94" mark. And that shelf in the right corner will be for an 80 gal. air compressor.
I will also add some more peg board on the side for crow bars and such.
my son lives about 5 miles away.
 

Attachments

  • IMG_4102.jpg
    IMG_4102.jpg
    142.1 KB · Views: 94
Last edited:

BHR4CE1

Well-known member
Joined
Sep 13, 2010
Messages
952
Location
Long Beach, CA
"Slightly" off topic, but my question pertains to Lista so I thought this would be a good place to post it. Would you consider Lista to be "low-end"? I have a Lista tool box in my garage, and in one of the comments on my youtube video (see my sig) a guy calls my Lista tool box "LOW-END". Just curious what the general consensus is.
 
OP
A

akdiesel

Well-known member
Joined
Aug 8, 2008
Messages
2,617
Location
Wasilla, AK
BHR4CE1

Well I will answer your question simply is No They are NOT "LOW-END".
Now to go into it more. The drawers and cabinet on a Lista are just the same build quality as Vidmar, Lyon, Equipto...etc. and all of those are considered industrial grade.
For every drawer on a Lista cabinet to hold to hold 400-440 lbs each give it my qualification as a high end brand.
The Mac / Snap-On tool boxes are great boxes as well but I feel they are not built as rugged as Lista or like.
I have seen many Lista boxes go through some major abuse and still function correctly.
The person that commented your garage and use of it sounds very envious. Just because "your garage is clean means you don't do anything in it." NO. this may mean that you take care of your stuff and clean up after your self.
I really like your set up and want to add the same lift in my shop.
 

BHR4CE1

Well-known member
Joined
Sep 13, 2010
Messages
952
Location
Long Beach, CA
BHR4CE1
The person that commented your garage and use of it sounds very envious. Just because "your garage is clean means you don't do anything in it." NO. this may mean that you take care of your stuff and clean up after your self.
I really like your set up and want to add the same lift in my shop.


Thanks for your input. I did a lot of checking when I designed my garage and Lista seemed to be a very good brand.
 

csp

Well-known member
Joined
Mar 23, 2010
Messages
5,719
Location
Franktown, CO
There's always someone who has to throw a childish comment in like that. Ignore them. I'm shocked that you even questioned the quality comment.
 

BHR4CE1

Well-known member
Joined
Sep 13, 2010
Messages
952
Location
Long Beach, CA
There's always someone who has to throw a childish comment in like that. Ignore them. I'm shocked that you even questioned the quality comment.

It just made me wonder a little. I've had great luck with my Lista cabinet...but I was curious since I don't see that many of you guys here using Lista.
 
OP
A

akdiesel

Well-known member
Joined
Aug 8, 2008
Messages
2,617
Location
Wasilla, AK
Cost is the major reason and then maybe access to them.
But I would not want them to lower their standard to make it more cost friendly.
 
Last edited:

MeentSS02

Well-known member
Joined
Aug 12, 2010
Messages
325
Location
Dayton, OH
It just made me wonder a little. I've had great luck with my Lista cabinet...but I was curious since I don't see that many of you guys here using Lista.

We're around:

IMG_1102_zpsb8fc6493.jpg


IMO, you get a lot for your money. I've not spent any time around high-end, tool truck brand boxes, so I can't really compare them, but I've been very happy with mine.

Now, back to the creator of this thread...one question: where did you get your stool? It's one of the last things I "need" for my garage to finish what I've started.
 
OP
A

akdiesel

Well-known member
Joined
Aug 8, 2008
Messages
2,617
Location
Wasilla, AK
MeentSS02

First - The stool is a Craftsman stool I got with a package deal with a table.
Second - great shop oh and that car too. Hope it came with wheels.
 

dbonne

Well-known member
Joined
Apr 18, 2013
Messages
305
Location
Southern Idaho
akdiesel: Great thread, I admire your setup. I too use a lot of unistrut in my daily life, you opened my eyes to the possibilities. Keep it coming!
 

MeentSS02

Well-known member
Joined
Aug 12, 2010
Messages
325
Location
Dayton, OH
MeentSS02

First - The stool is a Craftsman stool I got with a package deal with a table.
Second - great shop oh and that car too. Hope it came with wheels.

Thanks for the info.

As for the car, the wheels/tires were a bit too much. I have, however, moved the car to the front lawn and replaced the jack stands with cinder blocks ;) Upscale redneck is the look I was going for.
 
OP
A

akdiesel

Well-known member
Joined
Aug 8, 2008
Messages
2,617
Location
Wasilla, AK
dbonne

Thank you. The designe and the 12 gauge strength has so many possibilities instead the standard electrical support or solar panel frame work.

MeentSS02

Well if anything you'll have high class lawn art. I like that color.
 
To avoid these ads, REGISTER NOW!
Top Bottom