To avoid these ads, REGISTER NOW!

Looking for Suggestions on VCT

CountyCop911

Member
Joined
Jan 3, 2012
Messages
18
Location
Saint Louis
After reading a great deal of useful information on the Flooring Threads I have come to the conclusion I will be using VCT to finish the Floor in my 3-Car. I have a couple of questions and hope someone out here can provide some guidance.

First understanding the cleaner the better in all cases, just how much prep work would be recommended to prepare the surface for VCT application? I think the score lines would need to be sanded because there is a slight bevel on the edges and assume that would eventually manifest itself thru the tiles. Also would it be a good idea to fill the expansion joints with some sort of compound to still allow for expansion yet prevent the tile from possibly being depressed into the joints? If so what would make the most sense?

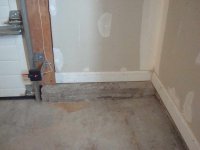
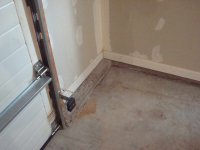
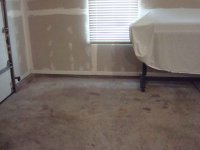
Lastly for finishing touches I would like to cover all exposed concrete which includes where the foundation is above the plane of the floor. See attached images. There are two situations, first is the scenario in which vertically the top of the foundation is behind the drywall yet can be seen. The amount of exposure varies because of the slope of the floor. The second is the area which is exposed parallel to the surface of the floor. I would like to finish both of these areas so as not to be able to see the concrete. I first considered using the same tile and simply continuing up whatever is exposed however the concrete is not smooth and likely would not take to tile very well. Thanks in advance for your help. This is a Great Board!!!
 

Attachments

  • Garage #1.jpg
    Garage #1.jpg
    137.7 KB · Views: 54
  • Garage #2.jpg
    Garage #2.jpg
    146.1 KB · Views: 46
  • Garage #3.jpg
    Garage #3.jpg
    139.9 KB · Views: 45
To avoid these ads, REGISTER NOW!

TigerGA

Well-known member
Joined
Nov 25, 2011
Messages
81
Location
Georgia Coast
Not sure how much time/money you're will to put into this. Are you willing to put some type leveling compound on the vertical concrete? I'm with you, the VCT wouldn't work on uneven vertical concrete. What about diamond plate baseboard? Or, how would it look if you painted the vertical concrete to match the wall or the VCT tiles?
 
OP
C

CountyCop911

Member
Joined
Jan 3, 2012
Messages
18
Location
Saint Louis
Thanks for the Reply. Not saying that money is no issue however I want it done right the first time. I was thinking about the area under the drywall and thought I could probably just rip off the 3-inch baseboard and replace it with 6-inch. when installing just let it follow the slope of the floor. There is ~ a 3-inch gap in which the concrete is exposed and currently the baseboard is installed level. If I install 6-inch over the 20 or so feet of the floor I do not think the eye will notice it is not level.
 

JohnReynolds

Active member
Joined
Apr 5, 2006
Messages
32
I had the same situation as you with the seams and the concrete below the walls. I just used 4" vinyl molding along the wall after laying down the tile.

As for the raised concrete at the joints, that's a more challenging problem. I used a 4" grinder with a diamond disc and ground both raised sides down to near level. I then filled the cracks and feathered the raised areas (like you do with taping a seam on sheetrock) out with leveling cement. The floor is not perfectly flat, but it is flat enough the tiles don't bend or crack.

Finally, if you really want a challenge, design a logo to put in your floor - I used Excel to make a scale grid and then proceeded to design a way to put an MG logo with the octagon around it and a GVSU (I am a professor there) logo.:thumbup: 
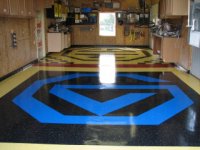
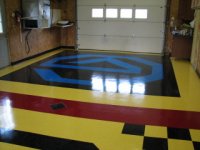
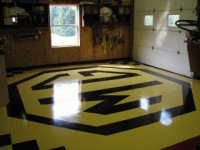
I will attach a jpg of the finished product - there are more cabinets and a lift in there now, but this will give you an idea of the floor right after I installed it.

I did this 3 years ago and have been meaning to do a write-up, but only recently finally finished the cabinets, lift, etc. It is a working garage, complete with oil, antifreeze, and teen-age boot prints, but I am impressed with how well the tile holds up - I replaced about 6 damaged tiles this year (first time in 3 years) and will probably have 2-3 that I will do next year.

John
 

Attachments

  • Garage_Floor.JPG
    Garage_Floor.JPG
    41.8 KB · Views: 140
To avoid these ads, REGISTER NOW!

Chuck W.

Well-known member
Joined
Nov 19, 2007
Messages
92
Location
Agoura Hills (Los Angeles) California
I replaced about 6 damaged tiles this year (first time in 3 years) and will probably have 2-3 that I will do next year.
John

Great looking garage John. Mine is now over four years old and looks great. I purchased a used 2500 high speed burnisher and stay on top of it.

I have a couple tiles that I need to replace. How hard is it to replace a tile in the middle of the floor. And, once replaced, how hard is it to shine it up to match the floor? Thanks.
 

JohnReynolds

Active member
Joined
Apr 5, 2006
Messages
32
Well, I cheated - I replaced them after I stripped the floor! I left mine for 3 years without buffing, waxing, or anything - won't do that again as some of the tiles have some edge stains from the wax wearing off and fluids soaking in.

As far as replacements between major stripping/waxing, I have a friend that does that as a part-time business and he told me what he does is, after removing the tile, take the new one, strip the factory coating off, then manually wax it (I assume with the same wax and number of coats that you put on the floor) and then glue it down.

Regardless of the waxing issue, when replacing any tile, be sure to clean as much old glue as you can, especially any 3-dimensional bits, and don't forget that VCT DOES have a grain to it. Follow that with a 75-100lb weight on the tile to set it and you should be good to go.

My house garage is also tiled and I live in Michigan and I only mop/clean it once or twice a winter (and I left it for 3 years without refinishing or buffing) - all I did was thoroughly strip it and then waxed it and it looked like new!

In spite of my abuse, I recommend at LEAST yearly buffing and/or stripping/waxing.
 

rwhite692

Well-known member
Joined
Mar 4, 2008
Messages
1,850
Location
Central Valley, CA
Finally, if you really want a challenge, design a logo to put in your floor....

Same here, though I went "old school" and used graph paper, LOL. It was challenging, but really the only challenge was getting the proportions truly accurate, since the logo did not allow for making it exclusively out of 12" squares. And the angled portions are not at a convenient 45 degrees, either.

2714047750011691741S600x600Q85.jpg


2384220760011691741S600x600Q85.jpg
 

JohnReynolds

Active member
Joined
Apr 5, 2006
Messages
32
Very nice - yeah, had the same problem with the MG logo. Since I made a jig to cut the 45 degree cuts on a table saw with a diamond blade, the width of the blade made the other "half" of the tile unusable/wrong size. Out of the whole garage and two logos, only 8 tiles in the M in MG) were not 45s. I have attached one picture of each logo.
 

Attachments

  • GVSU Floor Logo - SM.JPG
    GVSU Floor Logo - SM.JPG
    33.1 KB · Views: 33
  • MG Floor Logo - SM.JPG
    MG Floor Logo - SM.JPG
    35.2 KB · Views: 33
To avoid these ads, REGISTER NOW!
Top Bottom