To avoid these ads, REGISTER NOW!

Mark's Colorful Legacy Epoxy Project

CampguyMark

Member
Joined
Aug 12, 2014
Messages
24
Location
Southeast Oregon
Hi Guys,

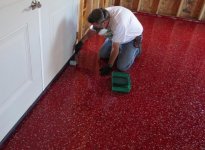
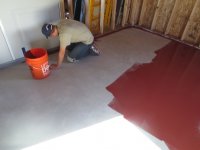
After spending the last couple of months reading and learning on this site, I'm finally ready to get to work on my garage floor.

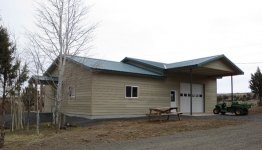
As a background, I own a campground in the high desert of Southeast Oregon. About 20 months ago, I had my "Dream Garage/Shop" built, but just the shell. Since then, it's just been a very expensive storage unit.

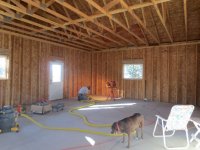
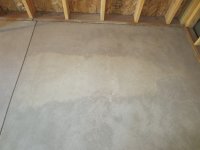
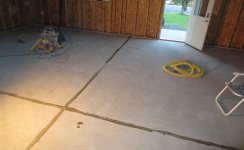
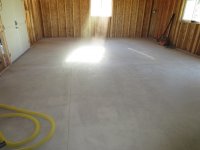
The garage is 30' X 48' that is divided into two sections. The shop/workarea/Man cave is going to be 30' X 22' with 10' ceilings while the garage will be 30' X 26' with 12' celings and with large doors on both sides, so that we can drive thru the garage.

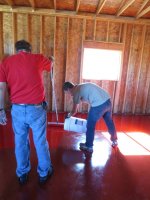
The worst part of the job was getting everything moved out of the shop side and stacked up on the garage side!

The next big hurdle is that we are in a very remote part of the country. The closest town, with any stores is 60 miles away and that's a town of 3,000 people. The closest Home Depot is 200 miles away. So, not only can we not hire anybody to help with the project, we were too far away from any tool rental store to rent the tools needed to prepare the project.

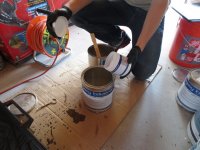
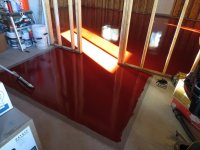
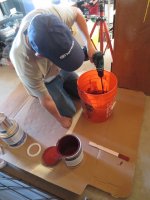
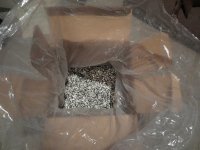
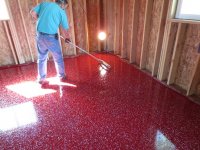
With that said, I decided to purchase the tools needed to grind the floors and finish the job myself. From my research on this site, I also decided to purchase all the epoxy products from Scotty and Legacy Industrial.

I ordered my tools, supplies and epoxy and waited for the UPS man to show up!
 

Attachments

  • 2.jpg
    2.jpg
    62.4 KB · Views: 240
  • 3.jpg
    3.jpg
    57.9 KB · Views: 204
  • 4.jpg
    4.jpg
    125.5 KB · Views: 270
  • 5.jpg
    5.jpg
    128.2 KB · Views: 284
To avoid these ads, REGISTER NOW!
OP
C

CampguyMark

Member
Joined
Aug 12, 2014
Messages
24
Location
Southeast Oregon
A couple of weeks ago, I received all the tools that I had ordered. They included a 7" Makita grinder, a Dustless shop vac with an extra 25' hose, a Diamabrush concrete prep tool along with the dust shroud, an adapter for the vac hose, and all the safety stuff (ear muffs, dust mask, and safety glasses)

I've never done a project like this, so it took a while to get used to the grinder. After several hours, I figured out that I just needed to turn on the grinder and my job was just to hold it level, move it in a circular motion, and let the grinder and the concrete prep tool do most of the work.

I've read quite a few people complaining about all the dust, but with the dustless shop vac and the dust shroud on the grinder, It wasn't too bad at all. In fact, part way thru the job I decided to ditch the dust mask. Like I read here, the dust is heavy and what wasn't sucked up by the vac pretty much stayed on the floor. I was expecting everything in the other room to be covered with a heavy coat of dust, but it was no worse than we are used to living in the high desert!

I found that working for 3 or 4 hours a day max was about all that this 55 year old body could handle, with taking stretching breaks every 20 or 30 minutes. I tried different methods, such as kneeling on a cart, but found that using plain old knee pads gave me the most control over the grinder. My biggest worry was that while I had the grinder locked on, that it would get away from me and go flying across the room!

Before I started grinding, I thought I had a perfectly smooth slab. After I started grinding, I found all kinds of ridges, small holes, grooves and even footprints! (I remember when they were laying the slab and the guy that was finishing it, walked around in his stocking feet and I was a little concerned and he said that it was hard enough, guess not!)

As you can see from the picture of the floor, it started out as a light gray and as I would grind it, it turned a darker gray. From the other picture, you can see that my dog, Reese, would follow me around the room performing a "Moisture" test!

Between the sore muscles and trying to run my campground, it took me over two weeks to get all 660 square feet finished with the prep work.
 

Attachments

  • 6.jpg
    6.jpg
    126.1 KB · Views: 312
  • 7.jpg
    7.jpg
    132.5 KB · Views: 286
  • 8.jpg
    8.jpg
    96.8 KB · Views: 287
OP
C

CampguyMark

Member
Joined
Aug 12, 2014
Messages
24
Location
Southeast Oregon
Now that I had the worst part of the job done, it was time to "Attack the Crack". I have two large contraction joints that were cut into the concrete. They are between 3/8" to 1/2" wide and from 1" to 2" deep. Not only did the contractor not cut a very straight line, but the concrete was still a little green, so when he cut it, it nicked the sides and didn't look very good.

I decided to order 2 gallons of the HD 821 Epoxy crack filler from Legacy. It is a two part epoxy and it was really quite easy to work with. I used some scraps of James Hardie lap siding and used a large old spoon. I would take one scoop of Part A and one scoop of Part B, and just blend it together for a minute or so, until it was a solid color.

Before I used the crack filler, I inserted some foam backer rod into the groves. I tried three different sizes, and for me the 1/2" worked the best. In some places the cut was so deep, that I put some 1/4" backer rod down in the groove and put the 1/2" on top if it. I left about 1/2" between the backer rod and the top of the slab.

After mixing up the crack filler, I just used a stiff putty knife and pushed it down into the crack. Since the grove was rather large, I left it slightly "over filled" so that when it dried, if it shrunk, there wouldn't be an indent.

The HD 821 was only supposed to have a pot life of 7 to 10 minutes, so the first couple of batches that I made up were rather small. But I found that I could use up the batch before it started to get stiff at all, so I started making large batches and it seemed to still be workable for 15 to 20 minutes.

After I finished filling all the crack and small holes, I just cleaned up my tools with some Xylol. I was glad that I wore disposable gloves while I was doing the job as everything got quite "sticky".

I had ordered two gallons of the HD 821, thinking that one gallon might not fill all the cracks, but I only ended up using about one quart of the two gallons!
 

Attachments

  • 13.jpg
    13.jpg
    95.5 KB · Views: 262
  • 12.jpg
    12.jpg
    94.5 KB · Views: 275
  • 11.jpg
    11.jpg
    78.8 KB · Views: 250
  • 10.jpg
    10.jpg
    95.7 KB · Views: 247
  • 9.jpg
    9.jpg
    130.9 KB · Views: 275
OP
C

CampguyMark

Member
Joined
Aug 12, 2014
Messages
24
Location
Southeast Oregon
After waiting for 24 hours for the crack filler to dry, I went back to the garage to check on the progress. It was very easy to see where I had used the crack filler as it had a "dark & wet" look to it. Even though it looked wet, it was completely dry, stiff and not "sticky" at all.

I took the grinder, and moving in a circular motion, moved down the line. It only took me 20 minutes or so to level out all the excess.

I was really afraid that the grinder would either pull out chunks of the crack filler or that it would "gum" up the grinder tool. It was really easy to level out and none of it pulled up at all.

As you can tell from the pictures, it turned out really nice. There were only five or six spots where it looked like there was an air bubble or something. I was able to mix up a really small batch on my spoon and fill in the couple of holes that I found and will grind them down in the morning before I sweep and vaccum.

Monday morning my son is coming over to help me and we are going to start the really good stuff, THE PRIMER!!
 

Attachments

  • 15.JPG
    15.JPG
    141.9 KB · Views: 251
  • 16.JPG
    16.JPG
    120.3 KB · Views: 255
  • 17.JPG
    17.JPG
    116.3 KB · Views: 277
  • 18.JPG
    18.JPG
    96.7 KB · Views: 241

mechanix311

Well-known member
Joined
Nov 27, 2012
Messages
59
Excellent job. I like how organized you are making sure you have all the tools ready right down to the safety glasses. The crack repair looks great. Maybe I should consider that product for my own garage.
 
OP
C

CampguyMark

Member
Joined
Aug 12, 2014
Messages
24
Location
Southeast Oregon
We have found that living so far from any stores, that we need to be really organized about everything. I once had to drive a 130 mile round trip to get a $0.50 part! That makes a 5 minute job into a half a day job!!
 

bry@n

Well-known member
Joined
Dec 29, 2008
Messages
2,785
Location
Ocean County, NJ
Jeez, I complainanout bring30 minutes from everything; so I stock up on stuff. Looks great. Keep up the great work and please keep taking pics.
 

Shea

Well-known member
Joined
Sep 19, 2012
Messages
2,865
Location
California
Great work. This is a good thread for people looking to epoxy their own garage. Keep us posted!
 
OP
C

CampguyMark

Member
Joined
Aug 12, 2014
Messages
24
Location
Southeast Oregon
The other day when I hit a few spots with the crack filler for a second coat, I realized that I had lots of flies, bugs, wasp flying around in the garage. So, I decided to set off some bug bombs to kill most of them before I started, so I wouldn't have my new floors filled with dead bugs. When I came in this morning to grind down the few spots, I found that all the bugs had decided to land in them!

Finished grinding the few spots and then swept, vacuumed and then used a leaf blower to blow off any remaining dust.

I ordered three gallons of the Legacy Standard Epoxy Primer in TILE RED. I also purchased the 18" rollers and a tray to fit the large roller.

I think the temperature is just about right, so off we go to prime!
 

Attachments

  • 22.jpg
    22.jpg
    52.4 KB · Views: 232
  • 21.JPG
    21.JPG
    110.3 KB · Views: 245
  • 20.JPG
    20.JPG
    120 KB · Views: 265
  • 19.JPG
    19.JPG
    126.4 KB · Views: 325
OP
C

CampguyMark

Member
Joined
Aug 12, 2014
Messages
24
Location
Southeast Oregon
We started working on the primer around 3:30. It was in the upper 70's while we were working. We poured the container of Part A into the large bucket and then added the Part B while mixing with the included mixing wand. We mixed it for about 5 minutes and then poured it into the painting tray.

My son started painting the edge all around the walls while I started with the roller. Since we were using the "Tile Red" primer, it was really easy to see any spots that we missed or were too thin. I was surprised at how many small little holes were in the cement. I actually had to go over them several times to get the primer to flow into them.

Since we had 3 gallons of primer, we decided to divide the room into thirds so we could tell if we were using too much or too little primer. It took me several times of dipping the roller into the primer until the roller felt like it had enough primer on it to really spread nicely.

Even though I felt like it was going on really thick, we did about half of the room on the first gallon. My son mixed up the next gallon of primer while I continued to roll on the primer.

With the second gallon of primer, we were able to finish up the main room and also my 5' X 7' tool room. We had about 1 cup of primer left when we were finished.

I left the dog at the house today, so that he wouldn't be walking around the floor. I didn't have to worry about any chipmunks or other critters getting on my floor, but we did find several bugs that decided to land on the wet floor and get stuck. I did have a problem with a snake slithering across the floor while I was grinding the floor!

We finished up a little after 5:00 and cleaned up our tools and closed up the garage for the night.
 

Attachments

  • 29.JPG
    29.JPG
    110.1 KB · Views: 389
  • 28.JPG
    28.JPG
    128.2 KB · Views: 308
  • 27.JPG
    27.JPG
    131.6 KB · Views: 299
  • 26.JPG
    26.JPG
    104.8 KB · Views: 284
  • 25.JPG
    25.JPG
    78.8 KB · Views: 293
  • 23.JPG
    23.JPG
    126.7 KB · Views: 290
OP
C

CampguyMark

Member
Joined
Aug 12, 2014
Messages
24
Location
Southeast Oregon
This evening we decided to work on a few items to get them ready for tomorrow. We are both a little nervous about installing the epoxy tomorrow. We have read about other people installing it, but until you do it for the first time, you just don't know how it will work out.

One of the things that we had read about on here was the nuts falling off of some peoples spiked shoes. So we took our spiked shoes and loosened the nuts, put a small drop of "Locktite" on the threads, and then tightened the nuts.

The other project was preparing the paint chips. I wanted to do a heavy coating of chips on my floor, so I ordered 25 pounds of chips from "The Original Color Chips". I ordered the 1/4" size and picked the mix of "Black Marble Sparkle". It is a combination of black, white, gray and with some silver metallic flakes.

The chips came in a large bag inside a box. Using some small buckets and a scale, we divided up the chips into 12 ziplock bags of 2 pounds each.

Our plan for tomorrow is to divide the room into thirds again, since we have 3 kits of epoxy. After rolling out the first section, we will distribute one bag of the chips. If we want the chips heavier, then we will use another bag. We have enough chips to use 4 bags for each section, but I think we may end up only spreading out 2 or 3 bags per section.
 

Attachments

  • 34.jpg
    34.jpg
    57.7 KB · Views: 191
  • 33.JPG
    33.JPG
    107.7 KB · Views: 166
  • 32.JPG
    32.JPG
    116.7 KB · Views: 185
  • 31.JPG
    31.JPG
    95.7 KB · Views: 161
  • 30.JPG
    30.JPG
    115.8 KB · Views: 209

95riosnake

Well-known member
Joined
Oct 26, 2013
Messages
394
Location
Pittsburgh, PA
I appreciate your thorough approach to this project! I can't wait to see the floor with the chips laid down, I love that look.
 
OP
C

CampguyMark

Member
Joined
Aug 12, 2014
Messages
24
Location
Southeast Oregon
Yes, it is going to be red, but not the same color red as the primer! You are going to have to wait until I post tonight to see the final color! :bounce::bounce::bounce::bounce:
 
OP
C

CampguyMark

Member
Joined
Aug 12, 2014
Messages
24
Location
Southeast Oregon
Went down to the garage a little before 1:00 to check on the floor. The primer was totally dry and I was surprised how hard, slick and shiny that most of it looked. As others have stated, it looked kind of patchy in places and you could tell where the sections overlapped and there was more primer applied. Overall it looked really good.

We decided to test out our paint chip "throwing" method and we also wanted to try different amounts of coverage to see how thick we wanted to put down the chips. We tried making a "shaker" out of a clean paint can. We drilled 3/8" holes in the bottom and loaded it up with paint chips. We tried shaking out the chips and then throwing the chips. We liked throwing the chips better, so we ditched the shaker.

After putting out the chips in different amounts we were really surprised that we liked a much lighter coverage than we had planned for. I guess we just loved seeing the red color and didn't want to cover it up with the paint chips.

We swept and vacuumed up the test chips and then got ready to put down the epoxy!
 

Attachments

  • 41.JPG
    41.JPG
    79.1 KB · Views: 175
  • 42.JPG
    42.JPG
    111.3 KB · Views: 222
  • 43.JPG
    43.JPG
    121.8 KB · Views: 250
  • 44.JPG
    44.JPG
    86.8 KB · Views: 227
  • 46.jpg
    46.jpg
    59.8 KB · Views: 418
OP
C

CampguyMark

Member
Joined
Aug 12, 2014
Messages
24
Location
Southeast Oregon
We purchased 2 of the Legacy HD Epoxy kits, which was supposed to cover 300 square feet each, in "Coke Red". Each kit came with 1.5 gallons of the HD Epoxy and since we were doing 660 square feet total, we decided to order an extra 1.5 gallons.

So we had three gallons of the Part A, which was the Coke Red and three half gallons of the Part B. We decided to dump all three gallons of the Part A into our large bucket and mix them all together. One of the few problems that we did have was the thick sludge on the bottom of the cans. We had to pour about half the can into the bucket and then use our mixer on the bottom of the can to get most of it out.

After getting the Part A mixed real well, we poured two of the gallons back into their cans, leaving one gallon in the bucket. We then slowly poured the first can of Part B into the bucket and we mixed it real well for five minutes.

We put a new 18" roller on and we also had a 30" squeegee with 1/8" notches.
 

Attachments

  • 54.jpg
    54.jpg
    50.9 KB · Views: 197
  • 53.jpg
    53.jpg
    51.9 KB · Views: 196
  • 52.JPG
    52.JPG
    136.7 KB · Views: 189
  • 51.JPG
    51.JPG
    78.5 KB · Views: 229
OP
C

CampguyMark

Member
Joined
Aug 12, 2014
Messages
24
Location
Southeast Oregon
As we did yesterday, we divided the room up into thirds and my son used a brush to paint around the edges while I used the roller and squeegee.

I'm not sure if it's because of the color we chose, but at first it didn't seem like the Coke Red epoxy was thick enough to cover over the Tile red primer. At first you could really see the darker color of the primer showing thru, but the more we worked it and moved it around, the more the bright red started to show up. I also had a really hard time using the squeegee and it didn't seem to help much. Near the end, I figured out that I needed a larger amount of epoxy in front of the squeegee to push or pull for it to help. I think I was just putting too small amount of epoxy for it to do it's job.

We used up the first gallon and a half right about the 1/3rd mark in the room. My wife and son mixed the second gallon while I started throwing the paint chips in the first section. The "chip throwing" was actually much easier than I was expecting. I think the trick was to just take a "pinch" of paint chips with my fingers and throw them really high. I was glad that we had 10' high ceilings (even though we don't have a ceiling yet!)

It did get easier as we moved to the second and third sections, but it was a little tough not to leave a thick overlap with the edge of the roller. I was really glad that we purchased the 18" rollers, it was really a life saver. I don't know how it would have turned out if all we had was just a 9" roller!

The other thing that I had a hard time adjusting to was the spiked shoes. I read other people say that you needed to practice walking in them, but until you are out on the slick floor, it's really hard to get used to. I kept taking too big of steps and then sliding, leaving a bunch of long scratches in the epoxy and then I would have to go over it again with the roller. I found I really had to take very short steps, bend my knees and keep my weight centered over my feet!
 

Attachments

  • 67.JPG
    67.JPG
    136.5 KB · Views: 265
  • 66.JPG
    66.JPG
    128.1 KB · Views: 330
  • 65.jpg
    65.jpg
    54.5 KB · Views: 290
  • 64.JPG
    64.JPG
    107.6 KB · Views: 246
  • 63.JPG
    63.JPG
    109.3 KB · Views: 259
  • 62.JPG
    62.JPG
    138.7 KB · Views: 255
  • 61.JPG
    61.JPG
    117.7 KB · Views: 283
OP
C

CampguyMark

Member
Joined
Aug 12, 2014
Messages
24
Location
Southeast Oregon
We finished up with the epoxy and were cleaning up the tools by around 3:30. The 4.5 gallons of the epoxy ended up being just the right amount as we had maybe a 1/2 cup left in the bucket when we finished.

As other people have commented, it really takes two or three people to do this job, especially on the day that you put down the epoxy and paint chips.

Even though we ordered 25 pounds of the paint chips, we ended up only using about 4 pounds on the floor. I guess we will save the leftovers for the next job!

After we cleaned up, we just stood there looking at the floor for a while. So far, it has turned out really beautiful and we just can't wait to get down there in the morning to check it out and put down the first coat of urethane!
 

Attachments

  • 84.jpg
    84.jpg
    78.7 KB · Views: 446
  • 83.jpg
    83.jpg
    76.6 KB · Views: 396
  • 82.jpg
    82.jpg
    55.2 KB · Views: 412
  • 81.jpg
    81.jpg
    91.7 KB · Views: 428
  • 80.jpg
    80.jpg
    53.2 KB · Views: 265
  • 79.jpg
    79.jpg
    52.6 KB · Views: 265
  • 78.JPG
    78.JPG
    117 KB · Views: 297
To avoid these ads, REGISTER NOW!

95riosnake

Well-known member
Joined
Oct 26, 2013
Messages
394
Location
Pittsburgh, PA
Man that looks awesome! I could only imagine what 25lb of chips would look like... probably wouldn't see any red at all lol. What's the plan for the color scheme on the walls? White top/red bottom/black dividing stripe?
 

JCQuick

Well-known member
Joined
Nov 29, 2008
Messages
4,932
Location
Apopka Fla.
I keep seeing more and more use this legacy product can anyone tell me how it is holding up. I hope to be doing my new shop soon thinking about using this + this Scotty guy is not far from me
 
OP
C

CampguyMark

Member
Joined
Aug 12, 2014
Messages
24
Location
Southeast Oregon
Man that looks awesome! I could only imagine what 25lb of chips would look like... probably wouldn't see any red at all lol. What's the plan for the color scheme on the walls? White top/red bottom/black dividing stripe?

I plan on pulling out the three colors (plus the silver metallic) of the floor paint chips to finish off the garage. I will use the light gray to paint the walls. All the doors, windows, electrical plugs and switches, and probably the molding will be white. I haven't decided on the cabinets yet, they will probably be either black or white. The wood stove that I am installing will be black along with the chimney pipe. I would also like to use galvanized roofing on my ceiling to really light up the room.
 

ford33

Well-known member
Joined
Feb 26, 2011
Messages
2,118
Location
Chicago, IL. USA
You and your family do excellent work. That floor looks great!. I like the red color and the contrasting chips.

Reading that you are over 100 miles from a Home Depot makes me feel foolish for getting upset when I have to go back to my local Home Depot for something. It is a 10 minute drive away.
 

Jim B

Well-known member
Joined
Mar 31, 2012
Messages
196
Location
California, USA
Wow!! Nice job you guys did. It's all in the prep isn't it. My Legacy floor looks great after 2 years now of getting abused by saw dust, wood glue, brake fluid, engine and gear oil, jack stands and spilled beer, although we try and keep the spilled beer to a minimum. :bounce: Once again fantastic job. Can't wait to see the whole garage finished. Keep us posted
 
OP
C

CampguyMark

Member
Joined
Aug 12, 2014
Messages
24
Location
Southeast Oregon
Went down to check on the floor and we are just blown away with how awesome it looks. Like other's on here have said, pictures just don't do justice to how great the floors look. I just can't wait to get the walls and ceiling up, so that I can install the lights. I'm sure that it will really shine with all the lights on!

We did find several minor problems on the floor. The first was 10 to 12 spots where it looks like the paint chips stuck together in a little clump. They were about the size of a nickle. I'm not sure if I squeezed them too tightly before I tossed them or what? It's not a big deal, It just drives the perfectionist in me crazy!

The second problems was one spot where I had slipped in the spike shoes and didn't see it before I finished rolling the floor. I had slid several times and rolled over it again and that fixed it. This is also something that nobody else will see, but me.

The final problem the we had was where a wasp must have landed on the floor right after we finished and spent his last few minutes! :deadhorse 
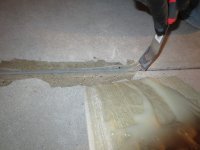
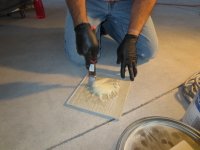
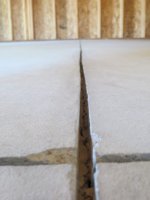
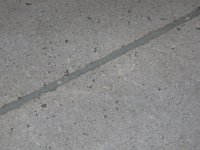
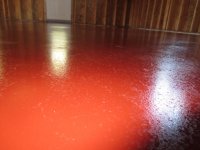
We were able to cut most of him out of the floor and after scraping his impression out, I'm sure the two coats of urethane will fill it in.

Overall the floor looks really great and can't wait to see how much better it's going to look when we are done!
 

Attachments

  • 90.JPG
    90.JPG
    122.7 KB · Views: 247
  • 89.JPG
    89.JPG
    100.4 KB · Views: 287
  • 88.JPG
    88.JPG
    132.3 KB · Views: 224
  • 87.JPG
    87.JPG
    104.2 KB · Views: 212
  • 86.jpg
    86.jpg
    66.9 KB · Views: 237
  • 85.jpg
    85.jpg
    72.9 KB · Views: 250
OP
C

CampguyMark

Member
Joined
Aug 12, 2014
Messages
24
Location
Southeast Oregon
Wow!! Nice job you guys did. It's all in the prep isn't it. My Legacy floor looks great after 2 years now of getting abused by saw dust, wood glue, brake fluid, engine and gear oil, jack stands and spilled beer, although we try and keep the spilled beer to a minimum. :bounce: Once again fantastic job. Can't wait to see the whole garage finished. Keep us posted

That's what I kept reading here, that if you wanted a nice floor that will last, you need to do a proper job of prep on the floors. I was lucky that I had the time to put into the prep and a wonderful wife that allowed me to get the tools to do the job right! :thumbup:
 
OP
C

CampguyMark

Member
Joined
Aug 12, 2014
Messages
24
Location
Southeast Oregon
To finish off our floor project we wanted to put down two coats of urethane. We ordered four gallons of the Legacy HD 356 VOC Urethane Clean Coat. This was the only day that we had to wear a respirator to install the product. I was really glad that we had several doors and windows that we could open and that it was a nice, calm day today.

A gallon of the urethane was supposed to cover 400 square feet, so we planned on using about one gallon plus 2/3rd's of the second gallon to cover our 660 square foot project. We didn't have to mix any products today, just stir up each can before pouring it into our paint tray.

Several people had mentioned that it was really hard to see where they had put down the urethane while they were rolling it, so we put up several spot lights in the corners, pointing across the floor.

We would do one small square at a time, about 8' by 8', and then go back and roll it at a 90 degree from the first roll.

At least on my floor, it was pretty easy to see where we had rolled the floor. If you look at the picture of the close up of the floor, you can see the difference between the left and right side of the picture. As soon as we rolled the urethane on the floor, the paint chips, especially the black ones, just seemed to "POP" out of the floor.

This part of the job went really fast and easy. We ended up using about one and 3/4th's gallons of product. It only took us about 45 minutes from the time we opened up the can to when we were cleaning up our tools!
 

Attachments

  • 97.JPG
    97.JPG
    124.8 KB · Views: 270
  • 96.JPG
    96.JPG
    99.4 KB · Views: 250
  • 95.jpg
    95.jpg
    73.6 KB · Views: 236
  • 94.JPG
    94.JPG
    111.6 KB · Views: 214
  • 93.JPG
    93.JPG
    115.4 KB · Views: 246
  • 92.JPG
    92.JPG
    127.7 KB · Views: 238
  • 91.JPG
    91.JPG
    66.6 KB · Views: 187
OP
C

CampguyMark

Member
Joined
Aug 12, 2014
Messages
24
Location
Southeast Oregon
Went down this morning to check on the floor to see how the first coat of urethane looked. Overall it looked great! We did find a couple more dead bugs, which we were able to cut out.

We did find a problem in one corner of the room. It's hard to tell from the picture, but there was one section, about 4' X 4', where there were lots of penny sized spots that didn't seem to be any urethane on it.

I was hoping that some of the "experts" on here might know what caused it? We weren't sure if maybe the urethane was too thin or thick or if maybe we were too close to our 24 hour re-coating window??

Anybody have any ideas?
 

Attachments

  • 101.jpg
    101.jpg
    58.3 KB · Views: 228
OP
C

CampguyMark

Member
Joined
Aug 12, 2014
Messages
24
Location
Southeast Oregon
Final day of our first epoxy floor project! :):):):)

We got all our tools ready to go and then used a 3" roller to go all the way around the room edges. We added the Legacy Soft Skid to our urethane and mixed it real carefully and then poured it into our paint tray. My son continued to stir up the soft skid in the paint tray while I rolled the floor.

It only took us about 30 minutes to do the whole room. As we got down to the last section, our paint tray was almost empty. Even though my son had really worked to keep the soft skid mixed up well, it was really thick on the last section that I did. I guess we should have opened another can of urethane and poured a little in the paint tray, instead of using the very bottom of the tray. You could really see how thick it was on the floor, but, at least it was in an area that you won't notice it.

We used about 1.5 gallons of the urethane on the second coat. We cleaned up all the tools, for the last time. Now we just have to wait till tomorrow to see how the finished project looks!
 

Attachments

  • 106.jpg
    106.jpg
    72.3 KB · Views: 225
  • 105.jpg
    105.jpg
    58 KB · Views: 212
  • 104.jpg
    104.jpg
    72 KB · Views: 194
  • 103.jpg
    103.jpg
    60.8 KB · Views: 179
  • 102.JPG
    102.JPG
    144.4 KB · Views: 154

LegacyIndustrial

ALLIANCE MEMBER
Joined
Jun 7, 2010
Messages
7,994
Location
deerfield, IL
Mark, looks too thick. If you had noticed this when rolling (hard to see) you could have rolled it out.

Your project and your documentation skills are amazing. Let me know your shirt size, son too.


Sent from my iPhone using Tapatalk
 

Notgrownup

Well-known member
Joined
May 5, 2014
Messages
5,863
Location
Snow Hill NC
The only question i have is about the color... Don't get me wrong it looks awesome...I love it. But wouldn't it be hard to find things like nuts n bolts etc.... VS a lighter color?
That red is awesome...I am very undecided on the color... At first i wanted beige and a Harley Davidson color chip mix but now i am not sure because i see so many other otions like this one that just blows my mind...
 
OP
C

CampguyMark

Member
Joined
Aug 12, 2014
Messages
24
Location
Southeast Oregon
The only question i have is about the color... Don't get me wrong it looks awesome...I love it. But wouldn't it be hard to find things like nuts n bolts etc.... VS a lighter color?
That red is awesome...I am very undecided on the color... At first i wanted beige and a Harley Davidson color chip mix but now i am not sure because i see so many other otions like this one that just blows my mind...

I have read several people saying that, but it doesn't make sense to me. See the pictures that I took from both sides of the garage. If anything, I think a shiny metal screw or nut shows up better on a darker surface than on the light color that it blends into. Even if it did blend in, you just have to get down on the floor an look across and it shows up well.

Even if that was a major problem, I still would have chosen the same colors. I will have lots of light in there when I am finished and I REALLY love color. I wanted to have something really unique and something that I could be really proud of. I think that I've done that so far. I might change my mind, several years down the road, But I doubt it!
 

Attachments

  • 111.jpg
    111.jpg
    62.8 KB · Views: 191
  • 112.JPG
    112.JPG
    120.5 KB · Views: 146
  • 113.JPG
    113.JPG
    123.8 KB · Views: 185
To avoid these ads, REGISTER NOW!
Top Bottom