To avoid these ads, REGISTER NOW!

Mark's Monster Garage....3800 sq ft

OP
I

IGO2XS

Well-known member
Joined
Apr 24, 2012
Messages
1,415
Location
Sarasota, FL
I can't get over how cool this van is turning out with all of the custom work you are doing to it. :bowdown:

One thing always leads me to another. I never saw this van going this far but I guess all my friends saw it coming. LOL

Not sitting in a van like this in many years I'm curious though, with the speaker in this location sticking out from the door so much will it intrude on you thigh or knee room?

JB

Good question on the door panels. There is a 10"wide "footwell" or step between the door and the side of the seat so plenty of room. I looks a little wide when the door is open but once your inside with the door closed the door panel is perfect. The other detail to keep in mind is once I radius the edges of the panels it will flow more than the square corners you see now.

You can bend and form 1/8 pvc foam board with a little bit of heat. Not too much or it will ruin the pvc. It holds it's shape well. It doesn't need to be solid behind it. You can also get 1/16" abs and form that over the top. Either way, if you want to use closed cell foam on top you can use 4 or 6lb closed cell. It's a lot less compliant and will take shape from a router bit well. Looks "hard", but has just enough compression to look and feel like an OEM panel.

Wow I need to be networking with you. Home Depot carries the 1/2" PVC sheets. I am looking for some 1/4" though and will probably have to go to Tampa.

Not surprised of the time and effort you are putting in just for the door panels. It really is taking shape,

I will probably have 50 hours in the door panel. I would think that 40 hours would be typical amount of time for a professional to build them.

Here is the current shape. I am redoing the very top trim otherwise its getting closer. I have mitered a few panels and it really looks nice. Some corners will stay square as I am undecided on which profile I want to use. Better to stop before I am 100% sure because of the time investment in each piece.


To avoid these ads, REGISTER NOW!

slodat

ALLIANCE MEMBER
Joined
Feb 6, 2010
Messages
3,682
Location
Central-ish, WA
Wow I need to be networking with you. Home Depot carries the 1/2" PVC sheets. I am looking for some 1/4" though and will probably have to go to Tampa.

I recommend finding a plastics supplier. I use Laird Plastics local to me. Try some 1/8 PVC and 1/16 ABS. Feel free to ask questions. I’m happy to help.
 

rattle_snake

Well-known member
Joined
Jun 25, 2015
Messages
5,225
Location
Chandler, AZ
It would seem that plastics would not absorb moisture like MDF and be a better choice in humid climates. How much more expensive are plastics and do they require more effort/time to build with?
 

slodat

ALLIANCE MEMBER
Joined
Feb 6, 2010
Messages
3,682
Location
Central-ish, WA
The plastics are significantly more expensive. A sheet of 3/4 PVC is around $250, 3/4 acrylic around $500 for example. My opinion is zero wood products in cars. I only use composites. MDF absorbs moisture and fails over time. I’m humidity alone is enough.

Composites, when you select the right material for the application, are much easier to work with than wood/mdf. They are lighter, stronger and less prone to breakage at the edge and of course the moisture issue.
 
OP
I

IGO2XS

Well-known member
Joined
Apr 24, 2012
Messages
1,415
Location
Sarasota, FL
It would seem that plastics would not absorb moisture like MDF and be a better choice in humid climates. How much more expensive are plastics and do they require more effort/time to build with?

I have been getting the 1/2" pvc 4 x 8 from Home Depot for $75. Its probably more user friendly than mdf because its easier to cut, router, and sand not to mention you dont have all the drywall dust to deal with.

The plastics are significantly more expensive. A sheet of 3/4 PVC is around $250, 3/4 acrylic around $500 for example. My opinion is zero wood products in cars. I only use composites. MDF absorbs moisture and fails over time. I’m humidity alone is enough.

Composites, when you select the right material for the application, are much easier to work with than wood/mdf. They are lighter, stronger and less prone to breakage at the edge and of course the moisture issue.

Thanks so much for your wisdom. You do awesome upholstery work!!

a few things going on. I am ordering a new set of wheels from HRBB for the van. I am doing 19" tall in the front and 24 x 14 in the back. a huge diameter in the rear but it will be so crazy looking. I have the 18" and 20" HHBB wheels that have never been driven on. Luckily they are 5 x 5 bolt pattern which fits c10 Chevy trucks.

I have decided to remove the front center console engine cover/ drink holder from the van. If you look at my picture with the center string line the console is about 8" off center. looks like we may be building a custom dash or doing major modifications to the original dash. It is plastic so hard to attach to using wood or pvc material.


The other exciting piece of news is Lingenfelter is shipping my LT4 to Rothspeed to fit in my 63 Corvette build............finally. Its my fault I just couldnt do without this motor and we have just waiting for Lingenfelter to finish the dyno and tuning. We will see alot of activity on the Corvette soon.

This is my motor........


casmurbax

Well-known member
Joined
Sep 25, 2012
Messages
2,759
Location
Wilton, NY
Mark,

I get the centering of the console. Funny the only time you would see that is if you were standing behind it with the doors open. I think it would bother me as well.

Those rear wheels will be HUGE I can't wait to see them.

So what is he motor producing? Glad to see things are moving along.
 

andyvh1959

Well-known member
Joined
Feb 15, 2020
Messages
2,598
Location
Green Bay WI
Cool build!! Ebay is a great source for ABS sheet stock. I have done a bunch of ABS plastic fairing mods for motorcycles and found ABS sheet stock on Ebay at reasonable prices. Especially if you can get by with smaller sheets or sections. ABS is easy to heat weld, or just use ABS pipe cement to bond the assemblies. Acetone also works as the bonding agent to build up sheet thickness.
 
OP
I

IGO2XS

Well-known member
Joined
Apr 24, 2012
Messages
1,415
Location
Sarasota, FL
Mark,

I get the centering of the console. Funny the only time you would see that is if you were standing behind it with the doors open. I think it would bother me as well.

Those rear wheels will be HUGE I can't wait to see them.

So what is he motor producing? Glad to see things are moving along.

I couldnt take the offset as well as all the obscure angles on the front console. I know we need to use as much of the dashboard as I can for mounting reasons. I want a dash looking more stock than custom so it has a clean look. Dashboards are challenges and right now I am not sure how to proceed. I could have the dash scanned and redesigned. From there I could have it 3D printed and ready for bonding to the factory dash.:D

I have plenty of room for a bigger tire/wheel. To be honest I was giving myself a hard time because I built the wheel tubs too big. Now my over engineering of the wheel tub size will come in handy for a 31" diameter tire buried in the wheel well. It is going to look pretty insane so I am excited.

The Lingenfelter LT-4 after tuning ended up with 790 HP and arouod 560 ft lbs of torq. Could they "turn it up" yes. 790 hp is pretty scary in a Corvette with no traction control. LOL

Cool build!! Ebay is a great source for ABS sheet stock. I have done a bunch of ABS plastic fairing mods for motorcycles and found ABS sheet stock on Ebay at reasonable prices. Especially if you can get by with smaller sheets or sections. ABS is easy to heat weld, or just use ABS pipe cement to bond the assemblies. Acetone also works as the bonding agent to build up sheet thickness.

Thanks for the info. I ordered some ABS through Home Depot. If you spend $50 you getting free shipping so I buy a ton of stuff from HD. On smaller orders I do curb side pick up and that way I dont have to go find it in the store......although I know the store by heart.
 
OP
I

IGO2XS

Well-known member
Joined
Apr 24, 2012
Messages
1,415
Location
Sarasota, FL
I finally was able to get the steering completed and I couldnt wait to get the van off the lift and rolled out on the driveway. I am really excited to reach this milestone in the build and to see it one step closer to completion. Plenty of work left to do but having a roller really makes me feel like I have accomplished something.


I also have the Mustang project in motion. We have been working on stripping everything off the car............interior, exterior and suspension. I have a mobile media blaster coming over next week to hit the underbelly and the engine compartment so we can prime and start working on the new suspension. The Mustang is going to my buddy Docs shop to have all the suspension installed.


OP
I

IGO2XS

Well-known member
Joined
Apr 24, 2012
Messages
1,415
Location
Sarasota, FL
Nice shot of the van! That van is going to turn some heads.
I hope the mustang is as solid as it looks after media blast.
Thank you for sharing!

Its a real solid car. Light collision in the passenger rear lower quarter panel. I found that paying money to get a quality car is the best way to start a project. Saves a ton of money.
 

SamYoung

Well-known member
Joined
Jun 4, 2020
Messages
104
Location
Massillon, Ohio
Loving the van pics. That thing is going to look cartoonish with another 4" of wheel in the back. Really going after the drawing you had done. Are you going to be keeping a similar sidewall height on the tires?
 

shortykorte

Well-known member
Joined
Sep 1, 2014
Messages
8,039
Location
Tallahassee, Fl
The van is looking wicked. Some reason I’m thinking zoomies and when you slide back the side door, there sits a big, blown top fuel engine inside.


Sent from my iPhone using Garage Journal
 
OP
I

IGO2XS

Well-known member
Joined
Apr 24, 2012
Messages
1,415
Location
Sarasota, FL
The van is looking wicked. Some reason I’m thinking zoomies and when you slide back the side door, there sits a big, blown top fuel engine inside.
Sent from my iPhone using Garage Journal

Its nice to see it on the ground for a change and I agree it has "stance". The wide back rim really makes a statement I think and adds to the look. I will have the zoomies for sure.

Loving the van pics. That thing is going to look cartoonish with another 4" of wheel in the back. Really going after the drawing you had done. Are you going to be keeping a similar sidewall height on the tires?

I havnt ordered the wheels yet as I have been waffling back and forth between 22's and 24's along with knowing I would take a pretty good hit on the wheels I have now. Oh the battle is real!! LOL

Saves a ton of money and time.

What kind of suspension is going on that?

I dont know if I said but the Mustang is a friend of mine. He so far has offered up around a $100,000 budget on the build which is why I agreed to do the car. I am not making any money on it just havin fun. The suspension is a FULL 4 wheel independent system from Heidts. Oh, lets not forget the 13" Wilwood drilled, and sloted with 6 pistons on the front and rear. The Heidts bill was $26,000 alone so I may be breaking the $100K mark!

You know guys I am really blessed to be retired and working in the garage every day all day. I am really having fun.:D
 
OP
I

IGO2XS

Well-known member
Joined
Apr 24, 2012
Messages
1,415
Location
Sarasota, FL
Tomorrow the ductless blasting guy will be here to do the engine bay, rear trunk, and the undercarriage to make it ready for the suspension install. Looking forward to getting the Mustang project underway. Its the "undesirable" body style but I think it will make the car that much cooler.


casmurbax

Well-known member
Joined
Sep 25, 2012
Messages
2,759
Location
Wilton, NY
So after they blast it how soon will you primer that, seal it or whatever you should do to bare metal so it won't rust?
 
To avoid these ads, REGISTER NOW!
OP
I

IGO2XS

Well-known member
Joined
Apr 24, 2012
Messages
1,415
Location
Sarasota, FL
So after they blast it how soon will you primer that, seal it or whatever you should do to bare metal so it won't rust?

We are going to coat it when we are done with it tomorrow. It may all get sandblasted again after suspension install so we can put a nice epoxy primer on all of it at once. Under the chassis we will used Raptor.
 

BORING HOP YARD

Well-known member
Joined
Jan 13, 2007
Messages
1,104
Location
Boring Oregon
Hey Mark, I did Raptor on the underside of my cab and fenders on my 56. Truck was bare metal, epoxy primed, scuffed and raptor applied. This was the first time I have used it under the body. Just wondering if you have used it on a project that you put a few miles on and your opinion on the performance of it long term.
Thank you!
 

SamYoung

Well-known member
Joined
Jun 4, 2020
Messages
104
Location
Massillon, Ohio
I haven't ordered the wheels yet as I have been waffling back and forth between 22's and 24's along with knowing I would take a pretty good hit on the wheels I have now. Oh the battle is real!! LOL

I can understand your struggle on the wheels. the 20s out back do look good and it has a nice lean to the stance already. 22s or 24s would push it more towards those cartoonish proportions, but it looks great as is. The depth of the lip really does it for the look no matter the diameter.

If the goal is stance change, maybe try out a higher profile tires out back. Definitely a cheaper option. I know most of your previous builds have had low pro tires, but a little meat might help capture the aggressive look better. Meatier rubber always looks meaner and faster to me. Big tires with deep barrels just reminds me of drag cars. Maybe not go full drag radial, but somewhere in between.
 
OP
I

IGO2XS

Well-known member
Joined
Apr 24, 2012
Messages
1,415
Location
Sarasota, FL
Hey Mark, I did Raptor on the underside of my cab and fenders on my 56. Truck was bare metal, epoxy primed, scuffed and raptor applied. This was the first time I have used it under the body. Just wondering if you have used it on a project that you put a few miles on and your opinion on the performance of it long term.
Thank you![/QUOTE

The secrete to longevity is in the preparation and you did it right. I have seen Raptor years later and it still looks like new.
 
OP
I

IGO2XS

Well-known member
Joined
Apr 24, 2012
Messages
1,415
Location
Sarasota, FL
I can understand your struggle on the wheels. the 20s out back do look good and it has a nice lean to the stance already. 22s or 24s would push it more towards those cartoonish proportions, but it looks great as is. The depth of the lip really does it for the look no matter the diameter.

If the goal is stance change, maybe try out a higher profile tires out back. Definitely a cheaper option. I know most of your previous builds have had low pro tires, but a little meat might help capture the aggressive look better. Meatier rubber always looks meaner and faster to me. Big tires with deep barrels just reminds me of drag cars. Maybe not go full drag radial, but somewhere in between.

Thanks for your input. I am trying to learn to think more and act less. I dont have any common sense when it comes to building cars because I want to go all out and see my vision though to the end no matter what. LOL
 

LutzTD

Well-known member
Joined
Dec 31, 2011
Messages
3,673
Location
Lutz, Florida
Tomorrow the ductless blasting guy will be here to do the engine bay, rear trunk, and the undercarriage to make it ready for the suspension install. Looking forward to getting the Mustang project underway. Its the "undesirable" body style but I think it will make the car that much cooler.


I was always purely a fastback guy as well, but a friend of mine found a Shelby coupe a few years back and that thing really changed my opinion, with the lips rolled and lowered, even on 60's wheels and tires it looked aggressive and fast. I always thought if I build another mustang (not at your level at all of course) I would do a 66 coupe. I cant wait to see it.
 

Bob Heine

ALLIANCE MEMBER
Joined
Oct 24, 2009
Messages
10,708
Location
Boca Raton, Florida
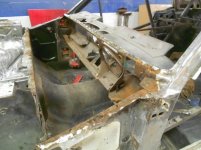
Mark, Rusty Gillis is a Mustang guru whose shop is about 80 miles north of you in Port Richey FL. He started a build on a '66 coupe in 2015 and finished it four years later. He knows that a "rust-free Mustang" is an oxymoron. He started with something similar to your friend's:
attachment.php


Looks good from the outside but those old Mustangs have no primer anywhere but the outside body surfaces. Under the cowl there is always going to be rust even if it isn't rotted through.
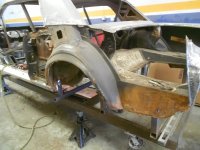
attachment.php


Same with the rear quarter panels.
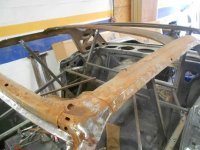
attachment.php


Under the perfect looking roof there is more rust.
attachment.php


Once the rust is removed from all the inner structure, Rusty gives it a couple of coats of epoxy primer.
attachment.php
 

Attachments

  • Mustang 1.jpg
    Mustang 1.jpg
    116.5 KB · Views: 1,470
  • Mustang 2.jpg
    Mustang 2.jpg
    64.2 KB · Views: 1,458
  • Mustang 3.jpg
    Mustang 3.jpg
    134.6 KB · Views: 1,469
  • Mustang 4.jpg
    Mustang 4.jpg
    132.6 KB · Views: 1,468
  • Mustang 5.jpg
    Mustang 5.jpg
    95 KB · Views: 1,471
Last edited:

Bob Heine

ALLIANCE MEMBER
Joined
Oct 24, 2009
Messages
10,708
Location
Boca Raton, Florida
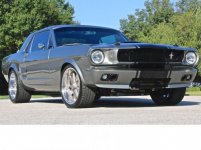
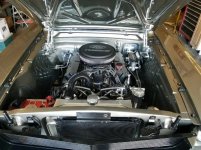
I don't know what your friend wants for a final product but with all the suspension work you plan I suspect he wants it wrapped with something nice. When Rusty finished the car in 2019 it looked pretty good. The engine bay is pretty clean.
attachment.php


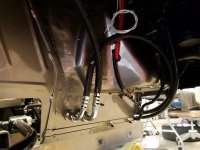
I really liked some of the details, like the hidden A/C lines.
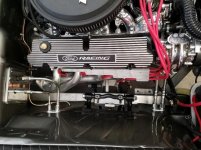
attachment.php


attachment.php


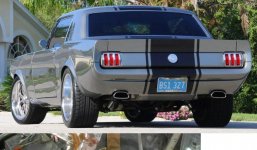
The finished car is Eleanor-ish but with a coupe body. Lots of subtle stuff done to the car, like the drip rail delete and mild fender flares.
attachment.php


Lots of nice touches on the rear as well.
attachment.php
 

Attachments

  • Mustang 10.jpg
    Mustang 10.jpg
    93.1 KB · Views: 1,505
  • Mustang 9.jpg
    Mustang 9.jpg
    76 KB · Views: 1,497
  • Mustang 8.jpg
    Mustang 8.jpg
    129 KB · Views: 1,488
  • Mustang 7.jpg
    Mustang 7.jpg
    84.3 KB · Views: 1,487
  • Mustang 6.jpg
    Mustang 6.jpg
    95.2 KB · Views: 1,486

shortykorte

Well-known member
Joined
Sep 1, 2014
Messages
8,039
Location
Tallahassee, Fl
Thanks for posting Bob. Wonder if Rusty minds having some crusty shop rats stop in for a tour.

Yes updates Mark.


Sent from my iPhone using Garage Journal
 

casmurbax

Well-known member
Joined
Sep 25, 2012
Messages
2,759
Location
Wilton, NY
Hey Mark, as others gave said, any updates?

I see you haven't been on, Last Activity: 03-17-2021 10:31 PM. Hope all is well.
 

Thirdyfivepickup

Well-known member
Joined
Nov 15, 2016
Messages
1,953
Location
Portage, Indiana
LOVE This!!!!! I am enjoying the stereo build. I used to be big into stereos then I got married... I'm also a rookie wood butcher so it hits both of my wheel houses. I didnt see but where did the grill mesh come from? I love the look of it.
 
OP
I

IGO2XS

Well-known member
Joined
Apr 24, 2012
Messages
1,415
Location
Sarasota, FL
Whats up guys? I feel so bad I have been out of touch. I just seems like when I finally get in the house and have dinner I am done for the day..........but that is no excuse! I can tell you I am still trying to get the van done and the 63 Corvette finished. Both have been slow because of parts or people showing up to work, etc. I will do updates on both projects in the next few days. I also need to add some photos. I just bought another car and I am in love with it. Its a 63 Lincoln convertible with the suicide doors. Man it sure is pretty.

I have been out in the garage every day and really loving it. Unlike last summer I am running the A/C when it gets warm. I really punished myself last summer by rarely turning it on. Forget that I want to be comfortable. It makes such a difference when working on the cars.

I guess I will talk about the van. As of last week it finally hit the ground with suspension more or less finished.. Because I used the crossmember meant for the c10 pickup I was in uncharted territory. We had some clearance issues with the tubular control arms so we had to modify them. Although the kit was a "bolt on" kit for the pickup, it was not the same for the van. We ended up finally welding the brackets to the frame. I know you guys have already seen pictures of the crossmember and control arms I will share them again.

Dang, I have been away from here so long the whole format of the Forum has changed. I love it. I know I deserve to take some abuse from you guys for the disappearing act so I am ready to get roasted!!

001(82).jpg
001(81).jpg
 
OP
I

IGO2XS

Well-known member
Joined
Apr 24, 2012
Messages
1,415
Location
Sarasota, FL
I don't know what your friend wants for a final product but with all the suspension work you plan I suspect he wants it wrapped with something nice. When Rusty finished the car in 2019 it looked pretty good. The engine bay is pretty clean

Wow Bob that is one pretty car. I like some of his ideas. I dont remember where I left it but we ended up with about $25.000 in Heidts suspension alone. I have a guy who is smoothing the firewall, taking out the shock towers, and mocking up the Coyote motor. I dont have any recent pictures but I will get some.
 

jbmatth

Well-known member
Joined
Jun 3, 2013
Messages
5,689
Location
Northern Ok.
No roast here either, I just want to see the progress, you always make amazing looking vehicles, well anything really but the vehicles are my gig.

JB
 
To avoid these ads, REGISTER NOW!
Top Bottom