skamp
Well-known member
It came out great. Nice job!
Steve
Steve


^ nice clean install. Glad you could make something out of the spare angle they included.
has anyone ever had an issue bolting the power unit to the cart? Mine has a bunch of extra holes in the bracket that's welded to the back of the motor, and although it bolts up, it is installed at a distance from the flow divider such that the short hose connecting the two is too long. I'm thinking the Chinese child that welded the bracket onto the motor may have accidentally flipped it upside down. Will probably end up drilling new holes for the flow divider in the cart bracket.


well, i feel dumb now. That is the exact problem I had. I kept insisting to myself that the fittings had to point towards each other, and I just could not get the fittings to start threading without kinking the hell out of the hose. I never considered clocking the fittings to take up the slack in the hose. Thanks for that tip! I am hoping to do a trial run tonight and bleed the columns.
 image by Norbert Ogiba, on Flickr
I was probably pretty close to 28 days for full cure.Generally is everyone waiting 28 days before loading a car on the lift? I poured just a hair over 2 yards, it has been about 2 weeks since the pour.
Thanks - just need that third special car to take up residency!^ looks like a nice open space with lots of room to play!

 image by Norbert Ogiba, on Flickr
 image by Norbert Ogiba, on Flickr

 Barely 3" and this is a commercial warehouse. When the bathroom was relocated there was a good 6" slab the plumber had to jack hammer so I assumed. Wrong! Anyway, no MJ install for me until I cut a hole, lay some rebar and pour some concrete. At $100 a set, I don't want to buy a third set of anchors.
SpecBC
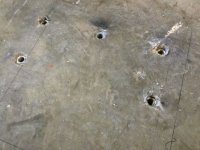
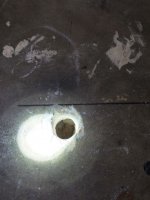
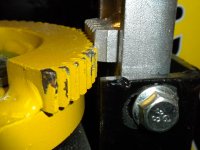
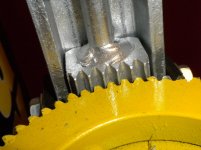
If you haven't drilled two test holes you're a day late. After two attempts of installing my MJ and not checking depth, I have two failed attempts. First attempt, the concrete was too thin and the bit I used was a tad wider than 7/8. Even using epoxy with the wej-it, I had pull up. (pix 1) The driver side, I had decent thickness, ground the bit head diameter down to 7/8 and used epoxy. That side I would lift an elephant with.
My second attempt was the other day. Again, no test holes before starting. I'm lazy and stupid I guess. Started with drivers side. Thickness was close to limit, used wej-it and epoxy and the install looks good. (pix 2).
When I drilled the passenger side, oh ****!
So check that thickness as soon as possible!!!
Ben
When I ordered my second set of anchors, Danmar told me 5" for epoxy, 4" for wedge. I went with the wedge since I probably didn't have the 5".
You should be able to use good masonry bits and a drill. Drill a small pilot and work up to 1/4 or 3/8 then see if you can verify depth. A coat hanger with a short 90* bent tip could work.
Hello Garage Journal,
First time post here, great thread!
Early apologies on the image size.
I'm looking at doing a MaxJax in my 28x10'10" carport this spring. I'm in Ontario, the GTA and have a full size 67 classic.
As partially seen below, my plan is to cut the asphalt and drill two 14"x 4' 6" deep footings below the proposed jack bases (indicated by the white squares), as well as cut for a slab around and joining the two bases (est 4x10'). Probably go 6-8" thick on the slab with the footings and all tied in with rebar. The slab towards the open side can be tied into the existing roof support footing (which is majorly big below). The spacing of the jack bases is yet to be determined, but realistically somewhere around 110-115". The open side is slightly below level from the house, so the base there will have to be built up.
Wondering if the experts here might answer a few questions, and perhaps offer some advice,
Do you think my proposed footing and slab in the asphalt drive be sufficient to support the max weight without moving? Should it be increased in width, say 5 or 6'? I could simply continue over and tie into my solid poured wall.
Would I be best fabricating a pour in place base plate with female plugs tied in to the rebar lattice to receive the bolts, or let the slab cure, then drill out for epoxy in Weg-it's?
How well can the jacks take wet weather? The plan would be to keep them up May-Nov but not in the winter. The Jack on the open side will be indirectly exposed to rain. I could make a slip on cover for it. I also plan on making up semi permanent hoses to go up and over.
Cheers and thanks, Mark
I used the mohawk spec as below, and parsed out the essentials.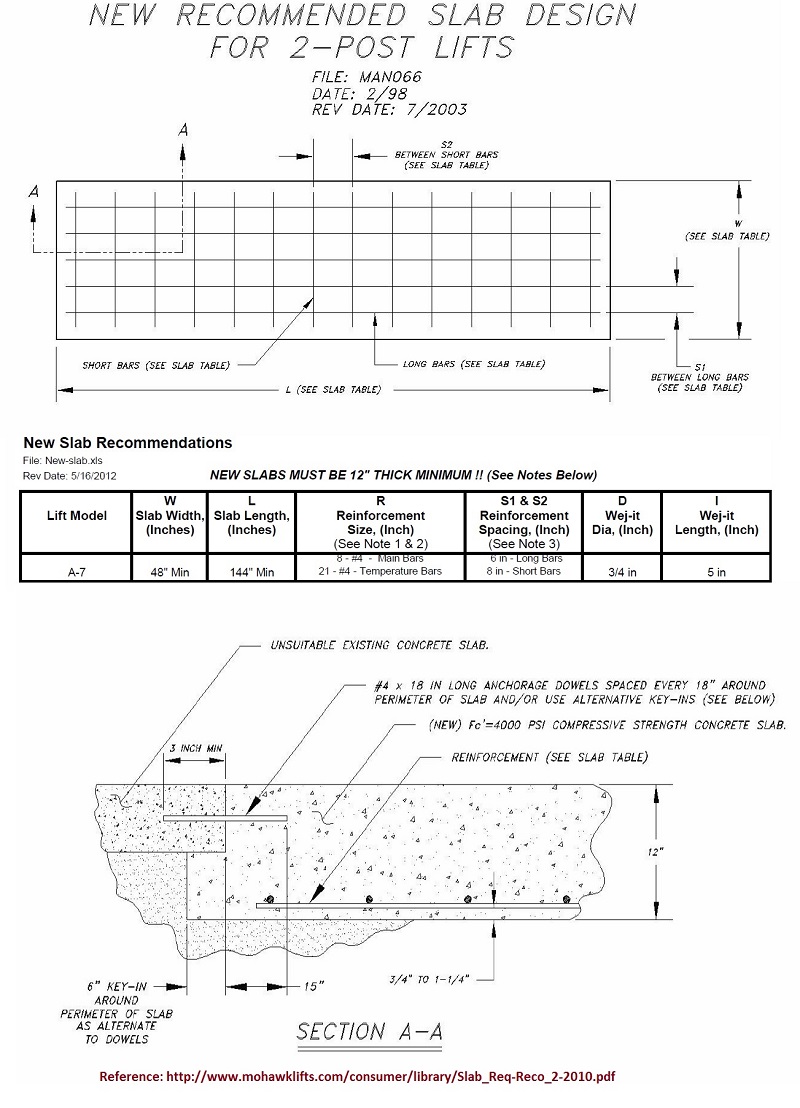
SpecBC It's a Dewalt.