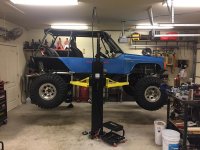
Hi All, here are a few photos of my semi-permanent MaxJax install.
I installed the lift last summer and up until recently, every time I needed to use the lift, I had to wheel the pump cart out and hook up the hoses. The hoses were stiff and hard to work with. The hoses also got in the way of my welding cart and I always had a fear of weld spatter getting on the hoses.
I started to read around on how others were dealing with hoses that got in the way and found that a few people had mounted their pumps to the side of the column or to the wall. My only issue with the installs that I read about was that people were using hoses to run the full length. Running hoses entirely from the pump to the column can get really expensive. I was looking at over 300 for just the hose, so I made a call to a local hydraulics shop to see about building hard lines for the install. To go hard line, the tubing and fittings for this project were less than $120.
The parts used are:
2pcs male elbow - 3/8NPT to 3/8" JIC flare (connects between pump head and the hard lines)
2pcs female connector - 3/8" JIC flare to 3/8NPT (connects between the end of the hard line and the factory MaxJax hose)
1pcs union - 3/8" JIC flare (I could only haul 10ft sticks of tube, so I used these to connect the ends of the tubing together)
6pcs nuts and sleeves - 3/8" JIC flare (these are used at each hard line connection)
60ft seamless tubing - 3/8" X .065" (I only used about 30ft for this install)
Cable clamp - 3/8" (for mounting the hard line to the wall)
Rubber insulated cable clamp - 3/4" (for mounting the MaxJax hose to the wall)
As mentioned in the parts list, all fittings use a 37 degree flare. For this, you will need a flaring tool. I used a flaring tool that is similar to the Professional Flaring tool that Eastwood sells. This tool is a million times better than the cheapo vice units that gnaw up the sides of the tube. The hydraulic shop did give the option of using compression fittings but I went with the flares because they are better and I already had the tool to make the flares.
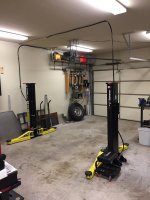
The hard line runs from the pump, up the wall, across the ceiling, and to the factory MaxJax hose. I decided to connect to the hoses, instead of straight to the column. This still allows me to take the columns down if needed. If I do need to move the columns, I can disconnect the hose and coil it up and out of the way.
I am very pleased with the install. The smaller ID of the hard lines doesn't seem to have had any effect on the lift or lower speed. My next steps are to get a jack-shaft garage door opener and maybe a high lift track conversion so I don't have to pull in backwards to use the lift.


I installed the lift last summer and up until recently, every time I needed to use the lift, I had to wheel the pump cart out and hook up the hoses. The hoses were stiff and hard to work with. The hoses also got in the way of my welding cart and I always had a fear of weld spatter getting on the hoses.
I started to read around on how others were dealing with hoses that got in the way and found that a few people had mounted their pumps to the side of the column or to the wall. My only issue with the installs that I read about was that people were using hoses to run the full length. Running hoses entirely from the pump to the column can get really expensive. I was looking at over 300 for just the hose, so I made a call to a local hydraulics shop to see about building hard lines for the install. To go hard line, the tubing and fittings for this project were less than $120.
The parts used are:
2pcs male elbow - 3/8NPT to 3/8" JIC flare (connects between pump head and the hard lines)
2pcs female connector - 3/8" JIC flare to 3/8NPT (connects between the end of the hard line and the factory MaxJax hose)
1pcs union - 3/8" JIC flare (I could only haul 10ft sticks of tube, so I used these to connect the ends of the tubing together)
6pcs nuts and sleeves - 3/8" JIC flare (these are used at each hard line connection)
60ft seamless tubing - 3/8" X .065" (I only used about 30ft for this install)
Cable clamp - 3/8" (for mounting the hard line to the wall)
Rubber insulated cable clamp - 3/4" (for mounting the MaxJax hose to the wall)
As mentioned in the parts list, all fittings use a 37 degree flare. For this, you will need a flaring tool. I used a flaring tool that is similar to the Professional Flaring tool that Eastwood sells. This tool is a million times better than the cheapo vice units that gnaw up the sides of the tube. The hydraulic shop did give the option of using compression fittings but I went with the flares because they are better and I already had the tool to make the flares.
The hard line runs from the pump, up the wall, across the ceiling, and to the factory MaxJax hose. I decided to connect to the hoses, instead of straight to the column. This still allows me to take the columns down if needed. If I do need to move the columns, I can disconnect the hose and coil it up and out of the way.
I am very pleased with the install. The smaller ID of the hard lines doesn't seem to have had any effect on the lift or lower speed. My next steps are to get a jack-shaft garage door opener and maybe a high lift track conversion so I don't have to pull in backwards to use the lift.
Attachments


Last edited:
")


 Now that's how you do it!Great, quality install