To avoid these ads, REGISTER NOW!

Mike's Garage & House Projects

OP
M

mfg0772

Well-known member
Joined
Aug 8, 2018
Messages
146
Location
Northeast CT
Mike,
For some reason the table photos in post #37 aren't showing up. I checked on the computer and the app. Good progress on getting the garage cleaned up and plugging forward on your projects.

I have no idea what is going on here. If others could help/verify if they can see pics, it would be appreciated. Obviously Nick was able to see pics. I tried both https and http and both work when I use Chrome, however, only https works when I check via the app or IE. For now, I went back to https since that might be ok.
 
To avoid these ads, REGISTER NOW!
OP
M

mfg0772

Well-known member
Joined
Aug 8, 2018
Messages
146
Location
Northeast CT
I prefer pics that are posted within the text as they appear larger and allow for seamless scrolling and viewing IMO. For now, I will add them as attachments as well as a fail safe until I get a better handle on the issue.
 

squashman702

Well-known member
Joined
Feb 16, 2012
Messages
345
Location
Stow, MA
Lots of great progress and I like the tables. You're also giving me bad ideas for coping around my pool. Used to live down your way for a bit as well- worked in Dayville and lived in Putnam for about a year. Keep up the good work!
 
OP
M

mfg0772

Well-known member
Joined
Aug 8, 2018
Messages
146
Location
Northeast CT
Lots of great progress and I like the tables. You're also giving me bad ideas for coping around my pool. Used to live down your way for a bit as well- worked in Dayville and lived in Putnam for about a year. Keep up the good work!

Squashman - crazy small world. I grew up in Danielson. Moved to Charleston, SC for 5 years after college. When my wife and I moved back, we lived in Dayville for 2 years before moving to Tolland. The daily commute to Hartford for both of us was too much.

My Dad's shop is in Dayville though so I'm back and forth often borrowing (or stealing) tools and equipment.
 
OP
M

mfg0772

Well-known member
Joined
Aug 8, 2018
Messages
146
Location
Northeast CT
Ok - now for a long overdue post. I've been putting it off because I didn't want to dig through my old pictures. This weekend, I finally finished a long overdue project (mostly :lol_hitti).

I've been renovating our living room for almost 2 years now. I did a solid 3 months of work, then the weather got nice and I moved outside. Then when winter set in, I got it mostly finished. Rinse, wash, repeat. I've been at about 98% complete for 8 months now. :dunno:

All I needed to do was build some doors for the built-ins I built. In my defense, we were going to do glass panels in the doors and COVID put a hamper on that. I finally had enough and decided it needed to get finished. No progress pictures but the little guy and I headed down to the basement and got some doors built. I ended up using 1/4" mdf for the panels since it should be pretty stable and paints up nicely.
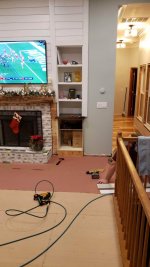
Completed room:
ACtC-3efTjncDVQRYCeMpsFuuRjmv-u7bxZ3gSQo_iGIHphGzGSnV2lpghklcfl-nbvBTEdLr6LhtlDheekHSeMvfr5pdtcso-sv1trf5YgmH52_Hw9YUS9GzmdiEFD7u1xmmO9wVZ4SxaipbywUmUHxDwkKaA=s1440-no


For comparison, the picture from the listing when we bought the house:
ACtC-3fFoKjAV4XwiDxJILsByRm-8NnwvJph3riocGgr8d9fhp9kBAxPL_Ax1Yie5PxmcjEoXewsu-WwhZSOXUExh4vp_EXUaX0yiMyrC7xq_uenEtQJMKrh7vOKbXp1zYg-TM3puc-T5iLUc-pIvEV5dcFsNw=s1334-no


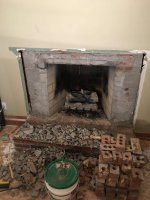
I do have a few progress pics and will give some highlights of the process. First up was scraping the popcorn ceiling. That was fun...not. Next was adding a ceiling fan and recessed lighting. This room had no lights before. Not even a switched outlet. Next was getting rid of the standard mantle and surround. What should have been a simple task was quickly complicated.
ACtC-3fYtxlnA8CQjVQVhKuvbr5_DbKAVMHJT64vwCJ7PM_3U3f68xMaLndGGnPU_VLrm9JUXLF3U66-rHdVeJi6EhYArj4CCF-tyV1raOgAXYC6iXLqdn6mbg8BpOdvqdIU9TGnueHaBJJYk5Fpt1ATpXOF3Q=w1156-h1540-no


The surround was attached with adhesive. Couple that with the fact that there were no ties holding the brick back to the CMU and the brick came down. That was detour 1. On the bright side, I got to practice my brickwork.

ACtC-3fAw8jVatFbRMGgZP1K0nPrqbU9e48-7LWjpjRDu98GoiL1Y32LGkOaQVMp7lBZ4SCRi4mbNrp-ZTTKIjJH0cxJKlnwPFhbfxTfO-_zaqquplaRWwDGDlndorGWKKDd6MX2TotSMM4SQTUlIEpcddzPdA=w2054-h1542-no


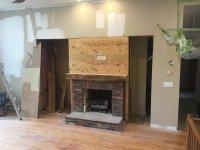
Next was a new mantle. We wanted something rustic. I was lucky enough to get a tree from my parents property. My dad and I milled it with an Alaskan sawmill and then I used a router sled to plane it and true it up.

ACtC-3copDgafBtlt-rS-eqoDOkcjnBGhzKp9Sm8AN83IwEfzaF8s7ZekAk-0wSumqWBQHkAPoXrEU9EvePOK5sfaSndpAfm7YMN2lVVdf8jLl4r5Xz9q0_4NEgp3GXw_GLpV_G_Uwr31BBKhocgeBV6K2itRw=w2054-h1542-no


Next up with was the nerve wrecking part...for my wife anyways. I knew we had a chase to the left of the chimney and a closet on the right. Time to open things up.

ACtC-3dZK2HDGYtnCusu2ejSbmUa3cAG5YjdKjfE8XBLBMBDwdUaw3TP1XG8FjGlgogvEYkGydtSTx2eI9poOEM-dBxw84mZmHua-xwvw2bFC57iDWJs4RAarI6Pks-7cJaFS8AnrW8WfsirhpaDFRAxTn6f6A=w2054-h1542-no


Adding the base cabinets for the built ins.

ACtC-3cILIYtSULYjBJ88e5C5Qyflq-kIL_MAK0l5-MqmslfHn0rmYr9sd5PjXTQSGQWpzjCx2twXfRfKTZdN7y6suOVCNYl1r7xNB4ag1yXQLEKqsziNoDDWrKsrlqHfdyhPXcm4aB_iLnYQe2Ek_0q4Teakg=w2054-h1542-no


Then adding the bookcases, trim, shiplap, and starting to install the built up crown molding.

ACtC-3fu3kXk5lu7DwdZjh3futaz7MbzJePK82oqxYSrqxLK4-HcyLHCUiScSUV0wwU2TTSfy7gCxaed_L0Ne9WxqAd_I3-TH5KB-8arGGUXPvIQ5i-8iDpO4qq8cbYgkXMCoIND7qdKtBQctw0Jf__Lo3XThQ=w2054-h1542-no


New floor starting to go in here. You can also see SWMBO's one contributions - the whitewash on the brick. I actually think the technique she used was call a German Schmear. I'll give her credit since she doesn't read this, it came out really nice.

ACtC-3dgu_81h2A9WjGWb5V2HVUVdE02tn23SnzU96ub52azVDG5OgKaaDwBFGXKMbQmqkwt4smS6tDnsJvKBk5ohxcWQsFhbYFZc9Zu8eQUzhoRZguHKliWfsthkia-fw2zXRzSA1X-XPRCmUdq84Xvan_NzA=w868-h1540-no


After that, it was lots of trim details. At this point, the only thing left is making a custom plate to cover the outlet I recessed in the mantle. I need to think on that a bit so I'll call it done for now.

Still using the same technique for posting pics which seems to work sporadically. In case this is one of those times it isn't working, pics are also attached. I couldn't attach them all but you should get the gist.
 

Attachments

  • 3FA1A8C8-E024-4CCF-B8E1-8052EC0D1F41.jpg
    3FA1A8C8-E024-4CCF-B8E1-8052EC0D1F41.jpg
    141.2 KB · Views: 15
  • 20191208_190435.jpg
    20191208_190435.jpg
    71.4 KB · Views: 13
  • IMG_3470.jpg
    IMG_3470.jpg
    117.6 KB · Views: 11
  • 20190316_150402.jpg
    20190316_150402.jpg
    146.9 KB · Views: 14
  • IMG_3403.jpg
    IMG_3403.jpg
    149 KB · Views: 13
  • IMG_3393.jpg
    IMG_3393.jpg
    93.5 KB · Views: 12
  • 6C192EEB-4753-4ABA-B16B-06421FA4E44E.jpg
    6C192EEB-4753-4ABA-B16B-06421FA4E44E.jpg
    71 KB · Views: 13
OP
M

mfg0772

Well-known member
Joined
Aug 8, 2018
Messages
146
Location
Northeast CT
Oh, and I almost forgot, made my first Gregor pizza this weekend. I mean, is it really Garage Journal if I don't post a pizza pic?

ACtC-3dFugoJKezIi_nfJqnbvF5ydCnDD2HhRl0ucwL7WCJKhagHr7SF44R_qcjP4yFR8hlv1S7ZE_uSt5A0xUt0MWuLIuagBAj4pRuT7ndx0EiCd6Mjiu2hb0BS1-Ir5Ixy8nHnydf7uSUndXCFw7Jr2WsZUQ=w1156-h1540-no


There will be many more of these in the future.
 

Attachments

  • IMG_5256.jpg
    IMG_5256.jpg
    149.6 KB · Views: 11
To avoid these ads, REGISTER NOW!

nicholam77

Well-known member
Joined
Dec 18, 2016
Messages
2,655
Location
Minneapolis, MN
Incredible! So cool to see another "built ins" project while I plug away at mine, it definitely gives me motivation. Although yours was much more amibitious... :D

I'm trying to wrap my head around glass panels in the doors. It's a cool idea and I have no doubt you would have pulled it off, but I think with the open shelving you have above, the solid shaker doors look perfect anyways.

Can you tell me about the flooring? What species? I love the variation in color and the how you finished it. Looks perfect with the "rustic" live edge mantel slab (which is awesome btw).

Like you said in my thread, I think we have a lot of commonalities. Just talking living rooms, mine also has popcorn (well, knockdown actually, and haven't dealt with it yet) and had no light fixtures. Who the hell doesn't put any lights in a room? But yeah, all the house renovations, trying to do it with young kids...

Cheers to someone else in a similar predicament! Keep posting, you've done great work so far.

:beer:
 
OP
M

mfg0772

Well-known member
Joined
Aug 8, 2018
Messages
146
Location
Northeast CT
Mantle and built ins look fantastic Mike.

Bret

Thanks Bret. The pictures present much better but I suppose that's usually the case. We all can quickly find the flaws in our own work.

Agreed, nice work.

Thanks Squashman.

Incredible! So cool to see another "built ins" project while I plug away at mine, it definitely gives me motivation. Although yours was much more amibitious... :D

I'm trying to wrap my head around glass panels in the doors. It's a cool idea and I have no doubt you would have pulled it off, but I think with the open shelving you have above, the solid shaker doors look perfect anyways.

Can you tell me about the flooring? What species? I love the variation in color and the how you finished it. Looks perfect with the "rustic" live edge mantel slab (which is awesome btw).

Like you said in my thread, I think we have a lot of commonalities. Just talking living rooms, mine also has popcorn (well, knockdown actually, and haven't dealt with it yet) and had no light fixtures. Who the hell doesn't put any lights in a room? But yeah, all the house renovations, trying to do it with young kids...

Cheers to someone else in a similar predicament! Keep posting, you've done great work so far.

:beer:

Nick - I should have clarified, when we were thinking glass doors, they would have been heavily frosted.

The flooring is hickory. I've been slowly putting it in throughout the house. I chose to get it from Somerset since they are a fairly big manufacturer so I could buy in stages as finances allow. I also went with engineered since some of my house is on slab and other is on basement and I also plan to add radiant heat. Being an engineered floor, it is also pre-finished which I felt was important as I think factory finishes tend to be the best. It has the ability to be refinished 1-2 times if necessary. So far, it is holding up well.
 
OP
M

mfg0772

Well-known member
Joined
Aug 8, 2018
Messages
146
Location
Northeast CT
Just a quick update from this past weekend...knocked out some shelves for my son's room. Nothing fancy but they get they job done. I've used this design in the past for his old room and it works well. Being able to see the covers makes the nighttime routine of picking a few books go slightly faster :eyecrazy:

ACtC-3fCD0v9PCicnK3wRpCfEPJZ1c94k5b2QY-PlHhGxeewbxBm078FwG5lk9a91p0ytmZkpY66vq8H63vIuAZcvqiuFA3lZLW79qpntSdequvx4Jd5AlnTZ5r-oQg5uAHOTueqWJdzqQu2wmWeunWQfwQgIQ=w1070-h1426-no


ACtC-3eF6_RWTV2I_Pw2qDPXEfLRYtJXIADrlwW2EuMBBDcJllEEjRYorrqFuEdpR-0BkbDvnkEV99pVKht0JKZNqp020pfHiaEPFhcNYtubYECWezqxCru47Ek_YBC-EJVZgEW2GeSHzZt4Mt_sJUK_8t_Wew=w1070-h1426-no
 

Attachments

  • IMG_5271.jpg
    IMG_5271.jpg
    106 KB · Views: 6
  • IMG_5272.jpg
    IMG_5272.jpg
    77.2 KB · Views: 6

The J

Well-known member
Joined
Mar 4, 2010
Messages
152
Mike's Garage & House Projects

First time reading your thread and I’m glad I did! Impressive improvements all around.

Maybe you started with accountability for maintaining a clean workshop, but I’m glad you’re posting the progress on all of the projects.

Your son’s room came out great- i really like the windows and amount of light in there.
I may have to steal the shelf idea for my bookworm.

How are they mounted? Any hidden screws, or the books do the hiding?

The mantle/fireplace wall is awesome! I will definitely borrow some design cues for my hideous fireplace wall. The new shaker doors are a nice touch.
 
OP
M

mfg0772

Well-known member
Joined
Aug 8, 2018
Messages
146
Location
Northeast CT
Re: Mike's Garage & House Projects

First time reading your thread and I’m glad I did! Impressive improvements all around.

Maybe you started with accountability for maintaining a clean workshop, but I’m glad you’re posting the progress on all of the projects.

Your son’s room came out great- i really like the windows and amount of light in there.
I may have to steal the shelf idea for my bookworm.

How are they mounted? Any hidden screws, or the books do the hiding?

The mantle/fireplace wall is awesome! I will definitely borrow some design cues for my hideous fireplace wall. The new shaker doors are a nice touch.

Thanks for checking things out J. Right now, the workshop is mostly clean but it seems to go in cycles lately. Hopefully I have some shop progress this summer. I've been hesitant to make any improvement since there is a roof leak above the garage. New roof is on tap for this spring.

The shelves are anchored with three screws into studs. They are about 42" long so I was able to hit three studs but my last set only hit two studs. The books hide the screws so no fancy mounting tricks. The front and back are just screwed together as well so some filler was used to hide the screws in the front face.
 

nicholam77

Well-known member
Joined
Dec 18, 2016
Messages
2,655
Location
Minneapolis, MN
Being able to see the covers makes the nighttime routine of picking a few books go slightly faster :eyecrazy:

Haha I feel that! We have a few of those books. Seems you have a truck/car/construction machinery enthusiast on your hands.

Beep beep beep!

:bounce:

But yeah, nice job on the shelves. Definitely nice to have the books displayed like that. We do bedtime stories, too, sometimes it's my favorite part of the day.
 
OP
M

mfg0772

Well-known member
Joined
Aug 8, 2018
Messages
146
Location
Northeast CT
Not much progress as of late, at least not worth of posting. I have been busy caulking and painting trim in our hallway. Hoping to get that finished this week/weekend so I can move on to a new project.

I did pick up a new toy today!

ACtC-3fpoXLL5h6Sw7sy94FOEdz4Y__xBMzcYJKqinjI1w-JFdWTHMeitlohbMFjTB-IgC2AEkMtzDTrA06FZBZKIm5qqDQ-8E-qfcG7_t2F_QJYsfXlr9j3dxLMGJt4vw_je02GO-KKpvptZNe5WI-T0_OzMA=s700-no


Not the actual pic but you get the gist. I've been eyeing a track saw for a while. I had a line on one a few weeks ago but the guy sold it out from under me. It wasn't a great deal but better than retail. Then this set came up. Minimal homeowner use in the last year. $350 :pimpflash The price completely eliminated the wavering I was having between Makita and stepping up to Festool. Now to find some projects to use it on.

I think I've mentioned getting some sort of outfeed/mft mobile bench in the past. Perusing YouTube, I stumbled on this video:
I think I am going to do something similar tweaked to fit my needs. This will also make good use of the new saw. Hoping to get going on that in the next month or so.
 

Attachments

  • xps01ptj-194368-5.jpg
    xps01ptj-194368-5.jpg
    52 KB · Views: 5

nicholam77

Well-known member
Joined
Dec 18, 2016
Messages
2,655
Location
Minneapolis, MN
Sweet! That is a great price on the cordless version!

Hard to pass up a good deal. The price is what swayed me on Makita vs. Festool as well. The Festool has some minor features I like, like the depth setting and splinter guard, but not to the tune of an extra $200-300. Plus, every Festool accessory will be more $$$... longer rails, blade replacements, etc. Also, the Makita does have some nice features the Festool does not, like the anti-tip lock and scoring feature. As far as actual performance, I think they are quite similar :thumbup: (I haven't used the TS55, but I struggle to imagine in what way the cuts could be much better)

I'm a long-time fan of Paoson's channel. If you plan on doing cross cuts on your MFT, I'd highly consider implementing a fence and rail supports at some point. Maybe take a look at Paoson's larger multi-purpose workbench or figure out your own solution. I've posted a handful of custom MFT builds in my thread if you need some inspiration.

Can't wait to follow that project!
 
OP
M

mfg0772

Well-known member
Joined
Aug 8, 2018
Messages
146
Location
Northeast CT
Sweet! That is a great price on the cordless version!

Hard to pass up a good deal. The price is what swayed me on Makita vs. Festool as well. The Festool has some minor features I like, like the depth setting and splinter guard, but not to the tune of an extra $200-300. Plus, every Festool accessory will be more $$$... longer rails, blade replacements, etc. Also, the Makita does have some nice features the Festool does not, like the anti-tip lock and scoring feature. As far as actual performance, I think they are quite similar :thumbup: (I haven't used the TS55, but I struggle to imagine in what way the cuts could be much better)

I'm a long-time fan of Paoson's channel. If you plan on doing cross cuts on your MFT, I'd highly consider implementing a fence and rail supports at some point. Maybe take a look at Paoson's larger multi-purpose workbench or figure out your own solution. I've posted a handful of custom MFT builds in my thread if you need some inspiration.

Can't wait to follow that project!

Nick - I used the Makita for a quick project and it was awesome. The other saw on my radar was a Festool TS75 with two track for $750. That seemed like a decent deal but when they Makita came up, it was too good to pass up.

I'm not on YouTube too often so a lot of those guys are new to me. I originally saw his large table. My problem is I am somewhat limited on space. My plan is to build the modular sections as time and money allow. This will also allow me to store them more efficiently. I also noted the fence and am planning on including that and some type of squaring jig.
 
To avoid these ads, REGISTER NOW!
Top Bottom