To avoid these ads, REGISTER NOW!

Miniature Boley vise creation

Slava Yorish

Well-known member
Joined
Sep 12, 2024
Messages
65
With this message I am starting the story of creation a miniature version of Boley jeweler's vise. First, I got a vise and thoroughly measured all dimensions. Then created a 3d version of it
 

Attachments

  • 20251119_154715.jpg
    20251119_154715.jpg
    490.9 KB · Views: 74
  • 20251102_195846.jpg
    20251102_195846.jpg
    594.2 KB · Views: 57
To avoid these ads, REGISTER NOW!
OP
S

Slava Yorish

Well-known member
Joined
Sep 12, 2024
Messages
65
Once I had the 3d model I printed a few small-scale miniatures just to determine which size I am comfortable to work with. It seems 1/3scale is too tiny, so I decided to start building a 1/2scale vise.
 

Attachments

  • 20251106_142605.jpg
    20251106_142605.jpg
    481.9 KB · Views: 54
OP
S

Slava Yorish

Well-known member
Joined
Sep 12, 2024
Messages
65
Once the size is determined, time to make a CAD of two molds- each for corresponding jaws. Molds should open allowing wax extraction. It also should have a port for wax injection. Some of the features cannot be resolved wothout cores. So the cores are designed as well. I 3d printed cores and molds on my resin printer. Here the result.
 

Attachments

  • IMG-20251123-WA0005.jpeg
    IMG-20251123-WA0005.jpeg
    274 KB · Views: 35
  • 20251124_115414.jpg
    20251124_115414.jpg
    518.1 KB · Views: 37
OP
S

Slava Yorish

Well-known member
Joined
Sep 12, 2024
Messages
65
And here is a short video of the entire process. From mold assembly to wax injection and model extraction.
 
To avoid these ads, REGISTER NOW!
OP
S

Slava Yorish

Well-known member
Joined
Sep 12, 2024
Messages
65
It took some time for all preparations. First, I built a wax tree where the stem will be a metal feed and the branches are the gates molten metal comes to the mold. After I finished with the tree I prepared investment mix and filled the flask. The mix dried and became solid. Next morning I started with steaming the wax out of the mold. Once it was done, the flask was inseted in the high temperature oven for burning out the ramains of the wax. No inclusions should present in the cavity when metal fills the mold. And finally a silicon bronze was melted and cast into the mold. I got my castings perfectly done. The next operation is cleaning and machining.
 

Attachments

  • 20260604_184758.jpg
    20260604_184758.jpg
    513.9 KB · Views: 24
  • 20260605_073321.jpg
    20260605_073321.jpg
    749.1 KB · Views: 24
  • 20260604_185605.jpg
    20260604_185605.jpg
    533.1 KB · Views: 22
  • 20260604_190758.jpg
    20260604_190758.jpg
    730.3 KB · Views: 23
  • 20260605_165112.jpg
    20260605_165112.jpg
    303.8 KB · Views: 26
  • 20260605_202112.jpg
    20260605_202112.jpg
    455.6 KB · Views: 39

LXCam

ALLIANCE MEMBER
Joined
Apr 23, 2013
Messages
19,109
Location
AZ
That’s impressive how much detail you produced considering how small those parts are. I’m surprised the finish isn’t a lot more grainy. 👍
 
OP
S

Slava Yorish

Well-known member
Joined
Sep 12, 2024
Messages
65
That’s impressive how much detail you produced considering how small those parts are. I’m surprised the finish isn’t a lot more grainy. 👍
Unlike sand casting here I used investment mix for jewelry. It is a fine powder that turns into solid in a few minutes and requires kiln firing before bein filled with liquid metal. The Technology widely used in jewelry. Therefore good surface finish.
 
OP
S

Slava Yorish

Well-known member
Joined
Sep 12, 2024
Messages
65
In this wise the nut is turning and the lead screw is attached to the rear jaw. I made the nut today.
 

Attachments

  • 20260609_204744.jpg
    20260609_204744.jpg
    327.3 KB · Views: 15
OP
S

Slava Yorish

Well-known member
Joined
Sep 12, 2024
Messages
65
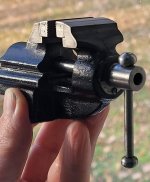
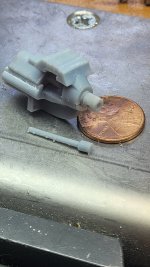
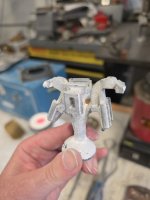
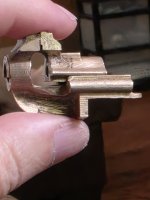
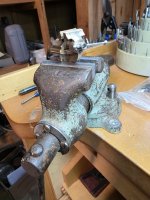
I was ready to start milling jaws but my milling machine had different thoughts. The laprop that controls it just stopped turning on. Something happened to voltage regulator. Anyway, I found the one just like mine on ebay and already purchased it. I made the screw, pinned it to the rear jaw, tapped #00-90 thread in front jaw, installed retaining plate with tiny screw and made a handle while waiting for the replacement. Here are a few pics. The vise it is sitting on is the smallest in commercially available (in the past) Wilton baby vise. They do not make that small anymore.
 

Attachments

  • 20260612_124014.jpg
    20260612_124014.jpg
    537.4 KB · Views: 2
  • 20260612_124109.jpg
    20260612_124109.jpg
    763.2 KB · Views: 3
To avoid these ads, REGISTER NOW!
Top Bottom