To avoid these ads, REGISTER NOW!

Miniature pinch bug vise

Slava Yorish

Well-known member
Joined
Sep 12, 2024
Messages
50
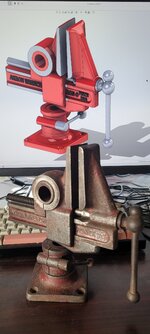
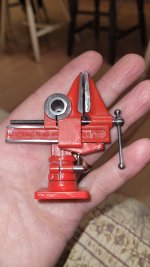
It is a start of the new project. This time it will be a miniature pinch bug vise. Full-sized original was made in Acron Ohio. The vise is rather unusual. It has some unique features like when you tighten the screw closing jaws you simultaneously stiffen the entire assembly. It also can be positioned vertically and tilted or horizontally and swiveled.
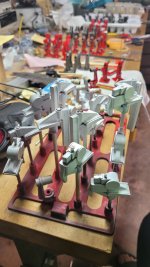
The starting is the same as with previously done miniature Wilton vises. I make 3d model of the vise then 3d print parts and check how it fit together. Hopefully, this project will be complete faster than the previous one.
Thanks.
 

Attachments

  • 20250710_174037.jpg
    20250710_174037.jpg
    553.3 KB · Views: 159
  • Pinchbug vise.JPG
    Pinchbug vise.JPG
    568.6 KB · Views: 132
To avoid these ads, REGISTER NOW!
OP
S

Slava Yorish

Well-known member
Joined
Sep 12, 2024
Messages
50
I printed 3D models. 4 total. The rest of the parts will be machined from.stock material. Then gates were added to the models and each model was placed in containers and filled with a special mold RTV silicon. The silicon slowly cures in 24 hrs. Next step is taking silicon off the tube and cutting the mold. This way I create a cavity for filling the mold with wax.
 

Attachments

  • 20250715_184928.jpg
    20250715_184928.jpg
    477.2 KB · Views: 71
  • SmartSelect_20250719_110538_Gallery.jpg
    SmartSelect_20250719_110538_Gallery.jpg
    766.4 KB · Views: 68
OP
S

Slava Yorish

Well-known member
Joined
Sep 12, 2024
Messages
50
A first pilot assembly. Just to develop a strategy of machining, select tools, stock materials etc. This one was cast straight from a special castable resin. This resin has almost 90%wax and can be 3d printed and cast using investment casting process.
 

Attachments

  • 20250719_152434.jpg
    20250719_152434.jpg
    259 KB · Views: 73
OP
S

Slava Yorish

Well-known member
Joined
Sep 12, 2024
Messages
50
I want to try printing this mold for a front jaw on 3D printer using flexible resin. If I succeed I could inject wax in this mold and avoid cutting silicone molds. Here is a project for 3D printer. Two halves of the mold- top and bottom.
 

Attachments

  • 20250721_202815.jpg
    20250721_202815.jpg
    400 KB · Views: 65
OP
S

Slava Yorish

Well-known member
Joined
Sep 12, 2024
Messages
50
Making sure the model looks similar to a real vise. Plus I started injecting wax into molds creating wax models.
 

Attachments

  • 20250729_090322.jpg
    20250729_090322.jpg
    404.1 KB · Views: 41
  • 20250726_195605.jpg
    20250726_195605.jpg
    264.5 KB · Views: 41
OP
S

Slava Yorish

Well-known member
Joined
Sep 12, 2024
Messages
50
I 3d printed all molds. Dynamic jaw mold I printed 6 or 7 times. I lost count. There were several issues I addressed. I started with a few types of flexible resins although I was not sure it will give me an advantage. The sought was flexibility will make removal from the mold easy. However I found it is also easy to remove the wax from rifid mold. Another issue was inconsistent geometry. It required several calibrations. Finally, I picked a basic grey resin, found proper exposure time plus determined the percentage of shrinking, and compensated for it. Additional challenge is to find proper temperature and speed of wax injection. I am close to this, but still not there. I am still not happy with the letters on the dynamic jaw. The rest of work is done, and wax models look good.
 

Attachments

  • 20250731_083533.jpg
    20250731_083533.jpg
    388.7 KB · Views: 29
  • 20250731_083617.jpg
    20250731_083617.jpg
    327.9 KB · Views: 27
  • 20250731_165236.jpg
    20250731_165236.jpg
    598 KB · Views: 40
OP
S

Slava Yorish

Well-known member
Joined
Sep 12, 2024
Messages
50
All wax models ship to the foundry. It will be cast from 8620 steel. Meanwhile I am finishing pilot vises. I need to prepare jigs as well.as order materials for all the vises. Here how one of two pilot vises looks like almost finished.
 

Attachments

  • 20250922_124637.jpg
    20250922_124637.jpg
    696.6 KB · Views: 52
OP
S

Slava Yorish

Well-known member
Joined
Sep 12, 2024
Messages
50
40 sets of castings just arrived from the foundry. It cast from 8620 steel. Now all machining started. Part-by-part, operation-by-operation. I removed gates preparing parts to be turned drilled and milled. I also plan to paint my vises bright red.
 

Attachments

  • 20251126_165711.jpg
    20251126_165711.jpg
    401.4 KB · Views: 45
  • 20251127_135114.jpg
    20251127_135114.jpg
    359.1 KB · Views: 44
  • 20251126_165711.jpg
    20251126_165711.jpg
    401.4 KB · Views: 52
To avoid these ads, REGISTER NOW!
OP
S

Slava Yorish

Well-known member
Joined
Sep 12, 2024
Messages
50
I finished with all the bases. First, I clamped it in the 3-jaw chuck and made the flange flat. Th3n I flipped the part and addressed the cylindrical part.20251202_181228.jpg
 
OP
S

Slava Yorish

Well-known member
Joined
Sep 12, 2024
Messages
50
I finish more vises. There is a small ring that slides on a lead screw. Then the ring and the lead screw are drilled together, and tiny pin is installed. Once it is done the front jaw opens while you turning the handle. It is a last operation before painting the vise.
 

Attachments

  • 20251211_134247.jpg
    20251211_134247.jpg
    462.4 KB · Views: 29
  • 20251211_175759.jpg
    20251211_175759.jpg
    812.2 KB · Views: 23
  • 20251211_134144.jpg
    20251211_134144.jpg
    535.9 KB · Views: 33
OP
S

Slava Yorish

Well-known member
Joined
Sep 12, 2024
Messages
50
Today, I finished fitting the front and the rear jaws together. One-by-one. Next operation 9s reaming the mounting hole then drilling and tapping the rear jaw to accomodate a lead screw.
 

Attachments

  • 20260124_133925.jpg
    20260124_133925.jpg
    531 KB · Views: 33
OP
S

Slava Yorish

Well-known member
Joined
Sep 12, 2024
Messages
50
It took some time. I prepared a bunch of vises for painting. First, I 3d printed a rack, then individual holders to hold separate parts. Parts were cleaned with acetone before priming. I used masking tape cut in width. 2mm, 3mm, 6mm and 10mm wide. I also experimented with different primers. Tamiya made in Japan especially for miniature models as well as an automotive one. I also tried Tamiya red spray paint but found much better control by using an airbrush. I used an automotive paint for this batch of vises. After primer was dry I slightly came over with 00 Scotch bright. And applied a clear coat after painting.
 

Attachments

  • 20260327_101615.jpg
    20260327_101615.jpg
    653.3 KB · Views: 12
  • 20260327_130029.jpg
    20260327_130029.jpg
    492.2 KB · Views: 10
  • 20260327_145103.jpg
    20260327_145103.jpg
    650.4 KB · Views: 13
  • 20260327_183351.jpg
    20260327_183351.jpg
    686.8 KB · Views: 20
OP
S

Slava Yorish

Well-known member
Joined
Sep 12, 2024
Messages
50
I finally finished this project and have a few vises for sale. They are $525 each.
Already started a new project- a 1/2 scale miniature Boley jeweler's vise. I will post updates for my new peoject in a separate thread. Thanks!20260404_093429.jpg
 
OP
S

Slava Yorish

Well-known member
Joined
Sep 12, 2024
Messages
50
Tonthe end of story: I made a videonof the process ohttps://youtu.be/DhqiUvZ8XVw?si=AbF7fjDi4P9DhX_Yf creation. It is available on youtube.
 
To avoid these ads, REGISTER NOW!
Top Bottom