To avoid these ads, REGISTER NOW!

Miter saw station

royce

Well-known member
Joined
Jun 22, 2014
Messages
3,103
Location
fairbanks ak
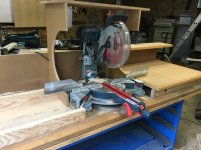
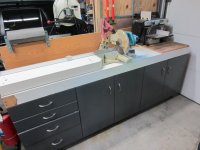
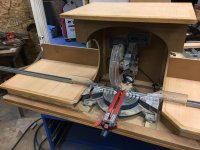
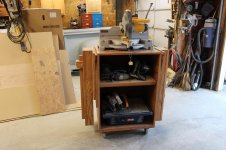
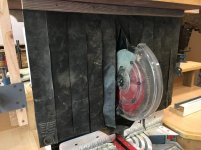
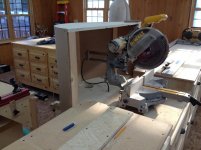
Got started today building a saw station.
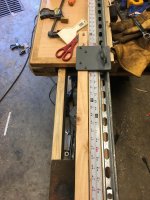
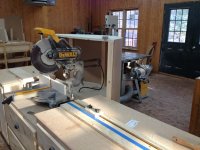
My goal is to set it up with good dust collection and a fence with stops both right and left.
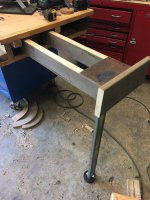
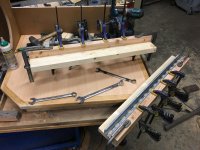
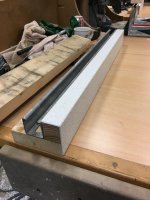
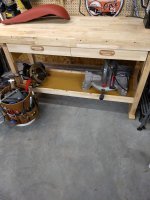
Started with some 1-1/4" particle board with formica and maple edge table tops, 2x4s and some 3/4 form plywood.
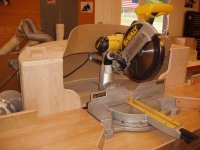
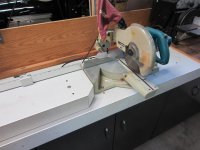
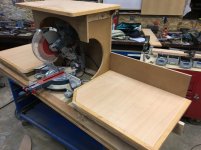
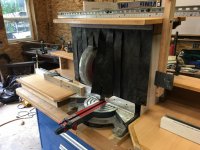
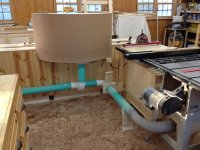
I sized the dust box for right and left miters with out considering compound cuts and ended up relieving the sides a lot.
I think I'll make some removable filler panels for when not making compound cuts.
Spent more time scratching both ends than working today, but still made some headway.

Royce
 

Attachments

  • IMG_3791.jpg
    IMG_3791.jpg
    152.4 KB · Views: 394
  • IMG_3797.jpg
    IMG_3797.jpg
    151.8 KB · Views: 382
To avoid these ads, REGISTER NOW!

nutjob

Well-known member
Joined
May 8, 2008
Messages
805
Location
NE, PA
Here's a pic of my setup. I used to have an extension table on the right that matched the left side but needed room for the belt/disk sander. I also find that I don't really need the fence on the right.


Kevin
 

Attachments

  • IMG_7982 (Large).jpg
    IMG_7982 (Large).jpg
    108.1 KB · Views: 279
  • IMG_7983 (Large).jpg
    IMG_7983 (Large).jpg
    112.3 KB · Views: 233

LXCam

ALLIANCE MEMBER
Joined
Apr 23, 2013
Messages
19,109
Location
AZ
That's going to be a nice set up Royce. What size is that base cabinet, it looks huge! 60"?
 

kbs2244

Well-known member
Joined
Nov 11, 2006
Messages
14,065
This is a very popular project on the wood shop sites.
Lots of ideas to steal.
 
OP
R

royce

Well-known member
Joined
Jun 22, 2014
Messages
3,103
Location
fairbanks ak
KBS, I've studied a few of them on other sites, sawmill creek is great.

Chad, a pic would be great.

Made some good progress today.
Got the under table dust ports in, tables mounted and the roof on.
I cantilevered the roof, thinking I'll mount a light to the overhang.
Next up, end wall filler panels, telescoping table extensions, fences and end stops.

Royce
 

Attachments

  • IMG_3805.jpg
    IMG_3805.jpg
    149.9 KB · Views: 192
  • IMG_3802.jpg
    IMG_3802.jpg
    149.6 KB · Views: 180
  • IMG_3798.jpg
    IMG_3798.jpg
    110.9 KB · Views: 173
OP
R

royce

Well-known member
Joined
Jun 22, 2014
Messages
3,103
Location
fairbanks ak
Got the extensions done today.
Framed with 2x4s with polyethelyne slides
Made the leg out of garage door rail with a adjustable polyethylene foot.

Royce
 

Attachments

  • IMG_3809.jpg
    IMG_3809.jpg
    102.6 KB · Views: 127
  • IMG_3810.jpg
    IMG_3810.jpg
    112.8 KB · Views: 134
  • IMG_3811.jpg
    IMG_3811.jpg
    124.8 KB · Views: 113
OP
R

royce

Well-known member
Joined
Jun 22, 2014
Messages
3,103
Location
fairbanks ak
Thanks jeepinerdeep and toolfool,
Got the fences glued up today, I'll use unistrut for the stop track.
I think I'll face the fences with formica.

Royce
 

Attachments

  • IMG_3812.jpg
    IMG_3812.jpg
    151.7 KB · Views: 158
Last edited:

don long

Well-known member
Joined
Mar 31, 2012
Messages
8,845
Location
southern california
Hi Royce
I've been wanting to tackle this kind of a project but haven't pulled the trigger yet. Thanks for the encouragement. Yours is looking great

Don
 
OP
R

royce

Well-known member
Joined
Jun 22, 2014
Messages
3,103
Location
fairbanks ak
Hello Don,
Not much of a plan on this one, just letting the materials on hand lead the way.
Glad you are encouraged.
Thanks

Royce
 

drewski

Well-known member
Joined
Apr 13, 2008
Messages
419
Location
Mid-Tn
I'm a little pushed for space so I built my miter saw setup in a way that lets me move it around. I saw a setup similar to this several years ago, so I just built it to fit my needs.
 

Attachments

  • IMG_0283.jpg
    IMG_0283.jpg
    152.9 KB · Views: 171
  • IMG_0281.jpg
    IMG_0281.jpg
    151.9 KB · Views: 136
To avoid these ads, REGISTER NOW!
OP
R

royce

Well-known member
Joined
Jun 22, 2014
Messages
3,103
Location
fairbanks ak
Great design Drewski,

I could not find any formica in the junk heap but did find some FRP and laminated that to the fences.
Also got the struts mounted.

Royce
 

Attachments

  • IMG_3816.jpg
    IMG_3816.jpg
    88.8 KB · Views: 103
OP
R

royce

Well-known member
Joined
Jun 22, 2014
Messages
3,103
Location
fairbanks ak
Got the stops made today and rulers let in.
With the way the stock fence needs to be moved outboard for compound cuts,the stops only have a 0" to 24" range.
I will make a longer strut to sandwich on these ones for longer cuts.

Royce
 

Attachments

  • IMG_3826.jpg
    IMG_3826.jpg
    139.2 KB · Views: 92
  • IMG_3825.jpg
    IMG_3825.jpg
    152.3 KB · Views: 92

ddawg16

Well-known member
Joined
Jul 11, 2008
Messages
21,005
Location
S. California
Looking good.....I think you're headed in the right direction....

I have an old Craftsman radial arm saw....and my compound miter is not a slidder....so I made a dual setup...common rip fence. Narrow boards I cut with the compound....wider with the radial.

Kinda tempted to get rid of the radial and compound and get a single slidder.....

On a positive note...I can cut a 16' long board anywhere I want to....

That reminds me.....I need to clean my garage.....badly.....
 

Attachments

  • IMG00103.jpg
    IMG00103.jpg
    146.4 KB · Views: 136
OP
R

royce

Well-known member
Joined
Jun 22, 2014
Messages
3,103
Location
fairbanks ak
Thanks ddawg,

Made the stop extension today, it worked out well, works on right or left side and has a range of 2' to 8'.
Has a simple mount that has a single sliding thumb screw to attach, takes only a few seconds to mount or take off.
The best part is it uses the same stops and curser as the short ones.

Also made a curtain out of some heavy cargo tarp, added a couple shelves and FRP side panels, a couple lags to hang the stops when not in use, drawers installed.

I guess it's done

Royce
 

Attachments

  • IMG_3840.jpg
    IMG_3840.jpg
    153.6 KB · Views: 137
  • IMG_3839.jpg
    IMG_3839.jpg
    149.8 KB · Views: 144
  • IMG_3837.jpg
    IMG_3837.jpg
    149.5 KB · Views: 144
  • IMG_3830.jpg
    IMG_3830.jpg
    88.1 KB · Views: 145
  • IMG_3829.jpg
    IMG_3829.jpg
    138.9 KB · Views: 140
  • IMG_3828.jpg
    IMG_3828.jpg
    120.1 KB · Views: 145

ddawg16

Well-known member
Joined
Jul 11, 2008
Messages
21,005
Location
S. California
Thanks ddawg,

Made the stop extension today, it worked out well, works on right or left side and has a range of 2' to 8'.
Has a simple mount that has a single sliding thumb screw to attach, takes only a few seconds to mount or take off.
The best part is it uses the same stops and curser as the short ones.

Also made a curtain out of some heavy cargo tarp, added a couple shelves and FRP side panels, a couple lags to hang the stops when not in use, drawers installed.

I guess it's done

Royce

Hmmmm.....you are giving me ideas.....like I don't have enough projects
 
OP
R

royce

Well-known member
Joined
Jun 22, 2014
Messages
3,103
Location
fairbanks ak
The stop awesome. Always appreciate your creativity and ingenuity. Thanks for sharing.

Thanks ilovevocs,
I just realized a great side benefit to this system is that the stops act as a secondary fence and need not be removed to make a cut.


Royce
 

BWS

Well-known member
Joined
Sep 3, 2006
Messages
923
Location
Mnts of Va
Just how we do it here;

Got 4 wood shapers and a router table.The RT gets used maybe a cpl times a year?It's on a mobile base.The mitre box is a simple torsion box with open front that fixture blocks get thrown into.Also,being open.... clamping fixtures/stop blocks is easier.It lives on top of RT.

Anyway,the few times we need the RT,just slide the saw system onto a table saw or big jointer temporarily. Good luck with your project.
 

nonhog

Well-known member
Joined
Nov 6, 2007
Messages
2,449
Location
Arizona (Tucson)
Great thread! Lots of good ideas.
My thoughts are to add a side to the cheap HF bench instead of just putting the saw on the bench when I need it.
 

Attachments

  • IMG_20180603_204744306.jpg
    IMG_20180603_204744306.jpg
    98.3 KB · Views: 59
OP
R

royce

Well-known member
Joined
Jun 22, 2014
Messages
3,103
Location
fairbanks ak
Thanks BWS

Nonhog, good idea.
I had this saw on the bench and every time I needed it, I had to clear the bench, so that compelled me to do this station.

Royce
 

corvettecrazy

Member
Joined
Apr 27, 2014
Messages
17
So many great ideas in this thread! I wish I had as much space as some of you to build extended tables.
 

ezridr60

Well-known member
Joined
Dec 16, 2011
Messages
202
Location
Iron River, MI
Here’s a few photos of a saw station I made a few years ago. It has worked out pretty well.
 

Attachments

  • 912BB057-879E-4F40-B862-7F27AA8DB558.jpg
    912BB057-879E-4F40-B862-7F27AA8DB558.jpg
    148.6 KB · Views: 94
  • 3B54ED3D-D466-456B-9779-2D1827CA7FE1.jpg
    3B54ED3D-D466-456B-9779-2D1827CA7FE1.jpg
    150.4 KB · Views: 98
  • CA30F99C-4546-4CB7-BFA2-DD4056913272.jpg
    CA30F99C-4546-4CB7-BFA2-DD4056913272.jpg
    148.7 KB · Views: 101
  • 88DEC264-A388-40CA-8567-1871AADD385D.jpg
    88DEC264-A388-40CA-8567-1871AADD385D.jpg
    149.5 KB · Views: 100

LXCam

ALLIANCE MEMBER
Joined
Apr 23, 2013
Messages
19,109
Location
AZ
Excellent work as always Royce and the thumb screw (lol) is bad to the bone. Great job bud.

Here’s a few photos of a saw station I made a few years ago. It has worked out pretty well.

Now that's the most impressive wood working station I've ever seen. Do you have a thread with some more details?
 
OP
R

royce

Well-known member
Joined
Jun 22, 2014
Messages
3,103
Location
fairbanks ak
Beautiful shop EZ

Firstram, the curtains are two layers of 3" wide staggered.
They work nicely, thank you

LX, chain links make for great thumb screws.

Thanks all

Royce
 
To avoid these ads, REGISTER NOW!
Top Bottom