
You are using an out of date browser. It may not display this or other websites correctly.
You should upgrade or use an alternative browser.
You should upgrade or use an alternative browser.
Modifications to Drill Press
- Thread starter jbbies
- Start date
First thing I did is mount the base (floor model) on a pair of 24-inch wide 6x6 landscape timbers. This not only made the tool much more stable (rock solid, actually, compared to being top-heavy and tippy), it raised the work surface 6 inches, so now I don't have to bend over to work at it. I'm 6'1", and hunching over to work at my stationary tools is pain. Literally. Raise the work surface 6-inches, and that's a TON. I did the same thing with my hydraulic shop press (but with metal legs, a spread base and adjustable machine feet), and will do the same thing with my bead blast cabinet.
Next, I made a plywood shelf for the bottom and secured it to the base. On this shelf, I set a Craftsman 2-drawer portable tool box (red), with the deep storage area under the lid. I removed the lock-bar from the lid, so I can open the drawers with the lid closed. I store my clamps, hole saws, a screwdriver for the pilot bit on the hole saws, any specific jigs, large drill bits, and my drill press vise (in the top storage area). 99-percent of the time you use these tools only at the drill press, so keep them in the box at the machine you'll be working at, rather than cluttering up your main tool box.
I removed the lock bar from the drawers because if you have to open the lid every time you want to go into a drawer, you'll probably just leave the lid open, which will fill it up with shavings. It saves two steps (lid up.... lid down) every time you want to go into a drawer.
I made a sacrificial table top out of a dollar-store white plastic cutting board. Trace the shape of the table, attach with counter-sunk screws and wing nuts below, and use with hole saws--they'll go into the cutting board, not your metal table.
Sunk the drill chuck key into a wooden file handle. This serves two purposes: I get better leverage when tightening the drill chuck, and it's harder to lose the key. I went the extra step of getting a Janitor's retractible key ring (the thing they always wear on their belt) and attached it to the pole with a big hose clamp, then put a small eye-bolt into the bottom of the file handle and attached it to the key ring, and now my drill chuck key is cable-retracted and always hangs right there, ready to use.
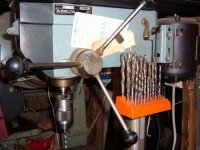
I made an "arm" from flat 1/4-inch aluminum plate that attaches to the pole... it attaches like a ring-style nitrous bottle holder or fire bottle holder in a race car. On the end sticking away from the machine, I made a little sheetmetal tray with upstanding flanges all the way around, screwed it to the arm, and have a little shelf to store my drill bit index, cutting fluid, and other small things. Line the shelf with a piece of rubber stair tread riser, because the stuff you put on it will rattle when the machine is running.
Finally, I replaced the rubber belt with a Link belt, to minimize machine vibration. A rubber belt takes an oblong set after a while, and will vibrate the machine as the oblong is forced over the pulleys. I also put a few scraps of Dynamat inside the plastic lid of the top cover to keep it from rattling and vibrating.
It started with me as a used $40 drill press, and after some basic repairs and my upgrades, it's a fine tool that is totally self-contained and independent of everything else in the shop, easy to use, and handy to work at. Your mileage may vary.
-Brad
Next, I made a plywood shelf for the bottom and secured it to the base. On this shelf, I set a Craftsman 2-drawer portable tool box (red), with the deep storage area under the lid. I removed the lock-bar from the lid, so I can open the drawers with the lid closed. I store my clamps, hole saws, a screwdriver for the pilot bit on the hole saws, any specific jigs, large drill bits, and my drill press vise (in the top storage area). 99-percent of the time you use these tools only at the drill press, so keep them in the box at the machine you'll be working at, rather than cluttering up your main tool box.
I removed the lock bar from the drawers because if you have to open the lid every time you want to go into a drawer, you'll probably just leave the lid open, which will fill it up with shavings. It saves two steps (lid up.... lid down) every time you want to go into a drawer.
I made a sacrificial table top out of a dollar-store white plastic cutting board. Trace the shape of the table, attach with counter-sunk screws and wing nuts below, and use with hole saws--they'll go into the cutting board, not your metal table.
Sunk the drill chuck key into a wooden file handle. This serves two purposes: I get better leverage when tightening the drill chuck, and it's harder to lose the key. I went the extra step of getting a Janitor's retractible key ring (the thing they always wear on their belt) and attached it to the pole with a big hose clamp, then put a small eye-bolt into the bottom of the file handle and attached it to the key ring, and now my drill chuck key is cable-retracted and always hangs right there, ready to use.
I made an "arm" from flat 1/4-inch aluminum plate that attaches to the pole... it attaches like a ring-style nitrous bottle holder or fire bottle holder in a race car. On the end sticking away from the machine, I made a little sheetmetal tray with upstanding flanges all the way around, screwed it to the arm, and have a little shelf to store my drill bit index, cutting fluid, and other small things. Line the shelf with a piece of rubber stair tread riser, because the stuff you put on it will rattle when the machine is running.
Finally, I replaced the rubber belt with a Link belt, to minimize machine vibration. A rubber belt takes an oblong set after a while, and will vibrate the machine as the oblong is forced over the pulleys. I also put a few scraps of Dynamat inside the plastic lid of the top cover to keep it from rattling and vibrating.
It started with me as a used $40 drill press, and after some basic repairs and my upgrades, it's a fine tool that is totally self-contained and independent of everything else in the shop, easy to use, and handy to work at. Your mileage may vary.
-Brad
Last edited:
Packard V8
Well-known member
I've owned a dozen drill presses over the years. The two best modifications are either a slow-speed intermediate 4-step pulley mounted to the post between the motor and the spindle pulleys. This gives 16-speeds. Of late, I've been buying motors from treadmills and setting them up as an infinitely variable speed.
thnx, jack vines
thnx, jack vines
1955 Walker Turner 20" Rebuilt in 1989.
Check out the Huot drill bit holder .
The light is a 12 volt track light with the transformer re-located
to the side.


Vise is an AMF float lock.
Equipped with power-downfeed and easily drills, 3/4" holes with no pilot holes.
Line up the bit with your punch mark, and pull the lever with the gray
colored ball on the end of it.
Getting tired of changing pulleys, for different speeds, going to
put Allen-Bradley VFD on real soon.

Check out the Huot drill bit holder .
The light is a 12 volt track light with the transformer re-located
to the side.
Vise is an AMF float lock.
Equipped with power-downfeed and easily drills, 3/4" holes with no pilot holes.
Line up the bit with your punch mark, and pull the lever with the gray
colored ball on the end of it.
Getting tired of changing pulleys, for different speeds, going to
put Allen-Bradley VFD on real soon.
First thing I did is mount the base (floor model) on a pair of 24-inch wide 6x6 landscape timbers. This not only made the tool much more stable (rock solid, actually, compared to being top-heavy and tippy), it raised the work surface 6 inches, so now I don't have to bend over to work at it. I'm 6'1", and hunching over to work at my stationary tools is pain. Literally. Raise the work surface 6-inches, and that's a TON. I did the same thing with my hydraulic shop press (but with metal legs, a spread base and adjustable machine feet), and will do the same thing with my bead blast cabinet.
Next, I made a plywood shelf for the bottom and secured it to the base. On this shelf, I set a Craftsman 2-drawer portable tool box (red), with the deep storage area under the lid. I removed the lock-bar from the lid, so I can open the drawers with the lid closed. I store my clamps, hole saws, a screwdriver for the pilot bit on the hole saws, any specific jigs, large drill bits, and my drill press vise (in the top storage area). 99-percent of the time you use these tools only at the drill press, so keep them in the box at the machine you'll be working at, rather than cluttering up your main tool box.
I removed the lock bar from the drawers because if you have to open the lid every time you want to go into a drawer, you'll probably just leave the lid open, which will fill it up with shavings. It saves two steps (lid up.... lid down) every time you want to go into a drawer.
I made a sacrificial table top out of a dollar-store white plastic cutting board. Trace the shape of the table, attach with counter-sunk screws and wing nuts below, and use with hole saws--they'll go into the cutting board, not your metal table.
Sunk the drill chuck key into a wooden file handle. This serves two purposes: I get better leverage when tightening the drill chuck, and it's harder to lose the key. I went the extra step of getting a Janitor's retractible key ring (the thing they always wear on their belt) and attached it to the pole with a big hose clamp, then put a small eye-bolt into the bottom of the file handle and attached it to the key ring, and now my drill chuck key is cable-retracted and always hangs right there, ready to use.
I made an "arm" from flat 1/4-inch aluminum plate that attaches to the pole... it attaches like a ring-style nitrous bottle holder or fire bottle holder in a race car. On the end sticking away from the machine, I made a little sheetmetal tray with upstanding flanges all the way around, screwed it to the arm, and have a little shelf to store my drill bit index, cutting fluid, and other small things. Line the shelf with a piece of rubber stair tread riser, because the stuff you put on it will rattle when the machine is running.
Finally, I replaced the rubber belt with a Link belt, to minimize machine vibration. A rubber belt takes an oblong set after a while, and will vibrate the machine as the oblong is forced over the pulleys. I also put a few scraps of Dynamat inside the plastic lid of the top cover to keep it from rattling and vibrating.
It started with me as a used $40 drill press, and after some basic repairs and my upgrades, it's a fine tool that is totally self-contained and independent of everything else in the shop, easy to use, and handy to work at. Your mileage may vary.
-Brad

Hoot
Well-known member
I agree - sounds like a lot of good mods and I'd like to see some pics of Brad54's drill press.
Another variation on the drill bit index (clamped to the collar on the column and swings out/away) and note the addition of the keyless chuck (from CDCO)
Also a custom mobile base and cabinets below to hold bit accessories (no pic..too cold to go out there!!)
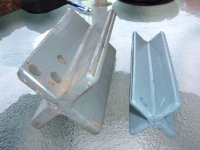
"V" blocks, in Momma Bear and Poppa Bear sizes, simply angles end welded together.
Also a custom mobile base and cabinets below to hold bit accessories (no pic..too cold to go out there!!)
"V" blocks, in Momma Bear and Poppa Bear sizes, simply angles end welded together.
Attachments
Last edited:
All good stuff...I planing on picking up a bench top today. I was spoiled in the past my dads shop had the biggest heaviest drill press I have ever seen. The thing has to way 1000-1500 pounds made pry in the 60s worked perfectly had a speed selector didn't have to mess with belts and so on. But I have moved away and trying to start my own tool collection but limited to the garage so compact things are a must.
A29
Well-known member
Happyshooter
Active member
I was handed down my father's old craftsman, back when they just started to use plastic and that only a little.
I purchased a boat trailer jack on sale at Harbor Freight and mounted it upside down on the pole. Adjustable table.
I built a table topper out of plywood and jig fittings from a woodworking store. I attached it with countersunk bolts and wingnuts to the drill press table.
The drill press now does 90% of what I need, easier.
mkdive
Well-known member
All great ideas...I would like to see some pictures of your drill press tables
I had the same question a couple weeks ago.....
http://www.garagejournal.com/forum/showthread.php?t=52721

mkdive
Well-known member
<---- looking forward to Brad54's pictures also!
mkdive
Well-known member
still waiting....
OccupantRJ
Well-known member
I added an Albrecht keyless chuck to mine, and also a cross type 4 way household light switch to reverse it. These switches pass power straight through in one mode, and cross the connections for the other mode. Good for 15 amps. Most 120 volt motors are reversed by switching the red and black, usually #5 and #8 wire, (check me on this), so by extending these wires outside the motor terminal box (peckerhead), and inserting the switch, the motor can be run in reverse. The motor cannot be reversed while running, but can once you hear the centrifugal switch click out. This is handy for tapping holes, or using left hand screw machine drills.
2 pole switches look like 4 ways, but have the toggle handle labelled ON and OFF. 4 ways are not labelled this way.
Here's a couple of links I found that may help.
http://igor.chudov.com/manuals/ElectricMotors.pdf
http://www.albrechtchucks.com/chuck...ssic_keyless_drill_chucks&chuck_category_id=5
2 pole switches look like 4 ways, but have the toggle handle labelled ON and OFF. 4 ways are not labelled this way.
Here's a couple of links I found that may help.
http://igor.chudov.com/manuals/ElectricMotors.pdf
http://www.albrechtchucks.com/chuck...ssic_keyless_drill_chucks&chuck_category_id=5
I always thought that AC motors only spin one direction? The capacitor starts that direction? I recently built a shop press and used a motor off of a large air compressor to run my hydraulic pump. I wanted to spin it the other direction so I took it to a electric motor shop and they told me $100 to switch it so I just mounted it different. Maybe he was full of it, but I doubt it he has done a lot of good work for me in the past.
OccupantRJ
Well-known member
There are a lot of different TYPES of AC motors. Not all may be reversible. Check the link I included?
OccupantRJ
Well-known member
Thanks for the link. I wasn't saying you were wrong, I was just telling my experiance.
Not a problem, I did not take it that way.
RJ
Torque1st
MEMBER EMERITUS
I used an old electric dryer base and made a HD top to mount my bench top drill press. The dryer base is filled with tooling and fixtures.
I also mounted an intermediate pulley like Brad54.
I use a "P" clamp to hold the chuck key mounted on the side of the press.
I also have a drilled and tapped hole with a brass plug and a wing bolt to lock the quill at a specific depth. The brass plug keeps from marring the quill. This is handy for drum sanding.
TAMPAGT07
Well-known member
I'm waitning for one with a laser pointer, infrared screen (for complete darkness use), and a pair of ***** (just for the hell of it.)
Torque1st
MEMBER EMERITUS
They already make units with a LASER cross-hair... ")
mkdive
Well-known member
They already make units with a LASER cross-hair...
Mine has the cross hairs...I wish it had the **** option. Might be a dangerous distraction?!

Griff93
Well-known member
I've been thinking about outfitting mine with a cross slide table but when making parts I'm normally doing something with them in the mill anyway so I just use it as an overgrown drill press. I still might pick one up to try it if I find a deal on it.
I put one of those strong neodymium magnets at the center of the quill feed and keep the chuck key there. I simply reach up and grab it, tighten the drill, then reach back up and the magnet catches it. I don't have to worry about any wire/cable being retracted and getting in the way of things.
senlow
Well-known member
Torque1st
MEMBER EMERITUS
I have one and it has been handy for some things. I have my vise mounted on it and it makes it easy to hold a part and locate on a center punch etc.I've been thinking about outfitting mine with a cross slide table but when making parts I'm normally doing something with them in the mill anyway so I just use it as an overgrown drill press. I still might pick one up to try it if I find a deal on it.
I put a magnet on the side of mine to hold the chuck key, center drills and other stuff.
Gotta love those old 20" Powermatics. I also have one from 53. Mine also has auto feed.
metalwork
Active member
I have a 50's Craftsman by King-Seeley like the one below. I hate belt changes so I want to modify it to a DC motor w/ variable controller. Found an commercial treadmill at my town dump w/ a 2HP DC motor & speed controller in it. Now it is just a question of hacking that into this -

mkdive
Well-known member
Those old cman presses have a cool styling. There was a couple of them for $75 in my local CL this last week. I wanted to pick one up and clean it up....but I just dont have the space for more than one DP in my garage. I need to make space for a lathe first.
metalwork
Active member
Those old cman presses have a cool styling. There was a couple of them for $75 in my local CL this last week. I wanted to pick one up and clean it up....but I just dont have the space for more than one DP in my garage. I need to make space for a lathe first.
It's a true beast with a huge base and column. I looked a several same vintage Deltas and got the Craftsman instead. Built just as well but some nice extra features. The looks nailed the deal for me. Mine's gray like the picture but they came in gold too.

I think the best modification one can make to a drill press is a deadman switch. My Edlund came with one and it's been a nice thing to have a few times.
Got to agree with that. Here is my garage sale version, kept it portable to be used on other machines too! (you can see we are still snow free here.......rather unusual, but I love it)
Attachments

Charles (in GA)
Well-known member
I added an Albrecht keyless chuck to mine, and also a cross type 4 way household light switch to reverse it. These switches pass power straight through in one mode, and cross the connections for the other mode. Good for 15 amps. Most 120 volt motors are reversed by switching the red and black, usually #5 and #8 wire, (check me on this), so by extending these wires outside the motor terminal box (peckerhead), and inserting the switch, the motor can be run in reverse. The motor cannot be reversed while running, but can once you hear the centrifugal switch click out. This is handy for tapping holes, or using left hand screw machine drills.
2 pole switches look like 4 ways, but have the toggle handle labelled ON and OFF. 4 ways are not labelled this way
I bought a 20" Dayton drill press from a guy at work who had bought it at a Grainger warehouse clearout sale. He didn't need it, but couldn't resist. It was still in the back of his truck, we loaded it into my trailer in the parking lot at work. It had fallen on the front of the head and smashed the switch and cracked the head. All that was cracked was a thin false front where the switch was. Running the quill out with the chuck removed and using a machinist square shows the head is still straight, so I never bothered to replace the head. An electrician friend had a Rev-Off-Fwd drum switch new in his junk box he sold me for $10 and I discovered the motor was reversible, though it was not wired that way from the factory. I figured the wiring out and mounted the switch and hooked it all up, works great.
I have given thought to the foot operated deadman but haven't found a reasonable priced one yet.
Charles
krooser
Well-known member
The best mod I made was to sell my Taiwan press and buy a real one...
Delta-Rockwell... Made in Pittsburg, PA, USA.

It's got a five step pulley and a four speed gear box on the motor...
Delta-Rockwell... Made in Pittsburg, PA, USA.
It's got a five step pulley and a four speed gear box on the motor...
That's a neat idea!
That switch looks familiar too.
That switch looks familiar too.
Got to agree with that. Here is my garage sale version, kept it portable to be used on other machines too! (you can see we are still snow free here.......rather unusual, but I love it)
I have given thought to the foot operated deadman but haven't found a reasonable priced one yet.
Charles
Anyone around here looking for a foot switch can find same at Busy-Bee. Expect Grizz or H/F would have a similar 15Amp model.
http://busybeetools.ca/cgi-bin/picture10?NTITEM=B2855
John Dillinger
Active member
I have a 20" Clausing Production drill press and I put a forward / reverse switch so I can use my reverse bits.
Also I mounted a plate on the left side above the on / off switch to hold
pilot bits , center finder , micro chuck , chuck key, and the like.
I also added a table top that is 4" above the regular table with some milled slots and a 1 1/4" hole in the middle. This makes holding work and vices and X/Y tables a lot easier.
JD
Last edited:
Keep
Well-known member
I built a slow speed attachment.

Next will be the cabinet base someone posted on here.
Next will be the cabinet base someone posted on here.