To avoid these ads, REGISTER NOW!

Modifying Garage Ceiling to Accommodate lift

Speedman87

Well-known member
Joined
May 11, 2014
Messages
55
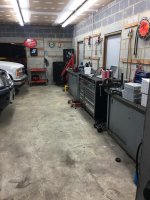
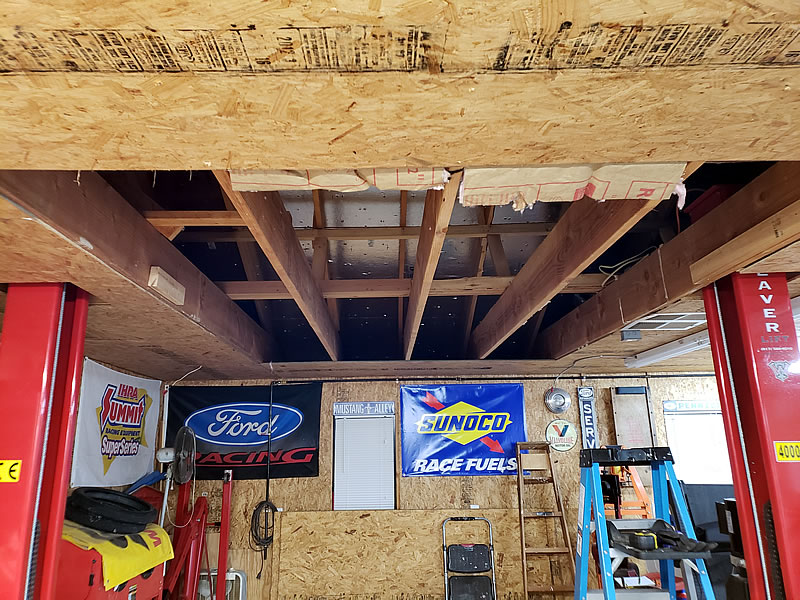
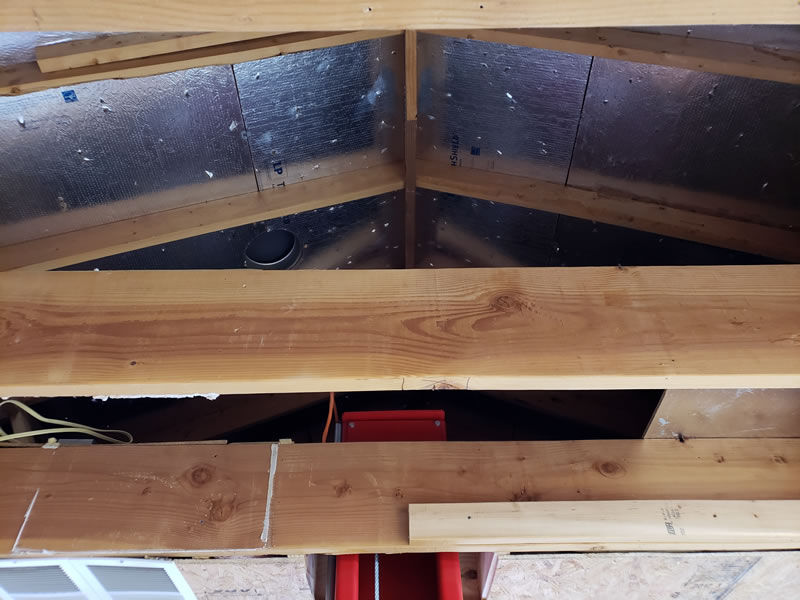
Hello , I would like to know what would be the proper way to modify my garage ceiling to accommodate a lift. I have a 3 bay 28x45ft garage of cinder block construction, currently I have a lift in that 3rd additional bay but i'm in need of another lift. In the third bay it has a hip style roof. I can lift cars all the way in the air and stand under it. SUVs i have to sit on a stool with wheels to do under car work. I want to put a lift in my first bay, the problem is the ceiling is only 9ft in the main part of the garage. I was originally going to get a bendpak Grandprix series lift that would work with 9ft ceilings, but after thinking about it for a while i figured if im going to put up the money for another lift i might as well go all the way with a full lift. Question, would it be a good idea just notch out a small portion of the first bay ceiling to accommodate a 12 ft lift. Only a 10x10 ft section would need to be removed from the ceiling to make this work. Any suggestions would be greatly appreciated. Thank you for your help
 

Attachments

  • garage.jpg
    garage.jpg
    111.3 KB · Views: 441
  • garage 2.jpg
    garage 2.jpg
    148.3 KB · Views: 419
  • plan 2.jpg
    plan 2.jpg
    37.5 KB · Views: 399
  • plan 3.jpg
    plan 3.jpg
    84.5 KB · Views: 423
  • plan.jpg
    plan.jpg
    68.4 KB · Views: 358
To avoid these ads, REGISTER NOW!

isb cornbinder

Well-known member
Joined
Nov 3, 2010
Messages
7,073
Location
Pacific South West, BC, Canada
I just went through this and decided against the modification/renovation. I was going to use a contractor, get city permits and engineered trusses to replace the standard trusses. This was necessary to be able to have insurance coverage.
I was intending to have about 20 feet of the ceiling modified. MY shop in just a little smaller than yours.

I decided to not make the changes to my shop. I did not think the $11,000 cost for renovation was good value, for my situation, at this time. This is not to say this renovation may be done at a later date. The four post hoist would have been extra.
 
Last edited:

catuck

Member
Joined
Jul 25, 2007
Messages
23
Location
Bolton, MA
It is possible to modify a truss, but you need an engineer to design it. You cannot just cut members of a truss, each one is important to the structural integrity of the truss - and the bottom chord is the most important member! Likely, adding plywood to each side of the trusses you wish to cut will be the simple solution. Where are you located? If you're in a heavy snow load area vs. the desert makes a very big difference on roof loads.
 

CraigStu

Well-known member
Joined
May 22, 2014
Messages
4,023
Location
Blacksburg, Va
You can't just remove 10 ft of the bottom chord in a truss. And to get your notch to be 10 ft wide, assuming trusses on 24" centers You need to modify at least 5 trusses. You would want to end up w/ trusses like these. (Scroll down about 1/2 way)
https://www.menards.com/main/buying...ng-guides/roof-truss-buying-guide/c-19431.htm
I would like to think that I could modify one truss at a time using glued and screwed plywood joiners and end up w/ something that would work. But then, you need to worry, either now or when you sell, about this job being permitted. And home modified trusses could be a problem.
 

Homerr

Well-known member
Joined
Mar 16, 2012
Messages
379
Location
Seattle, WA
You'd need to abandon the trusses, structurally, in the area you want to modify. Sister on proper sized rafters to the truss top chords and bear them on a ridge beam. Ridge beam then needs support at each end.
 
OP
S

Speedman87

Well-known member
Joined
May 11, 2014
Messages
55
Thanks for your reply, im kinda confused as to what you are saying do, can you explain further?
 

bad_idea

Well-known member
Joined
Jun 11, 2011
Messages
4,332
Location
Pasquotank, NC
You currently have trusses. The load (roof, snow, etc) pushes down on the roof and pulls the bottom cord (the 2x4 the ceiling is nailed to) in tension. Cut the bottom cord and the roof falls in.

Homer is suggesting you frame the roof with traditional framing techniques - rafters (the 2x the roof sheathing is nailed to), ridge beam (the rafters rest against this board, it runs along the ridge of the roof), and supports for the ridge beam. Not a DIY project, is a project for a carpenter and an engineer.
 
OP
S

Speedman87

Well-known member
Joined
May 11, 2014
Messages
55
Yes i have the person for the job. My cousin is a contractor and an excellent framer. He IS NOT an engineer and therefor I'm doing research on my own instead of fully investing in his suggestion. He suggest "That we can take it all the way up to the top rafter. I'm going to sister a 2x8 next to the 2x4 rafters with screws." Whether this is a good idea or not im not sure and why I'm making this post. Furthermore if this is a legit option what would my options be for insulation
 

firebirdparts

Well-known member
Joined
Jun 8, 2016
Messages
10,594
Location
Kingsport, TN
If you remove the truss and just leave a rafter, per your cousin, then the weight of the roof is pushing out on the walls. There are two ways to correct this. One is what homer suggested, and one is to provide structure to hold the walls straight and together. The second is a solution you don't see much, but it would work.

Bad idea says in a single sentence that "traditional framing is not a DIY project" and that may sound ridiculous, but the traditional framing is going to be resting on something on the ends of the ridge beam. That something (a beefed up truss) deserves some attention by a competent design person. Traditional framing itself of course is a DIY project, and always was for 1000's of years.
 
Last edited:

LX-Markham

Well-known member
Joined
Apr 27, 2013
Messages
2,929
Location
Markham, Ont.
...and one is to provide structure to hold the walls straight and together. The second is a solution you don't see much, but it would work.
This is how I did my 18'x19' garage. Rafters sistered to the truss top chord, pushing on a structural steel frame at the base.

IMG_1210_zpsd9eab511-M.jpg
 

GMCGarage

Well-known member
Joined
Jan 31, 2017
Messages
1,264
You could do the rafter idea, and then to handle the push from the rafters design a header to transfer the load across the top of your wall into the rest of the truss system. Otherwise, the rafters will push out the top of your wall and you will start to see a bow in the wall.
 
Last edited:

pbon

Well-known member
Joined
May 14, 2017
Messages
3,498
OP has a cinderblock wall not an engineered steel frame so he cannot do what you did. Might need supporting beams in the garage. Knee walls above the cutout with rafters across but I am not an engineer.

My barn is also different and what I did of little use to the OP. I cut a 9x19 hole in my ceiling but I have a 2nd floor above with balloon construction and still added knee walls and rafters to make a giant countertop for storage up above.
 

bad_idea

Well-known member
Joined
Jun 11, 2011
Messages
4,332
Location
Pasquotank, NC
To clarify my previous comment of this not being a DIY project - the engineering needs to be done by an engineer. What a bunch of guys say on the internet, never seeing your building, is worth what you paid for it. It's awesome that you have a carpenter available, wish I had that resource. Now you just need to find an engineer. There are a lot of factors here that need to be analyzed by someone that does this for a living.
 
OP
S

Speedman87

Well-known member
Joined
May 11, 2014
Messages
55
To clarify my previous comment of this not being a DIY project - the engineering needs to be done by an engineer. What a bunch of guys say on the internet, never seeing your building, is worth what you paid for it. It's awesome that you have a carpenter available, wish I had that resource. Now you just need to find an engineer. There are a lot of factors here that need to be analyzed by someone that does this for a living.


I agree, called about 5 firms today. None of them even want to begin to look at a project as small as mines


Sent from my iPhone using The Garage Journal mobile app
 

Falcon67

Well-known member
Joined
Jun 11, 2009
Messages
18,371
Location
Merkel, TX
Fixing to start on that here -

Ceiling1.jpg


Ceiling2.jpg


Will be merging the 2 2x12s on the right into one giant Howe truss and the other two into a beam that runs for 12' from the truss to an end wall. The "truss" will also be sheeted in OSB. The beam carries 280 lbs/ft and that's well withing a pair of doug fir 2x12s. The double 2x12 + 1/2" ply beam over the garage door carries 315 lb/ft and it's pretty happy. The one 2x12 on the left will move over some, closer to the post. The lumber stuff is no big deal - but there are 12 circuit runs in the strongbacks that have to move. Lotsa cutting and splicing.
 
Last edited:

pbon

Well-known member
Joined
May 14, 2017
Messages
3,498
You don’t really need an engineer. Just a good contractor with framing and construction experience. He should know enough and should tell you if he does not. I totally agree that the DIYer with rough carpentry skills should not be cutting structural stuff unless he knows what he is doing.
 

LX-Markham

Well-known member
Joined
Apr 27, 2013
Messages
2,929
Location
Markham, Ont.
You don’t really need an engineer. Just a good contractor with framing and construction experience.
Wrong, so wrong. I can only assume you are trolling for a “wrong” response.

No offence to the “good” contractors out there, but unless they have an engineering background they are only guessing. The structural modification needs to be analyzed and calculated.
 

ace10

Well-known member
Joined
Dec 17, 2017
Messages
1,490
Location
Rural NoVA
Wrong, so wrong. I can only assume you are trolling for a “wrong” response.

No offence to the “good” contractors out there, but unless they have an engineering background they are only guessing. The structural modification needs to be analyzed and calculated.


This.

There are small engineering firms/one man bands who will take on smaller/unique projects for a reasonable fee. I have needed this type of service many times.
 
Last edited:
To avoid these ads, REGISTER NOW!

bad_idea

Well-known member
Joined
Jun 11, 2011
Messages
4,332
Location
Pasquotank, NC
RyanMoe.com

Ryan Moe drew up the plans for my garage, was very easy to work with and knowledgeable enough. I suggest you hit him up, he might be able to help you out.
 
OP
S

Speedman87

Well-known member
Joined
May 11, 2014
Messages
55
I’ve decided to bite the bullet. Forwarded all the blue prints for the garage to an structural engineer. He said if can be done and is coming out Monday. $650 for the plans. Hopefully what he has designing is not to far off labor wise from what my cousin quoted me.


Sent from my iPhone using The Garage Journal mobile app
 
OP
S

Speedman87

Well-known member
Joined
May 11, 2014
Messages
55
Well $650 for engineering plans that says do exactly what my cousin purposed to do. I guess I’ll sleep better at night knowing for sure it was done right. I will post the plans and updates on the project


Sent from my iPhone using The Garage Journal mobile app
 

Homerr

Well-known member
Joined
Mar 16, 2012
Messages
379
Location
Seattle, WA
A couple of notes - although I'm glad you're getting an engineer involved.

1. You can't remove the existing 2x top chord of the trusses since the sheathing is nailed to it. The sistered on rafters otherwise would not be connected to the sheathing - unless you are re-roofing as well and can nail through the sheathing to the new rafters. You said the sistered rafters would be connected by screws. Structural screws can be fine here. Nails are great and seem simpler/cheaper. Either way the engineer should specify the nailing.

2. The ridge beam can be easily sized by anyone knowing what they are doing. This includes knowing snow loading in your area. Frequently lumber yards will do this if you are buying from them.

3. The support of the ridge beam. The gable end side will have bearing. The other side - well, it can get complicated:

3a. Put a post under it. Cut in a footing in the slab.

3b. Post down from ridge beam to a beam spanning front to back in the garage with bottom dropped below the ceiling level. The top might be able to be raised a few inches above the ceiling/plate line but the ends can't just be chopped off at the roof angle. Will need to verify the bearing capacity of footings supporting each end of the beam, especially between overhead garage doors since the loads here will be higher and don't want to overload the footing. The beam could bear in the wall plane or on a new post set just inside the existing wall framing.

3c. Build a site-built truss in situ to support the ridge beam. Could be complicated to build, i.e. to get framing members in place, and definitely an engineer is needed. Cleanest overall solution. Same footing issues as 3b.
 
OP
S

Speedman87

Well-known member
Joined
May 11, 2014
Messages
55
ee8461313484bfa88534bdf5a4b45ea6.jpg34bea3337ea389daec509fcbe822ee4b.jpg3b216e4f953cb44e90931a8c15459f67.jpg

Finally got the plans back from the engineer. Of course it’s over engineered. Same design my contractor suggested except with different materials. He suggest using 2x14 LVLs instead of 2x10 for the rafters. The contractor and I think this is overkill. Also it quadrupoles my material cost [emoji19]


Sent from my iPhone using The Garage Journal mobile app
 

Attachments

  • ee8461313484bfa88534bdf5a4b45ea6.jpg
    ee8461313484bfa88534bdf5a4b45ea6.jpg
    576 KB · Views: 15
  • 3b216e4f953cb44e90931a8c15459f67.jpg
    3b216e4f953cb44e90931a8c15459f67.jpg
    609.3 KB · Views: 12
  • 34bea3337ea389daec509fcbe822ee4b.jpg
    34bea3337ea389daec509fcbe822ee4b.jpg
    604.2 KB · Views: 18

kbs2244

Well-known member
Joined
Nov 11, 2006
Messages
14,065
Your engineer has gone completely conventual on you.
And over specified in the process.
(He isn't paying for material>)
Rafters with collar ties only get you as high as the collar ties.

If you go with a roof BEAM under the roof BOARD that the trusses now give you,
you will have a ceiling that goes to the peak.
But the ends of the beam will need support.
And it will need to be threaded through the existing trusses.
I have seen them threaded through the vents in the gable end walls.
(Do some research. It might need some imagnation.)

The wall end of the beam is easy enough with some extra 2x4's as a support post.
The other in will need a support post or sistered trusses.

Roof beams are often ignored as a roofing support system.
Since WW II rafters and roof boards have become "conventual"
But roof beams are the way log cabins were built.
 
Last edited:

850xpeps

Well-known member
Joined
Aug 6, 2017
Messages
1,365
Are collar ties an issue? With the height of the peak does it matter as it gets narrow above that.

Also is he “suggesting” you use lvls or saying you need to? Big difference.

Overkill or not buildings are designed with a safety factor in mind. And being an experienced carpenter I can still only guess what’s need. And the same is for your cousin.

Changes like this are sometimes better dealt with by a truss fab company as you can make them aware you want the cheaper option. And they will have the lvl or truss material you require.
 

rsanter

Well-known member
Joined
Dec 22, 2007
Messages
18,505
Location
visalia ca
The issue with eliminating the top cord is the outward force that will be put on the walls trying to push them apart.
There are several ways to handle this. Most will say you need an engineer but frankly someone that truly understands the forces involved and framing could likly do it without issue.

Is this a 2 post lift?
Option 1
Remove all the lower portions of the roof truss.
Install 2 poles (one on either side of the lift) and install a section beam to carry that portion of the roof. With the weight carried straight down there will not be force outward on the walls. You will need to upgrade (sister) larger dimensional lumber on the bottom of the roof deck to prevent sagging.

Option 2
Redesign the truss to a sissor truss design. This may need an engineer or you can simply copy an exsisting truss design of the needed span

Option 3
Replace the trusses in the area needed with pre engineered trusses. This will require a redo of the roof

Option 4
Install a steel beam along each wall to carry the outward load applied by the roof. Remove all the lower parts of the truss.Sister larger lumber to the underside of the roof deck to prevent sagging of the roof

Bob
 

850xpeps

Well-known member
Joined
Aug 6, 2017
Messages
1,365
The issue with eliminating the top cord is the outward force that will be put on the walls trying to push them apart.

There are several ways to handle this. Most will say you need an engineer but frankly someone that truly understands the forces involved and framing could likly do it without issue.


Is this a 2 post lift?

Option 1

Remove all the lower portions of the roof truss.

Install 2 poles (one on either side of the lift) and install a section beam to carry that portion of the roof. With the weight carried straight down there will not be force outward on the walls. You will need to upgrade (sister) larger dimensional lumber on the bottom of the roof deck to prevent sagging.


Option 2

Redesign the truss to a sissor truss design. This may need an engineer or you can simply copy an exsisting truss design of the needed span


Option 3

Replace the trusses in the area needed with pre engineered trusses. This will require a redo of the roof


Option 4

Install a steel beam along each wall to carry the outward load applied by the roof. Remove all the lower parts of the truss.Sister larger lumber to the underside of the roof deck to prevent sagging of the roof


Bob


You won’t get a permit with out an engineered design...... what if something happens? If he sells and says all the work has been permitted and it isn’t there will be issues.

Ya I could probably build something that won’t fall. But why wouldn’t you spend the minimal dollars on making sure. It’s stupid not to.


Sent from my iPad using Tapatalk Pro
 

bad_idea

Well-known member
Joined
Jun 11, 2011
Messages
4,332
Location
Pasquotank, NC
SpeedMan87,

I am glad you got an engineer to design this for you. Keep us posted on how the work goes. Take plenty of pics, we like those here.
 

laser3kw

Well-known member
Joined
Nov 17, 2012
Messages
7,276
Location
northen IL
Mine garage was engineered with scissor trusses over where my someday lift will be.
 

Attachments

  • garage 12-28-12 004 scissor.jpg
    garage 12-28-12 004 scissor.jpg
    86 KB · Views: 160
OP
S

Speedman87

Well-known member
Joined
May 11, 2014
Messages
55
Had another meeting with the engineer, asking if there was an alternative to the expensive LVL beams. He wouldn’t budge off his design plan. According to a horizontal roof rafter Maximum span calculator I should be fine with 2x12 lumber at 24in spacing ( maximum span is 20ft the length of the rafters in my garage would be 18ft) and this calculation is considering a max live load of 20ft/lbs squared. I think I would be fine with regular #1 2x12 lumber. But to cover myself I’ll go with the advise of the “trained professional”


Sent from my iPhone using The Garage Journal mobile app
 

Homerr

Well-known member
Joined
Mar 16, 2012
Messages
379
Location
Seattle, WA
LVL's are a great solution and I'd personally do no less, I'm with the engineer on this. As much as the structural value there are other reasons to use them - straight, flat, homogeneous material, and will give screws through truss top chords good bite. They work much better than solid sawn in moment and shear, which is key and what I think you and your contractor are overlooking.

Looks vague on the 'rear' side how the LVL will sit on the CMU wall. I'd personally go with taller collar ties, probably 2x10 and get more screws in there.

Really what is being said here:
Going with the LVLs would be the actual cost to build this structure vs unqualified expectations on cheaper and inadequate solutions

In the end it costs what it costs for an adequate structure - everyone's expectations be damned. Good work on an attempt to push back on the engineer however, sometimes they build in fairly large margins of safety.
 

Lewisthepilgrim

Well-known member
Joined
Dec 9, 2011
Messages
91
Location
seacoast NH
I have seen countless old homes that date back 200+ years. alot of these made from trees with the bark still on them. 5'' round trees as rafters, 15 feet long, 36'' on center, 200 years old....3 layers of shingles on them and NO noticable sag in the roof WHATSOEVER.....

just sayin ;)
 
OP
S

Speedman87

Well-known member
Joined
May 11, 2014
Messages
55
I have seen countless old homes that date back 200+ years. alot of these made from trees with the bark still on them. 5'' round trees as rafters, 15 feet long, 36'' on center, 200 years old....3 layers of shingles on them and NO noticable sag in the roof WHATSOEVER.....

just sayin ;)


Totally agree. Leave it to an engineer to over engineer something. Lol


Sent from my iPhone using The Garage Journal mobile app
 

pbon

Well-known member
Joined
May 14, 2017
Messages
3,498
Good point. A lot of instructions have excessive safety provisions. I have been in those 200+ year old houses with 36” on center roofing from scrawny tree trunks. Today’s engineers would never sign off on one of those houses, but the houses they design will be junk in 100 years.
 

R6 Racer

Well-known member
Joined
Feb 21, 2010
Messages
1,632
Location
Northern Ontario Canada
I recently finished mine. Very similar
Had an engineer do up the design & place the order with the truss company
That cost me 500.
The 5 trusses were 2500., delivered
14 sheets of 5/8" plywood sheeting was 500
Beer & pizza For 3 friends after the install was 200.
Engineers inspection & job sign off was another 100.

Total cost was right around $4000.

The new scissor trusses came in 3 pieces. 2 half trusses that butted against each other in the center & 1 center truss that covered half of each of the half trusses.
The tails of the new scissor trusses were tucked in over each end wall & then both were lifted up beside the old truss butting against each other in the center. Then the center piece was the attached to both of the two halves.
I do hope I'm being clear.
The 5 new scissor trusses were all attached along side of the existing flat bottom trusses. The 2 outside ones were installed on the inside of the 2 existing outside trusses. After they were all installed I cut out the bottom part of the 3 center old flat bottom trusses that hung below the new scissor trusses. The whole opening that I just exposed was then completely sheeted with 5/8" plywood.

There was also a bunch of other things that were required by the engineer like the 2800+ nails that had to be used & installed in a very specific pattern As well as a bunch of blocking & wind lashing that was needed.

My trusses are 24" on center & my opening is 8' wide x 31' long & goes from 10'6" tall at the ends to 14'6" tall in the center. The roof has a 6/12 pitch & the inside of the scissor trussed or my ceiling has a 3/12 pitch.


Steve

Oh, & my snow load requirements are quite high.
 
To avoid these ads, REGISTER NOW!
Top Bottom