To avoid these ads, REGISTER NOW!

Mopar / Wood Shop Cave

To avoid these ads, REGISTER NOW!

nicholam77

Well-known member
Joined
Dec 18, 2016
Messages
2,671
Location
Minneapolis, MN
This type of operation is perfect for domino but I don't see myself spending $1200+ to get into that system, just wouldn't use it often enough.

I've come to the same conclusion on multiple occasions. It would be so nice for certain projects... but these days I just don't make enough stuff to warrant the price. I still want one, though 😬
 
OP
M

moparfreak

Well-known member
Joined
Jan 24, 2005
Messages
853
Location
Milwaukee, WI
But you need a domino cutter. 😜
Was the reason for jointing and planing the 2x4 is so you have nice joints and nice look?
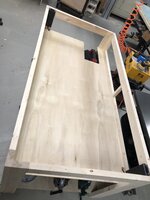
Yeah, I didn't want to spend $300 on maple or something like that to build the frame, but still want it to look clean and clear. I was really picky about the boards I chose, and then milled it so that it was flush, flat and tight joints. I want the faces of the workbench to be flat so that I can clamp stuff to the sides and make right angles to the top. I also plan to put dog holes and some matchfit dovetail slots along the sides, so wanted to start with clean surfaces. A bit extra work but worth it IMO. The milling was also needed to take the twist/bow out of the 2x4s. Even though I picked some good ones, a truly straight 2x4 is about as common as bigfoot.
I've come to the same conclusion on multiple occasions. It would be so nice for certain projects... but these days I just don't make enough stuff to warrant the price. I still want one, though 😬
Yeah, I would love one. I've got several table projects coming up in the next year (part of why I'm building out the shop infrastructure first), so I'll probably look into some mid-level options like the Jessem Pocket Mill Pro or the Dowel Max. I think the ability to make precision joinery is a must once you want to step past slapping stuff together with screw **** joints and pocket holes. It's the difference between perfect flush joints and coplanar surfaces vs. one board being 1/32" higher than the other and then hating yourself trying to sand or plane it down. The doweling jig I have is just hokey and bendy, hard to get precision. The Beadlock is a little bit better but not very intuitive and easy to mess up.

It's slow going but I think you guys will enjoy the follow along on this bench! I can't wait to get this thing to a freestanding point and I can start building the workholding features into it. Plus between the bench and the sanding station i'll be adding 19 drawers, so lots more storage to build out and organize!

Adam
 
OP
M

moparfreak

Well-known member
Joined
Jan 24, 2005
Messages
853
Location
Milwaukee, WI
Some progress over the past week or so...

More I use the beadlock the smoother it goes....
IMG_8173.jpg
IMG_8175.jpgIMG_8176.jpgIMG_8178.jpg
Then got the two sides done, and glued them together, and put casters on. The frame is now mobile!
IMG_8180.jpgIMG_8181.jpg
In retrospect, I don't know why I didn't include stretchers across the bottom of the short sides. But, what's done is done and once I start installing the plywood internal cabinet the entire thing will be super rigid (and heavy!). Plan to start cutting up the plywood and installing from the bottom up!

Adam
 
OP
M

moparfreak

Well-known member
Joined
Jan 24, 2005
Messages
853
Location
Milwaukee, WI
More progress in the past week. Starting on the inner plywood cabinet that will add a ton of stiffness. Before I get too far in building that, I cut and put in the base panel, and then flipped it over. I want to extract EVERY square inch of space on this thing, so I plan to have some wide shallow drawers in the under-space below in between the casters, which will be perfect for holding some of my various bar clamps used for glue-ups. Set up some plywood sides and runners and installed the drawer slides as well.
IMG_8190.jpg
This is also a good case of where I start to depart from the sketched out plans and really go off of the actual measurements. Now that the drawer opening and slides are installed, I can exactly hone in on the right drawer dimensions and get that perfect. I've had issues before cutting drawer parts before measuring the actual opening (just the theoretical opening) and then running into fitment or binding issues.

I also realized recently that I screwed up while I was building the frame, that I've ended up with an overall length of 69.5". It was supposed to be 72". This was because i pulled my measurements for the long stretchers off the wrong side, and then just carried that mistake through the rest of the parts. Oh well, just another reminder of how important it is to check and recheck things before cuts are made! Now I'll have to really be careful of cutting anything that relates to that overall length measurement. Slow and careful is the way to go with builds like this.

Adam
 

nicholam77

Well-known member
Joined
Dec 18, 2016
Messages
2,671
Location
Minneapolis, MN
I've got several table projects coming up in the next year (part of why I'm building out the shop infrastructure first), so I'll probably look into some mid-level options like the Jessem Pocket Mill Pro or the Dowel Max. I think the ability to make precision joinery is a must once you want to step past slapping stuff together with screw **** joints and pocket holes.

You could also look at a router-based mortising jig like Peter Millard's Loose Tenon jig. I have an earlier version and it works with off the shelf dominos. You could also make one... I've seen them on YouTube (I know Tamar 3x3 custom has one). Not the fastest... but neither are the other non-domino options. Not saying it's better, just another idea.
 
OP
M

moparfreak

Well-known member
Joined
Jan 24, 2005
Messages
853
Location
Milwaukee, WI
Alright, some more progress made. Started building the bottom drawers. Before I do the 14 upper drawers, figure it's good to get my steps and process down on the ones that are basically recessed under the cabinet. Recently upgraded to the Milwaukee track saw and sold my trusty older Grizzly. It's quite an upgrade. I wanted to be rid of the power cord which is super nice but still need to hook it up to vac if I don't want to spray the shop with dust shavings. Since I live in Milwaukee and work in engineering I've got a lot of friends who work there, so employee discount! :bounce:
IMG_8197.jpg
Then build the drawers, using pocket holes & brad nails. Quick and nothing fancy.
IMG_8199.jpg
Made up a quick template for marking & cutting out a "handle" of sorts. This is the cheapest type of handle (addition by subtraction).
IMG_8202.jpg
I have the table flipped upside down so I can install the drawers easily. and attach to the slides without actually taking them apart.
IMG_8203.jpg
Both drawers installed, and finally flipped the table over. Rest of the work will be right side up from now on (except for a couple routing/drilling operations on the sides which is later to come)
IMG_8204.jpg
And because with how long this is taking I really wanted to see some progress, I started putting some things into the drawers. These are intended to hold some of the assorted longer clamps.
IMG_8205.jpg
Tomorrow I start building the main cabinet on the inside. This will start to really build out the internal structure and make it hefty and rigid. A lot more to come.

Adam
 
OP
M

moparfreak

Well-known member
Joined
Jan 24, 2005
Messages
853
Location
Milwaukee, WI
You could also look at a router-based mortising jig like Peter Millard's Loose Tenon jig. I have an earlier version and it works with off the shelf dominos. You could also make one... I've seen them on YouTube (I know Tamar 3x3 custom has one). Not the fastest... but neither are the other non-domino options. Not saying it's better, just another idea.
I like his videos a lot, he's got some nice jigs, I'll take a peek!

Adam
 
OP
M

moparfreak

Well-known member
Joined
Jan 24, 2005
Messages
853
Location
Milwaukee, WI
Building out the cabinet portion of the table. Pretty basic stuff, but it's good to see it coming together.
IMG_8333.jpg
I designed a spot to hold an on-board vacuum. The vac will connect to a boom arm to handle integrated dust collection and sanding tasks to promote keeping the bench clean and tidy. The three bays on the left will be full of drawers.
IMG_8334.jpg
This side of the bench is going to be "vise central". After working for quite some time in the shop without what I consider to be any very good vises or workholding solutions, this bench is going to be ALL about workholding in various ways, including being able to accomodate several vises. The bay on the right is going to be open from the side and will hold several different styles that I've collected over the years that I'll build onto plates that will fit into and clamp onto the MFT style top with dog holes fixing them in place. I'll also be installing a traditional WW vise on this end up at the top.
IMG_8335.jpg
With all of this I've had to make a ton of small adjustments, so I'll have to go through and re-optimize my cut lists again. Next steps are to figure out how I want to bring power into the bench. Definitely need to have some integrated outlets to run the vac as well as power strip accessible but also not in the way. I'd like to figure that out before I close up the entire cabinet and make it harder to do the install. Then I have the top of the cabinet ready and it'll be time to start thinking about the MDF top!

Adam
 
OP
M

moparfreak

Well-known member
Joined
Jan 24, 2005
Messages
853
Location
Milwaukee, WI
Okay, now we're making progress. Finished up the vise shelf, made an extra shelf for my Moxon style vise, which is nice for working on joinery. The one on the left is a ball-joint swivel that holds odd shapes, the middle one is a low profile metal vise, and the one on the right is a pattern-maker's vise that has swivel jaws. I'll probably stick another shelf up there but going to give it some time to make sure I don't have any other uses that come to mind for that space. I'll mount the vises on platforms once the tabletop is done.
IMG_8390.jpg
Next is figuring out how to power this bench. Originally I was looking at those auto-on outlets for the vacuum, but it comes with a remote switch, so I'll just be keeping that in the drawer and can make switching it on and off easily. I plan to have a power strap at two opposite corners. To keep all the cordage neat and tidy, best route is to wire in a duplex outlet and have an extension cord come out of that. Then I can plug the entire bench into an outlet and power the whole thing. Easy peasy.

First job was searching through my electrical parts bin. Found everything I needed! $0! (well not counting the power strips which I ordered on Amazon).
IMG_8393.jpg
Spent some quiet solitude time wiring them up. Very peaceful work.
IMG_8394.jpg
Mounted into the Assembly Table. Turns out I wired it up right the first time, which is mildly surprising:
IMG_8395.jpg
Finished, have to install the power strips once they arrive as well as some cord wraps to keep the cable tidy, and then the top of the cabinet goes on next.
IMG_8396.jpg

Adam
 
OP
M

moparfreak

Well-known member
Joined
Jan 24, 2005
Messages
853
Location
Milwaukee, WI
More slow progress. Man all these little steps take time. Figured it would be easiest to get the drawer slides installed before I put the top on. 10 drawers to make up for the cabinet.
IMG_8514.jpg
Got the power strips and installed at the two corners. It'll be nice to have ample outlets and a few USBs. I'm used to running extension cords across to the middle of the shop from the walls, so now I won't have to do that anymore! Wire management and routing was key here. Made some notches and stapled the cord so it'll stay hidden underneath the top and stay behind the drawers.
IMG_8515.jpg
IMG_8516.jpg
IMG_8518.jpg
Okey, well now I have some choices. I can either:
- Add the cabinet top and then start working on the actual MFT-style tabletop. This will complete the boxing out of it and add the rigidity into it. This is the part I'm looking forward to the most since I'll then be able to use this as a freakin' workbench.
- Build out & install the drawers. This is the part I'm looking forward to the least cause it's boring meticulous repetitive work and I know it'll drag out. But, it will be undeniably easier to install them with the open top, so there's that.
- Rout the matchfit grooves into the side rails. This is going to be tricky, but I want to put matchfit dovetail grooves in the main front and side railes for more clamp-ability. Plan to do this with track and router (with router adapter for the track). I'm sorta worried about this cause if I screw it up, there's no going back. Might be best to do this last once the tabletop is on, and the bench has the maximum rigidity.

Adam
 

nicholam77

Well-known member
Joined
Dec 18, 2016
Messages
2,671
Location
Minneapolis, MN
Man all these little steps take time.

I somehow conveniently (or inconveniently??) forget this every time I start a woodworking project, but man is it the truth! 🤣

Rout the matchfit grooves into the side rails.

I assume you've done matchfit before, but in case not, you should do two passes, one with a straight bit to hog out the waste, and final pass with the dovetail bit. Not sure how heavy the bench is at this point, but I assume you will tip it so you're not routing vertically to the ground? Might be another point in the column of doing drawers later.

Anyways, looking good!
 
OP
M

moparfreak

Well-known member
Joined
Jan 24, 2005
Messages
853
Location
Milwaukee, WI
I assume you've done matchfit before, but in case not, you should do two passes, one with a straight bit to hog out the waste, and final pass with the dovetail bit. Not sure how heavy the bench is at this point, but I assume you will tip it so you're not routing vertically to the ground? Might be another point in the column of doing drawers later.
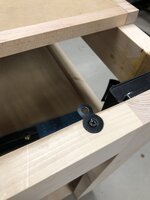
Yeah, I've got the straight bit to clearance out most of the waste and then the dovetail one to follow it up. I think using the track with clamps will help things go smoothly but I'm always worried about the router wandering off its path - it's happened to me before and I hate the little dips / curves in lines that are supposed to be laser straight.

I definitely plan to tip the bench over on its back. That's not too bad. But - to do the edges, where I'd really like to have those tracks as well. That is scary. It's 6' long so I'd have to basically tip it up (not easy by myself) and then get up on a ladder to rout it. Definitely requires some forethought on how I do the setup. I could do the routing with my M18 trim router, much easier to handle in a horizontal manner, but also less power than the 1/2" full-size router. I have seen videos of folks routing the matchfits with trim routers but I always wondered if it would bog down and slow the bit, cause burning, grabbing, etc.

I think today I might start cutting up the drawer pieces. Basically whatever I can do to push off the scary parts as long as possible!

Adam
 
OP
M

moparfreak

Well-known member
Joined
Jan 24, 2005
Messages
853
Location
Milwaukee, WI
Long holiday weekend, good chance to make progress so I just jumped right into the drawers. Been kinda dreading them so decided to power through. Friday cut them all up. Saturday and Sunday started building and mounting them as I went. Really simple constuction - pocket holes and brad nails. Not fine WW but whatever!
IMG_8543.jpg
IMG_8547.jpg
All mounted up, 10 drawers!
IMG_8549.jpg
Finally it's time to close up the cabinet portion of this build by mounting the top. I totally miscalculated in the design phase the height of the vacuum, so I needed to put a stupid looking cutout. I'll take the Bob Ross approach on this and call it a "happy little accident".
IMG_8550.jpg
I'm really excited to be done with this phase. Having the top on the cabinet is a nice step to be done with, it's also a huge storage surface that I'll be able to keep things for the workbench underneath and keep the main surface uncluttered hopefully.
IMG_8551.jpg
Going to try and finish up the drawer fronts tomorrow, and then move towards the tabletop. I decided I'm going to finish up the top, make the table completely rigid, and then start flipping it onto it's ends to rout the grooves and drill the dog holes. I feel like I'm in the 7th inning stretch now of this workbench project!

Adam
 

Attachments

  • IMG_8550.jpg
    IMG_8550.jpg
    467.6 KB · Views: 8
OP
M

moparfreak

Well-known member
Joined
Jan 24, 2005
Messages
853
Location
Milwaukee, WI
Putting drawer fronts on today. I have the Milwaukee M12 4-in-1 driver and I found the offset driver head to be quite useful in this case. Haven't used it too often, but this made the work go pretty quick.
IMG_8553.jpg
Finished all the drawer fronts!
IMG_8554.jpg
Looks better than I thought, actually. A few wrapup items is I need to set up a flush-trim bit on the router table and clearance out the handle cutouts on several of the drawers. Also thinking of running a chamfer bit around the drawer fronts to give a bit more finished of a look, but we'll see. Once that's done next step is to fit up the make WW vise prior to starting the top.

Adam
 
OP
M

moparfreak

Well-known member
Joined
Jan 24, 2005
Messages
853
Location
Milwaukee, WI
Well. Some steps forward and some steps back today.

First the progress.

Set up a flush trim compression bit on the router table and used it to clearance out the bits behind the drawer front handle cutouts. One-time setup and knocked out all 10 drawers in just a few minutes.
IMG_8559.jpg

Then turned attention to the next task prior to putting the top on which is to install and make the blocking for the big Vevor WW vise that I got for the bench. This is the only permanently mounted vise I plan for it, so I wanted it to be an all-purpose beefy one. This one is a beast and on Vevor was pretty cheap, $75 or so. First step was getting it positioned in place and clamped to confirm placement.
IMG_8565.jpg
I'm giving away some capacity but installing it inset and having the workbench rail serve as the inner jaw. Then I'll make an outer jaw to match and be good to go. Next is to set in place with a pair of lag screws. The right angle adapter from MT saved me here.
IMG_8566.jpg
First two screws and I'm surprised at how well it's holding. But, there are also two sets of large 1/2" holes from the bottom up that I'm going to add blocking support into so that I can have this 40# vise held in place with a minimum of 6 lags. That is next, I'll use 2x4s milled square and glued and screwed in.
IMG_8567.jpg

Now the bad news. I was set to start milling up the lumber for the blocking and noticed a puddle of water nearby in the Charger bay.
IMG_8560.jpg
Of course water is my worst fear. This is all new construction (well '15 new), so I wouldn't have expected to see this. First thought was it was coming in at the foundation where the wall meets floor. After some investigation it came in through the furnace ducting above.
IMG_8562.jpg
Hard to tell but it's wet around the seam. We had a lot of rain today, and at times it was coming down like buckets and also was a heavy driving rain. I think the wind drove some of that water straight through the rain cap and started filling up the pipe. Then it just dripped right down into my red toolbox and then down onto the floor. So I had to spend the rest of the night cleaning up the mess.
IMG_8563.jpg
IMG_8564.jpg
Not sure why this became a problem as it's been fine for years, will have to inspect the rain cap outside, maybe it flew off or dislodged. What a hassle. Hope to get back to the workbench tomorrow & pick up where I left off!

Adam
 
OP
M

moparfreak

Well-known member
Joined
Jan 24, 2005
Messages
853
Location
Milwaukee, WI
Home Stretch!

Finished securing the main vise. Milled up a few more blocks and sandwiched things in and glued/screwed it in place. Then did some contortions to get the lag screws drilled and bolted in from the bottom. Although it sacrificed some significant drawer space, I'm really loving the big wide space below the worksurface to access and store things.
IMG_8586.jpgIMG_8587.jpg
Secure & rock solid. I sprayed some dry silicone onto the screw and rods and it operates nice and smooth! After I get the top fixed in place, I'll need to come back and mill up and install the moving vise as well as the pop-up dog (the one that comes with it isn't tall enough). Onto the next step.

My SFIL was over on Sunday so I took advantage of having another set of hands and we muscled the large sheet of 3/4" MDF into place and made what I'm hoping is my very last cut on my old beat up piece of 1" foam. Took this down to size - 68" x 34.5" with the track saw. Moved it over to the workbench and now it's starting to look like a bench! Got some 1x maple down from the racks and ripped it to 7/8" wide and started gluing it onto the end as edging. I want the maple not only for looks but also edge durability. Had to work up some funky clamp setups to keep things tight while glue sets up:
IMG_8588.jpgIMG_8589.jpg
IMG_8591.jpg
Two sides of the edging done. Tonight I'll trim them off flush and glue up the long sides. Despite my excitement of finally seeing a top on this thing, I'm trying to be methodical here and now careful precision is the key! I'll be carefully laying out the hole pattern, get the support ribs installed, then can work on finishing touches.

Adam
 
OP
M

moparfreak

Well-known member
Joined
Jan 24, 2005
Messages
853
Location
Milwaukee, WI
Got all the edging glued on and edges trimmed. Looks nice with the maple finishing off the ends. Still need to flush trim and roundover the trim but will do that once it's fixed in place.
IMG_8596.jpg
Onto the next scary step - putting in the bajillion dog holes. I want these to be as perfectly square as possible, so I decided to invest in the Parf Guide System by UJK. It's a bit of expensive kit (as they say in GB) but this will guarantee squareness and will last me this bench and any others I want to build for the rest of my life pretty much. After watching several videos, reading the manual carefully, it's actually rather simple. It works by first using some template rulers and pins and guide bushings to set a pattern of 3mm holes. Then you come back later with the 20mm hole drill bit and jig to enlarge the holes based on the pattern you've already established.

First step is to do some careful layout of where the grid should be relative to the tabletop edges. Also want to make sure you'll have clear underneath where the holes get drilled, which is why I'm putting in the holes now before I've fastened the supports down. This way I can move the supports around to ensure they don't line up with the holes. First you set the first ruler and drill your first row of holes. I start with the "top" row since this is a row I'll use for a fence in some cases.
IMG_8597.jpg
Then set the guide bushing and go to town. It includes pins that fit firmly into the 3mm holes with zero play, and they lock into the ruler with the 6mm holes, so the ruler simply can't budge once you get a couple holes drilled. Really clever.
IMG_8598.jpgIMG_8599.jpg
Once the first row is set, you make your columns square to the rows by using the two rulers in conjunction and use the 3-4-5 / pythagorean theorem to intersect and make them perfect. Ingenious.
IMG_8600.jpgIMG_8601.jpg
Follow through to get upper and lower rows and columns on both sides made. Then the rest will be just moving the ruler around, setting pins and drilling the rest of the thousand holes.
IMG_8603.jpg
Over the next couple of days, going to work on finishing up the 3mm pattern, then getting the 20mm holes drilled, and then getting the supports installed and the top fastened down.

Adam
 
To avoid these ads, REGISTER NOW!
OP
M

moparfreak

Well-known member
Joined
Jan 24, 2005
Messages
853
Location
Milwaukee, WI
Made more progress over the last couple days. Did a few things I didn't get shots of - specifically getting the ribs set up underneath the tabletop. Got those drilled and installed into the table so now there's mid-span support in +4 areas in addition to being supported around the perimeter. I know MDF can sag over time but I feel confident that it'll remain flat for this table.

Next was completing the dog hole pattern. I gotta say the Parf Guide kit just makes this so straightforward. Still a lot of work, but was able to do it relatively painlessly.
IMG_8664.jpgIMG_8665.jpg
The guide itself you initially use the 3mm pins to put an alternating pattern of 20mm holes and then come back and use two 20mm dogs to fill in the rest. It goes a lot faster once you get past needing the 3mm pins anymore. The dust collection works fairly well, but you gotta watch out for the breakout puck that inevitably sticks to the forstner bit and then you don't realize it on the next hole and try to drill and it just jams up. I also turned the top over before I started and used the forstner bit to to a quick scoring cut on the bottom side so that when it broke out the bottom, it would be a clean hole rather than an ugly one. This was based on recommendations in the instructions and I found it to be worthwhile. Clean exit holes on the bottom this way.

Then to finish it up, I have this reamer/chamfer bit. The reamer part is mainly for cleaning up fuzzies and finish/glue that gets to the inside of the hole and keep it clean and true to size, which isn't so necessary for the first drilling, but the chamfer is really important for cleaning the top edge of the hole, and it also engages with chamfers on a lot of the newer dog designs and allows them to self-center perfectly and makes for a more precise fit. Also looks better too.
IMG_8666.jpg
And here's the finished top!
IMG_8667.jpg
I love it. Hope today to find the time to finish up adding the brackets and actually screw this down to the frame. Then flush trim the edges and and working out the holes on the sides and matchfit grooves.

Adam
 
OP
M

moparfreak

Well-known member
Joined
Jan 24, 2005
Messages
853
Location
Milwaukee, WI
Another packed day, but managed to steal some time away to work some more in the shop.

I decided to relocate the tracks. Initially was going to keep them in the space under the worktop but found a little nook to keep them in near where I keep my plywood. Made a little stand to keep them off the concrete and protect the edges better.
IMG_8668.jpgIMG_8669.jpg
Then I finished up the tedious work of installing all the little "figure-8" brackets. Had to fashion up a method of drilling square and consistent depth with the forstner bit on an edge. Used my Rockler drill fixture which was still a bit tippy but did the trick, and easy to control the depth.
IMG_8670.jpgIMG_8671.jpg
Then it was rinse and repeat about 25 times. Took a bit to get access to every single one but got the top completely fastened down. Rock solid yet also replaceable without completely deconstructing the entire bench.

Then once it was firmly fixed in place, time to make chips and bring the routers out to complete this project. First came the flush-trim. Used a really nice universal base from USSA youtuber, and it's really stable.
IMG_8672.jpgIMG_8673.jpg
Nice, flush and smooth.
IMG_8674.jpg
And finally, add a roundover. Used my Bosch cordless which I pretty much permanently have setup with a 1/8" radius bit. Set it as deep as it goes, and gives a nice soft edge without looking too curvy for my tastes.
IMG_8675.jpgIMG_8676.jpg

That's all for today. This is now a bench! Left to do is the dog holes and microjig grooves on the sides. Still not 100% on how to go about this (without tipping the entire bench onto its sides), so going to mull this one over for a day or two.

Adam
 

Attachments

  • IMG_8671.jpg
    IMG_8671.jpg
    349.1 KB · Views: 6
OP
M

moparfreak

Well-known member
Joined
Jan 24, 2005
Messages
853
Location
Milwaukee, WI
Last few percent here.....

Used the Parf Guide to put dog holes on the three main working sides. This allows me to use all the dog hole bits on the vertical sides as well. Took a bit of setup but I was able to get them all aligned with the holes on the top as well.
IMG_8695.jpg
Was going to rout some matchfit grooves also on the front so I could use those "L" clamps (which can't go into the dog holes because it's 1-1/4" material, too thick to make the turn), and I set up my track saw with the router guide and after fussing with it for awhile, I decided - this is just too janky. I didn't want to tip the bench over and in the end with all the clamps I can use with the dog holes I just don't think the extra tracks are really all that necessary. I don't want to mess up my bench and I can add them later on if I feel it's needed.
IMG_8696.jpg
Then I put 2 coats of waxed shellac on it, sanding in between then a final hand sand after to smooth it out. Now it's much more durable and doesn't pick up dirt and smudges like the raw MDF did. Looks and feels really good too. Taped off to do just the top but if it holds up nicely then I'll apply it to the rest of the frame as well.
IMG_8697.jpgIMG_8703.jpg
Rigged up a little system to hold a roll of craft paper, so I can pull it up and over if I'm doing paint/glue/messy stuff. A couple hooks, a 3/8" axle and cut the roll down to just the right length (miter saw didn't like that at all). Hides underneath all sneaky like. I've seen various versions of this idea on the web so wanted to try it.
IMG_8698.jpg
I got a few pieces of this thin HDPE sheet from Mnards and taped them together so they can fold/unfold easily and cover up the surface. This is another piece to be used for protection when I'm doing something that might damage the MDF surface. I do lots of mechanical / auto restoration work so this way I can still use this as a main worksurface for that kinda thing, the plastic will be a good tough wipeable surface for that, and it stores out of the way very easily without taking up much space at all.
IMG_8701.jpgIMG_8702.jpg
For when I want soft surface for finished projects that I want to protect, nabbed some old carpet pad and cut to size. My son thought it made a good place to nap. He's not wrong.
IMG_8706.jpg
Finally, added in some plastic plugs from UJK. I didn't want the holes to remain open and have things fall through and dust get through, etc. UJK makes some plastic plugs that are alright. A bit hard to get out, but you can also vacuum over them and they won't come out either. There are some nice SS ones that Benchdogs UK makes but very expensive. So - this will do for now!
IMG_8708.jpg
REALLY close to calling this project done! Last major thing to do is finish up the maple vise block, and also to rout in the track-saw waste strip in the top. Then I've got lots of drawer / organizing to do, and some dialing in of accessories for it, but that's all small details and this bench is already basically 100% functional. Probably at least 30 hours worth of work across a number of months but I'm very pleased! I'll post some more as I dial in the details and get it organized, so more to come, but this project is for the most part done and I'm starting to think about the next ones! Sanding Station overhaul is coming next, along with an outdoor dining table!

Adam
 
OP
M

moparfreak

Well-known member
Joined
Jan 24, 2005
Messages
853
Location
Milwaukee, WI
Today I set up the boom arm for the vac. I think somebody on here suggested it for me. I use threaded flush dogs as an attachment method. This way I can put it wherever I want. This is also the method I use to attach other jigs / vises to the workbench. I plan for 4 on this but only have two at the moment.
IMG_8719.jpgIMG_8720.jpg
Add a flex hose on the end and it's ready for action. Can sweep up dust on the bench or attach to a power tool.
IMG_8722.jpg
On to making the moving vise jaw. I had a large thick maple cutoff that should do well. Kinda gnarly/punky in a few spots so I need to trim around and square things up. Change the TS blade over to a thick cut rip. Cuts through hardwood like butter and doesn't bog down one bit.
IMG_8723.jpg
Mill it down flat with the jointer and planer (it had some warp to it), then use the TS to cross-cut and use the bench to take a few swipes with my planer. I've never been able to hold workpieces well for planing so this is new for me.
IMG_8725.jpgIMG_8724.jpg
It's roughly to size. Next up is to soften the edges, put some finish on it and then fasten it into place on the vise.
IMG_8726.jpg

Adam
 
OP
M

moparfreak

Well-known member
Joined
Jan 24, 2005
Messages
853
Location
Milwaukee, WI
Found some time to sneak away and finish up the vise jaw on the moving end. Got it to final dimensions and round over all the edges. Put the same shellac on it and man that maple really pops. Too bad most of it is gonna get covered up, oh well!
IMG_8728.jpg
For the vise I was originally looking at some generic "crubber" but then saw Andrew Klein's version that is a different compound that seems to really grip like crazy. He did a cool test that speaks to my engineering heart and sold me on it, so I bought a small roll and here I'm prepping it to size and will spray adhesive it on. I'd love to have gotten his twin turbo vise but decided to save that $$ for other things and opted for the cheap but very nice and functional 11" WW vise from Vevor.
IMG_8727.jpgIMG_8729.jpg

Flush it up perfect to the table surface using a level straight edge, and then use these transfer punches to locate and drill holes (love this set). Then it's all finished up! That Cork Rubber is really grippy!
IMG_8730.jpgIMG_8731.jpg
IMG_8732.jpg
I know the bench is mainly made with pretty utilitarian 2x4 pine and MDF but the maple bits really make it pop and look a bit better than a crummy piece of neglected shop furniture!

Adam
 
OP
M

moparfreak

Well-known member
Joined
Jan 24, 2005
Messages
853
Location
Milwaukee, WI
After a week long break to take the family on our annual June national park trip (Olympic this year!), finally back and into the shop. Last thing I wanted to do on the workbench is to set it up for being able to cut using the dog holes and track saw directly on the table. I wanted to get away from doing the big sheet of hard foam, and being able to use the dog holes and a fence to square up the track. In order to do this I set to routing a groove where I can have a replaceable zero-clearance insert that is where the cut will always be. This way I'm not cutting into my main worksurface, and it's also providing a backing to the cut to prevent tear-out on the bottom side.

I only wanted to go 3/8" deep into the worksurface (not more than half). That thickness isn't normally found as a sheet in MDF but I was able to find a trim profile that had a wide enough flat portion that I could trim out what I needed and it was cheap and easy from Menards.
IMG_8737.jpg
Then a bunch of CAREFUL setup and measurement with the track and router base. I squared the track off to two dogs so I know it should be square to the dog holes.
IMG_8912.jpg
After some clenching, run the first pass across. It went well, and was a good use of the boom arm to keep the dust out of the cut, worked well.
IMG_8913.jpg
From there, I widened the groove with two more passes to get just about to where I needed it to be. Then I used the TS to skim cut and trim the piece to a snug fit.
IMG_8914.jpgIMG_8915.jpg
I have a second piece ready in the bin for when this one gets all cut up, and if ever needed can grab more from Menards - so I'm pleased how it turned out.

Onto more projects!

Adam
 
OP
M

moparfreak

Well-known member
Joined
Jan 24, 2005
Messages
853
Location
Milwaukee, WI
Not too much shop time lately. It's been ungodly hot. But, back in tonight and knocked out a few small things.

Designed up a small hanger to use for the vacuum attachments I have from Milwaukee. Fusion360 to model it up, did a first and second try, then printed off the rest of them, turned out good!
IMG_8936.jpg
IMG_8937.jpg
And now I'll start working on the individual drawers. When I finished the table I just threw a bunch of $h!t into each drawer and now it's time to get it all organized. Following the 3D printed theme, I think the simplest and also most flexible is using some thin MDF and some easily printed joint pieces. Started experimenting with the marking/writing drawer.
IMG_8938.jpg
Once everything is in a good spot I'll add a few dabs of hot glue to lock things in place. I really like the concept of using 3D printed pieces to quickly design things up and organize - it's pretty much a perfect use case. Should be able to get this drawer wrapped up soon.

Adam
 

nicholam77

Well-known member
Joined
Dec 18, 2016
Messages
2,671
Location
Minneapolis, MN
The MFT bench is looking fantastic. Nice job on the 3d prints, too... I love 3d printing for organization. What printer do you have?

Curious to hear your thoughts on the dog hole plugs over time. In my experience I haven't really had an issue with things falling through that often. If I'm using screws I usually have them in a little bin, and I put a full hardboard cover over the top for things like glue ups.

P.S. I don't think you have enough pens 🤣
 
OP
M

moparfreak

Well-known member
Joined
Jan 24, 2005
Messages
853
Location
Milwaukee, WI
Looks good. Did you download a file for the drawer dividers or did you model them up yourself?
These I found online (I always search online before making something up custom myself). A lot of stuff out there has different widths so I tried out a few different ones and matched it to stock I had and could purchase more of easily.


Adam
 
OP
M

moparfreak

Well-known member
Joined
Jan 24, 2005
Messages
853
Location
Milwaukee, WI
The MFT bench is looking fantastic. Nice job on the 3d prints, too... I love 3d printing for organization. What printer do you have?

Curious to hear your thoughts on the dog hole plugs over time. In my experience I haven't really had an issue with things falling through that often. If I'm using screws I usually have them in a little bin, and I put a full hardboard cover over the top for things like glue ups.

P.S. I don't think you have enough pens 🤣
I have the Prusa Mini at home, and my new favorite - the Bambu Labs X1C at work. It's so effortless and reduces the friction for making up these type of custom solutions.

You might be right on the plugs - we'll see how the usability goes as times goes on. It might be just more convenient to avoid having to remove the plugs and have them open. The fact that I have great dust collection now has made me collect the dust much more now rather than just create a mess and brush it onto the floor.

Adam
 
OP
M

moparfreak

Well-known member
Joined
Jan 24, 2005
Messages
853
Location
Milwaukee, WI
Finished up the marking drawer. Yes, I know, OCD to the max - but it beats sorting through a messy drawer. Gonna leave it for a bit and make sure the layout works well and then add a few dabs of hot glue to lock the dividers into place to prevent them from shifting around when the drawer is opened and closed.
IMG_8951.jpg
Onto the next nightmare drawer!
IMG_8952.jpg

Adam
 
OP
M

moparfreak

Well-known member
Joined
Jan 24, 2005
Messages
853
Location
Milwaukee, WI
It gives me satisfaction to make things organized using basically free materials - scrap that I keep in my bins and a few $ worth of filament. Before going this route I looked at some drawer organizer systems that, while impressive, are just bonkers expensive. You can have $100 easily into each drawer. Using materials you have on hand and spending a bit extra time, thought and sweat into making it work for free is a reward in itself.

Adam
 

Nolift911

Well-known member
Joined
May 16, 2011
Messages
1,017
Location
Lansdowne, VA
Great thread - love the Mopar flavor. I had a 74 Charger in high school, still wish I had. You never forget your first car, put a lot of work into that $1300 car. Just a 318 but I did ad a 4 barrel and a cam, headers and dual exhaust and a shift kit. Those are Keystone Classics which I thought went well with the car. Also a kick- *** stereo with Pioneer TSX-80s on the rear shelf belting out Van Halen and Motley Crue. :cool:

It also sports the best Maaco paint money could buy...:ROFLMAO: I was headed to college and needed a "practical car" to get back and forth from college, sold it for $2100 cash, the guy was a waiter and gave me 2100 "one dollar bills" in a Nike show box. He was pretty proud to own it. Lost track of it but would like to know where it is - if it still is.

10604093_10205555684076712_2538532982413669994_o.jpg

I am after a 68 or 69 to rat rod myself, Charger of course. I think you have the right idea, lots of power, suspension and brakes, low with great stance - resto mod style but no paint, tired of painted cars - even bad painted cars, then you just have a car with a "bad paint job".

I would fix your metal, let it stay bare and then matte clear it. It can be mix matched with panels and ratty on the outside. That way it gets driven and used. Thinking Roadkill style, ViceGrip Garage - those shows changed/taught me to get away from pristine perfect to just get it running and on the road and enjoy.

My 02. I would get yours running/on road and worry about little stuff after the fact...get behind the wheel and the other stuff falls in line.

Will follow the journey -
 
OP
M

moparfreak

Well-known member
Joined
Jan 24, 2005
Messages
853
Location
Milwaukee, WI
I would fix your metal, let it stay bare and then matte clear it. It can be mix matched with panels and ratty on the outside. That way it gets driven and used. Thinking Roadkill style, ViceGrip Garage - those shows changed/taught me to get away from pristine perfect to just get it running and on the road and enjoy.

My 02. I would get yours running/on road and worry about little stuff after the fact...get behind the wheel and the other stuff falls in line.
That '74 looks great! Nice story, the 2100 one-dollar bills gave me a laugh.

The bare metal + clear is interesting. I think it'll definitely be something like that or primer grey / primer black. The 'fix the metal" part is such a huge and daunting task, it's all bad. I've definitely used pretty much any other project under the sun as an excuse to avoid just getting into the nuts and bolts of it. Just a few more shop projects and then I'll be ready ;)

In all seriousness I just need to get started. Usually once I start a project I can build some steam and momentum which helps move things along.

Adam
 

Nolift911

Well-known member
Joined
May 16, 2011
Messages
1,017
Location
Lansdowne, VA
That '74 looks great! Nice story, the 2100 one-dollar bills gave me a laugh.

The bare metal + clear is interesting. I think it'll definitely be something like that or primer grey / primer black. The 'fix the metal" part is such a huge and daunting task, it's all bad. I've definitely used pretty much any other project under the sun as an excuse to avoid just getting into the nuts and bolts of it. Just a few more shop projects and then I'll be ready ;)

In all seriousness I just need to get started. Usually once I start a project I can build some steam and momentum which helps move things along.

Adam
Ok great! - Should I check in daily or weekly or..... :cool: (I am in the same position on all my projects btw, sometimes a nudge is all that is needed)
 
To avoid these ads, REGISTER NOW!
Top Bottom