I don't see which lift you brought; results from my search are only bringing up car lifts. Can you provide a link, please? Thanks!I can use the lift to bring it up to the height of a workbench to help stabilize it.

You are using an out of date browser. It may not display this or other websites correctly.
You should upgrade or use an alternative browser.
You should upgrade or use an alternative browser.
Mopar / Wood Shop Cave
- Thread starter moparfreak
- Start date
OP
moparfreak
Well-known member
It's more of a motorcycle lift, like this one from Amazon:I don't see which lift you brought; results from my search are only bringing up car lifts. Can you provide a link, please? Thanks!
https://www.amazon.com/VIVOHOME-Scissor-Motorcycle-Scooter-1100Lb/dp/B06X9CYNJF?tag=atomicindus08-20
Pretty easy to use, and for my application pretty heavy duty.
OP
moparfreak
Well-known member
I organized the lower shelf to hold all the hand saws. I chose to use hard foam cause it's cheap and very easy to modify and lay out. It's not as premium or nice as the kaizen foam or custom wood cutouts but this took about 20 minutes and is effective and cheap/free with some foam I had lying around.

Finally can call this complete. Here it is completely mounted in its spot underneath the jointer:

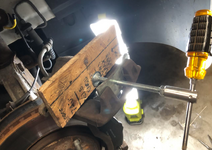
And then when I want to use it, I raise it up and have a dowel peg in the back that can engage in one of the dog holes in the workbench. This along with the locking casters gives enough stability for me to be able to sit on a chair next to it and do the fine scroll work with bending.

Finally can call this complete. Here it is completely mounted in its spot underneath the jointer:
And then when I want to use it, I raise it up and have a dowel peg in the back that can engage in one of the dog holes in the workbench. This along with the locking casters gives enough stability for me to be able to sit on a chair next to it and do the fine scroll work with bending.
OP
moparfreak
Well-known member
Been a few weeks since I posted. Not a whole lot of new build stuff, but I did get to finally set up my plumbing and electrical tools into a Packout setup. I have a few buddies that work at MT so was able to score these pretty cheap using their employee discount, so it wasn't as painful of a hit as it could have been. I like these as I've never had a real good setup for my plumbing and electrical tools, which I use the most often inside the house.

Electrical meters and probes and tools all fit in the bottom 4-drawer.


The rest of the boxes are plumbing.


So, all in all the shop is in a good place. I'll keep plugging away at some more improvement projects since I'll have some more time at home with holidays but starting to turn my attention to a new house project, the fireplace.
Right now we have a decommisioned fugly wood burning fireplace in our family room. We painted the brick (it was orange / salmon colored, yuck). This helped the aesthetic somewhat but it's still just a useless gaping hole. So, time to finally fix that. Here's what it looks like now:

With the chimney gone, and Wisconsin doesn't allow ventless, I'm going to be putting in an electric insert. At 240V it puts out some nice heat, looks nice, adds ambiance, and will be much better than what we have. I need to close off the left open side, so trying to track down some brick that matches the scratched texture of the ones we have. That is proving difficult, as these bricks are from '63 and I've never really seen them on any other houses, so it's not super common. Pulling electrical will be a challenge as the panel is a long ways away. Going to trim the opening out with a nice pieces of walnut. Lots of steps on this one! Hopefully I can get this done over the course of a month or two and still enjoy it while it's cold out.
Electrical meters and probes and tools all fit in the bottom 4-drawer.
The rest of the boxes are plumbing.
So, all in all the shop is in a good place. I'll keep plugging away at some more improvement projects since I'll have some more time at home with holidays but starting to turn my attention to a new house project, the fireplace.
Right now we have a decommisioned fugly wood burning fireplace in our family room. We painted the brick (it was orange / salmon colored, yuck). This helped the aesthetic somewhat but it's still just a useless gaping hole. So, time to finally fix that. Here's what it looks like now:
With the chimney gone, and Wisconsin doesn't allow ventless, I'm going to be putting in an electric insert. At 240V it puts out some nice heat, looks nice, adds ambiance, and will be much better than what we have. I need to close off the left open side, so trying to track down some brick that matches the scratched texture of the ones we have. That is proving difficult, as these bricks are from '63 and I've never really seen them on any other houses, so it's not super common. Pulling electrical will be a challenge as the panel is a long ways away. Going to trim the opening out with a nice pieces of walnut. Lots of steps on this one! Hopefully I can get this done over the course of a month or two and still enjoy it while it's cold out.
OP
moparfreak
Well-known member
Trying to get all the messy drawers in my new assembly table finally organized. Starting with this one which has a lot of layout / measurement tools. I like to use a combination of hard foam and the softer kaizen foam to create nesting for parts like this. Again it all goes back to using stuff I have on hand. I then use a dremel with a router base and a small router bit to hog out the material in the foam. It's all pretty light stuff and light cuts so I can do this free hand and get close enough.


Next organization project is an old craftsman workbench next to the Charger, and it had a big open shelf where I would keep all my specific automotive specialty kits and tools. The current drawers and open shelf just **** for storage and functionality. So, my plan is to pull it all out and then build a cabinet in that inside space and a stack of full width / depth drawers that can fit all those kits and specialized tools. Should be much neater and also easier to access. Started the project last night.
Here it the previous state.

All the tools to be stored:

After some disassembly:

Now I can clean behind it and take some measurements and calculate the layout of the drawers. I'm going for minimalist approach here, so I'll be installing plywood strips from scrap as needed to bolster the existing structure but I don't want to go out and buy a bunch more material than I really need. Will probably have to get a couple sheets of ply to build out all the drawers, and currently waffling back and forth between 1/2" or 3/4" material. The drawers will be rather wide and the tools are sorta heavy, but 1/2" is so much easier to deal with and also allows for more usable space. We'll see!
Next organization project is an old craftsman workbench next to the Charger, and it had a big open shelf where I would keep all my specific automotive specialty kits and tools. The current drawers and open shelf just **** for storage and functionality. So, my plan is to pull it all out and then build a cabinet in that inside space and a stack of full width / depth drawers that can fit all those kits and specialized tools. Should be much neater and also easier to access. Started the project last night.
Here it the previous state.
All the tools to be stored:
After some disassembly:
Now I can clean behind it and take some measurements and calculate the layout of the drawers. I'm going for minimalist approach here, so I'll be installing plywood strips from scrap as needed to bolster the existing structure but I don't want to go out and buy a bunch more material than I really need. Will probably have to get a couple sheets of ply to build out all the drawers, and currently waffling back and forth between 1/2" or 3/4" material. The drawers will be rather wide and the tools are sorta heavy, but 1/2" is so much easier to deal with and also allows for more usable space. We'll see!
OP
moparfreak
Well-known member
A Rockler Story Stick - https://www.rockler.com/rockler-story-stick-kit
You install them onto dowel (which I have next to it in the drawer) and set distances for when you're doing multiple repeated marks. I have found this to be useful for cabinetry / casework.
You install them onto dowel (which I have next to it in the drawer) and set distances for when you're doing multiple repeated marks. I have found this to be useful for cabinetry / casework.
Thank you. Interesting.A Rockler Story Stick - https://www.rockler.com/rockler-story-stick-kit
You install them onto dowel (which I have next to it in the drawer) and set distances for when you're doing multiple repeated marks. I have found this to be useful for cabinetry / casework.
I agree on the story stick but I’ve always done it “old school”. I guess that term sorta defines me
Nice job on your organization.
nicholam77
Well-known member
The Packout setup looks good. I have a very rough interpretation of that inside with some MakPac boxes and Systainer T-Locs, but it's not really organized. My garage being detached, especially in winter I hate to run out there for something. I need to work on an organized basic plumbing / electrical / hand tools setup like that for inside the house.
OP
moparfreak
Well-known member
Been plugging away at another drawer in the assembly table. This time one that holds combo and fixed squares. Used the dremel router + rigid foam again. Takes a bit of time, and some careful layout but works nicely in the end.
First mess around with different layouts, this one isn't quite the final approach.

Here's what I settled on:

After routing it out, I don't need to do all the actual rulers, just enough of the square body to keep them inset and from moving around.


Happy with the final layout. Only have a couple more drawers to organize in this table.
First mess around with different layouts, this one isn't quite the final approach.
Here's what I settled on:
After routing it out, I don't need to do all the actual rulers, just enough of the square body to keep them inset and from moving around.
Happy with the final layout. Only have a couple more drawers to organize in this table.
OP
moparfreak
Well-known member
Finished up organizing drawers in the Assembly Table.
First started with some remaining marking / measuring tools. Mostly angle finders / protractors / bevel gauges. For this I used bins I had lying around which should work just fine and adaptable.

Then I took a drawer where I stuffed a bunch of right angle clamping stuff and moved it over to the long flat drawer at the bottom, easier to find what I'm looking for now and freed up a lot of space in the taller drawer which is more useful space.


And now I'll consider the table done! I've got around 3-1/2 drawers pretty much empty but those will get filled and organized naturally in time. As far as shop projects go next focus of attention is the auto resto tools workbench, which I need to measure up and go pick up a few sheets of plywood.
Also made some progress on the fireplace project. This one has a lot of scrabbling around in my attic to get the new circuits installed. Need to put in a 20A 240V line for the fireplace itself and also will be adding a junction box and branch off of a nearby existing 15A 120V circuit for a TV outlet. I pulled a muscle pushing snow around last week, so the crawling around in the attic will have to wait a few more days till recovery is complete but I was able to do one of the tougher bits of the project which is to feed the 240V line down to the panel. From there I can snake it over to the former chimney (easier said than done!), but this was step 1.
Fortunately from the last time I added a new circuit to the panel in the corner of my shop (for the big dust collector), I scored and removed the drywall panel and just screwed it back on, rather than taped/mudded it back in. This made it much easier to access as it would have been nearly impossible to feed it back down blindly without opening up the wall. Yeah aesthetics aren't perfect but it's the corner of a shop and blocked mostly anyways by the wood rack above.

Next step is to continue to run that wire over and get it into the chimney.
First started with some remaining marking / measuring tools. Mostly angle finders / protractors / bevel gauges. For this I used bins I had lying around which should work just fine and adaptable.
Then I took a drawer where I stuffed a bunch of right angle clamping stuff and moved it over to the long flat drawer at the bottom, easier to find what I'm looking for now and freed up a lot of space in the taller drawer which is more useful space.
And now I'll consider the table done! I've got around 3-1/2 drawers pretty much empty but those will get filled and organized naturally in time. As far as shop projects go next focus of attention is the auto resto tools workbench, which I need to measure up and go pick up a few sheets of plywood.
Also made some progress on the fireplace project. This one has a lot of scrabbling around in my attic to get the new circuits installed. Need to put in a 20A 240V line for the fireplace itself and also will be adding a junction box and branch off of a nearby existing 15A 120V circuit for a TV outlet. I pulled a muscle pushing snow around last week, so the crawling around in the attic will have to wait a few more days till recovery is complete but I was able to do one of the tougher bits of the project which is to feed the 240V line down to the panel. From there I can snake it over to the former chimney (easier said than done!), but this was step 1.
Fortunately from the last time I added a new circuit to the panel in the corner of my shop (for the big dust collector), I scored and removed the drywall panel and just screwed it back on, rather than taped/mudded it back in. This made it much easier to access as it would have been nearly impossible to feed it back down blindly without opening up the wall. Yeah aesthetics aren't perfect but it's the corner of a shop and blocked mostly anyways by the wood rack above.
Next step is to continue to run that wire over and get it into the chimney.
OP
moparfreak
Well-known member
Progressed a bit on the new "cabinet" going into the workbench for the auto tools. Stiffened it up with plywood sides and some strips across the back and bottom to hold everything firm and square.


Now I've got a solid opening to calculate my drawers. From my work on the sanding station I really love having wide shallow drawers so this will be a good opportunity to add more of those. 37" x 21" drawers and I'll have a couple different depths. Planning on 6 drawers in all. I picked up the plywood (2 sheets of 1/2") this afternoon so hope to get these done within the next week or two.
Also finally found bricks to match my fireplace, so going to pick those up on the 31st when I have off, and if all goes to plan I'll be a bricklayer this weekend!
OP
moparfreak
Well-known member
Some more progress with some days off throughout the last couple weeks. Lots of monkeying around in the attic running wire for the fireplace but no good pictures of that, but hopefully getting some brickwork started later today.
In the shop, made some progress on the built-in cabinet.
Built the first drawer to confirm sizing is all good:


Fitment is good and now time to batch out 5 more! Looking forward to filling these out and finally getting all my automotive / mechanics tools organized and in some semblance of order finally.
While I was doing this I was going to throw out the two blue shelves that came with the Craftsman workbench, as the slides were terrible and cheap, but after thinking about it I thought I might be able to repurpose them. So, my thought was to make a little two drawer stack rolling cabinet out of them.

Started by gluing some wood strips to the top one to allow it to easily nest into the bottom one. Clear gorilla glue worked well here to bond the metal to wood.


Then glue on some blocks on the bottom one and mount some casters I already had.


Done! Pretty simple, and maneuverable. Will probably store some clamp accessories and other odd bits in here, but I'm glad I could reuse this, and create some storage for zero cost.

Next up is to continue work on the fireplace and finish off the auto tools cabinet. Happy new year!
In the shop, made some progress on the built-in cabinet.
Built the first drawer to confirm sizing is all good:
Fitment is good and now time to batch out 5 more! Looking forward to filling these out and finally getting all my automotive / mechanics tools organized and in some semblance of order finally.
While I was doing this I was going to throw out the two blue shelves that came with the Craftsman workbench, as the slides were terrible and cheap, but after thinking about it I thought I might be able to repurpose them. So, my thought was to make a little two drawer stack rolling cabinet out of them.
Started by gluing some wood strips to the top one to allow it to easily nest into the bottom one. Clear gorilla glue worked well here to bond the metal to wood.
Then glue on some blocks on the bottom one and mount some casters I already had.
Done! Pretty simple, and maneuverable. Will probably store some clamp accessories and other odd bits in here, but I'm glad I could reuse this, and create some storage for zero cost.
Next up is to continue work on the fireplace and finish off the auto tools cabinet. Happy new year!
shortykorte
Well-known member
Been busy. It’s great to get organized and end up with free space.
On the foam you routered, did you use a router or a dremel?
On the foam you routered, did you use a router or a dremel?
OP
moparfreak
Well-known member
I use a dremel with a small "router" style base which is sold by Lee Valley I believe.Been busy. It’s great to get organized and end up with free space.
On the foam you routered, did you use a router or a dremel?

I use a tiny bit that came in a pack of 25 or so assorted tiny gauge bits, that I forget where I got them from, but they're super small and so with that setup it's super easy to freehand to a very precise shape. I use a long nose marker to trace the shape I want and then I can just sneak up to the edge of the marked line. Since it's on the base it's quite stable, and there's pretty much no load on the bit since it's just cutting foam.
OP
moparfreak
Well-known member
Alright, so been continuing to spend time in the shop. Pushed hard and batched out and installed the rest of the wide drawers for the auto workbench. It is a TON of square footage for tool storage. Massive upgrade from before.

Drawer fronts and handles are last and will finish up over the next week or so. I've started putting some tools in but it'll be a big job just to do the reorganizing itself. Will leave that kind of job for some lazy Saturday type activities.
It's been pretty intense for the last several months on shop projects, and I've started to try to do probably too many different things at once. So, in finishing this project up and getting the auto tools all settled, I'll be returning back to a one foot in front of the other, one project at a time approach. I think it helps my brain going back to basics every once in awhile. Juggling a bunch of projects at once tends to create havoc and sets the breeding ground for mistakes and overlooks.
Also, want to keep my working area clean and organized to facilitate some more indoor projects. Want to get the fireplace project wrapped up before springtime. I've been working on it a lot during the weekends. Finally finished up all the miserable work with pulling the power to the fireplace. Pulled some 120V power from nearby for the TV outlet:

I happened to have that drywall patch already there but it wasn't mudded up, it was from when we had water damage from the former chimney (it was removed and roofed over). Some of this project will be to finally finish that off and paint the ceiling. Then I snaked the wires down the chimney from the attic. White is the 120V, purple is the 240V for the fireplace heater, which I will still need to connect to the panel, which I'll do once I have the insert in place.

Can also see in the pictures that I finally found a pretty close match on the brick at a local distributor, and started forming up the layers and making the cuts. With each of the 11 layers of bricks having 3/4 of them needing cuts, I'm carefully placing, measuring and cutting beforehand so that when I mix up the mortar it's straightforward. That is the plan at least!
And then finally I took care of one stupid little thing that was bugging me forever since I moved into the house. In the utility room where we have our sewer floor drain, it was nasty and so rusted it wouldn't sit well. Got a new one and put some holes for the HWH and furnace hoses to poke through making a cleaner install (jigsaw w/ metal cutting blade worked best here). Also the new one is cast iron and I put about 17 coats of enamel on it to hopefully prevent it from the same fate.


It's a small thing but these are the joys of OCD home ownership, lol.
Happy new year!
Drawer fronts and handles are last and will finish up over the next week or so. I've started putting some tools in but it'll be a big job just to do the reorganizing itself. Will leave that kind of job for some lazy Saturday type activities.
It's been pretty intense for the last several months on shop projects, and I've started to try to do probably too many different things at once. So, in finishing this project up and getting the auto tools all settled, I'll be returning back to a one foot in front of the other, one project at a time approach. I think it helps my brain going back to basics every once in awhile. Juggling a bunch of projects at once tends to create havoc and sets the breeding ground for mistakes and overlooks.
Also, want to keep my working area clean and organized to facilitate some more indoor projects. Want to get the fireplace project wrapped up before springtime. I've been working on it a lot during the weekends. Finally finished up all the miserable work with pulling the power to the fireplace. Pulled some 120V power from nearby for the TV outlet:
I happened to have that drywall patch already there but it wasn't mudded up, it was from when we had water damage from the former chimney (it was removed and roofed over). Some of this project will be to finally finish that off and paint the ceiling. Then I snaked the wires down the chimney from the attic. White is the 120V, purple is the 240V for the fireplace heater, which I will still need to connect to the panel, which I'll do once I have the insert in place.
Can also see in the pictures that I finally found a pretty close match on the brick at a local distributor, and started forming up the layers and making the cuts. With each of the 11 layers of bricks having 3/4 of them needing cuts, I'm carefully placing, measuring and cutting beforehand so that when I mix up the mortar it's straightforward. That is the plan at least!
And then finally I took care of one stupid little thing that was bugging me forever since I moved into the house. In the utility room where we have our sewer floor drain, it was nasty and so rusted it wouldn't sit well. Got a new one and put some holes for the HWH and furnace hoses to poke through making a cleaner install (jigsaw w/ metal cutting blade worked best here). Also the new one is cast iron and I put about 17 coats of enamel on it to hopefully prevent it from the same fate.
It's a small thing but these are the joys of OCD home ownership, lol.
Happy new year!
OP
moparfreak
Well-known member
Made some progress on both fronts this weekend. After some headscratching I figured out a way to get an outlet installed into the brick face through two layers of brick as well as a steel plate. Then a new TV went in wall mounted and it's a super clean install, no cords or cables!


Nice to get some functionality going while I finish up the fireplace aspect of the project. Isn't pictures but I cut and prepped a few more layers of brick, hope to get that mortared in shortly. Then I can focus on the electric fireplace insert install.
Next shifted attention back to the shop.
First question I wonder, I have this bin of misc allen keys. Does anyone have a good method to keep these organized? I have some regular allen sets but I just always drop the free allen keys that come with tools in this bin, and it bothers me. I suppose I could do a fishing tackle type box, or perhaps fabricate or 3d print some sort of organizer.
OP
moparfreak
Well-known member
Finally filled up the new drawers I just made with all the auto tools. Nice to not have these piled up high on the trunk lid of the Charger anymore. Also have 2.5-3 empty drawers still so lots of room to grow into!


This allows me to really see all the tools well. I've always hated searching through random tool sets in their assorted size plastic cases. All my work gets done here in the shop so I really never need to carry them around, so removing the tops and keeping the bottoms in the drawers for organization just made sense to me. I still need to put the rest of the drawer fronts and handles on but that should come later this week.
This allows me to really see all the tools well. I've always hated searching through random tool sets in their assorted size plastic cases. All my work gets done here in the shop so I really never need to carry them around, so removing the tops and keeping the bottoms in the drawers for organization just made sense to me. I still need to put the rest of the drawer fronts and handles on but that should come later this week.
OP
moparfreak
Well-known member
With all the storage of the new drawers, it's allowed me to organize and clear out my other two toolcarts in the area that have the rest of my mechanic / resto type tools. First one is my red Craftsman. It's a pretty crummy box but I've had it since my wedding (a couple friends got it for me), and it has a soft spot in my heart, even though I hate the old school non-roller drawer slides.
1st picks and seal tools, and spark/ignition/carb/battery.


Allen and torx tools, and oil filter/pressure/fuel.


Tap & dies, threading.


1st picks and seal tools, and spark/ignition/carb/battery.
Allen and torx tools, and oil filter/pressure/fuel.
Tap & dies, threading.
OP
moparfreak
Well-known member
Another tool box that is much nicer, used to be my dad's cart in surgery room (he was an anasthesialogist), and it's actually really high quality. Organized one of the drawers into the automotive electrical stuff. Several other empty ones remain.

Also finally took care of the upper cabinet of misc wrench storage. Have extractor, misc wrenches and measurement tooling up here.

I've switched from my old Dymo label maker to this new one from Niimbot based on a recommendation in a different thread here on GJ. No regrets, awesome little label maker! Not very expensive and much more flexible. Helps a lot on these organization projects.

Also finally took care of the upper cabinet of misc wrench storage. Have extractor, misc wrenches and measurement tooling up here.
I've switched from my old Dymo label maker to this new one from Niimbot based on a recommendation in a different thread here on GJ. No regrets, awesome little label maker! Not very expensive and much more flexible. Helps a lot on these organization projects.
Sorry, I wish I had a good method to share with you.Does anyone have a good method to keep these organized?

Too good to throw out, but………
I really like your drawer organization
Last edited:
nicholam77
Well-known member
The continued organization is looking great.
I do the same haha. This past year I bought a nice Wera allen set for the house and the garage, and their tool check plus, and to be honest I think the solution for me is to throw the 'freebie' bin of crappy IKEA allen keys away. It's akin to keeping random scraps of wood. You've got a bigger collection than me, though. If you struggle with the idea of tossing them out, maybe just keep them as-is and try not to think about it!
On the 3d printed route, you could at least do some drawer dividers and sort by general size / place them in the same vertical orientation.
First question I wonder, I have this bin of misc allen keys. Does anyone have a good method to keep these organized? I have some regular allen sets but I just always drop the free allen keys that come with tools in this bin, and it bothers me.
I do the same haha. This past year I bought a nice Wera allen set for the house and the garage, and their tool check plus, and to be honest I think the solution for me is to throw the 'freebie' bin of crappy IKEA allen keys away. It's akin to keeping random scraps of wood. You've got a bigger collection than me, though. If you struggle with the idea of tossing them out, maybe just keep them as-is and try not to think about it!
On the 3d printed route, you could at least do some drawer dividers and sort by general size / place them in the same vertical orientation.
Jeff Ivers
Well-known member
Well, you both are probably more organized than me - my "spare" allen keys reside in a snap-closure pocket cut off an old shirt. And before anyone suggests just throwing them away, I have countless times found a use for some of the spares.Sorry, I wish I had a good method to share with you.
Too good to throw out, but………
I really like your drawer organization
OP
moparfreak
Well-known member
I actually like having them around as sometimes I'll grab one and then put it with a tool if it has an allen screw adjustment in it, but yeah I'd like to come up with a better long term way to manage and then set my system for good, while also freeing up that bin for something else....I will noodle on it for a bit, but ultimately will probably come up with some type of bin / sorting method for them based on size.
OP
moparfreak
Well-known member
Finished up all the cuts on the brick. This was a lengthier step than I thought, because most of the bricks required notching cuts. Angle grinder with a tile cutting diamond bit worked great for this. All the cutting I did outside due to the excessive dust (and it was -2F today in Wisconsin)...not fun.

Next was the task of mixing up the mortar and laying the bricks. I must say after doing this, as is typical after I do something I haven't done before, is I have much respect for folks that do this on the daily. I can't imagine doing whole walls of this and being efficient at it. I mixed up the mortar, and I think I did myself a disservice as it wasn't quite wet enough, so was a bit more difficult to set the bricks properly, but I got myself a bit over 50% done, and while it was a frustrating job, it looks good so far.

Should be able to finish up the rest of it this week.
Also printed up some Gridfinity bins to organize the allen keys. They can be made any size/height and also with subdividers in them and space for clear labels. I got rid of a bunch of extras (I don't need more than 10 of each size, lol). But, nice to have some flexible bins like this, gridfinity + 3D printing is really awesome for shop organization. I ended up reorganizing all the allen & torx stuff to the top of the bin and freed up a drawer for storage for later.


Next was the task of mixing up the mortar and laying the bricks. I must say after doing this, as is typical after I do something I haven't done before, is I have much respect for folks that do this on the daily. I can't imagine doing whole walls of this and being efficient at it. I mixed up the mortar, and I think I did myself a disservice as it wasn't quite wet enough, so was a bit more difficult to set the bricks properly, but I got myself a bit over 50% done, and while it was a frustrating job, it looks good so far.
Should be able to finish up the rest of it this week.
Also printed up some Gridfinity bins to organize the allen keys. They can be made any size/height and also with subdividers in them and space for clear labels. I got rid of a bunch of extras (I don't need more than 10 of each size, lol). But, nice to have some flexible bins like this, gridfinity + 3D printing is really awesome for shop organization. I ended up reorganizing all the allen & torx stuff to the top of the bin and freed up a drawer for storage for later.
larry4406
Well-known member
Are you lining the "new" left side of the firebox with firebrick?
OP
moparfreak
Well-known member
No, the fireplace is an original wood-fired chimney and above the roof-line the chimney failed, lots of leaking and water damage into the house. So, rather than pay the exorbitant sum to rebuild it, we chose to demo and roof it over. So, what's going in there is an electric fireplace insert. Runs off 240V power and gives a bit of heat as well as visual ambiance. So, the brick is really just to close up the left side which has been a hokey look for awhile. That way when we install the new electric insert, it's faced on both sides with the same brick, and no firebrick needed.Are you lining the "new" left side of the firebox with firebrick?
OP
moparfreak
Well-known member
Been working hard on the fireplace but in the meantime finally snuck away some time in the shop to finish up the drawer fronts and handles for the workbench cabinet, so that one is now marked complete!

OP
moparfreak
Well-known member
Been awhile since last post, but things progress along.....
A small side project (cause I get distracted always), my hand plane shelf in one of my cabinets leaved much to be desired. Several years back I built a holding unit (not sure what else to call this?), that had a large main angled shelf. It lifts up and I keep some accessories underneath, and then it was open underneath. From when I set it up, its gotten cluttered and I haven't reorganized well. Time to fix.
First I wanted to build a quick drawer for the space in the bottom to make it much more usable. I'll use it for my smaller planes and odds n' ends.

First add some drawer slides, and then construct a simple drawer:


Drawer install looks decent. Cause of the handle above I can't really do a front drawer face but that's OK. It's shop furniture hidden in a standing cabinet.


Finally, took some time to carefully organize things for the long haul. Redid the top to store the larger planes and then put a piece of "kaizen" foam into the drawer and that works great for organizing all the smaller planes and accessories.


I have a fair collection of hand planes, as I really enjoy using these tools, and I'm especially partial to Lee Valley as they are well thought out and very high quality for the price. For a while now I've been less apt to grab the right plane because things were such a stacked mess to get to what I would need. Now this removes that barrier. All I need to do next is go through the planes and make sure to measure and sharpen all the blades that need attention, so that these tools are consistently ready to grab and go. A task in itself, but it's on my list. That last picture makes me want to take care of the other shelves in the cabinet which are just a mess.
Next up is to finish up the fireplace as I finally got the unit in, so some final steps this weekend!
A small side project (cause I get distracted always), my hand plane shelf in one of my cabinets leaved much to be desired. Several years back I built a holding unit (not sure what else to call this?), that had a large main angled shelf. It lifts up and I keep some accessories underneath, and then it was open underneath. From when I set it up, its gotten cluttered and I haven't reorganized well. Time to fix.
First I wanted to build a quick drawer for the space in the bottom to make it much more usable. I'll use it for my smaller planes and odds n' ends.
First add some drawer slides, and then construct a simple drawer:
Drawer install looks decent. Cause of the handle above I can't really do a front drawer face but that's OK. It's shop furniture hidden in a standing cabinet.
Finally, took some time to carefully organize things for the long haul. Redid the top to store the larger planes and then put a piece of "kaizen" foam into the drawer and that works great for organizing all the smaller planes and accessories.
I have a fair collection of hand planes, as I really enjoy using these tools, and I'm especially partial to Lee Valley as they are well thought out and very high quality for the price. For a while now I've been less apt to grab the right plane because things were such a stacked mess to get to what I would need. Now this removes that barrier. All I need to do next is go through the planes and make sure to measure and sharpen all the blades that need attention, so that these tools are consistently ready to grab and go. A task in itself, but it's on my list. That last picture makes me want to take care of the other shelves in the cabinet which are just a mess.
Next up is to finish up the fireplace as I finally got the unit in, so some final steps this weekend!
OP
moparfreak
Well-known member
Plane till, that's what it's called! I knew there was a word for it. I started it like 6 years ago so I totally understand, lol!
OP
moparfreak
Well-known member
Lots has gotten done over the last few days....
A holdover from the Craftsman auto tools workbench was the main lower shelf that I removed and replaced with built in drawers. Before throwing it out, I had an idea bouncing around about possibly repurposing it. It was a nice formed steel shallow case when turned on its end. One little dent but otherwise in very good clean shape.


I've been wanting to expand storage for my finishing supplies, and had a little nook I could put this in. Thought is to run some shelves across it using scrap plywood. Then mount it in the nook.


A quick easy mount up onto the wall, then filling it up with supplies. I have it set to be able to store most commonly used quarts of finish and spray cans, so it worked out nicely. Another way to turn an unused corner into useful space.


A holdover from the Craftsman auto tools workbench was the main lower shelf that I removed and replaced with built in drawers. Before throwing it out, I had an idea bouncing around about possibly repurposing it. It was a nice formed steel shallow case when turned on its end. One little dent but otherwise in very good clean shape.
I've been wanting to expand storage for my finishing supplies, and had a little nook I could put this in. Thought is to run some shelves across it using scrap plywood. Then mount it in the nook.
A quick easy mount up onto the wall, then filling it up with supplies. I have it set to be able to store most commonly used quarts of finish and spray cans, so it worked out nicely. Another way to turn an unused corner into useful space.
OP
moparfreak
Well-known member
Next I finished up a small little project I had been working on for a little bit. Had one of my grandfather's old vises. It's an interesting one, clamps to a tabletop and holds a piece on its edge both on top and side. I liked it, didn't want to get rid of it. But, didn't really have a use for any of my workbench tabletops as they were all very much thicker.


I wanted to keep its utility but adapt it to work with my MFT assembly table. So, first step was cut off the puny little clamp and flush it up.


I needed to make sure the jaws lined up still and would slide when mounted to the table. I added a piece of plastic shim to help the sliding jaw.


Then I made up an adapter block that consisted of a piece of 3/4" plywood scrap and two 20mm dowels. These dowels I drilled at the spacing for the MFT hole pattern on the edge. Drilled, glued and wedged them into place.


Then attached the fixed clamp body to this MFT adapter block, and now it mounts up flush to the side of the MFT bench and works nicely! I'm always happy when I can repurpose my grandfather's old tools.


I wanted to keep its utility but adapt it to work with my MFT assembly table. So, first step was cut off the puny little clamp and flush it up.
I needed to make sure the jaws lined up still and would slide when mounted to the table. I added a piece of plastic shim to help the sliding jaw.
Then I made up an adapter block that consisted of a piece of 3/4" plywood scrap and two 20mm dowels. These dowels I drilled at the spacing for the MFT hole pattern on the edge. Drilled, glued and wedged them into place.
Then attached the fixed clamp body to this MFT adapter block, and now it mounts up flush to the side of the MFT bench and works nicely! I'm always happy when I can repurpose my grandfather's old tools.
OP
moparfreak
Well-known member
I'm about a day away from getting this fireplace mounted. Been working on the walnut surround trim.
Got a nice rustic walnut board from Kettle Moraine Hardwoods, only about $50 and probably only used half to two thirds or so of it. Step one is layout and marking. I like to use white pencil for dark woods like walnut.

When ripping hardwoods, even with a big saw like the Sawstop I have, it makes a huge difference to put in the right blade. I use an 18 tooth full thickness rip blade. Cuts like butter. Having good constraints on the board are also important when ripping a 10' thick piece of hardwood by yourself.


Then I trimmed all the components down to size and first worked up and fit the base piece. I put a slight taper on the front edge to treat it sorta like a sill, and to have it meet the brick properly.

Then I can cut and fit the uprights and top piece in place.

Pocket hole jig & MFT assembly table to the rescue to pre-assemble the trim frame.


Since this is hardwood, Clamping and setup is really important for the pocket holes to stay put and not shift. I also use wax on the threads and use a fine threaded screw, since pocket hole joints don't really allow for easy pre-drilling of the hole.
I apply a dark walnut stain and then Odie's Oil as a finish, and here it is secured in place using the backer strips installed previously, so no showing screws or nails!

The two pine strips there are going to help support the fireplace insert unit, and I also need to pad out a bit of scrap wood at the upper corners to secure it into place where the insert has internal mounting holes for securing to framing. I also have a thin little lower walnut trim piece to mount on the bottom as well (which will mostly be covered up by the metal surround trim of the insert).
Hopefully tomorrow I'll be in a position to actually bring the insert into place, wire it up and call this project done!
Got a nice rustic walnut board from Kettle Moraine Hardwoods, only about $50 and probably only used half to two thirds or so of it. Step one is layout and marking. I like to use white pencil for dark woods like walnut.
When ripping hardwoods, even with a big saw like the Sawstop I have, it makes a huge difference to put in the right blade. I use an 18 tooth full thickness rip blade. Cuts like butter. Having good constraints on the board are also important when ripping a 10' thick piece of hardwood by yourself.
Then I trimmed all the components down to size and first worked up and fit the base piece. I put a slight taper on the front edge to treat it sorta like a sill, and to have it meet the brick properly.
Then I can cut and fit the uprights and top piece in place.
Pocket hole jig & MFT assembly table to the rescue to pre-assemble the trim frame.
Since this is hardwood, Clamping and setup is really important for the pocket holes to stay put and not shift. I also use wax on the threads and use a fine threaded screw, since pocket hole joints don't really allow for easy pre-drilling of the hole.
I apply a dark walnut stain and then Odie's Oil as a finish, and here it is secured in place using the backer strips installed previously, so no showing screws or nails!
The two pine strips there are going to help support the fireplace insert unit, and I also need to pad out a bit of scrap wood at the upper corners to secure it into place where the insert has internal mounting holes for securing to framing. I also have a thin little lower walnut trim piece to mount on the bottom as well (which will mostly be covered up by the metal surround trim of the insert).
Hopefully tomorrow I'll be in a position to actually bring the insert into place, wire it up and call this project done!
OP
moparfreak
Well-known member
Home stretch!
Finished up the full frame, and also padded out some mounting blocks in the upper corners to align with the holes for securing the insert into place.

Bring the unit close and wire it in. Fortunately I had a good amount of slack to prevent it from being awkward.

And finally it goes into place! Was a good snug fit, but with my wife's help it went into place smoothly. Finished product!

I'm really happy how this turned out and that it's over! I'm glad I wired this up for 240V, which was a ton more work, but the heater has a lot of output and will warm up the room nicely. Electric fireplaces can be chintzy on the low end but this is a really nice unit that I got from a local dealer and I'm very happy with it. I'm glad to call this project done, and turn attention to the next one!
Finished up the full frame, and also padded out some mounting blocks in the upper corners to align with the holes for securing the insert into place.
Bring the unit close and wire it in. Fortunately I had a good amount of slack to prevent it from being awkward.
And finally it goes into place! Was a good snug fit, but with my wife's help it went into place smoothly. Finished product!
I'm really happy how this turned out and that it's over! I'm glad I wired this up for 240V, which was a ton more work, but the heater has a lot of output and will warm up the room nicely. Electric fireplaces can be chintzy on the low end but this is a really nice unit that I got from a local dealer and I'm very happy with it. I'm glad to call this project done, and turn attention to the next one!
OP
moparfreak
Well-known member
Been a while since my last post, but various projects carry on....
I took a day off of work and gave some much needed attention to my daily driver - a '18 Challenger TA 392. Love it, but needs some TLC on a few minor things....
Had a door latch failure, where it just started grinding and couldn't operate the latch electrically. Could still open the door manually thankfully. $800 charge to replace at the dealership. Bought the part on Amazon for $76. Door panel comes off, but there's lots of good videos showing what to expect. This is where it's good to have an assortment of body pry tools:


New door latch mechanism. Installation is pretty much the reverse of removal and pretty straightforward, though a bit tricky with all of the cable connections and harness connections.

Grinding noise gone, and it works properly.
Next was to take care of some trunk lid struts that lost strength and I had too many times with the trunk banging my head. Easy fix - no more head bangers.

And finally while I'm on a roll, replaced the battery. It's 7 yr old battery and starting to deal with some slower cranking situations, especially in the cold. Battery test showing less than full health. I'll keep the old one as an emergency spare, but a new one from Autozone goes in. Pretty easy access in the trunk, which I must say really eliminates the typical corrosion seen on the terminals under-hood.

It was nice to take a day off and focus on the Challenger and knock a few things off the nagging issues list. Next up are to do brake pads and a thorough inside and out cleaning.
Another shop project I've been puttering away at is what I like to call a Lumber Cart. When I get into larger WW projects, and parts start to accumulate (boards and panels), I want a cart that I can stack them up on and bring to different machines as they go through the sizing and joinery steps. I decided to purchase one of the nice HF mechanic rolling tool carts that was pretty well reviewed and a good value for what it costs (~$130 if I recall). Then I would use this as the base for some modifications for this purpose.
I wanted to create some removable lightweight platforms that could be stacked and used as surfaces to put project parts. Was thinking about some plywood pieces, but then had the (weird, potentially bad?) idea to look for some grates and design a custom mounting method using 3D printed posts. So, I found a cheap set of 2 grill grates on Amazon and designed some posts in CAD. Here's the result:

Finished look is actually pretty good! It is two sets of 3D printed posts. The first set is screwed into place, and the second set can slide in and go double-decker. And both grates can be removed when not used and sit in some slotted holders on the back when not needed. Looking forward to using this feature in my next big WW project. I think this will do a good job of keeping my actual worksurfaces free of stacks of parts.

While I was at it, I also added some commonly used tools along with some organizers in the drawer. Yes, the missing 5/16" nut driver drives me to absolute madness.


I took a day off of work and gave some much needed attention to my daily driver - a '18 Challenger TA 392. Love it, but needs some TLC on a few minor things....
Had a door latch failure, where it just started grinding and couldn't operate the latch electrically. Could still open the door manually thankfully. $800 charge to replace at the dealership. Bought the part on Amazon for $76. Door panel comes off, but there's lots of good videos showing what to expect. This is where it's good to have an assortment of body pry tools:
New door latch mechanism. Installation is pretty much the reverse of removal and pretty straightforward, though a bit tricky with all of the cable connections and harness connections.
Grinding noise gone, and it works properly.
Next was to take care of some trunk lid struts that lost strength and I had too many times with the trunk banging my head. Easy fix - no more head bangers.
And finally while I'm on a roll, replaced the battery. It's 7 yr old battery and starting to deal with some slower cranking situations, especially in the cold. Battery test showing less than full health. I'll keep the old one as an emergency spare, but a new one from Autozone goes in. Pretty easy access in the trunk, which I must say really eliminates the typical corrosion seen on the terminals under-hood.
It was nice to take a day off and focus on the Challenger and knock a few things off the nagging issues list. Next up are to do brake pads and a thorough inside and out cleaning.
Another shop project I've been puttering away at is what I like to call a Lumber Cart. When I get into larger WW projects, and parts start to accumulate (boards and panels), I want a cart that I can stack them up on and bring to different machines as they go through the sizing and joinery steps. I decided to purchase one of the nice HF mechanic rolling tool carts that was pretty well reviewed and a good value for what it costs (~$130 if I recall). Then I would use this as the base for some modifications for this purpose.
I wanted to create some removable lightweight platforms that could be stacked and used as surfaces to put project parts. Was thinking about some plywood pieces, but then had the (weird, potentially bad?) idea to look for some grates and design a custom mounting method using 3D printed posts. So, I found a cheap set of 2 grill grates on Amazon and designed some posts in CAD. Here's the result:
Finished look is actually pretty good! It is two sets of 3D printed posts. The first set is screwed into place, and the second set can slide in and go double-decker. And both grates can be removed when not used and sit in some slotted holders on the back when not needed. Looking forward to using this feature in my next big WW project. I think this will do a good job of keeping my actual worksurfaces free of stacks of parts.
While I was at it, I also added some commonly used tools along with some organizers in the drawer. Yes, the missing 5/16" nut driver drives me to absolute madness.
Last edited:
OP
moparfreak
Well-known member
A while ago, I used to have my Ryobi and Milwaukee drill sets organized over on my miter station. When I redid the dust collection in the shop, those had to go and be relocated. Since they they were piled up on a workbench, and I finally turned my attention to organizing them. I took the 3D printed approach + scrap wood. Didn't really take in-process build pictures but the main approach was to bring in a few different drill holders and customizing them to fit each drill properly. The swing-out charger door is so that I have easy access to the charger and batteries while still keeping access to the inside of the cabinet for expansion if I add a few more drills to the collection.


Aside from a bit of filament, it was zero cost and now I have neat and tidy and easy access for the future, and now one less pile on a worksurface!
Aside from a bit of filament, it was zero cost and now I have neat and tidy and easy access for the future, and now one less pile on a worksurface!
OP
moparfreak
Well-known member
Couple months since last post. With spring and summer coming along the projects ON the garage slow down and switch to projects IN the garage....
My ZTR had a deck belt that would keep jumping off when I would engage the deck. Finally took a close look and it turns out the idler pulley has a stacked roller bearing setup and those bearings were toast. Ton of play in them, so it makes sense it was jumping around a lot and kicking the belt off.


Having a 12T hydraulic press from HF has continued to come in handy and worth the floor space. Bearings press out easily, and new ones go in.


Felt good to get that fixed and a pretty easy win. Went through two deck belts last year before I figured out the true cause.
Next up was brakes on the family van, which were waaaay at their life limit. Shop wanted a ton of $$, and I plan on getting rid of it this year so I just wanted to throw on some new pads. My pad pusher thing sorta ***** but a piece of OSB did the trick to fix it.


uh...yeah. the pad needed changing.

And then during the long weekend I started up some work to take care of the brake pads in my Challenger. It's got the big 6-piston brembos and they are known for squealing. These carbon ceramics have a good reputation for resolving that issue, and I didn't want to pay $800 for a brake job at the dealership so I set about swapping pads. It went well until I encountered one of the fronts the middle pin which is supposed to slide out rather easily was just completely bonded to the caliper body.

What a nightmare. Sledge hammers, heat, pneumatic hammer, prayers - nothing would budge this pin, whereas it slides right out on the other side. I unbolted the caliper body from the knuckle and stupidly undid the brake line and took this to the hydraulic press to push out that pin. It STILL wouldn't budge, and I didn't want to damage the caliper body as that would be real expensive to replace. So....I slid the new pads in from the other side and just reinstalled it, knowing that pin is forever stuck, to my shame. Had to rebleed the brakes, but it turned a 2-3 hour job into spanning over two days. Ugh. But, it's back on the road!
My ZTR had a deck belt that would keep jumping off when I would engage the deck. Finally took a close look and it turns out the idler pulley has a stacked roller bearing setup and those bearings were toast. Ton of play in them, so it makes sense it was jumping around a lot and kicking the belt off.
Having a 12T hydraulic press from HF has continued to come in handy and worth the floor space. Bearings press out easily, and new ones go in.
Felt good to get that fixed and a pretty easy win. Went through two deck belts last year before I figured out the true cause.
Next up was brakes on the family van, which were waaaay at their life limit. Shop wanted a ton of $$, and I plan on getting rid of it this year so I just wanted to throw on some new pads. My pad pusher thing sorta ***** but a piece of OSB did the trick to fix it.
uh...yeah. the pad needed changing.
And then during the long weekend I started up some work to take care of the brake pads in my Challenger. It's got the big 6-piston brembos and they are known for squealing. These carbon ceramics have a good reputation for resolving that issue, and I didn't want to pay $800 for a brake job at the dealership so I set about swapping pads. It went well until I encountered one of the fronts the middle pin which is supposed to slide out rather easily was just completely bonded to the caliper body.
What a nightmare. Sledge hammers, heat, pneumatic hammer, prayers - nothing would budge this pin, whereas it slides right out on the other side. I unbolted the caliper body from the knuckle and stupidly undid the brake line and took this to the hydraulic press to push out that pin. It STILL wouldn't budge, and I didn't want to damage the caliper body as that would be real expensive to replace. So....I slid the new pads in from the other side and just reinstalled it, knowing that pin is forever stuck, to my shame. Had to rebleed the brakes, but it turned a 2-3 hour job into spanning over two days. Ugh. But, it's back on the road!
Attachments
OP
moparfreak
Well-known member
Woof! Another couple months pass by. Summer is always a busy time, all our kids are home for the summer, busier house, we take trips (went to Zion & Bryce NP this year), keeping everyone busy and happy becomes a full time job. So, slower with the projects in the shop itself. But, I did get around to going on the final portion of the main middle work area of the shop (tablesaw, jointer, router table, assembly table).
This final piece is a combo workbench, storage and also serves as an outfeed support. It's a piece that will provide nice smooth planar surface with the existing assembly bench and tablesaw top, but then also I want to include a matchfit grid for more all purpose clamp-ability as well as a ton of storage. Here's a basic model:

Pretty basic but there's more going on than appears:
- It's super wide - 54"!
- Not a ton of room for internal structure. It's built with a couple of braces but still only plywood as the case, and no bottom bracing.
- I want to make the lower shelf an independent sliding platform that is sized to eventually house a Onefinity CNC that I plan to purchase in the near to mid future. This prevents a bottom brace and increased rigidity. However, I have this thing basically braced by all the machinery and workbenches tightly fitted around it so I don't expect racking to be really a problem.
Anyways, the build starts off. Here's what I'm replacing. An old steel rolling frame (salvaged from some lab setup so it was strange), that was too low, but had a really great tabletop to it.

That top is actually 1.5" thick Richlite. Richlite is sort of like a cross between MDF and Phenolic. SUUUUUUUPER hard and strong, has a very strong resin used and it's very dense. I can't lift that top by myself it's just way too heavy, probably 150 lb at least. Way too nice of stuff to get rid of, so I decided to reuse and size the new bench to fit it. It's not quite wide enough but the length is perfect. It also adds strength and rigidity cause there's no reinforcement needed, it's super strong and flat on its own.
Purchased sheet materials from HD and cut and assembled the main case. A bit tricky to get the join to the Richlite, I ended up using some steel right angle brackets on the underside.

Next up is to rout the matchfit grooves. Now, in a material like plywood or MDF it's a cinch. Super easy. There's a pair of bits - a straight bit to clear out most of the waste and then the specialized dovetail that comes in and finishes the pass. The problem is this Richlite is so dense and hard that it's death to router bits. I use Matchfit's specialized router base which makes making grids super easy by indexing off the previous groove. But, all in all, laying out the grid required around 75 passes with the router in a very unforgiving material. Two passes to cut the clearance groove, then the final pass - all times around 25 total runs in grid. Because of the rounded edges and the need to keep the router completely locked down into place I used the Milwaukee track guide and track to set the first passes in each direction. That system works so well, it's nicely made.


Broken bits were part of this long process. I ended up breaking two in the end, mostly by either going to fast in my feed rate, or not being well enough supported. Oh well, gonna have to always look at that crummy mistake. I'll call it character.


This final piece is a combo workbench, storage and also serves as an outfeed support. It's a piece that will provide nice smooth planar surface with the existing assembly bench and tablesaw top, but then also I want to include a matchfit grid for more all purpose clamp-ability as well as a ton of storage. Here's a basic model:
Pretty basic but there's more going on than appears:
- It's super wide - 54"!
- Not a ton of room for internal structure. It's built with a couple of braces but still only plywood as the case, and no bottom bracing.
- I want to make the lower shelf an independent sliding platform that is sized to eventually house a Onefinity CNC that I plan to purchase in the near to mid future. This prevents a bottom brace and increased rigidity. However, I have this thing basically braced by all the machinery and workbenches tightly fitted around it so I don't expect racking to be really a problem.
Anyways, the build starts off. Here's what I'm replacing. An old steel rolling frame (salvaged from some lab setup so it was strange), that was too low, but had a really great tabletop to it.
That top is actually 1.5" thick Richlite. Richlite is sort of like a cross between MDF and Phenolic. SUUUUUUUPER hard and strong, has a very strong resin used and it's very dense. I can't lift that top by myself it's just way too heavy, probably 150 lb at least. Way too nice of stuff to get rid of, so I decided to reuse and size the new bench to fit it. It's not quite wide enough but the length is perfect. It also adds strength and rigidity cause there's no reinforcement needed, it's super strong and flat on its own.
Purchased sheet materials from HD and cut and assembled the main case. A bit tricky to get the join to the Richlite, I ended up using some steel right angle brackets on the underside.
Next up is to rout the matchfit grooves. Now, in a material like plywood or MDF it's a cinch. Super easy. There's a pair of bits - a straight bit to clear out most of the waste and then the specialized dovetail that comes in and finishes the pass. The problem is this Richlite is so dense and hard that it's death to router bits. I use Matchfit's specialized router base which makes making grids super easy by indexing off the previous groove. But, all in all, laying out the grid required around 75 passes with the router in a very unforgiving material. Two passes to cut the clearance groove, then the final pass - all times around 25 total runs in grid. Because of the rounded edges and the need to keep the router completely locked down into place I used the Milwaukee track guide and track to set the first passes in each direction. That system works so well, it's nicely made.
Broken bits were part of this long process. I ended up breaking two in the end, mostly by either going to fast in my feed rate, or not being well enough supported. Oh well, gonna have to always look at that crummy mistake. I'll call it character.